索引使用空间异常增长一例

客户的某套系统上有一个表空间近日使用率异常增长,该表空间用以存储索引段,经过定位发现一个原本只有200M左右的索引使用将近30+G的空间,而且表现为绝大多数是未格式化的数据块。以下为通过 show_space脚本收集的段信息:

Unformatted Blocks = 1772568
Blocks with 00-25% free space = 0
Blocks with 26-50% free space = 2173
Blocks with 51-75% free space = 0
Blocks with 76-100% free space = 0
Full Blocks = 60762

Unformatted Blocks总数1772568,共使用1772568*16k=27G. 一个索引占用如此多的未格式化块似乎不可思议,首先想到的可能是一个威力惊人的Bug。

探索MOS,可以发现以下这个有趣的note:

Applies to:

Oracle Server – Enterprise Edition – Version: 10.2.0.3
Information in this document applies to any platform.

Symptoms

The problem as observed is that the space allocated for a table/index(partition) is far too high and keeps growing.

Using the AVG_ROW_SIZE * NUM_ROWS shows that the space as needed would be far less that the allocated space (in some cases allocated xxGb while xxMb would be expected).

Cause

Bug 5987262 TABLESPACE IS ABNORMALLY INCREASED BY UNFORMATTED BLOCKS.   This bug was closed as duplicate of unpublished Bug 5890312 HANG OBSERVED WHILE CREATING CTXCAT INDEX

The following PL/SQL block will show the space usage in the (partitioned) table

set serveroutput on
exec dbms_output.enable(1000000);

declare

unf number;
unfb number;
fs1 number;
fs1b number;
fs2 number;
fs2b number;
fs3 number;
fs3b number;
fs4 number;
fs4b number;
full number;
fullb number;

own dba_tables.owner%type;
tab dba_tables.table_name%type;

yesno varchar2(3);

type parts is table of dba_tab_partitions%rowtype;
partlist parts;

type cursor_ref is ref cursor;
c_cur cursor_ref;

begin

own:=upper(‘&owner’);
tab:=upper(‘&table_name’);
dbms_output.put_line(‘——————————————————————————–‘);

open c_cur for select partitioned from dba_tables
where owner=own and table_name=tab;
fetch c_cur into yesno;
close c_cur;

dbms_output.put_line(‘Owner:     ‘||own);
dbms_output.put_line(‘Table:     ‘||tab);

dbms_output.put_line(‘————————————————‘);

if yesno=’NO’
then
dbms_space.space_usage(own,tab,’TABLE’,unf,unfb,fs1,fs1b,fs2,fs2b,fs3,fs3b,fs4,fs4b,full,fullb);
dbms_output.put_line(‘unf: ‘||unf||’ fs1: ‘||fs1||’ fs2: ‘||fs2||’ fs3: ‘||fs3||’ fs4: ‘||fs4||’ full: ‘||full);

else
open c_cur for select * from dba_tab_partitions
where table_owner=own and table_name=tab;
fetch c_cur bulk collect into partlist;
close c_cur;

for i in partlist.first .. partlist.last
loop
dbms_space.space_usage(partlist(i).table_owner,partlist(i).table_name,’TABLE PARTITION’,unf,unfb,fs1,fs1b,fs2,fs2b,fs3,fs3b,fs4,fs4b,full,fullb,partlist(i).partition_name);
dbms_output.put_line(‘Partition: ‘||partlist(i).partition_name);
dbms_output.put_line(‘unf: ‘||unf||’ fs1: ‘||fs1||’ fs2: ‘||fs2||’ fs3: ‘||fs3||’ fs4: ‘||fs4||’ full: ‘||full);
end loop;

end if;
dbms_output.put_line(‘——————————————————————————–‘);

end;
/

In case there is a need to check a single table partition:

set serveroutput on
exec dbms_output.enable(1000000);

declare

unf number;
unfb number;
fs1 number;
fs1b number;
fs2 number;
fs2b number;
fs3 number;
fs3b number;
fs4 number;
fs4b number;
full number;
fullb number;

own dba_tables.owner%type;
tab dba_tables.table_name%type;
par dba_tab_partitions.partition_name%type;

begin

own:=upper(‘&owner’);
tab:=upper(‘&table_name’);
par:=upper(‘&partition_name’);

dbms_output.put_line(‘——————————————————————————–‘);

dbms_output.put_line(‘Owner:     ‘||own);
dbms_output.put_line(‘Table:     ‘||tab);
dbms_output.put_line(‘Partition: ‘||par);
dbms_output.put_line(‘————————————————‘);

dbms_space.space_usage(own,tab,’TABLE PARTITION’,unf,unfb,fs1,fs1b,fs2,fs2b,fs3,fs3b,fs4,fs4b,full,fullb,par);
dbms_output.put_line(‘unf: ‘||unf||’ fs1: ‘||fs1||’ fs2: ‘||fs2||’ fs3: ‘||fs3||’ fs4: ‘||fs4||’ full: ‘||full);

dbms_output.put_line(‘——————————————————————————–‘);

end;
/

The following PL/SQL block will show the space usage in the (partitioned) index:

set serveroutput on
exec dbms_output.enable(1000000);

declare

unf number;
unfb number;
fs1 number;
fs1b number;
fs2 number;
fs2b number;
fs3 number;
fs3b number;
fs4 number;
fs4b number;
full number;
fullb number;

own dba_indexes.owner%type;
ind dba_indexes.index_name%type;

yesno varchar2(3);

type parts is table of dba_ind_partitions%rowtype;
partlist parts;

type cursor_ref is ref cursor;
c_cur cursor_ref;

begin

own:=upper(‘&owner’);
ind:=upper(‘&index_name’);
dbms_output.put_line(‘——————————————————————————–‘);

open c_cur for select partitioned from dba_indexes
where owner=own and index_name=ind;
fetch c_cur into yesno;
close c_cur;

dbms_output.put_line(‘Owner: ‘||own);
dbms_output.put_line(‘Index: ‘||ind);

dbms_output.put_line(‘————————————————‘);

if yesno=’NO’
then
dbms_space.space_usage(own,ind,’INDEX’,unf,unfb,fs1,fs1b,fs2,fs2b,fs3,fs3b,fs4,fs4b,full,fullb);
dbms_output.put_line(‘unf: ‘||unf||’ fs1: ‘||fs1||’ fs2: ‘||fs2||’ fs3: ‘||fs3||’ fs4: ‘||fs4||’ full: ‘||full);

else
open c_cur for select * from dba_ind_partitions
where index_owner=own and index_name=ind;
fetch c_cur bulk collect into partlist;
close c_cur;

for i in partlist.first .. partlist.last
loop
dbms_space.space_usage(partlist(i).index_owner,partlist(i).index_name,’INDEX PARTITION’,unf,unfb,fs1,fs1b,fs2,fs2b,fs3,fs3b,fs4,fs4b,full,fullb,partlist(i).partition_name);
dbms_output.put_line(‘Partition: ‘||partlist(i).partition_name);
dbms_output.put_line(‘unf: ‘||unf||’ fs1: ‘||fs1||’ fs2: ‘||fs2||’ fs3: ‘||fs3||’ fs4: ‘||fs4||’ full: ‘||full);
end loop;

end if;
dbms_output.put_line(‘——————————————————————————–‘);

end;
/

In case there is a need to check a single index partition:

set serveroutput on
exec dbms_output.enable(1000000);

declare

unf number;
unfb number;
fs1 number;
fs1b number;
fs2 number;
fs2b number;
fs3 number;
fs3b number;
fs4 number;
fs4b number;
full number;
fullb number;

own dba_indexes.owner%type;
ind dba_indexes.index_name%type;
par dba_ind_partitions.partition_name%type;

begin

own:=upper(‘&owner’);
ind:=upper(‘&index_name’);
par:=upper(‘&partition_name’);

dbms_output.put_line(‘——————————————————————————–‘);

dbms_output.put_line(‘Owner: ‘||own);
dbms_output.put_line(‘Index: ‘||ind);
dbms_output.put_line(‘Partition: ‘||par);
dbms_output.put_line(‘————————————————‘);

dbms_space.space_usage(own,ind,’INDEX PARTITION’,unf,unfb,fs1,fs1b,fs2,fs2b,fs3,fs3b,fs4,fs4b,full,fullb,par);
dbms_output.put_line(‘unf: ‘||unf||’ fs1: ‘||fs1||’ fs2: ‘||fs2||’ fs3: ‘||fs3||’ fs4: ‘||fs4||’ full: ‘||full);

dbms_output.put_line(‘——————————————————————————–‘);

end;
/

If the value of UNF makes up the major part of the space as allocated,  unpublished bug 5890312 is hit.
In a specific case a table had a value of 4GB unformatted blocks out of 4.3GB allocated blocks.

Solution

The actions as needed to resolve this issue are:

1) Install the patch for unpublished Bug 5890312 in order to prevent future occurrences

2) Resolve the current space allocation, options:
– shrink the table (partition)
– recreate the table (partition)
– recreate the index (partition)

以上关于表空间异常增长且表(或表分区)和索引(或索引分区)中分配了大量未格式化的块的描述与我们的问题十分相似,但该文档的指出可能发生该问题的版本是10.2.0.3,而我们的版本已经是10.2.0.4了,是否又一次是Oracle的”伪修复”呢?怀着疑虑我们提交了SR,希望MOS帮助我们确认是否”hit Bug 729149.1″。

来自MOS的回复:

“The bug is fixed in 10.2.0.4.3 as well as 11.1.0.6.
You might as well apply the lastest PSU available for your platform: 10.2.0.4.4 Patch:9352164

I’m afraid there is no one off (interim) patch available for 10.2.0.4 on Solaris SPARC.
It was only provided for 9.2.0.8 and 10.2.0.3.
The one off patch 5890312 has been made available in Recommended Patch Sets (PSU): 10.2.0.4.3 and 10.2.0.4.4.

More information about Oracle Recommended Patches and their availability can be found in:
NOTE.756671.1 Oracle Recommended Patches — Oracle Database

If you have trouble applying any of the recommended PSUs, please let me know and i will log a one off backport request on your behalf  to ask development is it would be possible to provide you with the one off patch on 10.2.0.4.”

看起来我们并不走运,在10.2.0.4的基础上甚至没有one-off补丁,如果要彻底解决只能打PSU。

这个Bug最早出现是在9.2.0.8上,有一个相关的说明:

Hdr: 5987262 9.2.0.8.0 RDBMS 9.2.0.8.0 SPACE PRODID-5 PORTID-197 5890312
Abstract: TABLESPACE IS ABNORMALLY INCREASED  BY UNFORMATTED BLOCKS

*** 04/12/07 12:32 am ***
TAR:
----
6265975.992

PROBLEM:
--------
SQL>  select count(*) from pb.PBTAJUMT;

  COUNT(*)
----------
    897807

SQL> select sum(bytes)/1024/1024 from dba_extents where
segment_name='PBTAJUMT';

SUM(BYTES)/1024/1024
--------------------
               22008

SQL> select count(*) from dba_extents where segment_name='PBTAJUMT';

  COUNT(*)
----------
      5502

SQL>
       UNF
----------
   1404407

SQL>
       FS4
----------
        87

SQL>
       FS3
----------
         8

SQL>
       FS2
----------
         1

SQL>
       FS1
----------
        99

SQL>
       FULL
----------
      2291

AFTER 18 rows inserted >>

SQL> select count(*) from pb.PBTAJUMT;

  COUNT(*)
----------
    897825

SQL> select sum(bytes)/1024/1024 from dba_extents where
segment_name='PBTAJUMT';

SUM(BYTES)/1024/1024
--------------------
               23004

SQL> select count(*) from dba_extents where segment_name='PBTAJUMT';

  COUNT(*)
----------
      5751

SQL>
       UNF
----------
   1468072

SQL>
       FS4
----------
       103

SQL>
       FS3
----------
         7

SQL>
       FS2
----------
         2

SQL>
       FS1
----------
        56

SQL>
      FULL
----------
      2334

After 18 rows inserted, extents increased about 1G btyes.

DIAGNOSTIC ANALYSIS:
--------------------
ALERT LOG : node2 >

Thu Apr 12 09:40:15 2007
ORA-1653: unable to extend table PB.PBTAJUMT by 256 in
tablespace PB
Thu Apr 12 09:42:48 2007
ORA-1653: unable to extend table PB.PBTAJUMT by 256 in
tablespace PB
..
Thu Apr 12 09:44:37 2007
ORA-1653: unable to extend table PB.PBTAJUMT by 256 in
tablespace PB
Thu Apr 12 09:48:06 2007
ORA-1653: unable to extend table PB.PBTAJUMT by 256 in
tablespace PB
Thu Apr 12 09:49:49 2007
alter database datafile '/dev/oravg05/roravg05_04' resize 1000m
Thu Apr 12 09:50:21 2007
Completed: alter database datafile '/dev/oravg05/roravg05_04'
Thu Apr 12 09:50:39 2007
ORA-1653: unable to extend table PB.PBTAJUMT by 256 in
tablespace PB
...
Thu Apr 12 11:43:07 2007
 alter database datafile '/dev/oravg05/roravg05_04' resize 3300m
Completed:  alter database datafile '/dev/oravg05/roravg05_04
Thu Apr 12 11:43:51 2007
ORA-1653: unable to extend table PB.PBTAJUMT by 256 in
tablespace PB
Thu Apr 12 11:44:35 2007
alter database datafile '/dev/oravg05/roravg05_04' resize 3500
Thu Apr 12 11:44:37 2007
ORA-3214 signalled during: alter database datafile
'/dev/oravg05/roravg05_04'...
Thu Apr 12 11:44:54 2007
alter database datafile '/dev/oravg05/roravg05_04' resize 3500m
Thu Apr 12 11:45:05 2007
Completed: alter database datafile '/dev/oravg05/roravg05_04'

kjbdb1_ora_23026.trc :: segment dump >>

After a specific  extents , we can find owner is only inst 2 .
...
 0x05073607  Free: 2 Inst: 2
   0x05073608  Free: 1 Inst: 2
   0x05482905  Free: 2 Inst: 2
   0x05482906  Free: 1 Inst: 1
   0x05482907  Free: 5 Inst: 1
   0x05482908  Free: 5 Inst: 1
   0x11400405  Free: 5 Inst: 2 <======
   0x11400406  Free: 5 Inst: 2
   0x11400407  Free: 5 Inst: 2
   0x11400408  Free: 5 Inst: 2
   0x11400505  Free: 5 Inst: 2
   0x11400506  Free: 5 Inst: 2
   0x11400507  Free: 5 Inst: 2
   0x11400508  Free: 5 Inst: 2
   0x11400605  Free: 5 Inst: 2
   0x11400606  Free: 5 Inst: 2
   0x11400607  Free: 5 Inst: 2
   0x11400608  Free: 5 Inst: 2
   0x11400705  Free: 5 Inst: 2
   0x11400706  Free: 5 Inst: 2
   0x11400707  Free: 5 Inst: 2
   0x11400708  Free: 5 Inst: 2
   0x11400805  Free: 5 Inst: 2
   0x11400806  Free: 5 Inst: 2
   0x11400807  Free: 5 Inst: 2
   0x11400808  Free: 5 Inst: 2
   0x11400905  Free: 5 Inst: 2
   0x11400a05  Free: 5 Inst: 2
   0x11400b05  Free: 5 Inst: 2
   0x11400c05  Free: 5 Inst: 2
   0x11400d05  Free: 5 Inst: 2
   0x11400e05  Free: 5 Inst: 2
   0x11400f05  Free: 5 Inst: 2
   0x11401005  Free: 5 Inst: 2
   0x11401105  Free: 5 Inst: 2
   0x11401205  Free: 5 Inst: 2
   0x11401305  Free: 5 Inst: 2
   0x11401405  Free: 5 Inst: 2
   0x11401505  Free: 5 Inst: 2
   0x11401605  Free: 5 Inst: 2
   0x11401705  Free: 5 Inst: 2
   0x11401805  Free: 5 Inst: 2
   0x11401905  Free: 5 Inst: 2
   0x11401a05  Free: 5 Inst: 2
   0x11401b05  Free: 5 Inst: 2
   0x11401c05  Free: 5 Inst: 2
   0x11401d05  Free: 5 Inst: 2
   0x11401e05  Free: 5 Inst: 2
   0x11401f05  Free: 5 Inst: 2
   0x11402005  Free: 5 Inst: 2
   0x11402105  Free: 5 Inst: 2
   0x11402205  Free: 5 Inst: 2
   0x11402305  Free: 5 Inst: 2
   0x11402405  Free: 5 Inst: 2
   0x11402505  Free: 5 Inst: 2
   0x11402605  Free: 5 Inst: 2
   0x11402705  Free: 5 Inst: 2
   0x11402805  Free: 5 Inst: 2
   0x11402905  Free: 5 Inst: 2
   0x11402a05  Free: 5 Inst: 2
   0x11402b05  Free: 5 Inst: 2
   0x11402c05  Free: 5 Inst: 2
   0x11403605  Free: 5 Inst: 2
   0x11403705  Free: 5 Inst: 2

WORKAROUND:
-----------
none

RELATED BUGS:
-------------
bug.5945288, bug.4887955, bug.2447046
REPRODUCIBILITY:
----------------
No, cannot reproduce intentionally. But happened 4 times on product machine.

TEST CASE:
----------

STACK TRACE:
------------

SUPPORTING INFORMATION:
-----------------------
This system migrated on 19th of Mar. It happened 4 times from 20th of Mar.
24 HOUR CONTACT INFORMATION FOR P1 BUGS:

MOS无法重现该Bug,但可以确认该Bug的存在,具体触发的条件也不得而知。

如果您的环境无法在短期内应用补丁的话,可以通过 shrink/recreate 表(或表分区)和索引(或索引分区)来workaround这个问题,事实上我感觉这个Bug的触发条件并不简单,也就是说出现概率并不高;但如果您觉得自己不是那么幸运,那么还尽快将您的产品数据库升级到10.2.0.4.4以上或者10.2.0.5(我们是激进派)吧!

Fail to queue the whole FAL gap in dataguard一例

近日告警日志中出现以下记录:
FAL[server]: Fail to queue the whole FAL gap
GAP – thread 1 sequence 180-180
DBID 3731271451 branch 689955035

这是一个10.2.0.3的dataguard环境,采用物理备库,归档传输模式;查询metalink发现相关note:

Symptoms

When using ARCH transport, gaps could be flagged in the alert log even though the single log gap was for a log that had not been written at the primary yet.

alert.log on primary shows:

FAL[server]: Fail to queue the whole FAL gap

GAP – thread 1 sequence 63962-63962

DBID 1243807152 branch 631898097

or alert.log on standby shows:

Fetching gap sequence in thread 1, gap sequence 63962-63962

Thu Jan 24 14:36:30 2008

FAL[client]: Failed to request gap sequence

GAP – thread 1 sequence 63962-63962

DBID 2004523329 branch 594300676

FAL[client]: All defined FAL servers have been attempted.

v$archive_gap returns no rows

SQL> select * from v$archive_gap;

no rows selected

Cause

Bug 5526409 – FAL gaps reported at standby for log not yet written at primary

Solution

Bug 5526409 is fixed in 10.2.0.4 and 11.1.

Upgrade to 10.2.0.4 as Bug 5526409 is fixed in 10.2.0.4.

Their is no impact of these messages on the database. You can safely ignore these messages.

One-off Patch for Bug 5526409 on top of 10.2.0.3 is available for some platforms. Please check Patch 5526409 for your platform.

该note描述在10.1.0.2-10.2.0.3版本中,在ARCH传输的DataGuard环境中可能出现日志传输gap为单个在primary库中尚未写出的日志,该gap可能会在告警日志中以以上形式标示。
该bug(问题)在版本10.2.0.4和11.1中得到了修复,在10.2.0.3版本中部分平台上有one-off补丁。但实际上该bug(问题)对于主备库不会有任何影响,我们也可以将之忽略。

原SUN网站:java.sun.com,developers.sun.com,bigadmin将合并到OTN

就OTN上发布的合并声明来看到8月1日,Oracle将完成java.sun.com,developers.sun.com,bigadmin这几个网站合并到OTN的工作,这次迁移将是完整的并且在内容上是无损的。整合后的网站将提供给java开发者,数据库开发者及管理员,系统开发者及管理员一个多样的技术社区。

同时Oracle保证通过重定向技术确保用户原先的网页书签不会失效;java开发者仍可以像以往一样轻松获取java api信息;Oracle暂时不会修改java技术页面内容的构成,开发者目前不用担心不适应(我从metalink到MOS倒是很不适应,所幸现在好了);

docs.sun.com以及原sun旗下的论坛,博客,维基将暂时不做迁移。如果用户有问题可以向社区反馈讨论版反映。另外作为这些网站的原用户可能需要在OTN新注册一个成员账号。

PS:

7月30日,合并似乎提早了,OTN的界面有了极大的变化,就我个人而言似乎还是老的界面比较对眼!

理解Oracle在AIX平台上的内存使用

1.理解Oracle进程

首先我们要做的是理解Oracle的3种进程类型:后台进程( background process)和服务进程(也叫前台进程)还有用户进程。当我们尝试启动Oracle实例,首先受到召唤的是后台进程,一组后台进程和内存组建构成了 Oracle 实例,这些后台进程包括 日志记录进程lgwr,数据库写出进程 dbwr, 系统监控进程smon, 进程监控进程pmon, 分布式恢复进程reco, 检查点进程ckpt, 11g后变得更多了,多到我记不住。 这些进程在UNIX上的具体args总是形如ora_functionname_sid, 这里的functionname即后台进程的功能名而sid 即 $ORACLE_SID所指出的值。

第二类是用户进程,它可能是一个sqlplus命令行,可能是imp/exp工具,也可能是用户开发的一个java程序,当用户进程在本地启动时它们不直接操作SGA或者PGA,但毫无疑问它们也是需要消耗一定数量的虚拟内存的。
第三类进程就是我们说的服务进程,启动一个sqlplus 连接(这个连接可能是连到本地的 也可能的是远程的,这在我们讨论内存使用时无关紧要)的同时我们需要用到一个服务进程,它直接向我们的sqlplus终端负责。我们有时候也称服务进程为影子进程。影子进程总是和每一个用户进程一一对应的映射除非我们用到了MTS(多线程服务器)时。影子进程一般形如oracleSID,这里的sid和前文所指一般。


2.理解Oracle的内存使用

Oracle对内存的使用可以划分为2个大类型,即私有的和共享的。私有内存仅供单个进程使用。相反的,共享内存可以供多个进程使用且在具体使用上要复杂得多。在合计共享内存时,我们只需将所有进程所共享的内存段累加一次即可(Oracle 的SGA具体反映到OS层可能是多个shared memory segment,我们只需要将这一个或多个段的大小加到一起就可以了)。

我们可能使用到的最大的共享内存段毫无疑问会是SGA(SYSTEM GLOBAL AREA),我们看到的SGA被映射成虚拟地址且被每一个后台进程和前台进程attach到自己身上,以便随时能够利用到SGA; 我们有很多性能工具可以反映这部分的内存使用, 好比’top’,’ps -lf’, 但他们都无法分辨前后台进程内存使用中私有内存和共享内存分别得使用状况(我们往往只能得到一个Oracle使用内存很多的结论,却不知道是PGA还是 SGA消耗的更多的内存)。如果我们把从这些途径中获得每个进程的内存使用量相加,我们会发现这样计算的总内存使用量是SGA+PGA的几十倍,这是违反常识的,实际也分配不到那么多内存。 要真正了解Oracle内存使用,你使用的内存窥测命令需要能够分离Oracle使用的私有内存和共享内存。在Aix平台上有这样一个svmon(在其他 UNIX平台上有一个我认为更好的工具是pmap,与之对应AIX上有一个procmap命令,但这个命令并不能窥测Oracle 私有或共享内存的使用,所以我们只能退而求其次了)。


您可能在AIX的安装光盘上通过安装文件(filesets) “perfagent.tools”来获取该工具。使用”smit install_lastest”命令可以配备这个命令。对于svmon,作为一个非AIX操作系统专家而言,我推荐您读一下我引用的这篇文档:


The svmon Command

The svmon command provides a more in-depth analysis of memory usage. It is more informative, but also more intrusive, than the vmstat and ps commands. The svmon command captures a snapshot of the current state of memory. However, it is not a true snapshot because it runs at the user level with interrupts enabled.

To determine whether svmon is installed and available, run the following command:

# lslpp -lI perfagent.tools

The svmon command can only be executed by the root user.

If an interval is used (-i option), statistics will be displayed until the command is killed or until the number of intervals, which can be specified right after the interval, is reached.

You can use four different reports to analyze the displayed information:

Global (-G)
Displays statistics describing the real memory and paging space in use for the whole system.

Process (-P)
Displays memory usage statistics for active processes.

Segment (-S)
Displays memory usage for a specified number of segments or the top ten highest memory-usage processes in descending order.

Detailed Segment (-D)
Displays detailed information on specified segments.

Additional reports are available in AIX 4.3.3 and later, as follows:

User (-U)
Displays memory usage statistics for the specified login names. If no list of login names is supplied, memory usage statistics display all defined login names.

Command (-C)
Displays memory usage statistics for the processes specified by command name.

Workload Management Class (-W)
Displays memory usage statistics for the specified workload management classes. If no classes are supplied, memory usage statistics display all defined classes.

To support 64-bit applications, the output format of the svmon command was modified in AIX 4.3.3 and later.

Additional reports are available in operating system versions later than 4.3.3, as follows:

Frame (-F)
Displays information about frames. When no frame number is specified, the percentage of used memory is reported. When a frame number is specified, information about that frame is reported.

Tier (-T)
Displays information about tiers, such as the tier number, the superclass name when the -a flag is used, and the total number of pages in real memory from segments belonging to the tier.


How Much Memory is in Use

To print out global statistics, use the -G flag. In this example, we will repeat it five times at two-second intervals.


# svmon -G -i 2 5
memory   inuse  pinpgspace
size inuse free pin work pers clnt work pers clnt size inuse
16384 16250 134 2006 10675 2939 2636 2006 0 0 40960 12674
16384 16254 130 2006 10679 2939 2636 2006 0 0 40960 12676
16384 16254 130 2006 10679 2939 2636 2006 0 0 40960 12676
16384 16254 130 2006 10679 2939 2636 2006 0 0 40960 12676
16384 16254 130 2006 10679 2939 2636 2006 0 0 40960 12676

The columns on the resulting svmon report are described as follows:

memory
Statistics describing the use of real memory, shown in 4 K pages.

size
Total size of memory in 4 K pages.

inuse
Number of pages in RAM that are in use by a process plus the number of persistent pages that belonged to a terminated process and are still resident in RAM. This value is the total size of memory minus the number of pages on the free list.

free
Number of pages on the free list.

pin
Number of pages pinned in RAM (a pinned page is a page that is always resident in RAM and cannot be paged out).

in use
Detailed statistics on the subset of real memory in use, shown in 4 K frames.

work
Number of working pages in RAM.

pers
Number of persistent pages in RAM.

clnt
Number of client pages in RAM (client page is a remote file page).

pin
Detailed statistics on the subset of real memory containing pinned pages, shown in 4 K frames.

work
Number of working pages pinned in RAM.

pers
Number of persistent pages pinned in RAM.

clnt
Number of client pages pinned in RAM.

pg space
Statistics describing the use of paging space, shown in 4 K pages. This data is reported only if the -r flag is not used. The value reported starting with AIX 4.3.2 is the actual number of paging-space pages used (which indicates that these pages were paged out to the paging space). This differs from the vmstat command in that vmstat's avm column which shows the virtual memory accessed but not necessarily paged out.

size
Total size of paging space in 4 K pages.

inuse
Total number of allocated pages.

In our example, there are 16384 pages of total size of memory. Multiply this number by 4096 to see the total real memory size (64 MB). While 16250 pages are in use, there are 134 pages on the free list and 2006 pages are pinned in RAM. Of the total pages in use, there are 10675 working pages in RAM, 2939 persistent pages in RAM, and 2636 client pages in RAM. The sum of these three parts is equal to the inuse column of the memory part. The pin part divides the pinned memory size into working, persistent and client categories. The sum of them is equal to the pin column of the memory part. There are 40960 pages (160 MB) of total paging space, and 12676 pages are in use. The inuse column of memory is usually greater than the inuse column of pg spage because memory for file pages is not freed when a program completes, while paging-space allocation is.

In AIX 4.3.3 and later, systems the output of the same command looks similar to the following:

# svmon -G -i 2 5

size inuse free pin virtual
memory 65527 64087 1440 5909 81136
pg space 131072 55824

work pers clnt
pin 5918 0 0
in use 47554 13838 2695

size inuse free pin virtual
memory 65527 64091 1436 5909 81137
pg space 131072 55824

work pers clnt
pin 5918 0 0
in use 47558 13838 2695

size inuse free pin virtual
memory 65527 64091 1436 5909 81137
pg space 131072 55824

work pers clnt
pin 5918 0 0
in use 47558 13838 2695

size inuse free pin virtual
memory 65527 64090 1437 5909 81137
pg space 131072 55824

work pers clnt
pin 5918 0 0
in use 47558 13837 2695

size inuse free pin virtual
memory 65527 64168 1359 5912 81206
pg space 131072 55824

work pers clnt
pin 5921 0 0
in use 47636 13837 2695

The additional output field is the virtual field, which shows the number of pages allocated in the system virtual space.

Who is Using Memory?

The following command displays the memory usage statistics for the top ten processes. If you do not specify a number, it will display all the processes currently running in this system.

# svmon -Pau 10

Pid Command Inuse Pin Pgspace
15012 maker4X.exe 4783 1174 4781
2750 X 4353 1178 5544
15706 dtwm 3257 1174 4003
17172 dtsession 2986 1174 3827
21150 dtterm 2941 1174 3697
17764 aixterm 2862 1174 3644
2910 dtterm 2813 1174 3705
19334 dtterm 2813 1174 3704
13664 dtterm 2804 1174 3706
17520 aixterm 2801 1174 3619

Pid: 15012
Command: maker4X.exe

Segid Type Description Inuse Pin Pgspace Address Range
1572 pers /dev/hd3:62 0 0 0 0..-1
142 pers /dev/hd3:51 0 0 0 0..-1
1bde pers /dev/hd3:50 0 0 0 0..-1
2c1 pers /dev/hd3:49 1 0 0 0..7
9ab pers /dev/hd2:53289 1 0 0 0..0
404 work kernel extension 27 27 0 0..24580
1d9b work lib data 39 0 23 0..607
909 work shared library text 864 0 7 0..65535
5a3 work sreg[4] 9 0 12 0..32768
1096 work sreg[3] 32 0 32 0..32783
1b9d work private 1057 1 1219 0..1306 : 65307..65535
1af8 clnt 961 0 0 0..1716
0 work kernel 1792 1146 3488 0..32767 : 32768..65535
...


The output is divided into summary and detail sections. The summary section lists the top ten highest memory-usage processes in descending order.

Pid 15012 is the process ID that has the highest memory usage. The Command indicates the command name, in this case maker4X.exe. The Inuse column (total number of pages in real memory from segments that are used by the process) shows 4783 pages (each page is 4 KB). The Pin column (total number of pages pinned from segments that are used by the process) shows 1174 pages. The Pgspace column (total number of paging-space pages that are used by the process) shows 4781 pages.

The detailed section displays information about each segment for each process that is shown in the summary section. This includes the segment ID, the type of the segment, description (a textual description of the segment, including the volume name and i-node of the file for persistent segments), number of pages in RAM, number of pinned pages in RAM, number of pages in paging space, and address range.

The Address Range specifies one range for a persistent or client segment and two ranges for a working segment. The range for a persistent or a client segment takes the form ‘0..x,’ where x is the maximum number of virtual pages that have been used. The range field for a working segment can be ‘0..x : y..65535’, where 0..x contains global data and grows upward, and y..65535 contains stack area and grows downward. For the address range, in a working segment, space is allocated starting from both ends and working towards the middle. If the working segment is non-private (kernel or shared library), space is allocated differently. In this example, the segment ID 1b9d is a private working segment; its address range is 0..1306 : 65307..65535. The segment ID 909 is a shared library text working segment; its address range is 0..65535.

A segment can be used by multiple processes. Each page in real memory from such a segment is accounted for in the Inuse field for each process using that segment. Thus, the total for Inuse may exceed the total number of pages in real memory. The same is true for the Pgspace and Pin fields. The sum of Inuse, Pin, and Pgspace of all segments of a process is equal to the numbers in the summary section.

You can use one of the following commands to display the file name associated with the i-node:


* ncheck -i i-node_number volume_name
* find file_system_associated_with_lv_name -xdev -inum inode_number -print

To get a similar output in AIX 4.3.3 and later, use the following command:

# svmon -Put 10

------------------------------------------------------------------------------
Pid Command Inuse Pin Pgsp Virtual 64-bit Mthrd
2164 X 15535 1461 34577 37869 N N

Vsid Esid Type Description Inuse Pin Pgsp Virtual Addr Range
1966 2 work process private 9984 4 31892 32234 0..32272 :
65309..65535
4411 d work shared library text 3165 0 1264 1315 0..65535
0 0 work kernel seg 2044 1455 1370 4170 0..32767 :
65475..65535
396e 1 pers code,/dev/hd2:18950 200 0 - - 0..706
2ca3 - work 32 0 0 32 0..32783
43d5 - work 31 0 6 32 0..32783
2661 - work 29 0 0 29 0..32783
681f - work 29 0 25 29 0..32783
356d f work shared library data 18 0 18 24 0..310
34e8 3 work shmat/mmap 2 2 2 4 0..32767
5c97 - pers /dev/hd4:2 1 0 - - 0..0
5575 - pers /dev/hd2:19315 0 0 - - 0..0
4972 - pers /dev/hd2:19316 0 0 - - 0..5
4170 - pers /dev/hd3:28 0 0 - - 0..0
755d - pers /dev/hd9var:94 0 0 - - 0..0
6158 - pers /dev/hd9var:90 0 0 - - 0..0

------------------------------------------------------------------------------
Pid Command Inuse Pin Pgsp Virtual 64-bit Mthrd
25336 austin.ibm. 12466 1456 2797 11638 N N

Vsid Esid Type Description Inuse Pin Pgsp Virtual Addr Range
14c3 2 work process private 5644 1 161 5993 0..6550 :
65293..65535
4411 d work shared library text 3165 0 1264 1315 0..65535
0 0 work kernel seg 2044 1455 1370 4170 0..32767 :
65475..65535
13c5 1 clnt code 735 0 - - 0..4424
d21 - pers /dev/andy:563 603 0 - - 0..618
9e6 f work shared library data 190 0 2 128 0..3303
942 - pers /dev/cache:16 43 0 - - 0..42
2ca3 - work 32 0 0 32 0..32783
49f0 - clnt 10 0 - - 0..471
1b07 - pers /dev/andy:8568 0 0 - - 0..0
623 - pers /dev/hd2:22539 0 0 - - 0..1
2de9 - clnt 0 0 - - 0..0
1541 5 mmap mapped to sid 761b 0 0 - -
5d15 - pers /dev/andy:487 0 0 - - 0..3
4513 - pers /dev/andy:486 0 0 - - 0..45
cc4 4 mmap mapped to sid 803 0 0 - -
242a - pers /dev/andy:485 0 0 - - 0..0
...

The Vsid column is the virtual segment ID, and the Esid column is the effective segment ID. The effective segment ID reflects the segment register that is used to access the corresponding pages.

Detailed Information on a Specific Segment ID

The -D option displays detailed memory-usage statistics for segments.

# svmon -D 404
Segid: 404
Type: working
Description: kernel extension
Address Range: 0..24580
Size of page space allocation: 0 pages ( 0.0 Mb)
Inuse: 28 frames ( 0.1 Mb)
Page Frame Pin Ref Mod
12294 3320 pin ref mod
24580 1052 pin ref mod
12293 52774 pin ref mod
24579 20109 pin ref mod
12292 19494 pin ref mod
12291 52108 pin ref mod
24578 50685 pin ref mod
12290 51024 pin ref mod
24577 1598 pin ref mod
12289 35007 pin ref mod
24576 204 pin ref mod
12288 206 pin ref mod
4112 53007 pin mod
4111 53006 pin mod
4110 53005 pin mod
4109 53004 pin mod
4108 53003 pin mod
4107 53002 pin mod
4106 53001 pin mod
4105 53000 pin mod
4104 52999 pin mod
4103 52998 pin mod
4102 52997 pin mod
4101 52996 pin mod
4100 52995 pin mod
4099 52994 pin mod
4098 52993 pin mod
4097 52992 pin ref mod

The detail columns are explained as follows:

Page
Specifies the index of the page within the segment.

Frame
Specifies the index of the real memory frame that the page resides in.

Pin
Specifies a flag indicating whether the page is pinned.

Ref
Specifies a flag indicating whether the page's reference bit is on.

Mod
Specifies a flag indicating whether the page is modified.

The size of page space allocation is 0 because all the pages are pinned in real memory.

An example output from AIX 4.3.3 and later, is very similar to the following:

# svmon -D 629 -b

Segid: 629
Type: working
Address Range: 0..77
Size of page space allocation: 7 pages ( 0.0 Mb)
Virtual: 11 frames ( 0.0 Mb)
Inuse: 7 frames ( 0.0 Mb)

Page Frame Pin Ref Mod
0 32304 N Y Y
3 32167 N Y Y
7 32321 N Y Y
8 32320 N Y Y
5 32941 N Y Y
1 48357 N N Y
77 47897 N N Y

The -b flag shows the status of the reference and modified bits of all the displayed frames. After it is shown, the reference bit of the frame is reset. When used with the -i flag, it detects which frames are accessed between each interval.

Note: Use this flag with caution because of its performance impacts.

List of Top Memory Usage of Segments

The -S option is used to sort segments by memory usage and to display the memory-usage statistics for the top memory-usage segments. If count is not specified, then a count of 10 is implicit. The following command sorts system and non-system segments by the number of pages in real memory and prints out the top 10 segments of the resulting list.

# svmon -Sau

Segid Type Description Inuse Pin Pgspace Address Range
0 work kernel 1990 1408 3722 0..32767 : 32768..65535
1 work private, pid=4042 1553 1 1497 0..1907 : 65307..65535
1435 work private, pid=3006 1391 3 1800 0..4565 : 65309..65535
11f5 work private, pid=14248 1049 1 1081 0..1104 : 65307..65535
11f3 clnt 991 0 0 0..1716
681 clnt 960 0 0 0..1880
909 work shared library text 900 0 8 0..65535
101 work vmm data 497 496 1 0..27115 : 43464..65535
a0a work shared library data 247 0 718 0..65535
1bf9 work private, pid=21094 221 1 320 0..290 : 65277..65535

All output fields are described in the previous examples.

An example output from AIX 4.3.3 and later is similar to the following:

# svmon -Sut 10

Vsid Esid Type Description Inuse Pin Pgsp Virtual Addr Range
1966 - work 9985 4 31892 32234 0..32272 :
65309..65535
14c3 - work 5644 1 161 5993 0..6550 :
65293..65535
5453 - work 3437 1 2971 4187 0..4141 :
65303..65535
4411 - work 3165 0 1264 1315 0..65535
5a1e - work 2986 1 13 2994 0..3036 :
65295..65535
340d - work misc kernel tables 2643 0 993 2645 0..15038 :
63488..65535
380e - work kernel pinned heap 2183 1055 1416 2936 0..65535
0 - work kernel seg 2044 1455 1370 4170 0..32767 :
65475..65535
6afb - pers /dev/notes:92 1522 0 - - 0..10295
2faa - clnt 1189 0 - - 0..2324

Correlating svmon and vmstat Outputs

There are some relationships between the svmon and vmstat outputs. The svmon report of AIX 4.3.2 follows (the example is the same with AIX 4.3.3 and later, although the output format is different):

# svmon -G
m e m o r y i n u s e p i n p g s p a c e
size inuse free pin work pers clnt work pers clnt size inuse
16384 16254 130 2016 11198 2537 2519 2016 0 0 40960 13392

The vmstat command was run in a separate window while the svmon command was running. The vmstat report follows:

# vmstat 5
kthr memory page faults cpu
----- ----------- ------------------------ ------------ -----------
r b avm fre re pi po fr sr cy in sy cs us sy id wa
0 0 13392 130 0 0 0 0 2 0 125 140 36 2 1 97 0
0 0 13336 199 0 0 0 0 0 0 145 14028 38 11 22 67 0
0 0 13336 199 0 0 0 0 0 0 141 49 31 1 1 98 0
0 0 13336 199 0 0 0 0 0 0 142 49 32 1 1 98 0
0 0 13336 199 0 0 0 0 0 0 145 49 32 1 1 99 0
0 0 13336 199 0 0 0 0 0 0 163 49 33 1 1 92 6
0 0 13336 199 0 0 0 0 0 0 142 49 32 0 1 98 0

The global svmon report shows related numbers. The vmstatfre column relates to the svmon memory free column. The number that vmstat reports as Active Virtual Memory (avm) is reported by the svmon command as pg space inuse (13392).

The vmstat avm column provides the same figures as the pg space inuse column of the svmon command except starting with AIX 4.3.2 where Deferred Page Space Allocation is used. In that case, the svmon command shows the number of pages actually paged out to paging space whereas the vmstat command shows the number of virtual pages accessed but not necessarily paged out (see Looking at Paging Space and Virtual Memory).

Correlating svmon and ps Outputs

There are some relationships between the svmon and ps outputs. The svmon report of AIX 4.3.2 follows (the example is the same with AIX 4.3.3 and later, although the output format is different):

# svmon -P 7226

Pid Command Inuse Pin Pgspace
7226 telnetd 936 1 69

Pid: 7226
Command: telnetd

Segid Type Description Inuse Pin Pgspace Address Range
828 pers /dev/hd2:15333 0 0 0 0..0
1d3e work lib data 0 0 28 0..559
909 work shared library text 930 0 8 0..65535
1cbb work sreg[3] 0 0 1 0..0
1694 work private 6 1 32 0..24 : 65310..65535
12f6 pers code,/dev/hd2:69914 0 0 0 0..11

Compare with the ps report, which follows:

# ps v 7226
PID TTY STAT TIME PGIN SIZE RSS LIM TSIZ TRS %CPU %MEM COMMAND
7226 - A 0:00 51 240 24 32768 33 0 0.0 0.0 telnetd

SIZE refers to the virtual size in KB of the data section of the process (in paging space). This number is equal to the number of working segment pages of the process that have been touched (that is, the number of paging-space pages that have been allocated) times 4. It must be multiplied by 4 because pages are in 4 K units and SIZE is in 1 K units. If some working segment pages are currently paged out, this number is larger than the amount of real memory being used. The SIZE value (240) correlates with the Pgspace number from the svmon command for private (32) plus lib data (28) in 1 K units.

RSS refers to the real memory (resident set) size in KB of the process. This number is equal to the sum of the number of working segment and code segment pages in memory times 4. Remember that code segment pages are shared among all of the currently running instances of the program. If 26 ksh processes are running, only one copy of any given page of the ksh executable program would be in memory, but the ps command would report that code segment size as part of the RSS of each instance of the ksh program. The RSS value (24) correlates with the Inuse numbers from the svmon command for private (6) working-storage segments, for code (0) segments, and for lib data (0) of the process in 1-K units.

TRS refers to the size of the resident set (real memory) of text. This is the number of code segment pages times four. As was noted earlier, this number exaggerates memory use for programs of which multiple instances are running. This does not include the shared text of the process. The TRS value (0) correlates with the number of the svmon pages in the code segment (0) of the Inuse column in 1 K units. The TRS value can be higher than the TSIZ value because other pages, such as the XCOFF header and the loader section, may be included in the code segment.

The following calculations can be made for the values mentioned:

SIZE = 4 * Pgspace of (work lib data + work private)
RSS = 4 * Inuse of (work lib data + work private + pers code)
TRS = 4 * Inuse of (pers code)

Calculating the Minimum Memory Requirement of a Program

To calculate the minimum memory requirement of a program, the formula would be:

Total memory pages (4 KB units) = T + ( N * ( PD + LD ) ) + F

where:

T
= Number of pages for text (shared by all users)

N
= Number of copies of this program running simultaneously

PD
= Number of working segment pages in process private segment

LD
= Number of shared library data pages used by the process

F
= Number of file pages (shared by all users)

Multiply the result by 4 to obtain the number of kilobytes required. You may want to add in the kernel, kernel extension, and shared library text segment values to this as well even though they are shared by all processes on the system. For example, some applications like CATIA and databases use very large shared library modules. Note that because we have only used statistics from a single snapshot of the process, there is no guarantee that the value we get from the formula will be the correct value for the minimum working set size of a process. To get working set size, one would need to run a tool such as the rmss command or take many snapshots during the life of the process and determine the average values from these snapshots (see Assessing Memory Requirements Through the rmss Command).

If we estimate the minimum memory requirement for the program pacman, shown in Finding Memory-Leaking Programs, the formula would be:

T
= 2 (Inuse of code,/dev/lv01:12302 of pers)

PD
= 1632 (Inuse of private of work)

LD
= 12 (Inuse of lib data of work)

F
= 1 (Inuse of /dev/hd2:53289 of pers

That is: 2 + (N * (1632+ 12)) + 1, equal to 1644 * N + 3 in 4 KB units.


需要注意一点是,svmon会将UNIX上的文件系统缓存对应到曾经申请过这些文件页的进程身上。可笑的是,这些文件系统缓存是不受Oracle本身控制的,他既不是PGA亦不是SGA,这些缓存是受AIX操作系统分配并被排他式地控制着(controlled exclusively).以缓存文件为目的的这部分内存不在我们考虑的Oracle内存使用问题的范畴内,因为这部分内存实际是被AIX所支配着,与我们讨论的PGA/SGA没有联系,如果我们的环境中全部是裸设备(raw device)的话(当然这不太可能),就不存在大量文件系统缓存的问题了。当然这也不意味着这部分在我们考虑总的内存使用时被忽略或漠视,因为这部分文件系统缓存同样会消耗大量物理内存并可能引起不必要的换页操作。我们可以通过”svmon -Pau 10″来了解这部分内存的使用状况;在AIX上著名的性能调优工具virtual memory optimizer,原先的vmtume,现在的vmo工具,可以帮助我们调节文件系统内存的具体阀值如 maxperm,minperm,strict_maxperm(这里不做展开)。有兴趣的话可以参考下面引用的这篇文档:


Tuning VMM Page Replacement with the vmtune Command

The memory management algorithm, discussed in Real-Memory Management, tries to keep the size of the free list and the percentage of real memory occupied by persistent segment pages within specified bounds. These bounds can be altered with the vmtune command, which can only be run by the root user. Changes made by this tool remain in effect until the next reboot of the system. To determine whether the vmtune command is installed and available, run the following command:

# lslpp -lI bos.adt.samples

Note: The vmtune command is in the samples directory because it is very VMM-implementation dependent. The vmtune code that accompanies each release of the operating system is tailored specifically to the VMM in that release. Running the vmtune command from one release on a different release might result in an operating-system failure. It is also possible that the functions of vmtune may change from release to release. Do not propagate shell scripts or /etc/inittab entries that include the vmtune command to a new release without checking the vmtune documentation for the new release to make sure that the scripts will still have the desired effect.

Executing the vmtune command on AIX 4.3.3 with no options results in the following output:

# /usr/samples/kernel/vmtune
vmtune:  current values:
-p       -P        -r          -R         -f       -F       -N        -W
minperm  maxperm  minpgahead maxpgahead  minfree  maxfree  pd_npages maxrandwrt
52190   208760       2          8        120      128     524288        0

-M      -w      -k      -c        -b         -B           -u        -l    -d
maxpin npswarn npskill numclust numfsbufs hd_pbuf_cnt lvm_bufcnt lrubucket defps

209581    4096    1024       1      93         96          9      131072     1

-s              -n         -S           -h
sync_release_ilock  nokillroot  v_pinshm  strict_maxperm
0               0           0             0

number of valid memory pages = 261976   maxperm=79.7% of real memory
maximum pinable=80.0% of real memory    minperm=19.9% of real memory
number of file memory pages = 19772     numperm=7.5% of real memory

The output shows the current settings for all the parameters.
Choosing minfree and maxfree Settings

The purpose of the free list is to keep track of real-memory page frames released by terminating processes and to supply page frames to requestors immediately, without forcing them to wait for page steals and the accompanying I/O to complete. The minfree limit specifies the free-list size below which page stealing to replenish the free list is to be started. The maxfree parameter is the size above which stealing will end.

The objectives in tuning these limits are to ensure that:

* Any activity that has critical response-time objectives can always get the page frames it needs from the free list.
* The system does not experience unnecessarily high levels of I/O because of premature stealing of pages to expand the free list.

The default value of minfree and maxfree depend on the memory size of the machine. The default value of maxfree is determined by this formula:

maxfree = minimum (# of memory pages/128, 128)

By default the minfree value is the value of maxfree - 8. However, the difference between minfree and maxfree should always be equal to or greater than maxpgahead. Or in other words, the value of maxfree should always be greater than or equal to minfree plus the size of maxpgahead. The minfree/maxfree values will be different if there is more than one memory pool. Memory pools were introduced in AIX 4.3.3 for MP systems with large amounts of RAM. Each memory pool will have its own minfree/maxfree which are determined by the previous formulas, but the minfree/maxfree values shown by the vmtune command will be the sum of the minfree/maxfree for all memory pools.

Remember, that minfree pages in some sense are wasted, because they are available, but not in use. If you have a short list of the programs you want to run fast, you can investigate their memory requirements with the svmon command (see Determining How Much Memory Is Being Used), and set minfree to the size of the largest. This technique risks being too conservative because not all of the pages that a process uses are acquired in one burst. At the same time, you might be missing dynamic demands that come from programs not on your list that may lower the average size of the free list when your critical programs run.

A less precise but more comprehensive tool for investigating an appropriate size for minfree is the vmstat command. The following is a portion of a vmstat command output obtained while running an C compilation on an otherwise idle system.

# vmstat 1
kthr     memory             page              faults        cpu
----- ----------- ------------------------ ------------ -----------
r  b   avm   fre  re  pi  po  fr   sr  cy  in   sy  cs us sy id wa
0  0  3085   118   0   0   0   0    0   0 115    2  19  0  0 99  0
0  0  3086   117   0   0   0   0    0   0 119  134  24  1  3 96  0
2  0  3141    55   2   0   6  24   98   0 175  223  60  3  9 54 34
0  1  3254    57   0   0   6 176  814   0 205  219 110 22 14  0 64
0  1  3342    59   0   0  42 104  249   0 163  314  57 43 16  0 42
1  0  3411    78   0   0  49 104  169   0 176  306  51 30 15  0 55
1  0  3528   160   1   0  10 216  487   0 143  387  54 50 22  0 27
1  0  3627    94   0   0   0  72  160   0 148  292  79 57  9  0 34
1  0  3444   327   0   0   0  64  102   0 132  150  41 82  8  0 11
1  0  3505   251   0   0   0   0    0   0 128  189  50 79 11  0 11
1  0  3550   206   0   0   0   0    0   0 124  150  22 94  6  0  0
1  0  3576   180   0   0   0   0    0   0 121  145  30 96  4  0  0
0  1  3654   100   0   0   0   0    0   0 124  145  28 91  8  0  1
1  0  3586   208   0   0   0  40   68   0 123  139  24 91  9  0  0

Because the compiler has not been run recently, the code of the compiler itself must be read in. All told, the compiler acquires about 2 MB in about 6 seconds. On this 32 MB system, maxfree is 64 and minfree is 56. The compiler almost instantly drives the free list size below minfree, and several seconds of rapid page-stealing activity take place. Some of the steals require that dirty working segment pages be written to paging space, which shows up in the po column. If the steals cause the writing of dirty permanent segment pages, that I/O does not appear in the vmstat report (unless you have directed the vmstat command to report on the I/O activity of the physical volumes to which the permanent pages are being written).

This example describes a fork() and exec() environment (not an environment where a process is long lived, such as in a database) and is not intended to suggest that you set minfree to 500 to accommodate large compiles. It suggests how to use the vmstat command to identify situations in which the free list has to be replenished while a program is waiting for space. In this case, about 2 seconds were added to the compiler execution time because there were not enough page frames immediately available. If you observe the page frame consumption of your program, either during initialization or during normal processing, you will soon have an idea of the number page frames that need to be in the free list to keep the program from waiting for memory.

If we concluded from the example above that minfree needed to be 128, and we had set maxpgahead to 16 to improve sequential performance, we would use the following vmtune command:

# /usr/samples/kernel/vmtune -f 128 -F 144

Tuning Memory Pools

In operating system versions later than AIX 4.3.3, the vmtune -m number_of_memory_pools command allows you to change the number of memory pools that are configured at system boot time. The -m flag is therefore not a dynamic change. The change is written to the kernel file if it is an MP kernel (the change is not allowed on a UP kernel). A value of 0 restores the default number of memory pools.

By default, the vmtune -m command writes to the file /usr/lib/boot/unix_mp, but this can be changed with the command vmtune -U path_to_unix_file. Before changing the kernel file, the vmtune command saves the original file as name_of_original_file.sav.
Tuning lrubucket to Reduce Memory Scanning Overhead

Tuning lrubucket can reduce scanning overhead on large memory systems. In AIX 4.3, a new parameter lrubucket was added. The page-replacement algorithm scans memory frames looking for a free frame. During this scan, reference bits of pages are reset, and if a free frame has not been found, a second scan is done. In the second scan, if the reference bit is still off, the frame will be used for a new page (page replacement).

On large memory systems, there may be too many frames to scan, so now memory is divided up into buckets of frames. The page-replacement algorithm will scan the frames in the bucket and then start over on that bucket for the second scan before moving on to the next bucket. The default number of frames in this bucket is 131072 or 512 MB of RAM. The number of frames is tunable with the command vmtune -l, and the value is in 4 K frames.
Choosing minperm and maxperm Settings

The operating system takes advantage of the varying requirements for real memory by leaving in memory pages of files that have been read or written. If the file pages are requested again before their page frames are reassigned, this technique saves an I/O operation. These file pages may be from local or remote (for example, NFS) file systems.

The ratio of page frames used for files versus those used for computational (working or program text) segments is loosely controlled by the minperm and maxperm values:

* If percentage of RAM occupied by file pages rises above maxperm, page-replacement steals only file pages.
* If percentage of RAM occupied by file pages falls below minperm, page-replacement steals both file and computational pages.
* If percentage of RAM occupied by file pages is between minperm and maxperm, page-replacement steals only file pages unless the number of file repages is higher than the number of computational repages.

In a particular workload, it might be worthwhile to emphasize the avoidance of file I/O. In another workload, keeping computational segment pages in memory might be more important. To understand what the ratio is in the untuned state, we use the vmtune command with no arguments.

# /usr/samples/kernel/vmtune
vmtune:  current values:
-p       -P        -r          -R         -f       -F       -N        -W
minperm  maxperm  minpgahead maxpgahead  minfree  maxfree  pd_npages maxrandwrt
52190   208760       2          8        120      128     524288        0

-M      -w      -k      -c        -b         -B           -u        -l    -d
maxpin npswarn npskill numclust numfsbufs hd_pbuf_cnt lvm_bufcnt lrubucket defps
209581    4096    1024       1      93         96          9      131072     1

-s              -n         -S           -h
sync_release_ilock  nokillroot  v_pinshm  strict_maxperm
0               0           0             0

number of valid memory pages = 261976   maxperm=79.7% of real memory
maximum pinable=80.0% of real memory    minperm=19.9% of real memory
number of file memory pages = 19772     numperm=7.5% of real memory

The default values are calculated by the following algorithm:

minperm (in pages) = ((number of memory frames) - 1024) * .2
maxperm (in pages) = ((number of memory frames) - 1024) * .8

The numperm value gives the number of file pages in memory, 19772. This is 7.5 percent of real memory.

If we know that our workload makes little use of recently read or written files, we may want to constrain the amount of memory used for that purpose. The following command:

# /usr/samples/kernel/vmtune -p 15 -P 50

sets minperm to 15 percent and maxperm to 50 percent of real memory. This would ensure that the VMM would steal page frames only from file pages when the ratio of file pages to total memory pages exceeded 50 percent. This should reduce the paging to page space with no detrimental effect on the persistent storage. The maxperm value is not a strict limit, it is only considered when the VMM needs to perform page replacement. Because of this, it is usually safe to reduce the maxperm value on most systems.

On the other hand, if our application frequently references a small set of existing files (especially if those files are in an NFS-mounted file system), we might want to allow more space for local caching of the file pages by using the following command:

# /usr/samples/kernel/vmtune -p 30 -P 90

NFS servers that are used mostly for reads with large amounts of RAM can benefit from increasing the value of maxperm. This allows more pages to reside in RAM so that NFS clients can access them without forcing the NFS server to retrieve the pages from disk again.

Another example would be a program that reads 1.5 GB of sequential file data into the working storage of a system with 2 GB of real memory. You may want to set maxperm to 50 percent or less, because you do not need to keep the file data in memory.
Placing a Hard Limit on Persistent File Cache with strict_maxperm

Starting with AIX 4.3.3, a new vmtune option (-h) called strict_maxperm has been added. This option, when set to 1, places a hard limit on how much memory is used for a persistent file cache by making the maxperm value be the upper limit for this file cache. When the upper limit is reached, the least recently used (LRU) is performed on persistent pages.


另一个可以尝试的工具是”ps vg”命令,一般来说每个AIX版本上都默认存在”ps”命令。输入”ps v”命令后紧跟上进程号,可以显示该进程号对应进程
的较详细内存使用状况,注意在”v”之前是没有”-“号的,以下是”ps -lf”命令和”ps v”命令的对比:


$ps -lfp  5029994
F S      UID     PID    PPID   C PRI NI ADDR    SZ    WCHAN    STIME    TTY  TIME CMD
240001 A  orauser 5029994       1   0  60 20 1d2e7b510 98000            Apr 15      - 190:34 ora_pmon_DEC

$ps v   5029994
PID    TTY STAT  TIME PGIN  SIZE   RSS   LIM  TSIZ   TRS %CPU %MEM COMMAND
5029994      - A    190:34    4  9152 144536    xx 88849 135384  0.0  0.0 ora_pm


“ps v”命令显示了我们感兴趣的RSS和TRS值,RSS也就是我们说的驻留集,其等于工作段页数(working-segment)*4 + 代码段(code segment) *4,单位为kbytes,而TRS值则仅等于代码段(code segment)*4 kbytes。
请注意AIX平台上内存页的单位为4096 bytes即4k一页,这就是为什么以上RSS和TRS值需要乘以四,举例来说在实际内存使用中代码段占用了2页内存(2 * 4096bytes= 8k),则显示的TRS值应为8。由于RSS既包含了work_segment又包含了code_segment,则RSS-TRS所仅余为工作段内存(work_segment),或曰私有内存段(private memory)。以上例而言,pmon后台进程所用内存:


144536(RSS)-135384(TRS)=9152
9152*1024=9371648 bytes

则pmon后台进程所用私有内存为9152k(9371648 bytes),而非”ps -lf”命令所显示的95MB(98000k)。


TRS即代码段所用内存大致与$ORACLE_HOME/bin/oracle 2进制文件的大小相仿,每个Oracle进程(前后台进程)都需要引用到该oracle 2进制文件,实际该code_segment代码段概念即Unix C中正文段(text)的概念。
如果您真的有闲心想要计算Oracle后台进程内存使用总量,那么可以尝试使用一下公式估算:


(P1.RSS-P1.TRS)+(P2.RSS-P2.TRS)+(P3.RSS-P3.TRS)+…+(Pn.RSS-Pn.TRS)+ TRS + SGA


前台进程的所使用的私有内存计算要复杂上一些,因为前台进程更频繁地使用的私有内存,同时Oracle会尝试回收部分内存,所以其波动更大。你可以多试几次”ps v”命令以便察觉当前窥视的前台进程内存使用是否存在颠簸。
呵呵,在AIX这个黑盒上想要了解Oracle内存使用的细节还真有些难度,实在不行我们就猜吧!

oracle安装介质及补丁集下载地址补全版

Oracle 8i For AIX/Linux/Unix/Windows的安装介质 OR CDROM目前在Oracle官网或者edelivery上已经没有下载了:


 0-For AIX/0-64/Oracle/Oracle817CD1.nrg
 0-For AIX/0-64/Oracle/Oracle817CD2.nrg
 0-For AIX/0-64/Oracle/Oracle_816.nrg
 oracle817 for unix.ISO #oracle817_for_Intel UNIX (DGUX Intel,SCO UnixWare,Solaris Intel).ISO
 p2376472_8174_AIX
 p2376472_8174_AIX64.zip
 p2376472_8174_AIX.zip
 linux81701.tar


有不少学习研究Oracle的朋友,苦于没有metalink账号无法下载补丁集等软件;网上曾有总结过安装介质和补丁集的下载地址的文章,可以使用迅雷或快车等软件下载到介质,针对最新的11g release 2和未辑录的平台相关补丁集,进行了一定的补全。


这里共享的链接来自于oracle官方网站,仅供研究和非商业用途之用。


Oracle9i Database Release 2 Enterprise/Standard/Personal Edition for Windows NT/2000/XP

http://download.oracle.com/otn/nt/oracle9i/9201/92010NT_Disk1.zip
http://download.oracle.com/otn/nt/oracle9i/9201/92010NT_Disk2.zip
http://download.oracle.com/otn/nt/oracle9i/9201/92010NT_Disk3.zip

Oracle9i Database Release 2 Enterprise/Standard/Personal/Client Edition for Windows XP 2003/Windows Server 2003 (64-bit)

http://download.oracle.com/otn/nt/oracle9i/9202/92021Win64_Disk1.zip
http://download.oracle.com/otn/nt/oracle9i/9202/92021Win64_Disk2.zip

Oracle9i Database Release 2 Enterprise/Standard Edition for Intel Linux

http://download.oracle.com/otn/linux/oracle9i/9204/ship_9204_linux_disk1.cpio.gz
http://download.oracle.com/otn/linux/oracle9i/9204/ship_9204_linux_disk2.cpio.gz
http://download.oracle.com/otn/linux/oracle9i/9204/ship_9204_linux_disk3.cpio.gz

Oracle9i Database Release 2 (9.2.0.4) Enterprise/Standard Edition for Linux x86-64

http://download.oracle.com/otn/linux/oracle9i/9204/amd64_db_9204_Disk1.cpio.gz
http://download.oracle.com/otn/linux/oracle9i/9204/amd64_db_9204_Disk2.cpio.gz
http://download.oracle.com/otn/linux/oracle9i/9204/amd64_db_9204_Disk3.cpio.gz

Oracle9i Database Release 2 Enterprise/Standard Edition for AIX – Based 4.3.3 Systems (64-bit)

http://download.oracle.com/otn/aix/oracle9i/9201/server_9201_AIX64_Disk1.cpio.gz
http://download.oracle.com/otn/aix/oracle9i/9201/server_9201_AIX64_Disk2.cpio.gz
http://download.oracle.com/otn/aix/oracle9i/9201/server_9201_AIX64_Disk3.cpio.gz
http://download.oracle.com/otn/aix/oracle9i/9201/server_9201_AIX64_Disk4.cpio.gz

Oracle9i Database Release 2 Enterprise/Standard Edition for AIX- Based 5L Systems

http://download.oracle.com/otn/aix/oracle9i/9201/A99331-01.zip
http://download.oracle.com/otn/aix/oracle9i/9201/A99331-02.zip
http://download.oracle.com/otn/aix/oracle9i/9201/A99331-03.zip
http://download.oracle.com/otn/aix/oracle9i/9201/A99331-04.zip

Oracle9i Database Release 2 Enterprise/Standard Edition for Sun SPARC Solaris (32-bit)

http://download.oracle.com/otn/solaris/oracle9i/9201/92010Sol_Disk1.cpio.gz
http://download.oracle.com/otn/solaris/oracle9i/9201/92010Sol_Disk2.cpio.gz
http://download.oracle.com/otn/solaris/oracle9i/9201/92010Sol_Disk3.cpio.gz

Oracle9i Database Release 2 Enterprise/Standard Edition for Sun SPARC Solaris (64-bit)

http://download.oracle.com/otn/solaris/oracle9i64/9201/solaris64_9.2.0.1.0.Disk1.cpio.gz
http://download.oracle.com/otn/solaris/oracle9i64/9201/solaris64_9.2.0.1.0.Disk2.cpio.gz
http://download.oracle.com/otn/solaris/oracle9i64/9201/solaris64_9.2.0.1.0.Disk3.cpio.gz

Oracle Database 10g Release 2 (10.2.0.1.0) Enterprise/Standard Edition for Microsoft Windows (32-bit)

http://download.oracle.com/otn/nt/oracle10g/10201/10201_database_win32.zip
http://download.oracle.com/otn/nt/oracle10g/10201/10201_client_win32.zip
http://download.oracle.com/otn/nt/oracle10g/10201/10201_clusterware_win32.zip
http://download.oracle.com/otn/nt/oracle10g/10201/10201_gateways_win32.zip

Oracle Database 10g Release 2 (10.2.0.1.0) Enterprise/Standard Edition for Microsoft Windows (x64)

http://download.oracle.com/otn/nt/oracle10g/10201/102010_win64_x64_database.zip
http://download.oracle.com/otn/nt/oracle10g/10201/102010_win64_x64_client.zip
http://download.oracle.com/otn/nt/oracle10g/10201/102010_win64_x64_clusterware.zip

Oracle Database 10g Release 2 (10.2.0.1.0) Enterprise/Standard Edition for Linux x86

http://download.oracle.com/otn/linux/oracle10g/10201/10201_database_linux32.zip
http://download.oracle.com/otn/linux/oracle10g/10201/10201_client_linux32.zip
http://download.oracle.com/otn/linux/oracle10g/10201/10201_gateways_linux32.zip

Oracle Database 10g Release 2 (10.2.0.1.0) Enterprise/Standard Edition for Linux x86-64

http://download.oracle.com/otn/linux/oracle10g/10201/10201_database_linux_x86_64.cpio.gz
http://download.oracle.com/otn/linux/oracle10g/10201/10201_client_linux_x86_64.cpio.gz
http://download.oracle.com/otn/linux/oracle10g/10201/10201_clusterware_linux_x86_64.cpio.gz
http://download.oracle.com/otn/linux/oracle10g/10201/10201_gateways_linux_x86_64.cpio.gz

Oracle Database 10g Release 2 (10.2.0.1.0) Enterprise/Standard Edition for AIX5L

http://download.oracle.com/otn/aix/oracle10g/10201/10gr2_aix5l64_database.cpio.gz
http://download.oracle.com/otn/aix/oracle10g/10201/10gr2_aix5l64_client.cpio.gz
http://download.oracle.com/otn/aix/oracle10g/10201/10gr2_aix5l64_cluster.cpio.gz
http://download.oracle.com/otn/aix/oracle10g/10201/10gr2_aix5l64_gateways.cpio.gz

Oracle Database 10g Release 2 (10.2.0.2) Enterprise/Standard Edition for Solaris Operating System (x86)

http://download.oracle.com/otn/solaris/oracle10g/10202/10202_database_solx86.zip
http://download.oracle.com/otn/solaris/oracle10g/10202/10202_client_solx86.zip
http://download.oracle.com/otn/solaris/oracle10g/10202/10202_clusterware_solx86.zip

Oracle Database 10g Release 2 (10.2.0.1.0) Enterprise/Standard Edition for Solaris Operating System (x86-64)

http://download.oracle.com/otn/solaris/oracle10g/10201/x8664/10201_database_solx86_64.zip
http://download.oracle.com/otn/solaris/oracle10g/10201/x8664/10201_client_solx86_64.zip
http://download.oracle.com/otn/solaris/oracle10g/10201/x8664/10201_clusterware_solx86_64.zip

Oracle Database 10g Release 2 (10.2.0.1.0) Enterprise/Standard Edition for HP-UX PA-RISC

http://download.oracle.com/otn/hp/oracle10g/10201/10201_database.zip
http://download.oracle.com/otn/hp/oracle10g/10201/10201_clusterware.zip
http://download.oracle.com/otn/hp/oracle10g/10201/10201_client.zip

Oracle Database 10g Release 2 (10.2.0.1) Enterprise/Standard Edition for HP-UX Itanium

http://download.oracle.com/otn/hp/oracle10g/10201/itanium/10gr2_database_hpi.zip
http://download.oracle.com/otn/hp/oracle10g/10201/itanium/10gr2_client_hpi.zip
http://download.oracle.com/otn/hp/oracle10g/10201/itanium/10gr2_clusterware_hpi.zip

Oracle Database 10g Release 2 (10.2.0.1.0) Enterprise/Standard Edition for Solaris Operating System (SPARC) (64-bit)

http://download.oracle.com/otn/solaris/oracle10g/10201/sol64/10gr2_db_sol.cpio.gz
http://download.oracle.com/otn/solaris/oracle10g/10201/sol64/10gr2_client_sol.cpio.gz
http://download.oracle.com/otn/solaris/oracle10g/10201/sol64/10gr2_cluster_sol.cpio.gz

Oracle Database 10g Release 2 (10.2.0.4.0) for MAC OS X on Intel x86-64
http://download.oracle.com/otn/mac/oracle10g/10204/x86_64/db.zip
http://download.oracle.com/otn/mac/oracle10g/10204/x86_64/client.zip

Oracle Database 10g Release 2 (10.2.0.4.0) Enterprise/Standard Edition for Microsoft Windows Vista x64 and Microsoft Windows Server 2008 x64
http://download.oracle.com/otn/nt/oracle10g/10204/10204_vista_w2k8_x64_production_db.zip
http://download.oracle.com/otn/nt/oracle10g/10204/10204_vista_w2k8_x64_production_client.zip
http://download.oracle.com/otn/nt/oracle10g/10204/10204_vista_w2k8_x64_production_crs.zip

Oracle Database 11g Release 2 (11.2.0.1.0) for Microsoft Windows (64-bit)

http://download.oracle.com/otn/nt/oracle11g/112010/win64_11gR2_database_1of2.zip
http://download.oracle.com/otn/nt/oracle11g/112010/win64_11gR2_database_2of2.zip
http://download.oracle.com/otn/nt/oracle11g/112010/win64_11gR2_client.zip
http://download.oracle.com/otn/nt/oracle11g/112010/win64_11gR2_grid.zip

Oracle Database 11g Release 2 (11.2.0.1.0) for Microsoft Windows (32-bit)
http://download.oracle.com/otn/nt/oracle11g/112010/win32_11gR2_database_1of2.zip
http://download.oracle.com/otn/nt/oracle11g/112010/win32_11gR2_database_2of2.zip
http://download.oracle.com/otn/nt/oracle11g/112010/win32_11gR2_client.zip
no grid

Oracle Database 11g Release 2 (11.2.0.1.0) for Linux x86
http://download.oracle.com/otn/linux/oracle11g/R2/linux_11gR2_database_1of2.zip
http://download.oracle.com/otn/linux/oracle11g/R2/linux_11gR2_database_2of2.zip
http://download.oracle.com/otn/linux/oracle11g/R2/linux_11gR2_client.zip
http://download.oracle.com/otn/linux/oracle11g/R2/linux_11gR2_grid.zip

Oracle Database 11g Release 2 (11.2.0.1.0) for Linux x86-64
http://download.oracle.com/otn/linux/oracle11g/R2/linux.x64_11gR2_database_1of2.zip
http://download.oracle.com/otn/linux/oracle11g/R2/linux.x64_11gR2_database_2of2.zip
http://download.oracle.com/otn/linux/oracle11g/R2/linux.x64_11gR2_client.zip
http://download.oracle.com/otn/linux/oracle11g/R2/linux.x64_11gR2_grid.zip

Oracle Database 11g Release 2 (11.2.0.1.0) for Solaris Operating System (SPARC) (64-bit)
http://download.oracle.com/otn/solaris/oracle11g/R2/solaris.sparc64_11gR2_database_1of2.zip
http://download.oracle.com/otn/solaris/oracle11g/R2/solaris.sparc64_11gR2_database_2of2.zip
http://download.oracle.com/otn/solaris/oracle11g/R2/solaris.sparc64_11gR2_client.zip
http://download.oracle.com/otn/solaris/oracle11g/R2/solaris.sparc64_11gR2_client32.zip
http://download.oracle.com/otn/solaris/oracle11g/R2/solaris.sparc64_11gR2_grid.zip

Oracle Database 11g Release 2 (11.2.0.1.0) for Solaris Operating System (x86-64)
http://download.oracle.com/otn/solaris/oracle11g/R2/solaris.x64_11gR2_database_1of2.zip
http://download.oracle.com/otn/solaris/oracle11g/R2/solaris.x64_11gR2_database_2of2.zip
http://download.oracle.com/otn/solaris/oracle11g/R2/solaris.x64_11gR2_client.zip
http://download.oracle.com/otn/solaris/oracle11g/R2/solaris.x86_11gR2_client.zip
http://download.oracle.com/otn/solaris/oracle11g/R2/solaris.x64_11gR2_grid.zip

Oracle Database 11g Release 2 (11.2.0.1.0) for HP-UX Itanium
http://download.oracle.com/otn/hp/oracle11g/R2/hpia64_11gR2_database_1of2.zip
http://download.oracle.com/otn/hp/oracle11g/R2/hpia64_11gR2_database_2of2.zip
http://download.oracle.com/otn/hp/oracle11g/R2/hpia64_11gR2_client.zip
http://download.oracle.com/otn/hp/oracle11g/R2/hpia64_11gR2_client32.zip
http://download.oracle.com/otn/hp/oracle11g/R2/hpia64_11gR2_grid.zip

Oracle Database 11g Release 2 (11.2.0.1.0) for HP-UX PA-RISC (64-bit)
http://download.oracle.com/otn/hp/oracle11g/R2/hpux.parisc64_11gR2_database_1of2.zip
http://download.oracle.com/otn/hp/oracle11g/R2/hpux.parisc64_11gR2_database_2of2.zip
http://download.oracle.com/otn/hp/oracle11g/R2/hpux.parisc64_11gR2_client.zip
http://download.oracle.com/otn/hp/oracle11g/R2/hpux.parisc32_11gR2_client.zip
http://download.oracle.com/otn/hp/oracle11g/R2/hpux.parisc64_11gR2_grid.zip

Oracle Database 11g Release 2 (11.2.0.1.0) for AIX (PPC64)
http://download.oracle.com/otn/aix/oracle11g/R2/aix.ppc64_11gR2_database_1of2.zip
http://download.oracle.com/otn/aix/oracle11g/R2/aix.ppc64_11gR2_database_2of2.zip
http://download.oracle.com/otn/aix/oracle11g/R2/aix.ppc64_11gR2_client.zip
http://download.oracle.com/otn/aix/oracle11g/R2/aix.ppc32_11gR2_client.zip
http://download.oracle.com/otn/aix/oracle11g/R2/aix.ppc64_11gR2_grid.zip

以下为9208,10203,10204在使用较广泛平台上补丁集:

ftp://updates.oracle.com/4547809/p4547809_92080_AIX64-5L.zip
ftp://updates.oracle.com/4547809/p4547809_92080_HP64.zip
ftp://updates.oracle.com/4547809/p4547809_92080_HPUX-IA64.zip
ftp://updates.oracle.com/4547809/p4547809_92080_LINUX.zip
ftp://updates.oracle.com/4547809/p4547809_92080_Linux-IA64.zip
ftp://updates.oracle.com/4547809/p4547809_92080_Linux-x86-64.zip
ftp://updates.oracle.com/4547809/p4547809_92080_MVS.zip
ftp://updates.oracle.com/4547809/p4547809_92080_SOLARIS.zip
ftp://updates.oracle.com/4547809/p4547809_92080_SOLARIS64.zip
ftp://updates.oracle.com/4547809/p4547809_92080_WINNT.zip
ftp://updates.oracle.com/4547809/p4547809_92080_WINNT64.zip

oracle 10.2.0.3 patch
ftp://updates.oracle.com/5337014/p5337014_10203_AIX5L.zip
ftp://updates.oracle.com/5337014/p5337014_10203_HPUX-IA64.zip
ftp://updates.oracle.com/5337014/p5337014_10203_LINUX.zip
ftp://updates.oracle.com/5337014/p5337014_10203_Linux-x86-64.zip
ftp://updates.oracle.com/5337014/p5337014_10203_Linux-x86.zip
ftp://updates.oracle.com/5337014/p5337014_10203_Win32.zip
ftp://updates.oracle.com/5337014/p5337014_10203_Win64.zip

oracle 10.2.0.4 patch:

ftp://updates.oracle.com/6810189/p6810189_10204_AIX5L.zip
ftp://updates.oracle.com/6810189/p6810189_10204_HPUX-IA64.zip
ftp://updates.oracle.com/6810189/p6810189_10204_HPUX-64.zip
ftp://updates.oracle.com/6810189/p6810189_10204_LINUX.zip
ftp://updates.oracle.com/6810189/p6810189_10204_Linux-x86-64.zip
ftp://updates.oracle.com/6810189/p6810189_10204_Linux-x86.zip
ftp://updates.oracle.com/6810189/p6810189_10204_Win32.zip
ftp://updates.oracle.com/6810189/p6810189_10204_Win64.zip
ftp://updates.oracle.com/6810189/p6810189_10204_Solaris-64.zip
ftp://updates.oracle.com/6810189/p6810189_10204_Solarisx86.zip
ftp://updates.oracle.com/6810189/p6810189_10204_Solaris86-64.zip


10.2.0.5各平台的补丁可以从官方地址下载

[转]如何阅读systemstate dump

转自老白的<oracle rac 日记>一书,

dump systemstate产生的跟踪文件包含了系统中所有进程的进程状态等信息。每个进程对应跟踪文件中的一段内容,反映该进程的状态信息,包括进程信息,会话信息,enqueues信息(主要是lock的信息),缓冲区的信息和该进程在SGA区中持有的(held)对象的状态等信息。dump systemstate产生的跟踪文件是从dump那一刻开始到dump任务完成之间一段事件内的系统内所有进程的信息。

那么通常在什么情况下使用systemstate比较合适呢?

Oracle推荐的使用systemstate事件的几种情况是:

数据库hang住了

数据库很慢

进程正在hang

数据库出现某些错误

资源争用


dump systemstate的语法为:

ALTER SESSION SET EVENTS ‘immediate trace name systemstate level 10’;

也可以使用ORADEBUG实现这个功能:

sqlplus -prelim / as sysdba

oradebug setmypid

oradebug unlimit;

oradebug dump systemstate 10

如果希望在数据库发生某种错误时调用systemstate事件,可以在参数文件(spfile或者pfile)中设置event参数,

例如,当系统发生死锁(出现ORA-00060错误)时dump systemstate:

event = “60 trace name systemstate level 10”


LEVEL参数:

10    Dump all processes (IGN state)

5     Level 4 + Dump all processes involved in wait chains (NLEAF state)

4     Level 3 + Dump leaf nodes (blockers) in wait chains (LEAF,LEAF_NW,IGN_DMP state)

3     Level 2 + Dump only processes thought to be in a hang (IN_HANG state)

1-2   Only HANGANALYZE output, no process dump at all


如果Level过大的话会产生大量的跟踪文件并影响系统的I/O性能,建议不要采用3级以上的跟踪。Hanganalyze报告会分作许多片断,会话片断信息总是由一个header详尽描述被提取的的会话信息。


一般来说,一份systemstate dump中包含了以下内容:

dump header文件头

process dump dump时所有的process的dump信息,每个process一个专门的章节。

call dump在process dump中,包含call dump

session dump每个process中,都有1个或多个(MTS时)session dump

enqueue dump

buffer dump在session dump中可能包含buffer dump


在阅读systemstate dump时,一般首先使用ASS工具来进行分析。ASS是oracle工程师编写的一个AWK脚本,用于分析systemstate dump文件,找出dump中可能存在问题的地方。通过ASS的输出结果,我们就可以发现一些blocker的线索,这些线索就是我们重点要查看的地方。


我们可以通过搜索SO的地址信息来定位某个SO,找到后分析这个SO的信息,并且通过PARENT SO的地址找到其PARENT,建立这些SO的关系图。比如我们找到一个SESSION的SO,就可以看看这个session属于哪个process,这个session正在执行的sql是什么,等等。通过这种分析,就把可能存在问题的SO及关联的SO全部找出来,这样就为进一步分析提供了素材。


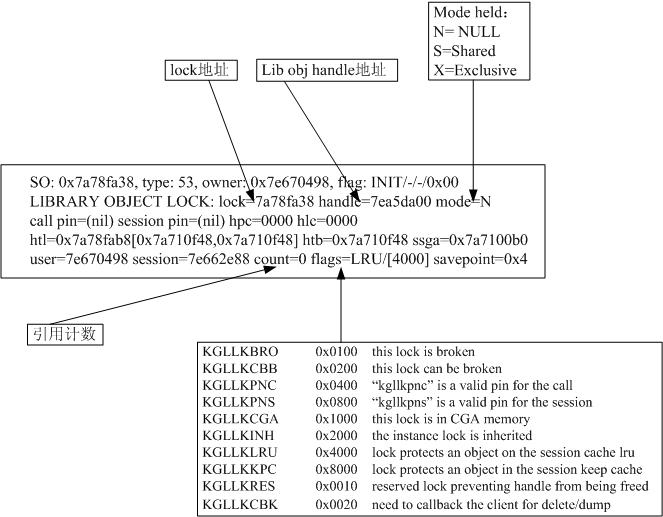
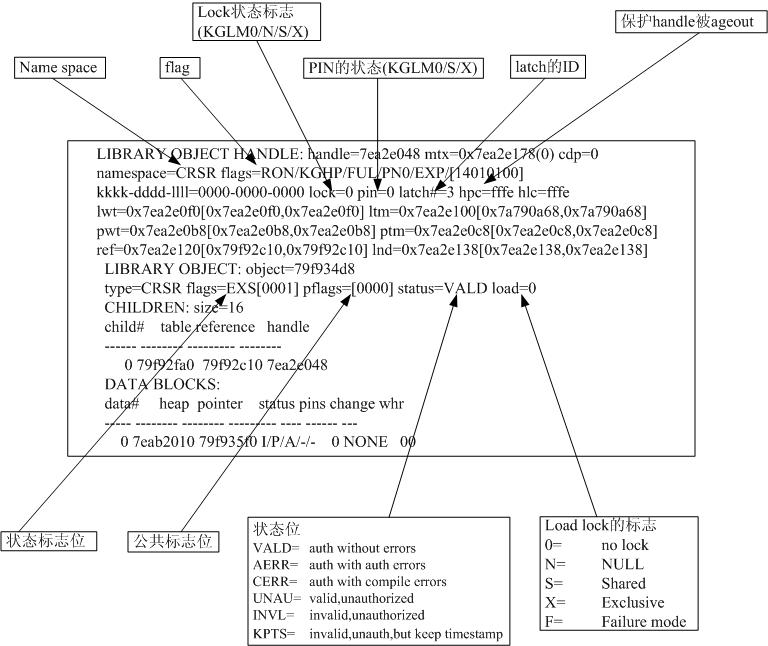
1、标准的state object header(SO)

state object header中包含了一些基本的信息,比如:

SO: c00004ti4jierj, type: 2. owner: 0000000000, flag: init/-/-/0x00

其中SO是state object的号码;

type表示state object的类别;

TYPE: state object的已知类别:

2 process(进程)

3 call

4 session(会话信息)

5 enqueue(锁信息)

6 file infomation block(文件信息块,每个FIB标识一个文件)

11 broadcast handle(广播消息句柄)

12 KSV slave class state

13 ksvslvm

16 osp req holder(会话执行os操作的holder)

18 enqueue resource detail(锁资源详细资料)

19 ges message(ges消息)

20 namespace [ksxp] key

24 buffer [db buffer]

36 dml lock

37 temp table lock(临时表锁)

39 list of blocks(用于block cleanout的块列表清单)

40 transaction(事务)

41 dummy

44 sort segment handle(排序段句柄)

50 row cache enqueue

52 user lock

53 library cache lock

54 library cache pin

55 library cache load lock

59 cursor enqueue

61 process queue

62 queue reference

75 queue monitor sob


owner是这个SO的父节点(如果为0,说明是最顶层的SO);flag表示状态,值有以下三种:

kssoinit;state object被初始化了

kssoflst;state object在freelist上

kssofcln;state object已经被pmon释放了。


State object header的数据结构如下:

struct kssob {

unsigned char       kssobtyp; /* state object的类别*/

unsigned char       kssobflg; /* flags */

unsigned char       kssobdelstage;

struct kssob *       kssobown; /*拥有者的SO指针*/

kgglk                   kssoblnk; /*在父对象成员链中的指针*/

}

2、processstate dump(ksupr)

processstate dump转储了进程的状态,从这些信息中我们可以了解进程的基本属性以及进程的状态。

在阅读processstate dump时,我们主要关注的进程的标识(FLAG),从中也可以知道进程的类别。从”(latch info)”中可以看到进程等待latch的情况,这也有助于了解进程故障的原因。另外,进程的OS信息对于进一步了解进程情况也是很有帮助的。

实际上,x$ksupr包含了进程的信息,通过该内存视图可以更进一步了解processstate dump的内容。

ADDR    地址

INDX    序号

INST_ID实例ID

KSSPAFLG   state object的状态:

KSSOINIT 0x01 // state object initialized

KSSOFLST 0x02 // state object is on free list

KSSOFCLN 0x04 // state object freed by PMON(for debugging)

KSSPAOWN  该SO的OWNER,如果自己是顶层的SO,那么owner为0

KSUPRFLG   该process的状态:

KSUPDEAD 0x01 process is dead and should be cleaned up

KSUPDSYS 0x02 detached,system process

KSUPDFAT 0x04 detached,fatal(system) process

KSUPDCLN 0x08 process is cleanup(pmon)

KSUPDSMN 0x10 process is smon

KSUPDPSU 0x20 pseudo process

KSUPDMSS 0x40 muti-stated server

KSUPDDPC 0x80 dispatcher process

KSUPRSER   进程的序号(SERIAL NO)

KSUPRIOC

KSLLALAQ   持有的latch

KSLLAWAT   正在等待的latch

KSLLAWHY  latch请求的上下文(用于debug)

KSLLAWER  latch请求的位置(用于debug)

KSLLASPN   本进程正在spin的latch

KSLLALOW  所持有latch级别的位图(0~9级)

KSLLAPSC   进程发出的POST消息的计数

KSLLAPRC   进程收到的POST消息的计数

KSLLAPRV   收到的最后一个POST的LOC ID,参考图中的①

KSLLAPSN   最后一个发送POST的LOC ID,参考图中的②

KSLLID1R    RESOURCE ID的第一部分

KSLLID2R    RESOURCE ID的第二部分

KSLLRTYP   RESOURCE TYPE+RESOURCE FLAG

KSLLRMTY  RESOURCE MANAGE的类型:

KRMENQ    0x01 enqueues

KRMLATCH  0x02 latches

KRMLIBCALK 0x03 library cache locks

KRMBUFLK  0x04 buffer locks

KSLLARPO   最后一个发送消息给这个进程的OS进程

KSLLASPO   这个进程最后一个发送信息过去的OS进程

KSUPRPID    OS进程号

KSUPRWID   等待事件的ID

KSUPRUNM  OS用户名

KSUPRMNM 用户的机器名

KSUPRPNM  用户程序名

KSUPRTID    用户终端名

KSSRCOBJ   STATE OBJECT RECOVERY数据中的正在被操作的对象

KSSRCFRE   STATE OBJECT RECOVERY数据中的FREELIST的地址

KSSRCSRC   STATE OBJECT RECOVERY数据中的SOURCE PARENT

KSSRCDST   STATE OBJECT RECOVERY数据中的DESTINATION PARENT

KSASTQNX  MESSAGE STATE中的前向指针

KSASTQPR   MESSAGE STATE中的后向指针

KSASTRPL   MESSAGE STATE中的REPLY VALUE

KSUPRPGP   PROCESS GROUP的名字

KSUPRTFI    进程的trace文件名

KSUPRPUM  PGA使用的内存

KSUPRPNAM  KSUPRPNAM+KSUPRPRAM是pga分配内存的总和

KSUPRPRAM

KSUPRPFM  pga可释放的内存

KSUPRPMM pga使用的最大内存

3、session state object 

会话信息中包含了大量我们所需要的信息,一般来说会话状态块是我们分析会话情况的重点。

在会话状态信息中,flag是十分重要的,我们可以从flag中了解会话目前的情况,以及flag位图的详细信息。该会话正在执行的sql和pl/sql的SO地址可以让我们找到当前会话正在做的工作,有助于进一步

分析。另外,会话的等待事件和历史等待事件可以让用户了解会话在现在和过去一段时间里等待的情况,如果要分析会话故障原因的话,这些资料都是十分重要的。

flag的位图如下:

KSUSFUSR   0x00000001   user session (as opposed to recursive session)

KSUSFREC   0x00000002   recursive session(always internal)

KSUSFAUD   0x00000004   audit logon/logoff,used by cleanup

KSUSFDCO  0x00000008   disable commit/rollback from plsql

KSUSFSYS   0x00000010   user session created by system processes

KSUSFSGA   0x00000020   whether UGA is allocate in sga

KSUSFLOG   0x00000040   whether user session logs on to ORACLE

KSUSFMSS   0x00000080   user session created by multi-stated server

KSUSFDIT    0x00000100   disable (defer) interrupt

KSUSFCLC   0x00000200   counted for current license count decrement

KSUSFDET   0x00000400   session has been detached

KSUSFFEX   0x00000800   “forced exit”during shutdown normal

KSUSFCAC   0x00001000   (cloned) session is cached

KSUSFILS    0x00002000   default tx isolation level is serializable

KSUSFOIL    0x00004000   override serializable for READ COMMITTED

KSUSFIDL    0x00008000   idle session scheduler

KSUSFSKP   0x00010000   SKIP unusable indexes maintenance

KSUSFCDF   0x00020000   defer all deferrable constraint by default

KSUSFCND  0x00040000   deferable constraints are immediate

KSUSFIDT    0x00080000   session to be implicitly detached

KSUSFTLA   0x00100000   transaction audit logged

KSUSFJQR   0x00200000   recource checking in job q process enabled

KSUSFMGS  0x00400000   session is migratable

KSUSFGOD  0x00800000   migratable session need to get ownership id

KSUSFSDS   0x01000000   suppress/enable TDSCN      computations

KSUSFMSP   0x02000000   parent of migratable session

KSUSFMVC  0x04000000   MV container update progress

KSUSFNAS   0x08000000   an NLS alter session call was done

KSUSFTRU    0x10000000  a trusted callout was performed

KSUSFHOA   0x20000000   an HO agent was called

KSUSFSTZ   0x40000000   an alter session set time_zone was done

KSUSFSRF   0x80000000   summary refresh


4、call state object

Call state object是针对一个call的,我们查看call state object的时候一定要注意depth值,以此判断该call是用户调用还是递归调用。

5、enqueue state object  

从enqueue state object中,我们主要可以查看锁的类型、锁的模式以及flag。

6、transaction dump

Transaction dump对应的oracle内存结构是KTCXB,可以通过X$KTCXB来了解更详细的情况。

flag的描述如下(资料来源早期版本,针对10g可能略有不同):

1          allocated but no transaction

2          transaction active

4          state object no longer valid

8          transaction about to commit/abort

10          space management transaction

20          recursive transaction

40          no undo logging

80          no change/commit,must rollback

100        use system undo segment (0)

200        valid undo segment assigned

400        undo seg assigned,lock acquired

800        change may have been made

1000      assigned undo seg

2000      required lock in cleanup

4000      is a pseudo space extent

8000      save the tx table & tx ctl block

10000    no read-only optimize for 2pc

20000    multiple sess attached to this tx

40000    commit scn future set

80000    dependent scn future set

100000   dist call failed,force rollback

200000   remote uncoordinated ddl tx

400000   coordinated global tx

800000   pdml transaction

1000000        next must be commit or rollback

2000000        coordinator in pdml

4000000        disable block level recovery

8000000        library and/or row caches dirty

10000000      serializable transaction

20000000      waiting for unbound transaction

40000000      loosely coupled transaction branch

80000000      long-running transaction


flag2的描述如下(资料来源早期版本,针对10g可能略有不同):

1    tx needs refresh on commit

2    delete performed in tx

4    concurrency check enabled

8    insert performed

10   dir path insert performed

20   fast rollback on net disconnect

40   do not commit this tx

80   this tx made remote change

100 all read-only optim enabled


事务环境的结构如下:

Struct ktcev {

kenv             ktcevenv;

kuba             UBA的高水位;

kuba             ktcevucl;

sb2        在undo高水位块中的剩余空间;

kcbds     undo block的描述;

kdbafr    undo段头的DBA地址;

kturt *    指向undo seg的KTURT结构;

}


7、library object lock/handle

library object lock如下:

Flags的描述如下:

KGLLKBRO  0x0100   this lock is broken

KGLLKCBB   0x0200   this lock can be broken

KGLLKPNC  0x0400   “kgllkpnc” is a valid pin for the call

KGLLKPNS   0x0800   “kgllkpns” is a valid pin for the session

KGLLKCGA  0x1000   this lock is in CGA memory

KGLLKINH   0x2000   the instance lock is inherited

KGLLKLRU   0x4000   lock protects an object on the session cache lru

KGLLKKPC   0x8000   lock protects an object in the session keep cache

KGLLKRES   0x0010   reserved lock preventing handle from being freed

KGLLKCBK   0x0020   need to callback the client for delete/dump


作为library object的主体,handle的信息如图:

其中namespace的取值包括:

CRSR    cursor

TABL     table/view/sequence/synonym

BODY    body(e.g.,package body)

TRGR    trigger

INDX    index

CLST     cluster

KGLT    internal KGL testing

PIPE      pipe

LOB      lob

DIR       directory

QUEU    queue

OBJG     replication object group

PROP    replication propagator

JVSC     java source

JVRE     java resource

ROBJ     reserved for server-side RepAPI

REIP      replication internal package

CPOB    context policy object

EVNT    pub_sud internal information

SUMM   summary

DIMN    dimension

CTX      app context

OUTL    stored outlines

TULS     ruleset objects

RMGR   resource manager

XDBS    xdb schema

PPLN     pending scheduler plan

PCLS     pending scheduler class

SUBS     subscription information

LOCS    location information

RMOB   remote objects info

RSMD   RepAPI snapshot metadata

JVSD     java shared data

STFG    file group

TRANS  transformation

RELC     replication – log based child

STRM    stream:capture process in log-based replication

REVC    rule evaluation context

STAP     stream:apply process in log-based replication

RELS     source inlog-based replication

RELD    destination in log-based replication

IFSD     IFS schema

XDBC    XDB configuration management

USAG    user agent mapping

VOMDTABL  multi-versioned object for table

JSQI      scheduler-event queue info object

CDCS    change set

VOMDINDX multi-versioned object for index

STBO    sql tuing base object

HTSP     hintset    object

JSGA     scheduler global attributes

JSET     scheduler start time namespace

TABL_T temporary table

CLST_T temporary cluster

INDX_Ttemporary index

SCPD    sratch pad

JSLV      scheduler job slave

MODL   mining models


状态标志位的取值:

EXS       existent

NEX      no-existent

LOC

CRT       being created

ALT       being altered

DRP       being dropped

PRG       being purged

UPD      being uodated

RIV       marked for rolling invalidation

NRC      don’t recover when an exclusive pin fails

UDP      dep being updated

BOW     bad owner of database link

MEM     has frame memory associated with heap 0

REA       protected with read-only access at least once

NOA      protected with no access at least once


通过对library cache object/handle的分析,可以找到相关的sql以及cursor的状态。


7月最新发布10.2.0.4.5 Patch Set Update

同11.2.0.1.2 psu同时发布的还有10.2.0.4.5 psu,值得注意的是这2个psu都包括了针对ora-600/7445错误出现时信息显示的原因和调用(cause/action)。

附该psu的readme note:

Released: July 13, 2010

This document is accurate at the time of release. For any changes and additional information regarding PSU 10.2.0.4.5, see these related documents that are available at My Oracle Support (http://support.oracle.com/):

  • Note 854428.1 Patch Set Updates for Oracle Products

  • Note 1089052.1 Oracle Database Patch Set Update 10.2.0.4.5 Known Issues

Patch Set Update 10.2.0.4.5 introduces new overlay PSU packaging. This new packaging reduces, and may eliminate altogether, the number of new overlay patches required to install the PSU. There are changes in both the patch application and patch conflict resolution. Oracle recommends that you read this entire readme before installing the patch.

This document includes the following sections:

1 Patch Information

Patch Set Update PSU 10.2.0.4.5 is an overlay PSU whose base PSU is 10.2.0.4.4. This patch can only be applied in an Oracle home for which PSU 10.2.0.4.4 has already been installed.

PSU 10.2.0.4.5 contains the bug fixes listed in Section 5, “Bugs Fixed by This Patch”.

Table 1 describes installation types and security content. For each installation type, it indicates the most recent PSU patch to include new security fixes that are pertinent to that installation type. If there are no security fixes to be applied to an installation type, then “None” is indicated. If a specific PSU is listed, then apply that or any later PSU patch to be current with security fixes.

Table 1 Installation Types and Security Content

Installation Type Latest PSU with Security Fixes

Server homes

PSU 10.2.0.4.5

Client-Only Installations

None

Instant Client Installations

None

(The Instant Client installation is not the same as the client-only Installation. For additional information about Instant Client installations, see Oracle Database Concepts.)

ASM (Automatic Storage Management) homes

PSU 10.2.0.4.1

CRS (Cluster Ready Services) homes

None


2 Patch Installation and Deinstallation

This section includes the following sections:

2.1 Platforms for PSU 10.2.0.4.5

For a list of platforms that are supported in this Patch Set Update, see My Oracle Support Note 1060989.1 Critical Patch Update July 2010 Patch Availability Document for Oracle Products.


2.2 OPatch Utility Information

You must use the OPatch 10.2 version 10.2.0.4.8 or later to apply this patch. Oracle recommends that you use the latest released OPatch 10.2, which is available for download from My Oracle Support patch 6880880 by selecting the 10.2.0.0.0 release.

For information about OPatch documentation, including any known issues, see My Oracle Support Note 293369.1 OPatch documentation list.


2.3 Patch Installation

These instructions are for both non-RAC environments and RAC environments.

2.3.1 Patch Pre-Installation Instructions

Before you install PSU 10.2.0.4.5, perform the following actions to check the environment and to detect and resolve any one-off patch conflicts.


2.3.1.1 Environment Checks
  1. Ensure that the $PATH definition has the following executables: make, ar, ld, and nm.

    The location of these executables depends on your operating system. On many operating systems, they are located in /usr/ccs/bin, in which case you can set your PATH definition as follows:

    export PATH=$PATH:/usr/ccs/bin  


2.3.1.2 Prerequisite 10.2.0.4.4 Base Patch Set Update Patch

PSU 10.2.0.4.5 is packaged as an overlay patch which requires that the 10.2.0.4.4 Patch Set Update has been installed. Check that PSU 10.2.0.4.4 is installed by ensuring that the OPatch inventory includes the PSU 10.2.0.4.4 tracking bug (9352164).

If the PSU 10.2.0.4.4 tracking bug (9352164) is not present in the OPatch inventory, do the following to minimize your downtime:

  1. Download PSU 10.2.0.4.4 patch 9352164 and review its readme instructions.

  2. Perform the One-off Patch Conflict Detection and Resolution for both PSU 10.2.0.4.4 and PSU 10.2.0.4.5. That is, you do not need to have PSU 10.2.0.4.4 installed to do the conflict detection on PSU 10.2.0.4.5. If there are conflicts, you only need to file one Support Request to get them resolved.

  3. After conflicts are resolved, install PSU 10.2.0.4.4, followed by PSU 10.2.0.4.5.

  4. Install any conflict resolution overlay patches.

  5. Perform the PSU 10.2.0.4.4 Post-Installation Instructions, followed by the PSU 10.2.0.4.5 Post-Installation Instructions.


2.3.1.3 One-off Patch Conflict Detection and Resolution

For an introduction to the PSU one-off patch concepts, see “Patch Set Updates Patch Conflict Resolution” in My Oracle Support Note 854428.1 Patch Set Updates for Oracle Products.

The fastest and easiest way to determine whether you have one-off patches in the Oracle home that conflict with the PSU, and to get the necessary conflict resolution patches, is to use the Patch Recommendations and Patch Plans features on the Patches & Updates tab in My Oracle Support. These features work in conjunction with the My Oracle Support Configuration Manager. Recorded training sessions on these features can be found in Note 603505.1.

However, if you are not using My Oracle Support Patch Plans, follow these steps:

  1. Determine whether any currently installed one-off patches conflict with the PSU patch as follows:

    unzip p9654991_102044_<platform>.zip  opatch prereq CheckConflictAgainstOHWithDetail -phBaseDir ./9654991  
  2. The report will indicate the patches that conflict with PSU 10.2.0.4.5. File a service request (SR) requesting a new merge patch that will replace PSU 10.2.0.4.5.


2.3.2 Patch Installation Instructions

Follow these steps:

  1. If you are using a Data Guard Physical Standby database, you must first install this patch on the primary database before installing the patch on the physical standby database. It is not supported to install this patch on the physical standby database before installing the patch on the primary database. For more information, see My Oracle Support Note 278641.1.

  2. If you are patching an ASM instance, shut down all Oracle Database instances that use this ASM instance. (To see which Oracle Database instances are connected to this ASM instance, query the V$ASM_CLIENT view.)

  3. Do one of the following, depending on whether this is a RAC environment:

    • If this is a RAC environment, choose one of the patch installation methods provided by OPatch (rolling, all node, or minimum downtime), and shutdown instances and listeners as appropriate for the installation method selected.

      This PSU patch is rolling RAC installable. Refer to My Oracle Support Note 244241.1 Rolling Patch – OPatch Support for RAC.

    • If this is not a RAC environment, shut down all instances and listeners associated with the Oracle home that you are updating. For more information, see Oracle Database Administrator’s Guide.

  4. Set your current directory to the directory where the patch is located and then run the OPatch utility by entering the following commands:

    unzip p9654991_102044_<platform>.zip  cd 9654991  opatch apply  
  5. If there are errors, refer to Section 3, “Known Issues”.


2.3.3 Post Installation Instructions

Do not perform the operations in this section on ASM instances. However, if you shut down ASM as part of applying the PSU, you must start ASM instances before you can perform any of the actions in this section on any database instances.

After installing the patch, perform the following actions:

  1. Load modified SQL files into the database, as explained in Section 2.3.3.1.

  2. Recompile views in the database, if necessary, as explained in Section 2.3.3.2.

2.3.3.1 Loading Modified SQL Files into the Database

The following steps load modified SQL files into the database. For a RAC environment, perform these steps on only one node.

  1. For each database instance running on the Oracle home being patched, connect to the database using SQL*Plus. Connect as SYSDBA and run the catbundle.sql script as follows:

    cd $ORACLE_HOME/rdbms/admin  sqlplus /nolog  SQL> CONNECT / AS SYSDBA  SQL> STARTUP  SQL> @catbundle.sql opsu apply  SQL> QUIT  

    The catbundle.sql execution is reflected in the dba_registry_history view by a row associated with bundle series OPSU.

    For information about the catbundle.sql script, see My Oracle Support Note 605795.1 Introduction to Oracle Database catbundle.sql.

  2. Check the following log files in $ORACLE_HOME/cfgtoollogs/catbundle for any errors:

    catbundle_OPSU_<database SID>_APPLY_<TIMESTAMP>.log  catbundle_OPSU_<database SID>_GENERATE_<TIMESTAMP>.log  

    where TIMESTAMP is of the form YYYYMMMDD_HH_MM_SS. If there are errors, refer to Section 3, “Known Issues”.


2.3.3.2 Recompiling Views in the Database

Recompiling views in the database is a one-time action that is required to complete the installation of CPU fixes that were initially released in January, 2008. It requires that the database be in upgrade mode, so this step is not rolling RAC installable. You may defer this step to a later downtime. If you do this, your system will continue to work; however, the installation of the January 2008 CPU fixes will not be complete until the view recompilation is completed.

Skip this section if you have recompiled views for this database during the installation of a previous PSU or CPU.

The time required to recompile the views and related objects depends on the total number of objects and on your system configuration. In one internal Oracle test with approximately 2000 views and 4000 objects, the total execution time for view_recompile_jan2008cpu.sql and utlrp.sql was about 30 minutes.

If you want to check whether view recompilation has already been performed for the database, execute the following statement:

SELECT * FROM registry$history where ID = '6452863';  

If the view recompilation has been performed, this statement returns one or more rows. If the view recompilation has not been performed, this statement returns no rows.

The following steps recompile the views in the database. For a RAC environment, perform these steps on only one node.

  1. Run the pre-check script (so named because it was initially released in CPUJan2008), which reports the maximum number of views and objects that may be recompiled:

    cd $ORACLE_HOME/cpu/view_recompile  sqlplus /nolog  SQL> CONNECT / AS SYSDBA  SQL> @recompile_precheck_jan2008cpu.sql  SQL> QUIT  

    The purpose of this step is to help you determine whether view recompilation should be done at the same time as the PSU install, or scheduled later.

  2. If the database is not in a RAC environment, perform this step and skip the next step. (If the database is in a RAC environment, go to the next step.)

    Run the view recompilation script. Note that this script is run with the database in upgrade mode, which restricts connections as SYSDBA.

    cd $ORACLE_HOME/cpu/view_recompile  sqlplus /nolog  SQL> CONNECT / AS SYSDBA  SQL> SHUTDOWN IMMEDIATE  SQL> STARTUP UPGRADE  SQL> @view_recompile_jan2008cpu.sql  SQL> SHUTDOWN;  SQL> STARTUP;  SQL> QUIT  
  3. If the database is in a RAC environment, run the view recompilation script as follows. Note that this script is run with the database in upgrade mode, which restricts connections as SYSDBA. Stop all instances except the one where the view recompilation is being executed.

    cd $ORACLE_HOME/cpu/view_recompile  sqlplus /nolog  SQL> CONNECT / AS SYSDBA  SQL> STARTUP NOMOUNT  SQL> ALTER SYSTEM SET CLUSTER_DATABASE=FALSE SCOPE=spfile;  SQL> SHUTDOWN  SQL> STARTUP UPGRADE  SQL> @view_recompile_jan2008cpu.sql  SQL> SHUTDOWN;  SQL> STARTUP NOMOUNT;    Set the CLUSTER_DATABASE initialization parameter to TRUE:    SQL> ALTER SYSTEM SET CLUSTER_DATABASE=TRUE SCOPE=spfile;    Restart the database:    SQL> QUIT  cd $CRS_HOME/bin  srvctl start database -d <database-name>  
  4. Check the log file for any errors. The log file is in the current directory and is named: vcomp_<sid>_<timestamp>.log

  5. If any invalid objects were reported, run the utlrp.sql script as follows:

    cd $ORACLE_HOME/rdbms/admin  sqlplus /nolog  SQL> CONNECT / AS SYSDBA  SQL> @utlrp.sql  

    Then, manually recompile any invalid objects. For example:

    SQL> alter package schemaname.packagename compile;  


2.3.4 Post Installation Instructions for Databases Created or Upgraded after Installation of PSU 10.2.0.4.5 in the Oracle Home

These instructions are for a database that is created or upgraded after the installation of PSU 10.2.0.4.5.

You must execute the steps in Section 2.3.3.1, “Loading Modified SQL Files into the Database” for any new database only if it was created by any of the following methods:

  • Using DBCA (Database Configuration Assistant) to select a sample database (General, Data Warehouse, Transaction Processing)

  • Using a script that was created by DBCA that creates a database from a sample database

  • Cloning a database that was created by either of the two preceding methods, and if the steps in Section 2.3.3.1, “Loading Modified SQL Files into the Database” were not executed after PSU 10.2.0.4.5 was applied

Upgraded databases require that you perform the steps in Section 2.3.3.2, “Recompiling Views in the Database” if these steps have not previously been performed; otherwise, no post-installation steps need to be performed.


2.4 Patch Deinstallation

These instructions are for both Non-RAC environments and RAC environments.

2.4.1 Patch Deinstallation Instructions for a Non-RAC Environment

Follow these steps:

  1. Verify that an $ORACLE_HOME/rdbms/admin/catbundle_OPSU_<database SID>_ROLLBACK.sql file exists for each database associated with this ORACLE_HOME. If this is not the case, you must execute the steps in Section 2.3.3.1, “Loading Modified SQL Files into the Database” against the database before deinstalling the PSU.

  2. Shut down all instances and listeners associated with the Oracle home that you are updating. For more information, see Oracle Database Administrator’s Guide.

  3. Run the OPatch utility specifying the rollback argument as follows.

    opatch rollback -id 9654991  

    After the rollback command completes, PSU 10.2.0.4.5 is deinstalled, but PSU 10.2.0.4.4 and any of its other overlay patches remain installed in the Oracle home.

  4. If there are errors, refer to Section 3, “Known Issues”.


2.4.2 Post Deinstallation Instructions for a Non-RAC Environment

Follow these steps:

  1. Start all database instances running from the Oracle home. (For more information, see Oracle Database Administrator’s Guide.)

  2. For each database instance running out of the ORACLE_HOME, connect to the database using SQL*Plus as SYSDBA and run the rollback script as follows:

    cd $ORACLE_HOME/rdbms/admin  sqlplus /nolog  SQL> CONNECT / AS SYSDBA  SQL> STARTUP  SQL> @catbundle_OPSU_<database SID>_ROLLBACK.sql  SQL> QUIT  

    In a RAC environment, the name of the rollback script will have the format catbundle_OPSU_<database SID PREFIX>_ROLLBACK.sql.

  3. Check the log file for any errors. The log file is found in $ORACLE_HOME/cfgtoollogs/catbundle and is named catbundle_OPSU_<database SID>_ROLLBACK_<TIMESTAMP>.log where TIMESTAMP is of the form YYYYMMMDD_HH_MM_SS. If there are errors, refer to Section 3, “Known Issues”.


2.4.3 Patch Deinstallation Instructions for a RAC Environment

Follow these steps for each node in the cluster, one node at a time:

  1. Shut down the instance on the node. (Shut down all RDBMS instances before any ASM instances.)

  2. Run the OPatch utility specifying the rollback argument as follows.

    opatch rollback -id 9654991  

    After the rollback command completes, PSU 10.2.0.4.5 is deinstalled, but PSU 10.2.0.4.4 and any of its other overlay patches remain installed in the Oracle home.

    If there are errors, refer to Section 3, “Known Issues”.

  3. Start the instance on the node. Depending on the type of home, enter the following commands or command.

    • For ASM homes:

      srvctl start listener  srvctl start asm  srvctl start instance  
    • For RDBMS (non-ASM) homes:

      srvctl start instance  


2.4.4 Post Deinstallation Instructions for a RAC Environment

Follow the instructions listed in Section Section 2.4.2, “Post Deinstallation Instructions for a Non-RAC Environment” only on the node for which the steps in Section 2.3.3.1, “Loading Modified SQL Files into the Database” were executed during the patch application.

All other instances can be started and accessed as usual while you are executing the deinstallation steps.


3 Known Issues

For information about OPatch issues, see My Oracle Support Note 293369.1 OPatch documentation list.

For issues documented after the release of this PSU, see My Oracle Support Note 1089052.1 Oracle Database Patch Set Update 10.2.0.4.5 Known Issues.

Other known issues are as follows.

Issue 1   

The following ignorable errors may be encountered while running the catbundle.sql script or its rollback script:

ORA-29809: cannot drop an operator with dependent objects  ORA-29931: specified association does not exist  ORA-29830: operator does not exist  ORA-00942: table or view does not exist  ORA-00955: name is already used by an existing object  ORA-01430: column being added already exists in table  ORA-01432: public synonym to be dropped does not exist  ORA-01434: private synonym to be dropped does not exist  ORA-01435: user does not exist  ORA-01917: user or role 'XDB' does not exist  ORA-01920: user name '<user-name>' conflicts with another user or role name  ORA-01921: role name '<role name>' conflicts with another user or role name  ORA-01952: system privileges not granted to 'WKSYS'  ORA-02303: cannot drop or replace a type with type or table dependents  ORA-02443: Cannot drop constraint - nonexistent constraint  ORA-04043: object <object-name> does not exist  ORA-29832: cannot drop or replace an indextype with dependent indexes  ORA-29844: duplicate operator name specified   ORA-14452: attempt to create, alter or drop an index on temporary table already in use  ORA-06512: at line <line number>. If this error follow any of above errors, then can be safely ignored.  ORA-01927: cannot REVOKE privileges you did not grant  
Issue 2   

The view recompilation pre-check script returns different results during subsequent runs (such as after the first time you ran it).

The results (the maximum number of views and objects that may be recompiled) may be more or less than reported in the previous running of the script. This is expected behavior, and is not a problem.

Issue 3   

If the view recompilation script has already been run, a message is displayed indicating that the script has already been applied.

This is not a problem, because as the instructions note, you do not need to run the script if it has already been run.


4 References

The following documents are references for this patch.

Note 293369.1 OPatch documentation list

Note 360870.1 Impact of Java Security Vulnerabilities on Oracle Products

Note 468959.1 Enterprise Manager Grid Control Known Issues

Note 9352164.8 Bug 9352164 – 10.2.0.4.4 Patch Set Update (PSU)


5 Bugs Fixed by This Patch

This patch includes the following bug fixes.


5.1 CPU Molecules

CPU molecules in PSU 10.2.0.4.5:

PSU 10.2.0.4.5 contains the following new PSU 10.2.0.4.5 molecules:

9678690 – DB-10.2.0.4-MOLECULE-043-CPUJUL2010

9678695 – DB-10.2.0.4-MOLECULE-044-CPUJUL2010

9678697 – DB-10.2.0.4-MOLECULE-045-CPUJUL2010


5.2 Bug Fixes

PSU 10.2.0.4.5 contains the following new fixes:

9573054 – ORA-07445 IN TIME MGR PROCESS ON RAC WHILE QUERYING AQ$_QUEUE_TABLE_AFFINITY

9713537 – ENHANCE CAUSE/ACTION FIELDS OF THE INTERNAL ERROR ORA-00600

9714832 – ENHANCE CAUSE/ACTION FIELDS OF THE INTERNAL ERROR ORA-07445

7月最新发布11.2.0.1.2 Patch set update

7月13日,11g release 2 的第二个补丁集更新发布了;9i的最终版本为9.2.0.8,10g上10.2.0.5很有可能成为最终版本,我们预期今后(11g,12g)中Patch set数量会有效减少,而patch set update数量可能大幅增加;这样的更新形式可以为Oracle Database提升一定的软件形象。可以猜想11gr2的最终版本号可能是11.2.0.2/3.x。

附该psu的readme note:

Released: July 13, 2010

This document is accurate at the time of release. For any changes and additional information regarding PSU 11.2.0.1.2, see these related documents that are available at My Oracle Support (http://support.oracle.com/):

  • Note 854428.1 Patch Set Updates for Oracle Products
  • Note 1089071.1 Oracle Database Patch Set Update 11.2.0.1.2 Known Issues

This document includes the following sections:

1 Patch Information

Patch Set Update (PSU) patches are cumulative. That is, the content of all previous PSUs is included in the latest PSU patch.

PSU 11.2.0.1.2 includes the fixes listed in Section 5, “Bugs Fixed by This Patch”.

Table 1 describes installation types and security content. For each installation type, it indicates the most recent PSU patch to include new security fixes that are pertinent to that installation type. If there are no security fixes to be applied to an installation type, then “None” is indicated. If a specific PSU is listed, then apply that or any later PSU patch to be current with security fixes.

Table 1 Installation Types and Security Content

Installation Type Latest PSU with Security Fixes
Server homes PSU 11.2.0.1.2


Client-Only Installations None
Instant Client Installations None

(The Instant Client installation is not the same as the client-only Installation. For additional information about Instant Client installations, see Oracle Database Concepts.)

2 Patch Installation and Deinstallation

This section includes the following sections:

2.1 Platforms for PSU 11.2.0.1.2

For a list of platforms that are supported in this Patch Set Update, see My Oracle Support Note 1060989.1 Critical Patch Update July 2010 Patch Availability Document for Oracle Products.

2.2 OPatch Utility Information

You must use the OPatch utility version 11.2.0.1.0 or later to apply this patch. Oracle recommends that you use the latest released OPatch 11.2, which is available for download from My Oracle Support patch 6880880 by selecting the 11.2.0.0.0 release.

For information about OPatch documentation, including any known issues, see My Oracle Support Note 293369.1 OPatch documentation list.

2.3 Patch Installation

These instructions are for all Oracle Database installations.

2.3.1 Patch Pre-Installation Instructions

Before you install PSU 11.2.0.1.2, perform the following actions to check the environment and to detect and resolve any one-off patch conflicts.

2.3.1.1 Environments with ASM

If you are installing the PSU to an environment that has Automatic Storage Management (ASM), note the following:

  • For Linux x86 and Linux x86-64 platforms, install either (A) the bug fix for 8898852 and the Database PSU patch 9654983, or (B) the Grid Infrastructure PSU patch 9343627.
  • For all other platforms, no action is required. The fix for 8898852 was included in the base 11.2.0.1.0 release.

2.3.1.2 Environment Checks
  1. Ensure that the $PATH definition has the following executables: make, ar, ld, and nm.The location of these executables depends on your operating system. On many operating systems, they are located in /usr/ccs/bin, in which case you can set your PATH definition as follows:
    export PATH=$PATH:/usr/ccs/bin
    

2.3.1.3 One-off Patch Conflict Detection and Resolution

For an introduction to the PSU one-off patch concepts, see “Patch Set Updates Patch Conflict Resolution” in My Oracle Support Note 854428.1 Patch Set Updates for Oracle Products.

The fastest and easiest way to determine whether you have one-off patches in the Oracle home that conflict with the PSU, and to get the necessary conflict resolution patches, is to use the Patch Recommendations and Patch Plans features on the Patches & Updates tab in My Oracle Support. These features work in conjunction with the My Oracle Support Configuration Manager. Recorded training sessions on these features can be found in Note 603505.1.

However, if you are not using My Oracle Support Patch Plans, follow these steps:

  1. Determine whether any currently installed one-off patches conflict with the PSU patch as follows:
    unzip p9654983_11201_<platform>.zip
    opatch prereq CheckConflictAgainstOHWithDetail -phBaseDir ./9654983
    
  2. The report will indicate the patches that conflict with PSU 9654983 and the patches for which PSU 9654983 is a superset.Note that Oracle proactively provides PSU 11.2.0.1.2 one-off patches for common conflicts.
  3. Use My Oracle Support Note 1061295.1 Patch Set Updates – One-off Patch Conflict Resolution to determine, for each conflicting patch, whether a conflict resolution patch is already available, and if you need to request a new conflict resolution patch or if the conflict may be ignored.
  4. When all the one-off patches that you have requested are available at My Oracle Support, proceed with Section 2.3.2, “Patch Installation Instructions”.

2.3.2 Patch Installation Instructions

Follow these steps:

  1. If you are using a Data Guard Physical Standby database, you must first install this patch on the primary database before installing the patch on the physical standby database. It is not supported to install this patch on the physical standby database before installing the patch on the primary database. For more information, see My Oracle Support Note 278641.1.
  2. Do one of the following, depending on whether this is a RAC environment:
    • If this is a RAC environment, choose one of the patch installation methods provided by OPatch (rolling, all node, or minimum downtime), and shutdown instances and listeners as appropriate for the installation method selected.This PSU patch is rolling RAC installable. Refer to My Oracle Support Note 244241.1 Rolling Patch – OPatch Support for RAC.
    • If this is not a RAC environment, shut down all instances and listeners associated with the Oracle home that you are updating. For more information, see Oracle Database Administrator’s Guide.
  3. Set your current directory to the directory where the patch is located and then run the OPatch utility by entering the following commands:
    unzip p9654983_11201_<platform>.zip
    cd 9654983
    opatch apply
    
  4. If there are errors, refer to Section 3, “Known Issues”.

2.3.3 Patch Post-Installation Instructions

After installing the patch, perform the following actions:

  1. Apply conflict resolution patches as explained in Section 2.3.3.1.
  2. Load modified SQL files into the database, as explained in Section 2.3.3.2.

2.3.3.1 Applying Conflict Resolution Patches

Apply the patch conflict resolution one-off patches that were determined to be needed when you performed the steps in Section 2.3.1.3, “One-off Patch Conflict Detection and Resolution”.

2.3.3.2 Loading Modified SQL Files into the Database

The following steps load modified SQL files into the database. For a RAC environment, perform these steps on only one node.

  1. For each database instance running on the Oracle home being patched, connect to the database using SQL*Plus. Connect as SYSDBA and run the catbundle.sql script as follows:
    cd $ORACLE_HOME/rdbms/admin
    sqlplus /nolog
    SQL> CONNECT / AS SYSDBA
    SQL> STARTUP
    SQL> @catbundle.sql psu apply
    SQL> QUIT
    

    The catbundle.sql execution is reflected in the dba_registry_history view by a row associated with bundle series PSU.

    For information about the catbundle.sql script, see My Oracle Support Note 605795.1 Introduction to Oracle Database catbundle.sql.

  2. Check the following log files in $ORACLE_HOME/cfgtoollogs/catbundle for any errors:
    catbundle_PSU_<database SID>_APPLY_<TIMESTAMP>.log
    catbundle_PSU_<database SID>_GENERATE_<TIMESTAMP>.log
    

    where TIMESTAMP is of the form YYYYMMMDD_HH_MM_SS. If there are errors, refer to Section 3, “Known Issues”.

2.3.4 Patch Post-Installation Instructions for Databases Created or Upgraded after Installation of PSU 11.2.0.1.2 in the Oracle Home

These instructions are for a database that is created or upgraded after the installation of PSU 11.2.0.1.2.

You must execute the steps in Section 2.3.3.2, “Loading Modified SQL Files into the Database” for any new database only if it was created by any of the following methods:

  • Using DBCA (Database Configuration Assistant) to select a sample database (General, Data Warehouse, Transaction Processing)
  • Using a script that was created by DBCA that creates a database from a sample database

2.4 Patch Deinstallation

These instructions apply if you need to deinstall the patch.

2.4.1 Patch Deinstallation Instructions for a Non-RAC Environment

Follow these steps:

  1. Verify that an $ORACLE_HOME/rdbms/admin/catbundle_PSU_<database SID>_ROLLBACK.sql file exists for each database associated with this ORACLE_HOME. If this is not the case, you must execute the steps in Section 2.3.3.2, “Loading Modified SQL Files into the Database” against the database before deinstalling the PSU.
  2. Shut down all instances and listeners associated with the Oracle home that you are updating. For more information, see Oracle Database Administrator’s Guide.
  3. Run the OPatch utility specifying the rollback argument as follows.
    opatch rollback -id 9654983
    
  4. If there are errors, refer to Section 3, “Known Issues”.

2.4.2 Patch Post-Deinstallation Instructions for a Non-RAC Environment

Follow these steps:

  1. Start all database instances running from the Oracle home. (For more information, see Oracle Database Administrator’s Guide.)
  2. For each database instance running out of the ORACLE_HOME, connect to the database using SQL*Plus as SYSDBA and run the rollback script as follows:
    cd $ORACLE_HOME/rdbms/admin
    sqlplus /nolog
    SQL> CONNECT / AS SYSDBA
    SQL> STARTUP
    SQL> @catbundle_PSU_<database SID>_ROLLBACK.sql
    SQL> QUIT
    

    In a RAC environment, the name of the rollback script will have the format catbundle_PSU_<database SID PREFIX>_ROLLBACK.sql.

  3. Check the log file for any errors. The log file is found in $ORACLE_HOME/cfgtoollogs/catbundle and is named catbundle_PSU_<database SID>_ROLLBACK_<TIMESTAMP>.log where TIMESTAMP is of the form YYYYMMMDD_HH_MM_SS. If there are errors, refer to Section 3, “Known Issues”.

2.4.3 Patch Deinstallation Instructions for a RAC Environment

Follow these steps for each node in the cluster, one node at a time:

  1. Shut down the instance on the node.
  2. Run the OPatch utility specifying the rollback argument as follows.
    opatch rollback -id 9654983
    

    If there are errors, refer to Section 3, “Known Issues”.

  3. Start the instance on the node as follows:
    srvctl start instance
    

2.4.4 Patch Post-Deinstallation Instructions for a RAC Environment

Follow the instructions listed in Section Section 2.4.2, “Patch Post-Deinstallation Instructions for a Non-RAC Environment” only on the node for which the steps in Section 2.3.3.2, “Loading Modified SQL Files into the Database” were executed during the patch application.

All other instances can be started and accessed as usual while you are executing the deinstallation steps.

3 Known Issues

For information about OPatch issues, see My Oracle Support Note 293369.1 OPatch documentation list.

For issues documented after the release of this PSU, see My Oracle Support Note 1089071.1 Oracle Database Patch Set Update 11.2.0.1.2 Known Issues.

Other known issues are as follows.

Issue 1
The following ignorable errors may be encountered while running the catbundle.sql script or its rollback script:

ORA-29809: cannot drop an operator with dependent objects
ORA-29931: specified association does not exist
ORA-29830: operator does not exist
ORA-00942: table or view does not exist
ORA-00955: name is already used by an existing object
ORA-01430: column being added already exists in table
ORA-01432: public synonym to be dropped does not exist
ORA-01434: private synonym to be dropped does not exist
ORA-01435: user does not exist
ORA-01917: user or role 'XDB' does not exist
ORA-01920: user name '<user-name>' conflicts with another user or role name
ORA-01921: role name '<role name>' conflicts with another user or role name
ORA-01952: system privileges not granted to 'WKSYS'
ORA-02303: cannot drop or replace a type with type or table dependents
ORA-02443: Cannot drop constraint - nonexistent constraint
ORA-04043: object <object-name> does not exist
ORA-29832: cannot drop or replace an indextype with dependent indexes
ORA-29844: duplicate operator name specified
ORA-14452: attempt to create, alter or drop an index on temporary table already in use
ORA-06512: at line <line number>. If this error follow any of above errors, then can be safely ignored.
ORA-01927: cannot REVOKE privileges you did not grant

4 References

The following documents are references for this patch.

Note 293369.1 OPatch documentation list

Note 360870.1 Impact of Java Security Vulnerabilities on Oracle Products

Note 468959.1 Enterprise Manager Grid Control Known Issues

Note 9352237.8 Bug 9352237 – 11.2.0.1.1 Patch Set Update (PSU)

5 Bugs Fixed by This Patch

This patch includes the following bug fixes.

5.1 CPU Molecules

CPU molecules in PSU 11.2.0.1.2:

PSU 11.2.0.1.2 contains the following new CPU molecules:

9676419 – DB-11.2.0.1-MOLECULE-004-CPUJUL2010

9676420 – DB-11.2.0.1-MOLECULE-005-CPUJUL2010

5.2 Bug Fixes

PSU 11.2.0.1.2 contains the following new fixes:

Automatic Storage Management

8755082 – ORA-00600: [KCFIS_TRANSLATE4:VOLUME LOOKUP], [2], [WRONG DEVICE NAME], [], [], [

8890026 – ASM PARTNERING CREATES IMBALANCED PARTNERSHIPS

9170608 – STBH:DD BLOCKS PINNED FOR QUERIES THAT DO NOT REQUEST USED SPACE

9363145 – STBH:DB INSTANCES TERMINATED BY ASMB DUE TO ORA-00600 [KFDSKALLOC0]

Buffer Cache

8330783 – HANGING DB WITH “CACHE BUFFER CHAINS” AND “BUFFER DEADLOCK” WAITS DURING INSERT

8822531 – TAKING AWR SNAP HANGS

Data Guard Broker

8918433 – UNPERSISTED FSFO STATE BITS CAN GET PERSISTED

9363384 – PHYSICAL STANDBY SERVICES NOT STARTED AFTER CONVERT FROM SNAPSHOT

9467635 – BROKER’S METADATA FILE UPGRADE TO 11.2 IS BROKEN

9467727 – GETSTATUS DOC YIELDS INCORRECT RESULT IF DBRESOURCE_ID PROP VALUE IS USED

Data Guard Logical

8774868 – LGSBFSFO: ORA-600 [3020], [3], [138] RAISED IN RECOVERY SLAVE

8822832 – V$ARCHIVE_DEST_STATUS HAS INCORRECT VALUE FOR APPLIED_SEQ#

DataGuard Redo Transport

8872096 – ARCHIVING FORCED DURING CLOSE WHEN NO STANDBY IS PRESENT

9399090 – STBH: CONSTANT/HIGH FREQUENT LOG SWITCHES ON BEEHIVE DATABASE IN THE LAST 3 DAYS

Shared Cursors

8865718 – RECURSIVE CURSORS CONTAINING “AS OF SNAPSHOT” CLAUSE ARE NOT SHARED

8981059 – HIGH VERSION COUNT:BIND_MISMATCH,USER_BIND_PEEK_MISMATCH,OPTIMIZER_MODE_MISMATCH

9010222 – APPS ST 11G ORA-00600 [KKSFBC-REPARSE-INFINITE-LOOP]

9067282 – TB:SH:ORA-00600:[KKSFBC-WRONG-KKSCSFLGS] WHILE RUNNING TPC-H

DML Drivers

9255542 – ARRAY INSERT TO PARTITIONED TABLE LOOSES ROWS DUE TO CONCURRENT DDL (ORA-14403)

9488887 – FORIEGN KEY VIOLATION WITH ARRAY-INSERT AND ONLINE IDX REBUILD AFTER BUG-9255542

Flashback Database

8834425 – ORA-240 IN RVWR PROCESS CAUSING 5MIN TRANSACTIONAL HANG

PLSQL

9210925 – AFTER MANUAL UPGRADE TO 11.1.0.7 PL/SQL CALLS INCORRECT FUNCTION

Automatic Memory Management

8505803 – PRE_PAGE_SGA RESULTS IN EXCESSIVE PAGE TABLE SIZE WHEN USING MEMORY_TARGET [AMM]

Partitioning

9165206 – PARTITIONING ORA-600 [KKPOLLS1] / [KKDOILSF1] – DURING PARTITION MAINTANANCE

Real Application Cluster

8875671 – LX64: ORA-600 ARGS [KJPNP_CHK:!MASTER_READY],

9093300 – LOTS OF REPEATED KJXOCDR: DROP DUPLICATE OPEN MESSAGE IN LMD TRACE

Row Access Method

8544696 – TABLE GROWTH – BLOCKS ARE NOT REUSED

Streams

8650719 – DOWNSTREAM CAPTURE ABORTS WITH ORA-26766

Secure Files

8856478 – RAM SECUREFILE PERF DEGRADATION WITH SF COMPRESSION ON SMALL LOBS DURING ATB MOVE

9272086 – STBH: DATA PUMP WRITER SEEMS TO BE WAITING ON WAIT FOR UNREAD MESSAGE ON BROADCA

DB Recovery

8909984 – APPSST GSI 11G: GAPS IN AWR SNAPSHOTS

9068088 – MEDIA RECOVERY WAS HUNG ON STANDBY

9145541 – ORA-600 [25027] / ORA-600 [4097] FOR ACTIVE TX IN A PLUGGED TABLESPACE

9167285 – PKT-BUGOLTP: ORA-07445: [KCRALC()+87]

Space Management

7519406 – ‘J000’ TRACE FILE REGARDING GATHER_STATS_JOB INTERMITTENTLY SINCE 10.2.0.4

8815639 – [11GR2-LNX-090813] MULTIPLE INSERT CAUSE DATA ALLOCATION ABOVE HHWM

9216806 – HIGH “ENQ: TS – CONTENTION” FOR TEMPORARY SEGMENT WHILE SQLLDR DIRECT PATH LOAD

9242411 – STRESS-BIGBH: LOTS OF OR-3113S IN BIGBH STRESS TEST

9461782 – ORA-7445 [KTSLF_SUMFSG()+54] [SIGSEGV] AND KTSLFSUM_CFS ON CALL STACK

Compression

9011088 – [11GR2]ADDING COLUMN TO COMPRESSED TABLE, DATA LOSS OCCURED.

9275072 – APPSST GSI 11G : BUFFER BUSY WAITS INSERTING INTO TABLES

9341448 – APPSST GSI 11G : BUFFER BUSY WAITS AND LATCH: CACHE BUFFERS WAITS WHEN INSERTING

9637033 – ORA-07445[KDR9IR2RST0] INSERT AS SELECT IN A COMPRESSED TABLE WITH > 255 COLUMNS

SQL Execution

8664189 – ORA-00600 [KDISS_UNCOMPRESS: BUFFER LENGTH]

9119194 – PSRC: DISTRIBUTED QUERY SLOWER IN 10.2.0.4 COMPARED TO 10.2.0.3

Transaction Management

8268775 – PERF: HIGH US ENQUEUE CONTENTION DURING A LOGIN STORM OR SESSION FAILOVER

8803762 – ORA-00600 [KDSGRP1] BLOCK CORRUPTION ON 11G DATABASE UPGRADE

Memory Management

8431487 – INSTANCE CRASH ORA-07445 [KGGHSTFEL()+192] ORA-07445[KGGHSTMAP()+241]

Message

9713537 – ENHANCE CAUSE/ACTION FIELDS OF THE INTERNAL ERROR ORA-00600

9714832 – ENHANCE CAUSE/ACTION FIELDS OF THE INTERNAL ERROR ORA-07445

SQL*Net break/reset to client等待事件

一般情况下无法从动态视图(v$session/v$session_wait)看到这个等待事件,因为它十分短暂。其本质从字面意思上来解释的话,是一种网络等待(network issue);
举例而言,如果运行的代码中包含某种可能的错误,且在调用中触发了的话,服务器端本地的服务进程有义务对远程客户端告知该信息,这个告知的过程中服务进程就处于SQL*Net break/reset to client等待中,直到客户端收到问题信息为止。与一般意义上的Sever-client模式一样,使用dblink时也可能出现该种等待事件。
下面我们来尝试演示该种等待事件:

SQL>  create table tv (t1 int unique);

Table created.

SQL> insert into tv values(1);

1 row created.

SQL> commit;

Commit complete.

SQL> oradebug setmypid;
Statement processed.
SQL>  oradebug event 10046 trace name context forever,level 8;
Statement processed.
SQL> insert into tv values(1);
insert into tv values(1)
*
ERROR at line 1:
ORA-00001: unique constraint (SYS.SYS_C009343) violated

SQL>  oradebug event 10046 trace name context off;
Statement processed.
SQL> select event, total_waits from v$session_event where event like '%break%' and sid =(select distinct sid from v$mystat);

EVENT                                                            TOTAL_WAITS
---------------------------------------------------------------- -----------
SQL*Net break/reset to client                                              2

可以看到出现了2次SQL*Net break/reset to client ,进一步分析trace文件可以发现以下记录:

EXEC #2:c=8000,e=9020,p=0,cr=10,cu=9,mis=0,r=0,dep=0,og=1,plh=0,tim=1279117896316991
ERROR #2:err=1 tim=1279117896317039
STAT #2 id=1 cnt=0 pid=0 pos=1 obj=0 op='LOAD TABLE CONVENTIONAL  (cr=0 pr=0 pw=0 time=0 us)'
WAIT #2: nam='SQL*Net break/reset to client' ela= 33 driver id=1413697536 break?=1 p3=0 obj#=-1 tim=1279117896317323
WAIT #2: nam='SQL*Net break/reset to client' ela= 521 driver id=1413697536 break?=0 p3=0 obj#=-1 tim=1279117896317915
WAIT #2: nam='SQL*Net message to client' ela= 5 driver id=1413697536 #bytes=1 p3=0 obj#=-1 tim=1279117896317964

2次SQL*Net break/reset to client分别为33us和521us; 设计不良的应用程序或者程序中存在较多未安置的exception都可能导致SQL*Net break/reset to client等待事件。

AIX平台上大型OLTP数据库的shutdown问题

客户的新系统上线已经一年有余,核心系统硬件采用IBM P595,操作系统版本AIX 5300-09,存储使用DS6000,数据库版本为10.2.0.4,没有打额外的patch set update.此套系统平时会话数量在2000-3000的水平,每秒新建会话在10个左右。

客户这套系统一直有一个问题,即每次准备关闭实例进行一些维护工作时,在多次手动执行检查点(确保脏块被写出)后,shudown immediate命令仍需要非常长的时间才完成关闭数据库动作;之前客户一直使用在shutdown之前将大部分应用服务进程杀死的方法,可以缩短 shutdown immediate命令完成的时间。

实际上服务进程在2000-3000的OLTP系统在当前已经很普及了,而在其他平台上(譬如:Linux,SUN OS)上则不会出现一个shutdown操作持续半个小时以上的情况。

通过查询My Oracle support发现一个9i上shutdown immediate费时半个小时的note:

Hdr: 3484589 9.2.0.4.0 RDBMS 9.2.0.4.0 PRODID-5 PORTID-212
Abstract: BUG:3046394  WHICH IS A REWORK OF BUG :2674297 DOES NOT  STILL FIX THE PROBLEM.
PROBLEM:
--------
Shutdown abort on AIX5L takes 7 min. and Shutdown immediate takes 30 min.
Patch for the bug 3046394( which is a rework of Bug 2674297) is applied ,but
there is no improvement in the time taken ot shutdown.
The problem is same as addressed in these two bugs but has not been fixed.

2. Pertinent configuration information
none

3. Indication of the frequency and predictability of the problem
Consistent.

4. Sequence of events leading to the problem
Shutdown abort

5. Technical impact on the customer. Include persistent after effects.
Shutdown taking a long time which is unacceptable to the  Customer.

DIAGNOSTIC ANALYSIS:
--------------------
From the alert log we see time taken for shutdown is around 7 min.
The patch 3046394 is applie,which is confirmed form the output of
Apply_3046394_02-20-2004_19-11-35.log

The shutdown abort was tried again now,it still takes the same amount of time.

The system calls made by the shutdown abort include:-
(These are a subset of the total Kill calls made)
196022:    kill(359980, 9)                    = 0
196022:    kill(359980, 0)                    = 0
196022:    _nsleep(0x0FFFFFFFFFFF9D80, 0x0FFFFFFFFFFF9E50)    = 0
196022:    kill(359980, 0)                    = 0
196022:    _nsleep(0x0FFFFFFFFFFF9D80, 0x0FFFFFFFFFFF9E50)    = 0
196022:    kill(359980, 0)                    = 0
196022:    _nsleep(0x0FFFFFFFFFFF9D80, 0x0FFFFFFFFFFF9E50)    = 0
196022:    kill(359980, 0)                    = 0
196022:    _nsleep(0x0FFFFFFFFFFF9D80, 0x0FFFFFFFFFFF9E50)    = 0

WORKAROUND:
-----------
No Workaround available.

RELATED BUGS:
-------------
Bug:3046394 , Bug :2674297

另一个文档指出,shutdown abort慢的主要原因Oracle关闭进程使用的是system call kill()函数,Bug 3484589的补丁中已经将Oracle 在shutdown实例时可能的等待问题移除了。

Shutdown abort taking long time on AIX (patch 3046394 applied) [ID 274399.1]
Applies To

Oracle Server - Enterprise Edition - Version: 9.2.0.1 to 9.2.0.4
AIX5L Based Systems (64-bit)
Symptoms

Shutdown abort taking a long time to complete on AIX.
Cause
This has been filed as bug 2674297. The wait time was reduced to shorten the shutdown time. This still 
takes around 50ms for each process to be terminated. This has been re-worked in Bug 3046394 to remove the 
delay during the shutdown and compensate for it during database startup.
But we still see the delay in shutdown abort on AIX. The delay during shutdown abort persists after applying 
the above patch (3046394) due to OS level handling of the shutdown command.

Fix
There is no fix. The problem still persists at the OS level. This is because of the way the kill command is 
processed at the OS level. Bug 3484589, has clearly mentioned that all the waits from the Oracle side have 
been removed. There is no further code that can be implemented to reduce the time at shutdown.

另一个文档则指出了这种连shutdown abort都慢的情况仅出现在AIX平台上:

Hdr: 3485690 9.2.0.3 RDBMS 9.2.0.3 OSD PRODID-5 PORTID-319 3046394
Abstract: SHUTDOWN ABORT TAKES A LONG TIME ON IBM AIX
PROBLEM:
--------
Ct has up to  8000 connections on their database. When they issue a shutdown
abort, it takes 8 minutes to complete. With 175 connections, it took 2.5
minutes to shutdown abort. With no one attached it takes 14 seconds.

When I test this on our database in house, AIX took 12 seconds to shutdown.
Linux takes .2 seconds, as does Solaris, and Windows 2000.

DIAGNOSTIC ANALYSIS:
--------------------
Applied patch for bug 2674297, and shutdown abort with 5000 connections took 5
minutes.

看起来这是一个操作系统调用引起的问题,且因为是操作系统的问题,Oracle无法提供进一步彻底解决方法;

总结起来当服务进程数量较多时,在AIX平台上shutdown immediate的缓慢程度往往是用户无法接受的,我们可以采取一个折中的方案,使用shutdown abort来缩短关闭实例所用的时间:

1.  alter system checkpoint;             -- 手动做检查点三次,保证脏块写出

2.  shutdown abort;                      -- abort实例,相当于断电

3.  startup restrict ;                   -- 以限制模式开启实例,普通应用此时无法连接数据库,故不会产生额外的服务进程

4.  shutdown normal;                     -- 以普通模式关闭实例,会再次进行完全检查点,并回滚事务

其中第二步的shutdown abort,可以以杀死pmon进程的方式替代(这样其实会更快);采用以上折中方式前,请确认您的online redo log处于复用或已镜像的状态下。

沪ICP备14014813号-2

沪公网安备 31010802001379号