PRM-DUL Whitepaper ParnassusData Recovery Manager For Oracle Database User Guide V0.4

Overview

ParnassusData Recovery Manager (PRM) is an enterprise-level Oracle database recovery tool, which can extract and restore database datafile from Oracle 9i, 10g, 11g, 12c directly without any SQL execution on Oracle database instances. ParnassusData Recovery Manager is a Java-based green software without any installation. Download it, and click to run.


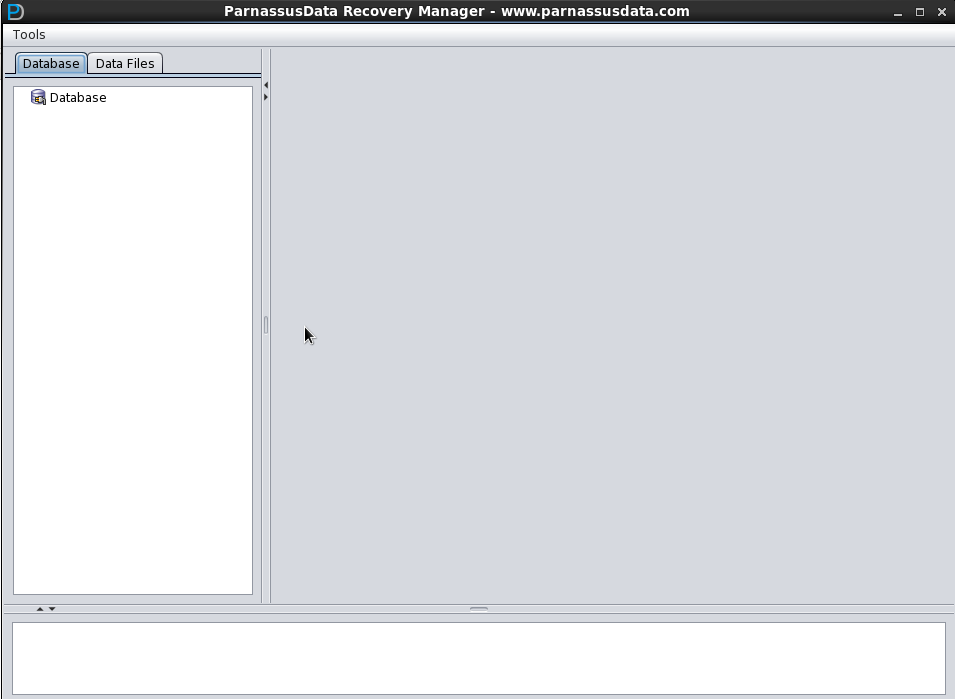
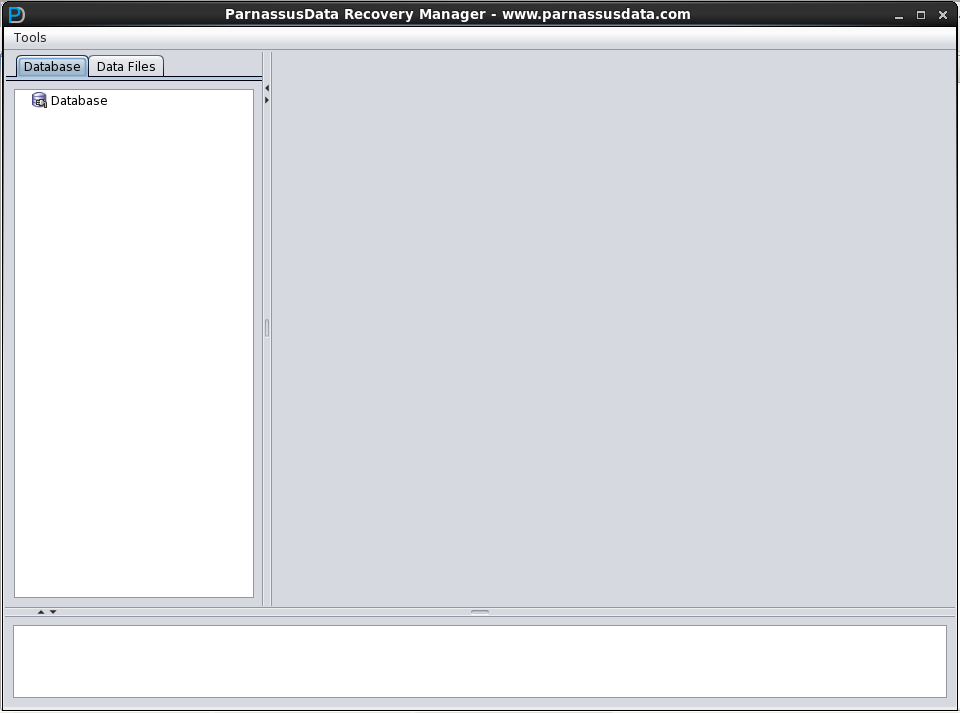
PRM adopts the convenient GUI for any command (as shown in Picture1). There is no need to learn additional scripts or master any skill in Oracle data structure. It is all integrated in Recovery Wizard of the tool.


Download PRM-DUL:

http://parnassusdata.com/sites/default/files/ParnassusData_PRMForOracle_3206.zip
 

PRM-DUL-DUL1


Why PRM is necessary?

Isn’t RMAN enough for ORACLE database recovery? Why do the users need PRM for Oracle recovery? You may ask.

In the growing IT systems within enterprises, database size is expanding geometrically. Oracle DBAs are facing the problems that disks are insufficient for full backup, and tape storages take much more time than usual expectation.


“For Database, backup 1st” is the first lesson for DBAs, however, the fact is that: disk space for backup is not sufficient, new storage device is still on the way, and even the backup does not actually work in the process of data recovery.


In order to solve the above problems, PD Recovery Manager, based on its understanding of the data structure within Oracle DB and core startup process, can not only solve cases such as system tablespace lost without any backup, data dictionary table misoperation, and database unable to be opened caused by inconsistent data dictionary due to power outages, but also restore data from Truncated/Deleted business data tables.


No matter you are a professional DBA or new fish in Oracle world, you can master this user-friendly tool immediately. PRM is easy to install and use. You don’t need to have any deep Oracle knowledge or skills in scripts. All you need to do is to click-by-click and you will finish all recovery processes.


Comparing the traditional recovery tool Oracle DUL, which is an Oracle internal tool and only for Oracle employee usage, PRM can be used by any     kind of IT professionals or geeks. It greatly shortens the failure time from database failure to complete data recovery, and cuts down the total cost of   enterprise.


There are 2 ways for data recovery by PRM:

By traditional way, data has to be extracted to text file and then inserted to a new DB by SQLLDR tools, which takes double time and occupies double storage size.


Another way that we strongly recommend for you is to use the unique data bridge feature of ParnassusData Recovery Manager. It can extract data from original source database and then insert into new destination database without any inter-media. This is a truly time and storage saver.


Oracle ASM is becoming popular in enterprise database implementation, due to its advantage in high performance, cluster support, and convenient management. However, for many IT professionals, ASM is a black box. Once the data structure of certain Disk Group in ASM is corrupted so that the Disk Group cannot be mounted, which means that all data is locked in ASM. In this circumstance without PRM, only senior Oracle experts can manually patch ASM internal structure, but it is too expensive and time-consuming for normal Oracle users.


PRM now can support two kinds of ASM data recovery:


  1. Once Disk Group cannot be mounted, PRM can read metadata, and clone ASM file from Disk Group.
  2. Once Disk Group cannot be mounted, PRM can read ASM file and extract data, which supports both traditional data export and data bridge.


PRM-DUL  Software Introduction

ParnassusData Recovery Manager (PRM) was based on Java development, which ensured that PRM can run across platforms. No matter AIX, Solaris, HPUNIX, Red-Hat, Oracle Linux, SUSE, or Window, It can be run  smoothly. Whether AIX, Solaris, HPUX and other Unix platforms, Redhat, Oracle Linux, SUSE and other Linux platforms, or Windows can run PRM directly.


OS & Platform that PRM Supports:


Platform Name Supported
AIX POWER ü
Solaris Sparc ü
Solaris X86 ü
Linux X86 ü
Linux X86-64 ü
HPUX ü
MacOS ü


Database Version that PRM Supports:


ORACLE DATABASE VERSION Supported
Oracle 7 û
Oracle 8 û
Oracle 8i û
Oracle 9i ü
Oracle 10g ü
Oracle 11g ü
Oracle 12c ü


Considering some old servers run early OS like AIX 4.3, on which the latest JD cannot be installed. Any platforms that can run JDS 1.4 can run PRM.


In addition, Oracle 10g database is integrated with JDK 1.4, and 11g with JDK 1.5. Therefore, users can run PRM directly without any JDK updates or installation.


For users who needs JDK 1.4, please download from below link:

http://www.oracle.com/technetwork/java/javasebusiness/downloads/java-a rchive-downloads-javase14-419411.html


For less bug and performance purpose, ParnassusData strongly recommend users to use Open JDK on Linux.


Open JDK for Linux download Link:


Open jdk x86_64 for Linux   5 http://pan.baidu.com/s/1qWO740O
Tzdata-java x86_64 for Linux 5 http://pan.baidu.com/s/1gdeiF6r
Open jdk x86_64 for Linux   6 http://pan.baidu.com/s/1mg0thXm
Open jdk x86_64 for Linux   6 http://pan.baidu.com/s/1sjQ7vjf
Open jdk x86 for Linux 5 http://pan.baidu.com/s/1kT1Hey7
Tzdata-java x86 for Linux  5 http://pan.baidu.com/s/1kT9iBAn
Open jdk x86 for Linux 6 http://pan.baidu.com/s/1sjQ7vjf
Tzdata-java x86 for Linux  6 http://pan.baidu.com/s/1kTE8u8n


JDK on Other platforms download link:


AIX JAVA SDK 7 http://pan.baidu.com/s/1i3JvAlv
JDK Windows x86 http://pan.baidu.com/s/1qW38LhM
JDK Windows x86-64 http://pan.baidu.com/s/1qWDcoOk
Solaris JDK 7 x86-64bit http://pan.baidu.com/s/1gdzgSvh
Solaris JDK 7 x86-32bit http://pan.baidu.com/s/1mgjxFlQ
Solaris JDK 7 Sparc http://pan.baidu.com/s/1pJjX3Ft


The minimum JAVA software environment for PRM is JDK 1.4. Parnassus Data strongly recommends you to run it on JDK 1.6, since JDK 1.4, it has greatly improved performance on JAVA procedure.

Therefore, the recovery speed of PRM under JDK 1.6 is faster than JDK 1.4.


PRM hardware requirement:


CPU At least 800 MHZ
Memory At least 512 MB
Disk At least 50 MB


PRM recommended hardware configuration:


CPU 2.0 GHZ
Memory 2 GB
Disk 2 GB


Languages that PRM Supports:


Language Character Set Encoding
Simplified/Traditional Chinese  

ZHS16GBK


GBK

Simplified/Traditional Chinese  

ZHS16DBCS


CP935

Simplified/Traditional Chinese  

ZHT16BIG5


BIG5

Simplified/Traditional Chinese  

ZHT16DBCS


CP937

Simplified/Traditional Chinese  

ZHT16HKSCS


CP950


Simplified/Traditional Chinese  

ZHS16CGB231280


GB2312

Simplified/Traditional Chinese  

ZHS32GB18030


GB18030

Japanese JA16SJIS SJIS
Japanese JA16EUC EUC_JP
Japanese JA16DBCS CP939
Korean KO16MSWIN949 MS649
Korean KO16KSC5601 EUC_KR
Korean KO16DBCS CP933
French WE8MSWIN1252 CP1252
French WE8ISO8859P15 ISO8859_15
French WE8PC850 CP850
French WE8EBCDIC1148 CP1148
French WE8ISO8859P1 ISO8859_1
French WE8PC863 CP863
French WE8EBCDIC1047 CP1047
French WE8EBCDIC1147 CP1147
Deutsch WE8MSWIN1252 CP1252
Deutsch WE8ISO8859P15 ISO8859_15
Deutsch WE8PC850 CP850
Deutsch WE8EBCDIC1141 CP1141
Deutsch WE8ISO8859P1 ISO8859_1
Deutsch WE8EBCDIC1148 CP1148
Italian WE8MSWIN1252 CP1252
Italian WE8ISO8859P15 ISO8859_15
Italian WE8PC850 CP850
Italian WE8EBCDIC1144 CP1144
Thai TH8TISASCII CP874
Thai TH8TISEBCDIC TIS620
Arabic AR8MSWIN1256 CP1256
Arabic AR8ISO8859P6 ISO8859_6
Arabic AR8ADOS720 CP864
Spanish WE8MSWIN1252 CP1252
Spanish WE8ISO8859P1 ISO8859_1


Spanish WE8PC850 CP850
Spanish WE8EBCDIC1047 CP1047
Portuguese WE8MSWIN1252 CP1252
Portuguese WE8ISO8859P1 ISO8859_1
Portuguese WE8PC850 CP850
Portuguese WE8EBCDIC1047 CP1047
Portuguese WE8ISO8859P15 ISO8859_15
Portuguese WE8PC860 CP860


Features that PRM supports:


Features Supported
Cluster Table YES
Inline or out-of-line LOBS, different chunk version and size, LOB partition YES
Heap            table,           partitioned            or non-partitioned YES
Partition and Non-partition YES
Table With chained rows ,migrated rows, intra-block  chaining YES
Bigfile Tablespace YES
ASM Automatic Storage Management 10g,11g,12c,diskgroups  are dismounted YES
ASM      11g    Variable Extent Size YES
IOT, partitioned or non-partitioned YES(Future)
Basic Compressed Heap table YES(Future)
Advanced Compressed Heap Table NO
Exudates HCC Heap Table NO
Encrypted Heap Table NO
Table with Virtual Column NO


Attention: for virtual column、11g optimized default column, data export has no problem, but it may lose the corresponding column. These two are new features after 11g with less users.


Data type that PRM supports:


Data Type Supported
BFILE No
Binary XML No
BINARY_DOUBLE Yes
BINARY_FLOAT Yes
BLOB Yes
CHAR Yes
CLOB and NCLOB Yes
Collections (including VARRAYS and nested tables) No
Date Yes
INTERVAL DAY TO SECOND Yes
INTERVAL YEAR TO MONTH Yes
LOBs stored as SecureFiles Future
LONG Yes
LONG RAW Yes
Multimedia data types (including Spatial, Image, and Oracle Text) No
NCHAR Yes
Number Yes
NVARCHAR2 Yes
RAW Yes
ROWID, UROWID Yes
TIMESTAMP Yes
TIMESTAMP WITH LOCAL TIMEZONE Yes
TIMESTAMP WITH TIMEZONE Yes
User-defined types No
VARCHAR2 and VARCHAR Yes
XMLType stored as CLOB No
XMLType stored as Object Relational No


Support for ASM by PRM:


Function Supported
Directly extract Table data from ASM YES
Directly copy datafile from ASM YES
Repair ASM metadata YES
Draw ASM Structure by  GUI Future


PRM installation and start-up

It is not necessary to install PRM since it is a Java-based green software. Users simply need to extract the ZIP package and click to RUN.


unzip        prm_latest.zip

ParnassusData recommends you to run PRM with command line, from which you can get more diagnostic information.


Starting method under Windows:


  1. Make sure you have installed JDK correctly and add JAVA to environment variable.
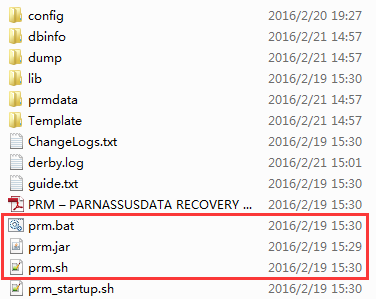
  2. Double click ‘prm.bat’ under the folder.

PRM-DUL-DUL2

prm.bat will start PRM in the background.
PRM-DUL-DUL3

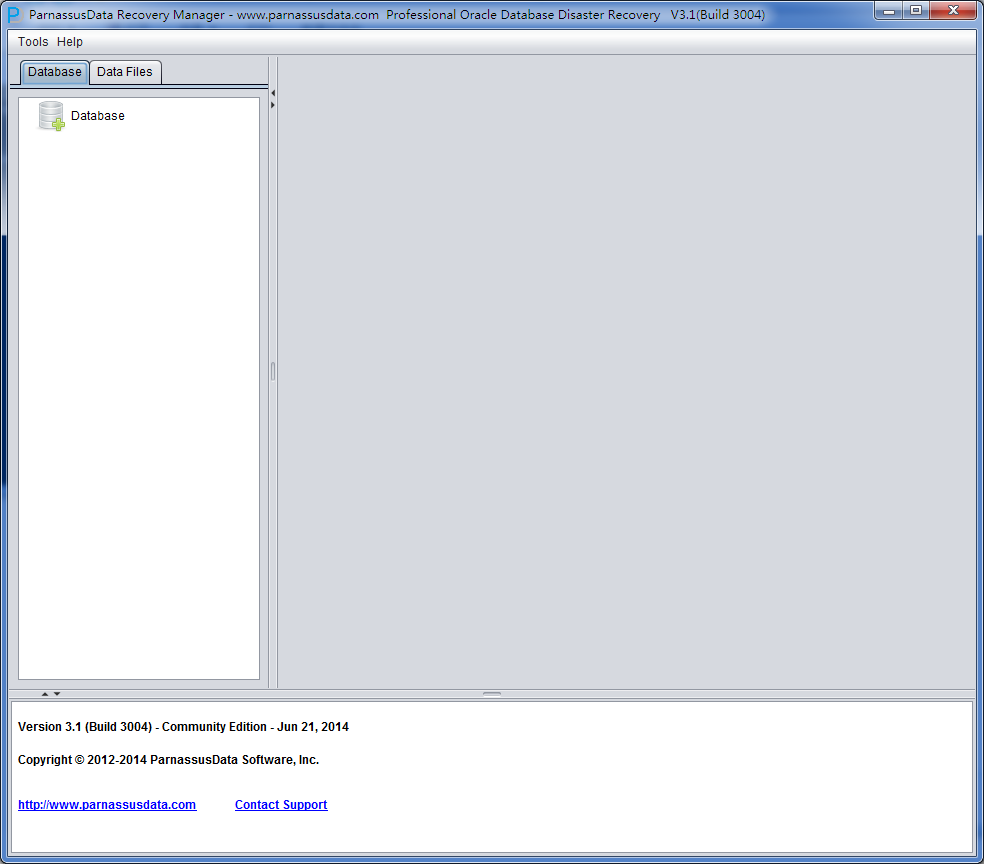
Then, it pops up PRM-DUL main interface:
PRM-DUL-DUL4

Linux/Unix:


In Linux/Unix, use X Server for GUI


  1. Make sure you had installed JDK and add Java to profile
  2. cd to PRM-DUL folder, and run./PRM-DUL.sh to start the tool


Starting method under Linux/Unix:


Under Linux/Unix, use X Server for GUI


  1. Make sure you have installed JDK correctly and add Java to environment variable
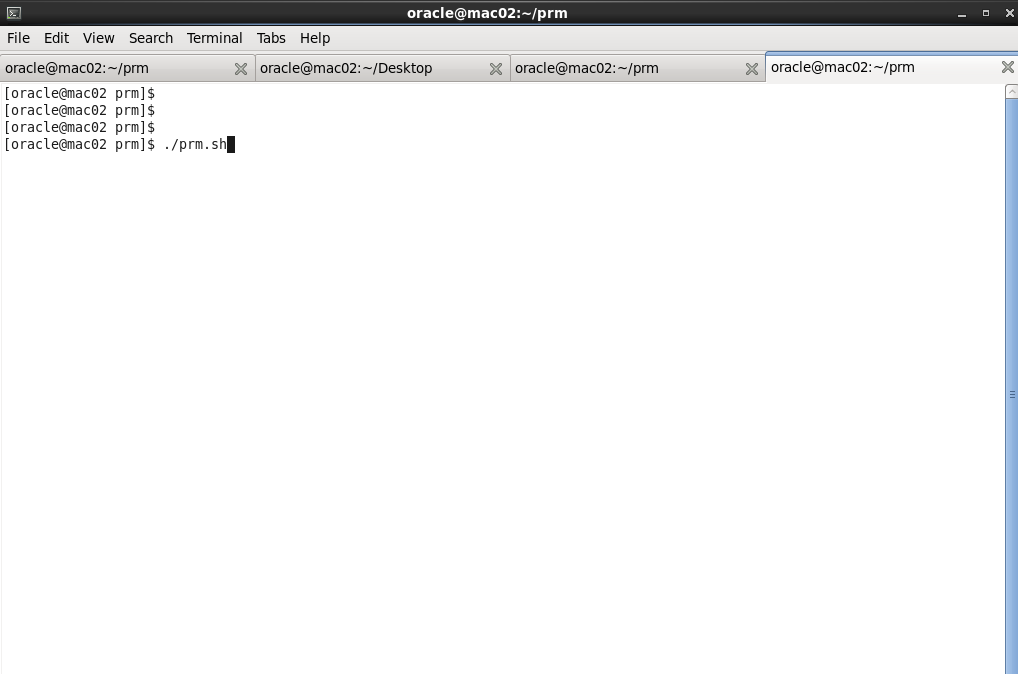
  2. Cd to the directory of PRM, and run./prm.sh to start the main interface of the program
 

PRM-DUL-DUL5

PRM-DUL-DUL6


PRM License Registration

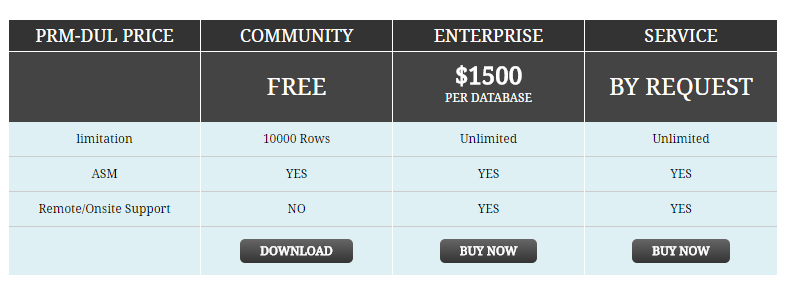
ParnassusData Recovery Manager (PRM) needs license for full use. ParnassusData provide the community version of PRM for user testing and demo. (Community version has no limits on ASM clone, and we will add more free features in it.)


It needs license for full use of PRM. Now, we provide two kinds of license for clients: Standard Edition and Enterprise Edition, and specifications are as follows.


prm-price


Clients can purchase PRM license from official website: www.parnassusdata.com, and it needs Database name. After your purchasing, you will receive an email which includes a DBNAME and License Key.


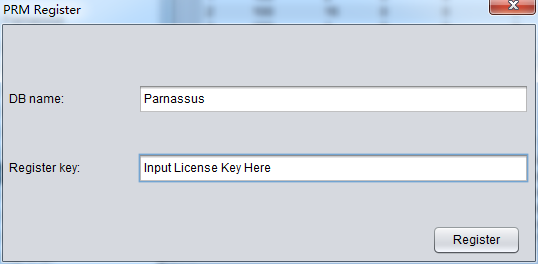
Once you obtain the License Key, please register in the software as below,

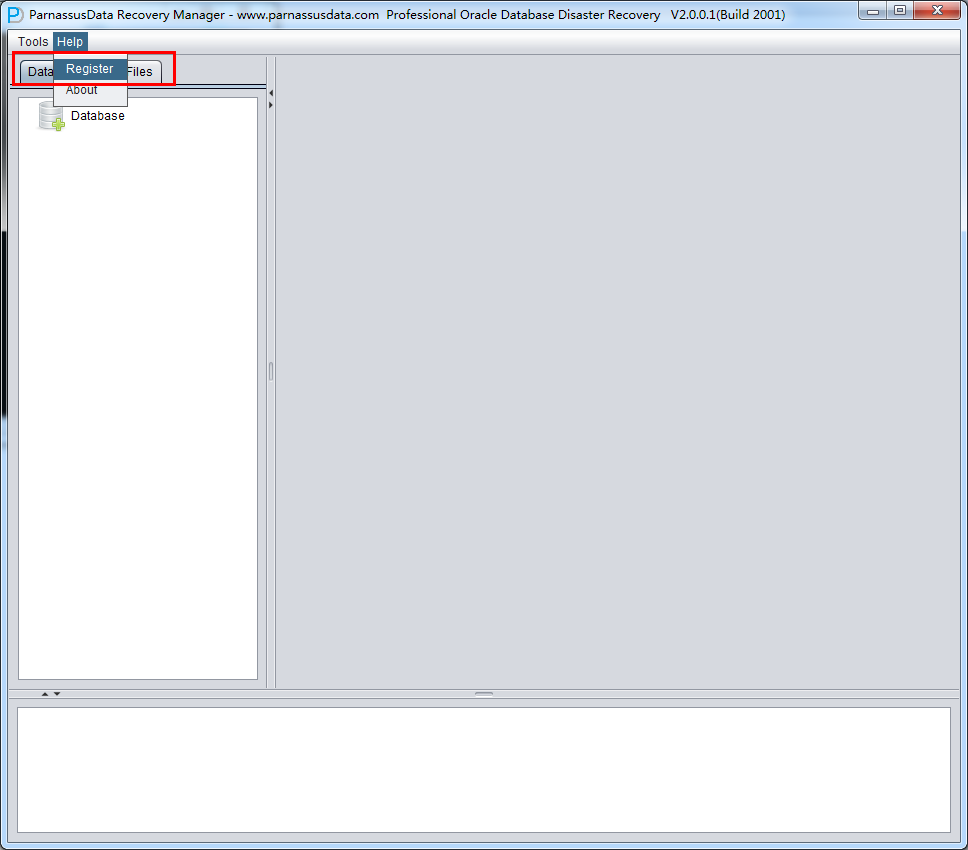
  1. In the Menu,  Help  => Register
  2. Input DB NAME and you License Key, then click Register button


After registration, you don’t need to input license key again on your next boot.
 

PRM-DUL-DUL8

PRM-DUL-DUL9

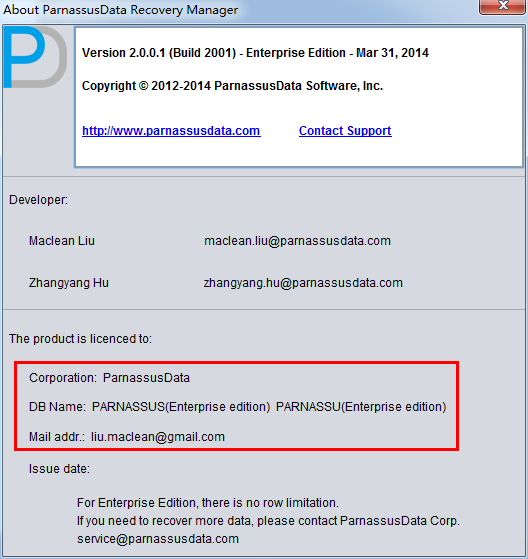
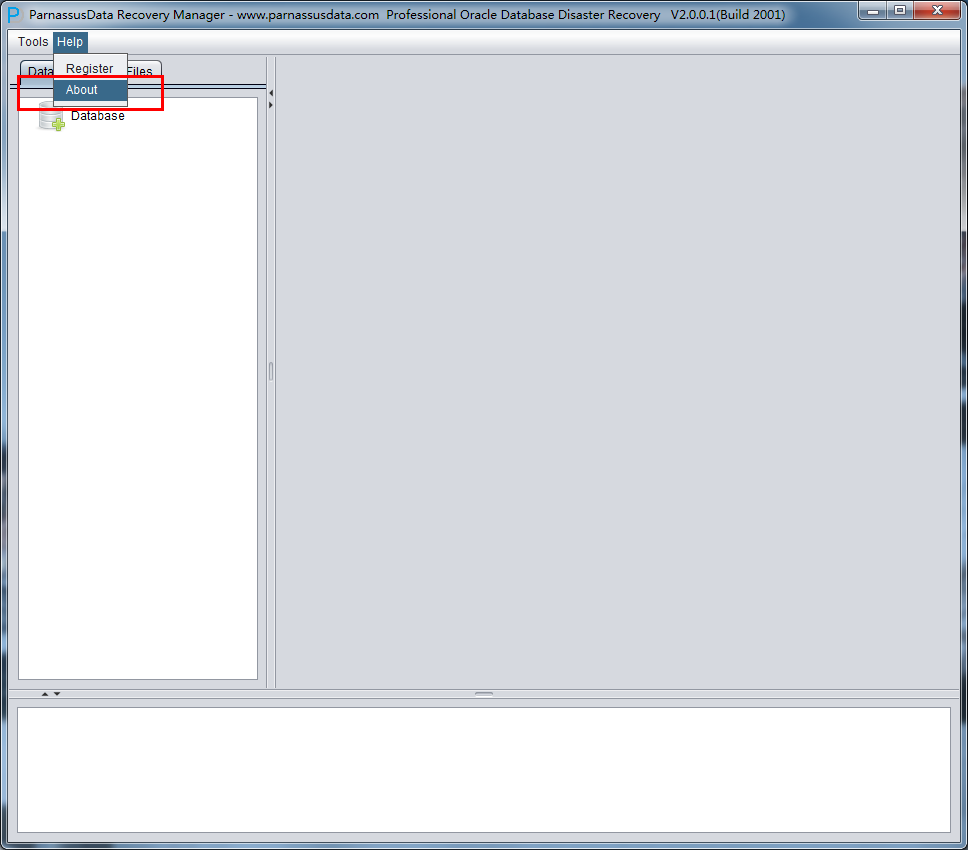
Your registration information can be found in Help=>about
PRM-DUL-DUL10


PRM-DUL-DUL11


Case Study on Oracle database recovery via PRM

CASE 1: General recovery of truncated table by mistake


User D had truncated all data in a table by mistake due to mistaking test environment library for product database. The DBA tried to recover table from RMAN backup, and accidently the backup is unavailable. Therefore DBA decided to use PRM for rescuing all truncated data.

Since all database system files under the environment are available and healthy, DBA just needs to load SYSTEM tablespace datafile in dictionary mode and datafile in TRUNCATED table. For example:


create table ParnassusData.torderdetail_his1	tablespace	users as select * from parnassusdata.torderdetail_his;


SQL> desc	ParnassusData.TORDERDETAIL_HIS
Name	Null?	Type
----------------------- -------- --------------
SEQ_ID	NOT NULL	NUMBER(10)
SI_STATUS	NUMBER(38)
D_CREATEDATE	CHAR(20)
D_UPDATEDATE	CHAR(20)
B_ISDELETE	CHAR(1)
N_SHOPID	NUMBER(10)
N_ORDERID	NUMBER(10)
C_ORDERCODE	CHAR(20)
N_MEMBERID	NUMBER(10)
N_SKUID	NUMBER(10)
C_PROMOTION	NVARCHAR2(5)
N_AMOUNT	NUMBER(7,2)
N_UNITPRICE	NUMBER(7,2)
N_UNITSELLINGPRICE	NUMBER(7,2)
N_QTY	NUMBER(7,2)
N_QTYFREE	NUMBER(7,2)
 

N_POINTSGET	NUMBER(7,2)
N_OPERATOR	NUMBER(10)
C_TIMESTAMP	VARCHAR2(20)
H_SEQID	NUMBER(10)
N_RETQTY	NUMBER(7,2)
N_QTYPOS	NUMBER(7,2)


select count(*) from ParnassusData.TORDERDETAIL_HIS;


COUNT(*)
----------
984359


select bytes/1024/1024 from dba_segments where segment_name='TORDERDETAIL_HIS' and owner='PARNASSUSDATA';

BYTES/1024/1024
---------------
189.71875


SQL>  truncate  table ParnassusData.TORDERDETAIL_HIS;


Table truncated.


SQL> select count(*) from ParnassusData.TORDERDETAIL_HIS;

COUNT(*)
----------
0


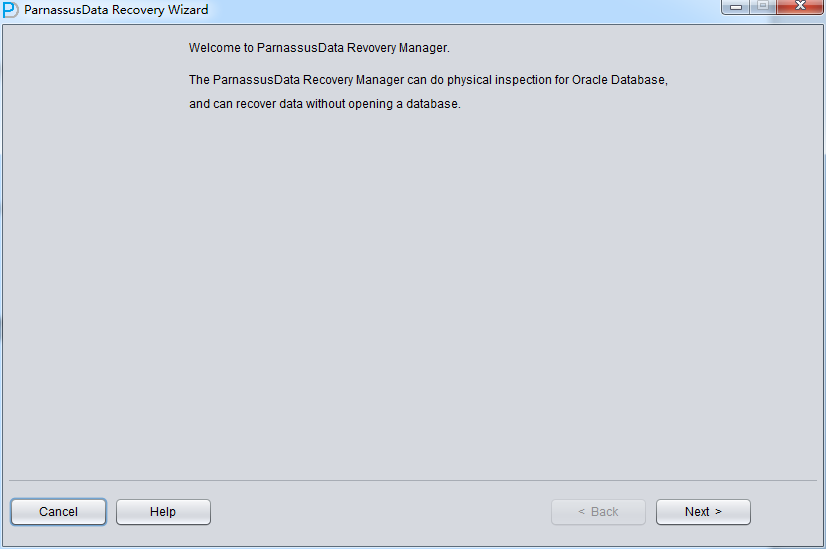
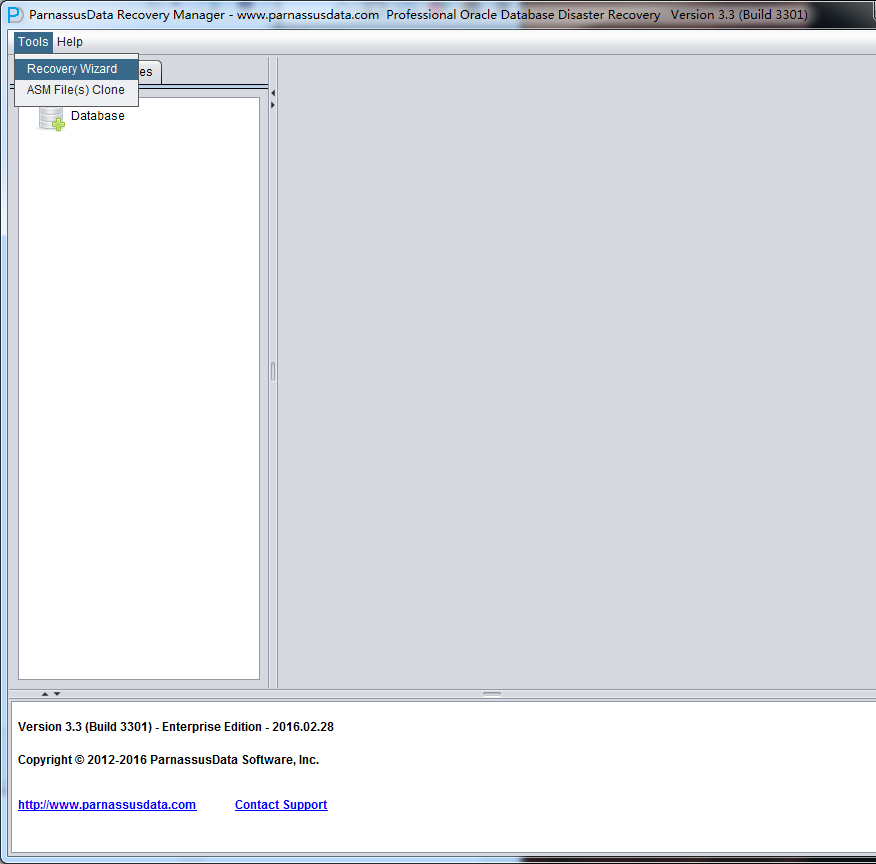
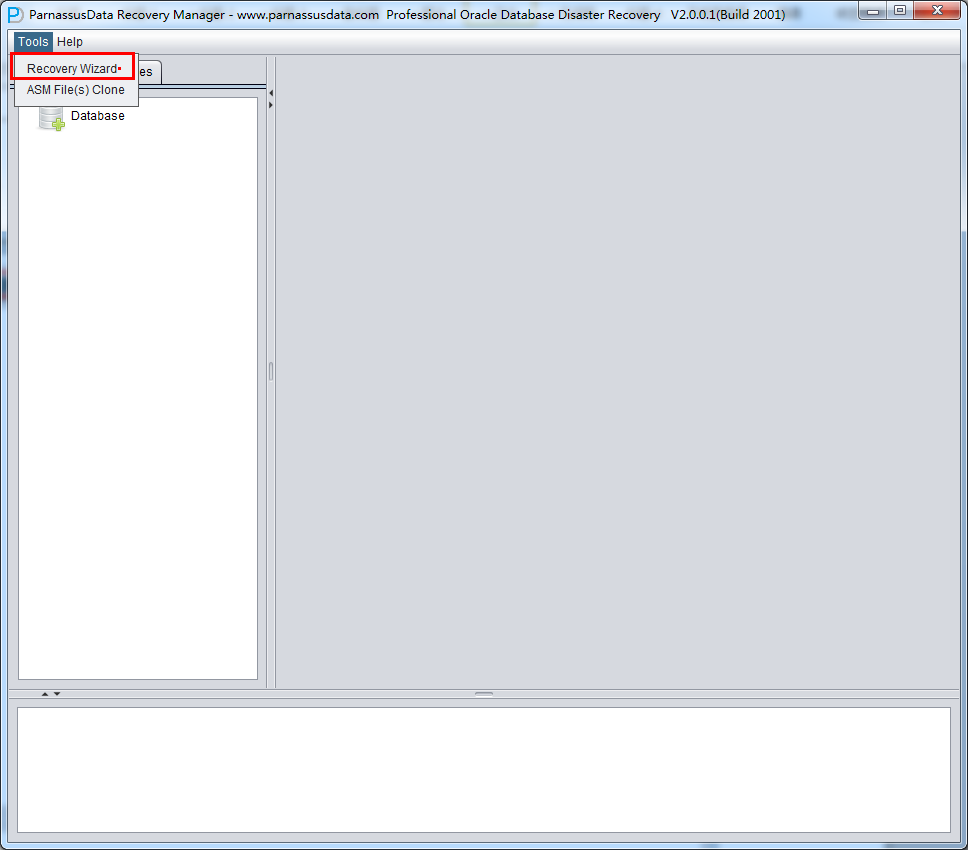
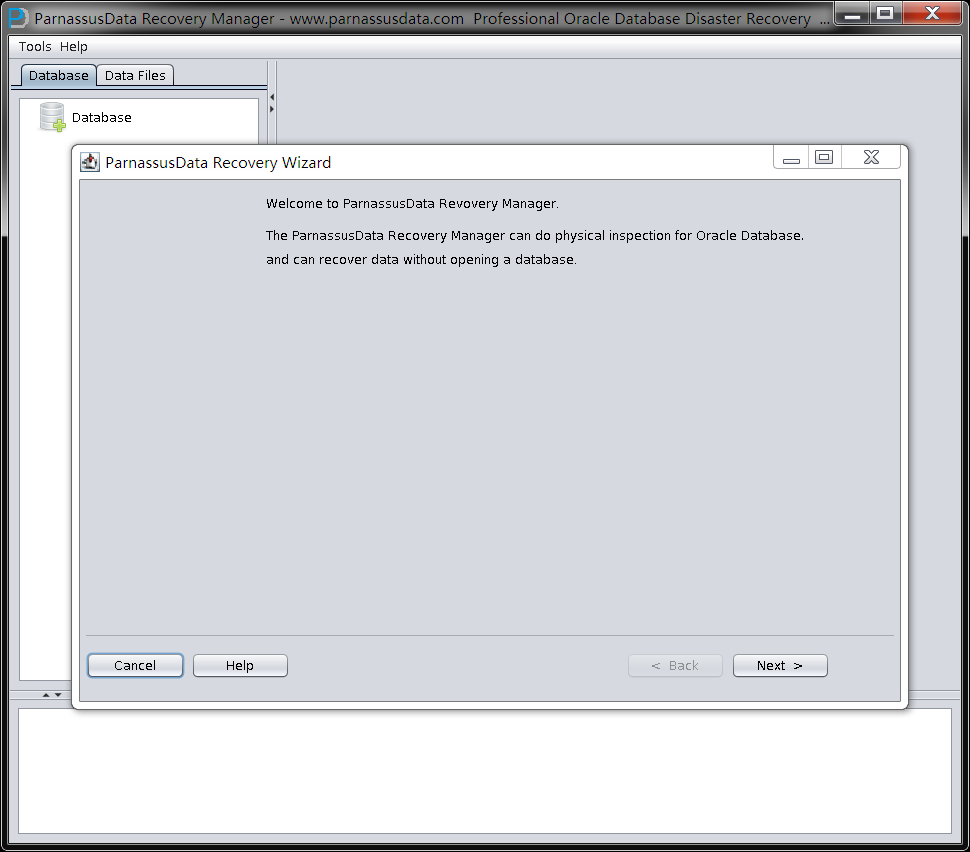
Run PRM, and select Tools =>Recovery Wizard
PRM-DUL-DUL12


Click Next


PRM-DUL-DUL13

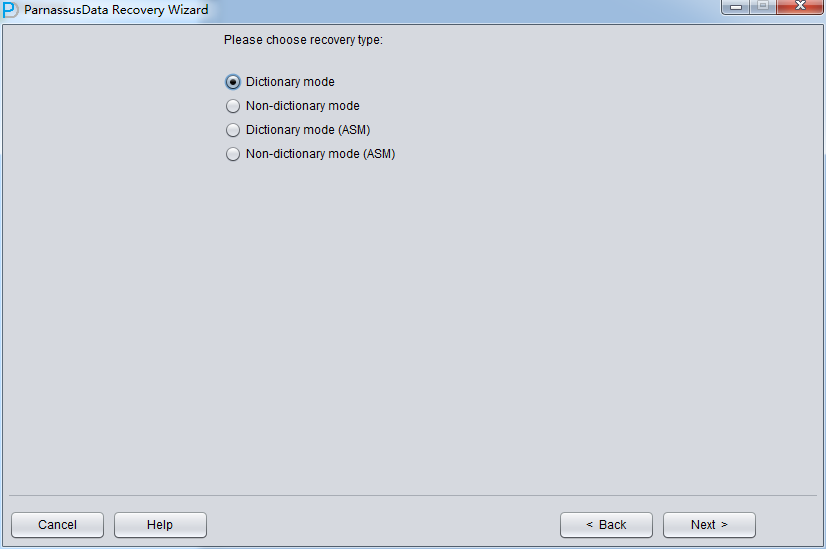
Since client did not use ASM storage in the scenario, just select ‘Dictionary Mode’:

PRM-DUL-DUL14


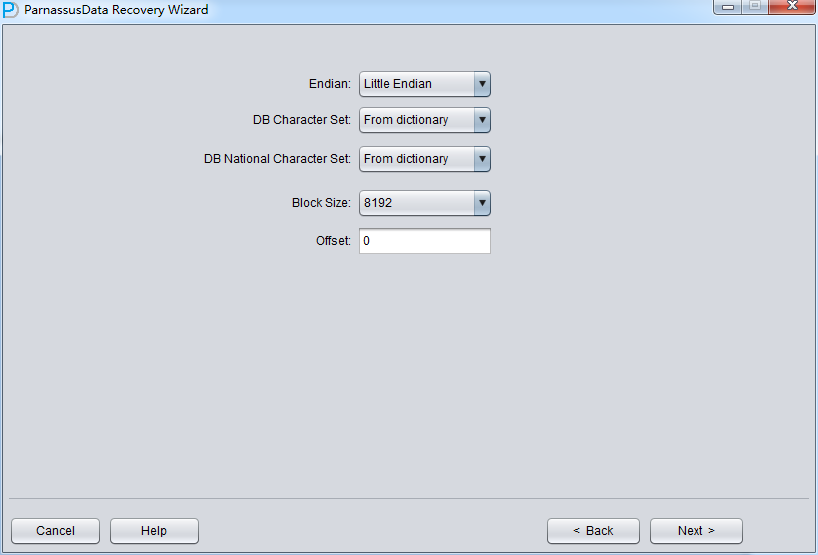
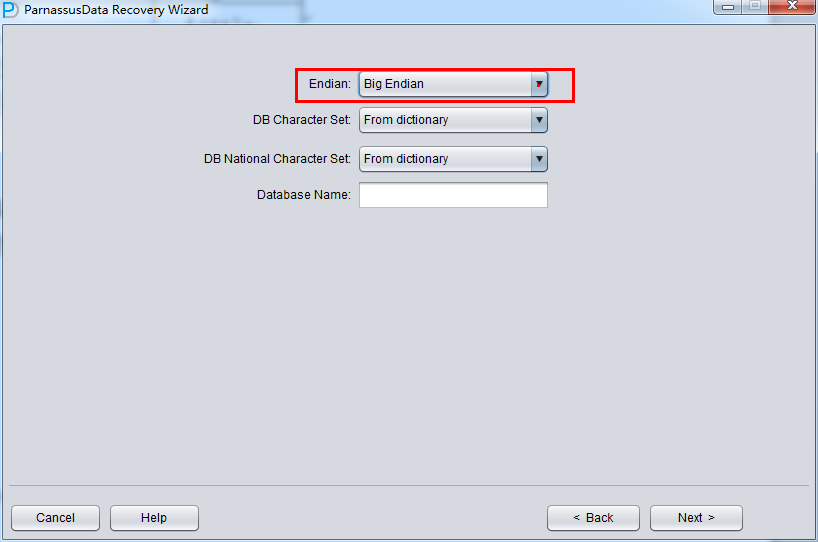
Next, we  need  to  select  a few parameters: Endian byte- order  and DBNAME.


Oracle datafiles adopt different Endian byte orders on different OS, please choose accordingly:


Solaris[tm] OE (32-bit) Big
Solaris[tm] OE (64-bit) Big
Microsoft Windows IA (32-bit) Little
Linux IA (32-bit) Little
AIX-Based  Systems (64-bit) Big
HP-UX (64-bit) Big
HP Tru64 UNIX Little
HP-UX IA (64-bit) Big
Linux IA (64-bit) Little
HP Open VMS Little
Microsoft Windows IA (64-bit) Little
IBM zSeries Based Linux Big
Linux x86 64-bit Little
Apple Mac OS Big
Microsoft Windows x86  64-bit Little
Solaris Operating System (x86) Little
IBM Power Based Linux Big
HP IA Open VMS Little
Solaris Operating System (x86-64) Little
Apple Mac OS (x86-64) Little

In traditional UNIX, AIX (64-bit), UP-UNIX (64-bit), it uses Big Endian byte order.
 

PRM-DUL-DUL15


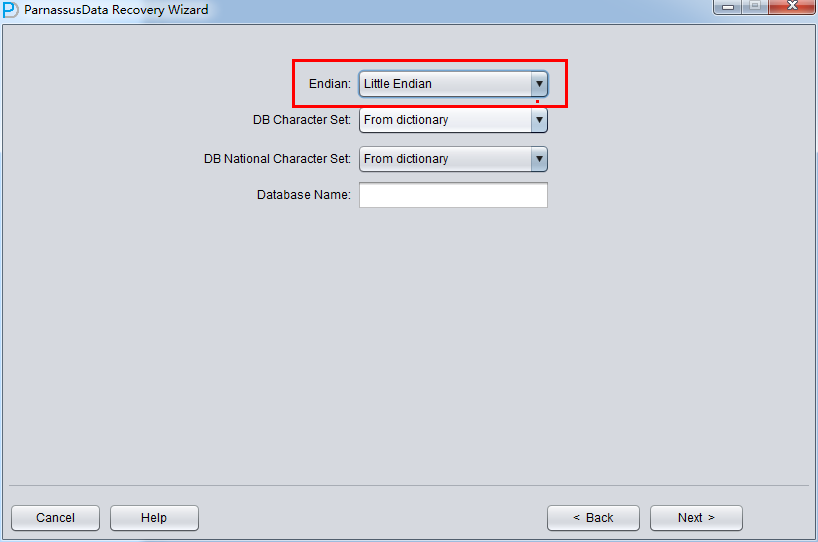
Usually, Linux X86/64, Windows remain the default Little Endian:
PRM-DUL-DUL16

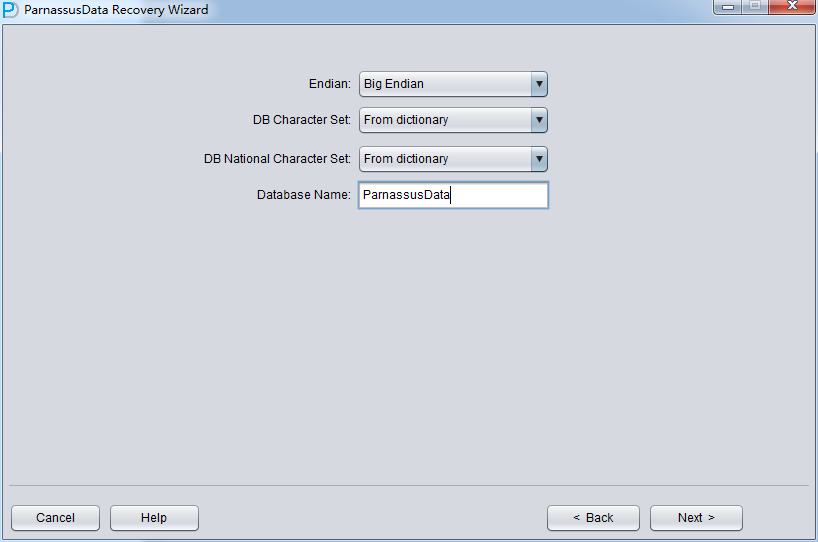
Attention: if your data file was generated on AIX, and you want to copy the datafile to Windows and recover data by PRM, you should select the original Big Endian mode.
Since the data file is on Linux X86, we select Little for Endian, and input the database name.

license key is generated based on DB_NAME found in datafile header)
PRM-DUL-DUL17

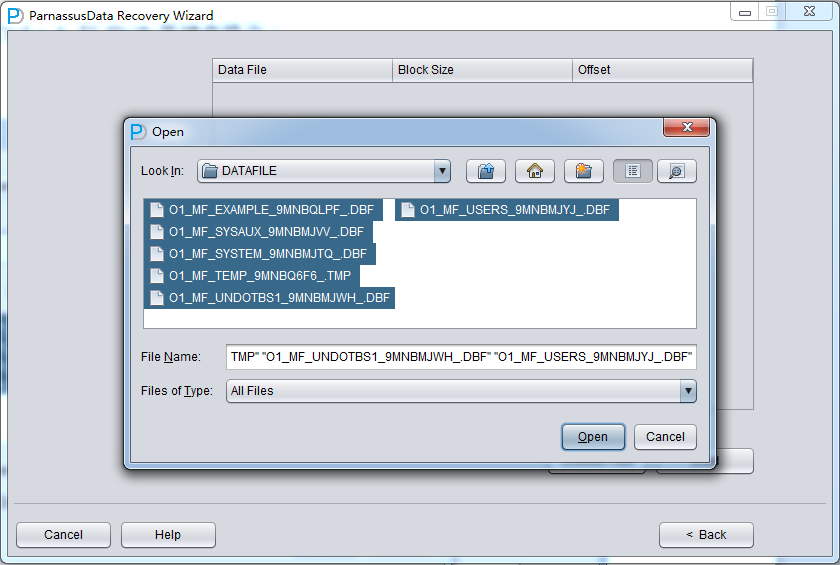
Click “Next” =>Click “Choose Files”


If the database is not too big, you can select all data files together; if the database is very big and DBA knows the data location, you can just select SYSTEM tablespace datafile(necessary) and specified datafile.


Attention: make sure the GUI Supports Ctrl + A & Shift short keys:
 

PRM-DUL-DUL18

PRM-DUL-DUL19


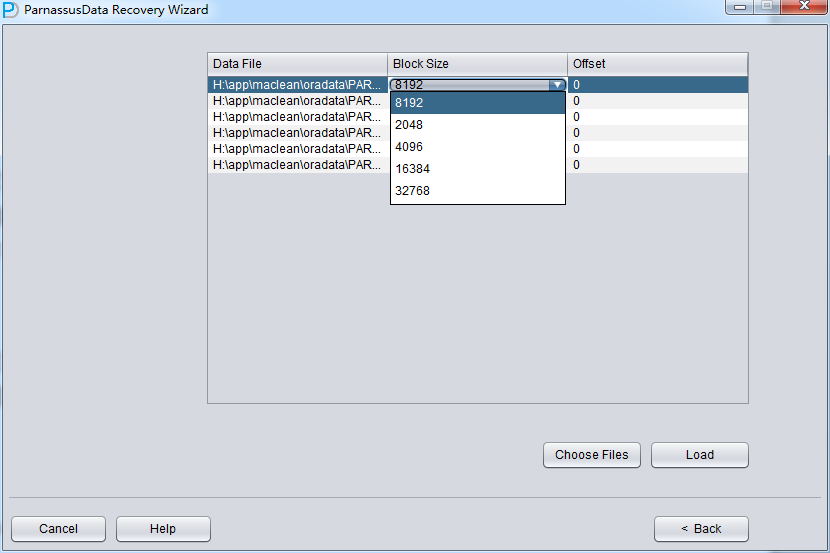
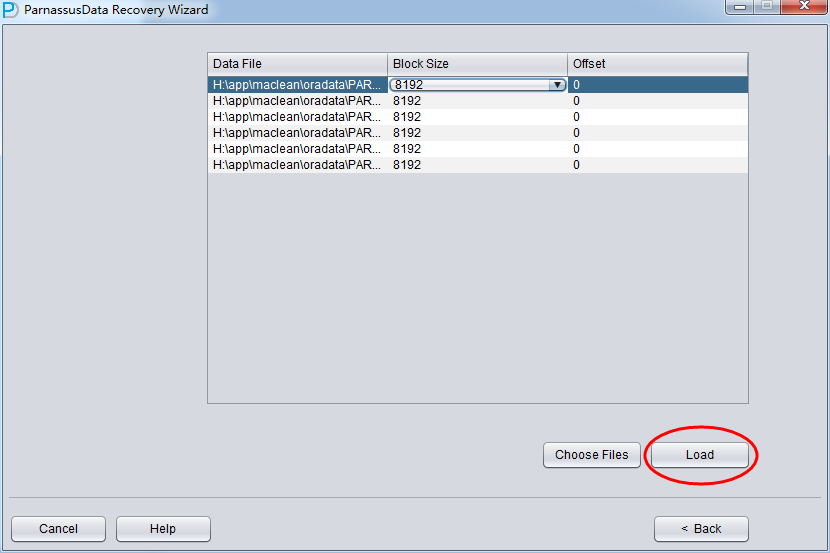
Then specify the Block Size (i.e. Oracle data block size) based on the actual situation. For example, if the default DB_BLOCK_SIZE is 8K, but some tablespace specify 16k as its block size, then users just need to modify the block size for datafile whose block size are not 8k.


OFFSET setting are mainly for raw device storage mode, for example: on AIX, LV based on normal VG as datafile, the offset will be 4k OFFSET.


If you are using raw device but don’t know what the OFFSET is, you can use dbfsize tool under $ORACLE_HOME/bin to check, as shown in the picture below.


$dbfsize /dev/lv_control_01


Database file: /dev/lv_control_01

Database file type: raw device without 4K starting offset Database file size: 334 16384 byte blocks


Since the block size of all data file here is 8K and there is no OFFSET, please click Load:
 

PRM-DUL-DUL20


During Load phase, PRM read Oracle data dictionary directly from system tablespace, and recreate a new data dictionary in embedded database, which enables PRM to process all kinds of data in Oracle DB.
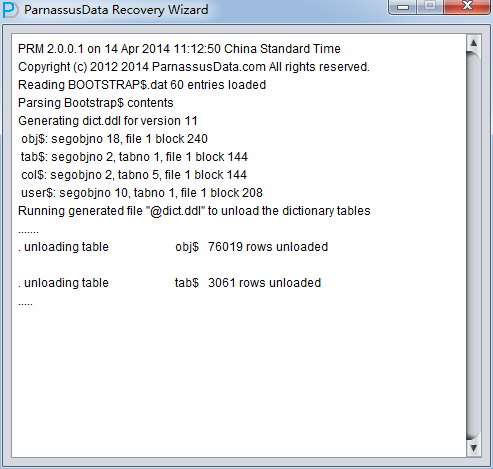
PRM-DUL-DUL21

After loading, information such as the database character set and the national character set will be output in the background:
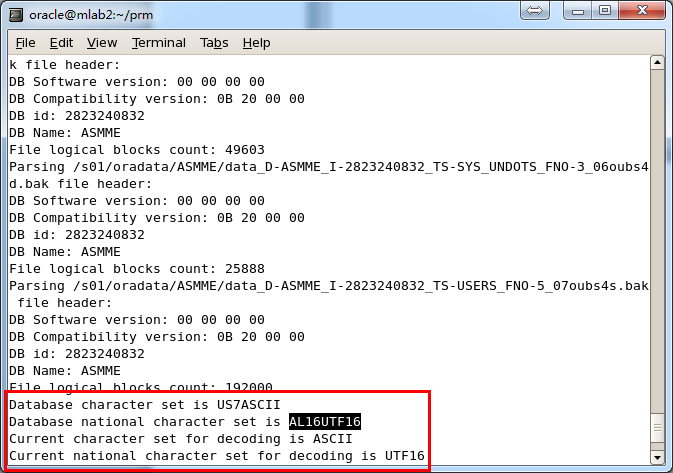
PRM-DUL-DUL22

 
Attention: PRM supports multiple languages and multiple character set of Oracle DB. However,
the prerequisite is the OS have installed specified language packages. For example, if you didn’t install Chinese language package on Windows, and Oracle database character set are independent and support ZHS16GBK, PRM would display Chinese as messy code. Once the Chinese language package is installed on OS, PRM can display multi-byte character set properly.

Similarly, it needs to install font-Chinese language package on Linux.

[oracle@mlab2 log]$ rpm -qa|grep chinese

fonts-chinese-3.02-12.el5

After loading, on the left side of PRM GUI, it will display a tree diagram grouped by database users.

Click Users, you can find more users. For example, if users want to recover a table under PARNASSUSDATA SCHEMA, click PARNASSUSDATA and double click the table name:
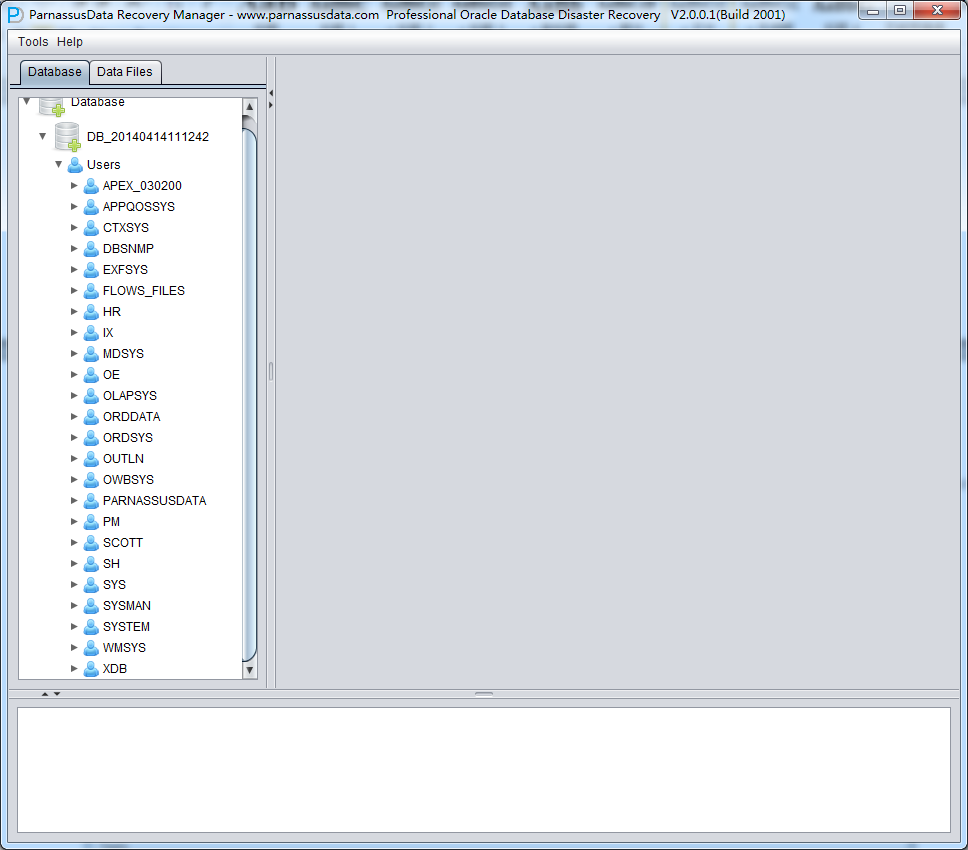
PRM-DUL-DUL23

The TORDERDETAIL_HIS table has been truncated before,   so  it    won’t  show any data.

Now right-click and select Unload truncated data on the table:
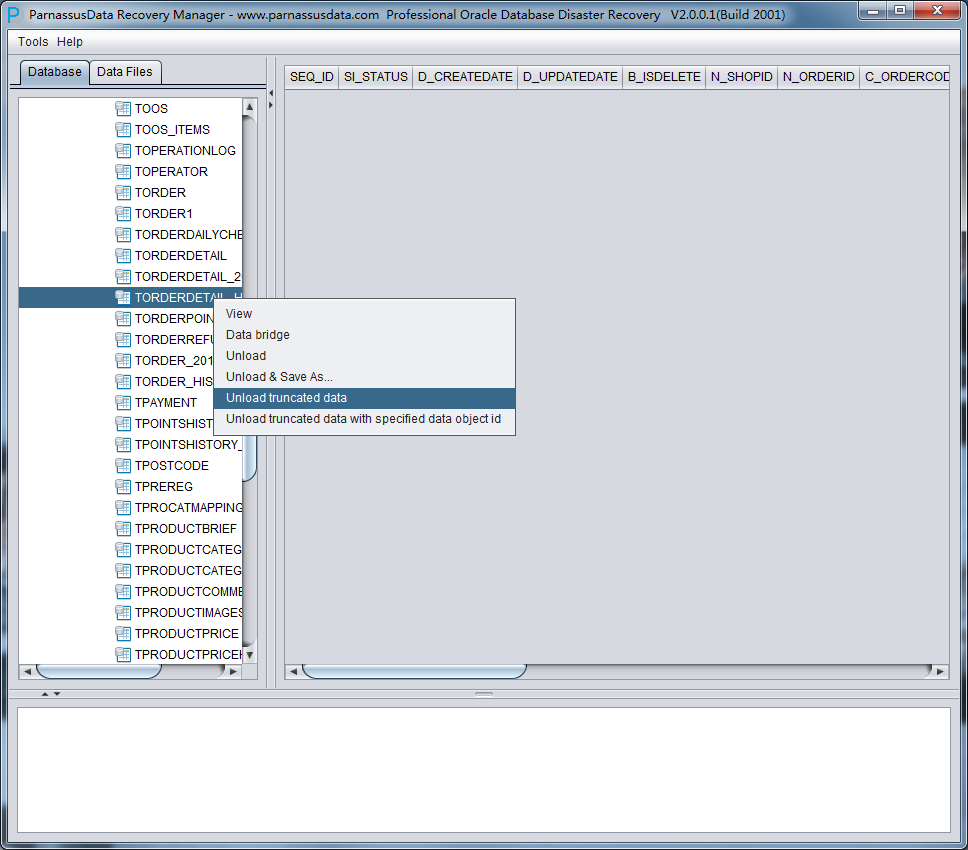
PRM-DUL-DUL24


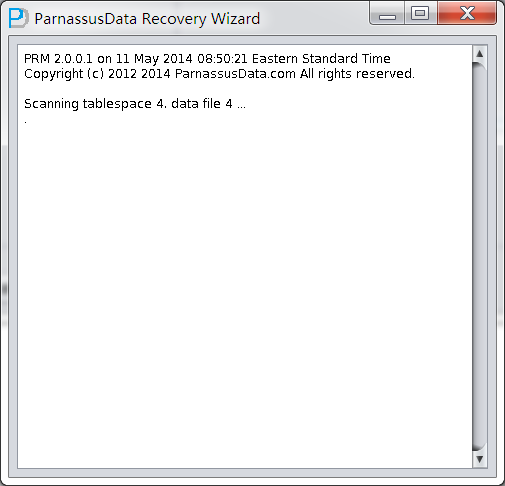
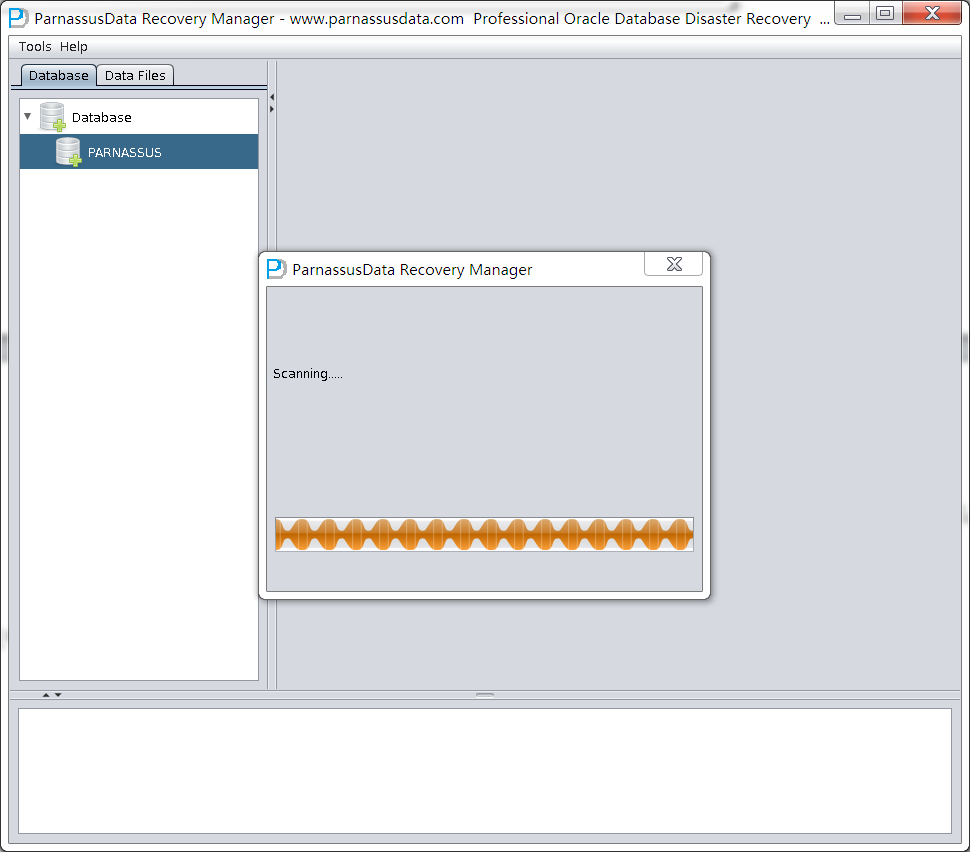
PRM will scan the tablespace and extract data from truncated table.


PRM-DUL-DUL25


PRM-DUL-DUL26

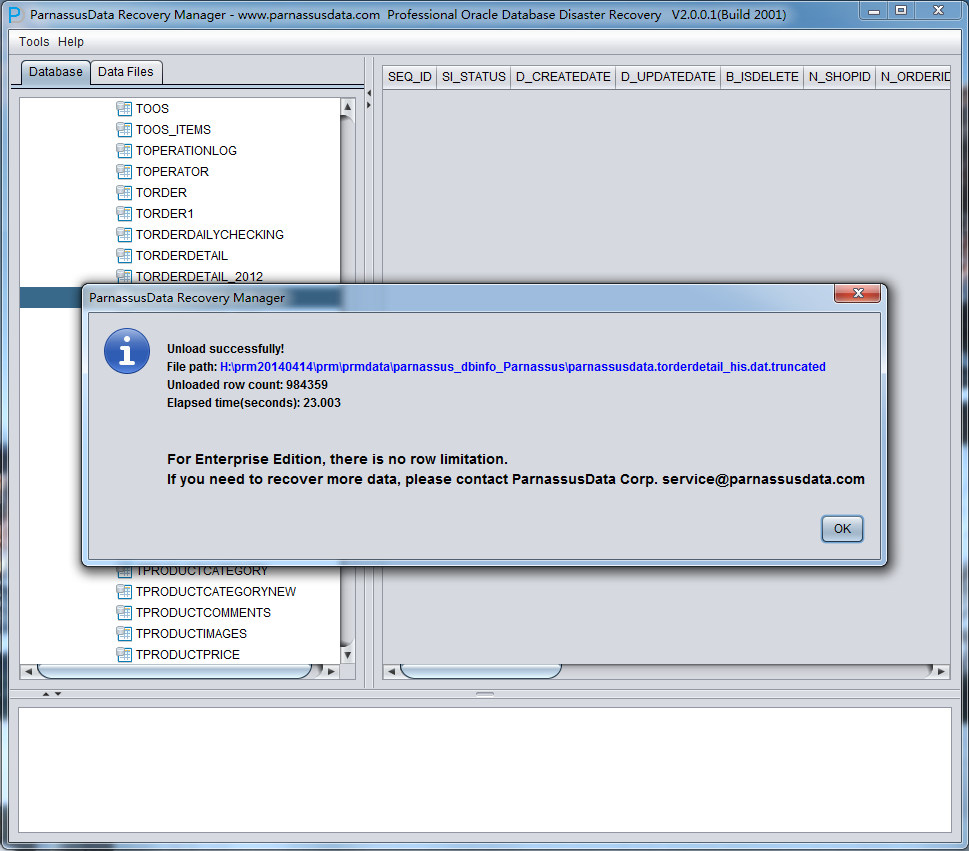
As shown in the above picture, 984359 record have been exported from the truncated TORDERDETAIL_HIS, and stored under the specified path.

In addition, it generated SQLLDR control file for text data importing.


$ cd /home/oracle/PRM-DUL/PRM-DULdata/parnassus_dbinfo_PARNASSUSDATA/$ ls -l ParnassusData*-rw-r–r– 1 oracle oinstall       495 Jan 18 08:31 ParnassusData.torderdetail_his.ctl-rw-r–r– 1 oracle oinstall 191164826 Jan 18 08:32 ParnassusData.torderdetail_his.dat.truncated 

$ cat ParnassusData.torderdetail_his.ctl

LOAD DATA

INFILE  ‘ParnassusData.torderdetail_his.dat.truncated’

APPEND

INTO TABLE ParnassusData.torderdetail_his

FIELDS TERMINATED BY ‘ ‘

OPTIONALLY ENCLOSED BY ‘”‘

TRAILING NULLCOLS (

“SEQ_ID” ,

“SI_STATUS” ,

“D_CREATEDATE” ,

“D_UPDATEDATE” ,

“B_ISDELETE” ,

“N_SHOPID” ,

“N_ORDERID” ,

“C_ORDERCODE” ,

“N_MEMBERID” ,

“N_SKUID” ,

“C_PROMOTION” ,

“N_AMOUNT” ,

“N_UNITPRICE” ,

“N_UNITSELLINGPRICE” ,

“N_QTY” ,

“N_QTYFREE” ,

“N_POINTSGET” ,

“N_OPERATOR” ,

“C_TIMESTAMP” ,

“H_SEQID” ,

“N_RETQTY” ,

“N_QTYPOS”

)


When you import data to original table, ParnassusData strongly recommends you to modify the SQLLDR table name as a temporary table, thus it would not overwrite the original environment.


$ sqlldr control=ParnassusData.torderdetail_his.ctl direct=yUsername:/ as sysdba//user SQLLDR to import data//Minus can be used for data comparing

select * from ParnassusData.torderdetail_his minus select * from parnassus.torderdetail_his;


no rows selected


After comparing the tested truncate case table with original data table, it is found that the records are exactly the same.

It demonstrates that PRM has successfully and completely recovered the record on truncated table.


CASE 2: Recovery of MIS-truncated table by DataBridge

In Case 1, we used traditional unload+sqlldr method for data recovery, but in fact ParnassusData strongly recommend you to use DataBridge Feature for recovery.


Why use DataBridge?


  • Traditional unload+sqlldr method means that a copy of data needs to be saved as flat file on file system first, the data has to be loaded into Unicode text file and then inserted into destination database by sqlldr, which will take double storage space and double
  • DataBridge can extract data from source DB and export to destination DB without any
  • The data sent to destination DB by databridge is structured, users can immediately use SQL statement to verify its integrity and consistency.
  • If the source and destination database locate on different servers, the read/write IO will be balanced on two servers, and MTTR will be
  • If DataBridge is used in truncated table recovery, it is very convenient for the truncated data to be exported back to problem database


DataBridge is very easy and convenient to use. Right click the table on the left side, and select DataBridge:
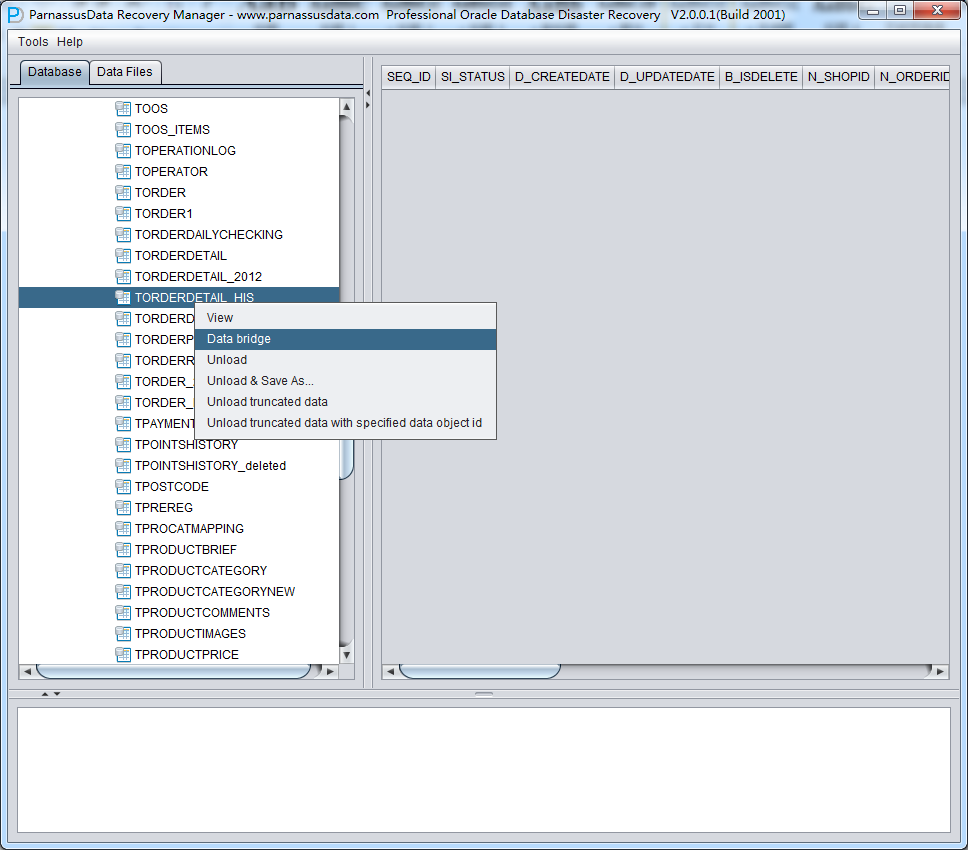
 

PRM-DUL-DUL27

For the first time to use DataBridge, DB connection information is necessary, which is similar with SQL Developer connection, including DB host, Port, Service_Name and user login information.

Attention: DataBridge will save data to the specified schema given in the DB connection.
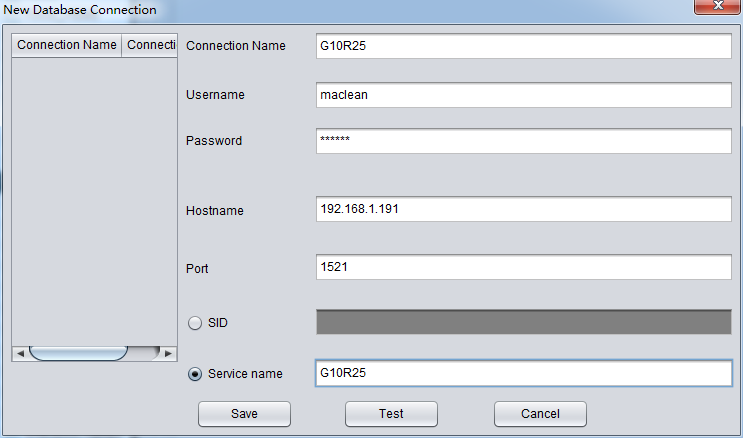
 

PRM-DUL-DUL28

For example, the above G10R25 connection, the user is maclean, and the corresponding Oracle Easy Connection is

192.168.1.191:1521/G10R25.


After inputting the account/connection information, you can use the Test button for connection testing. If the message “Connect to DB server successfully “is returned, the connection is done and click to save.
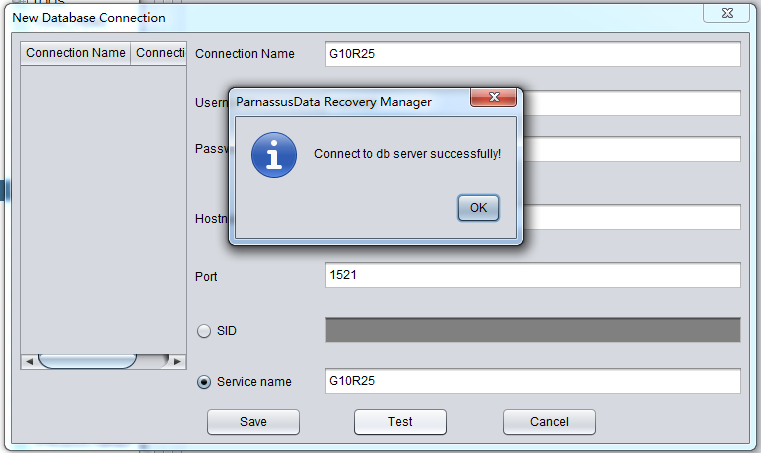
 

PRM-DUL-DUL29

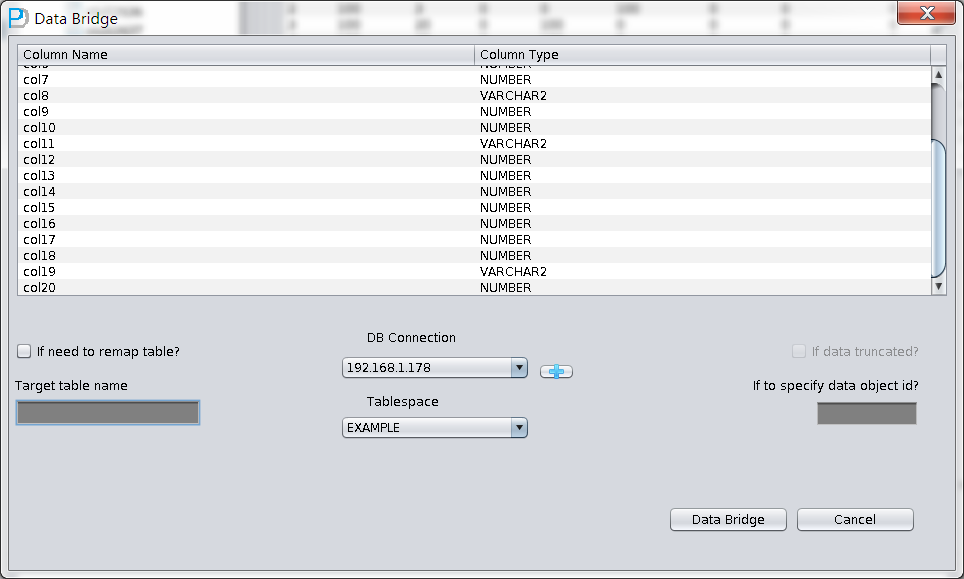
After saving connection, and then enter the DataBridge main interface, first select the just added Connection G10R25 under the drop-down list of DB Connection:
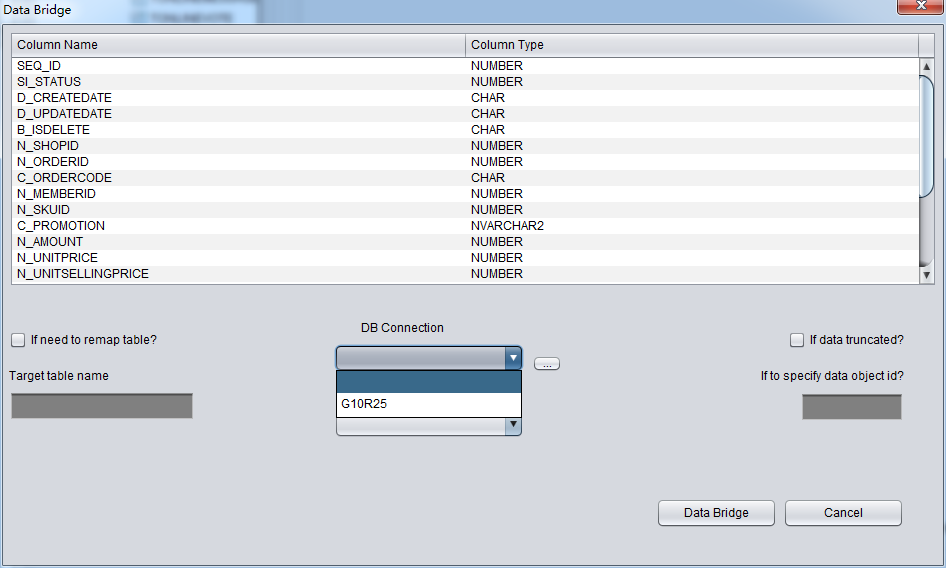
PRM-DUL-DUL30

If your DB connection is not in the drop down list, please click DB connection Button, which is highlighted in red.
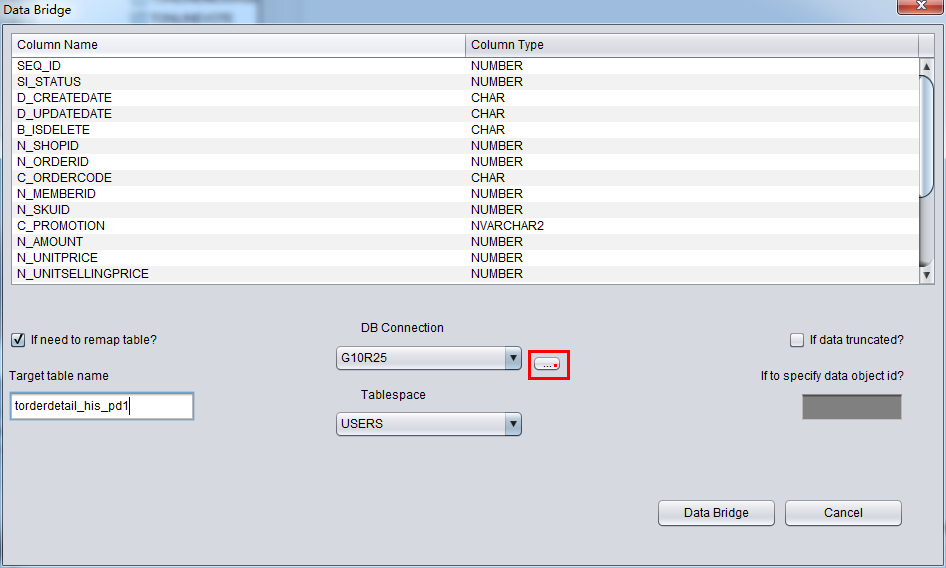
PRM-DUL-DUL31


After selecting DB Connection, the Tablespace dropdown list will be selectable:
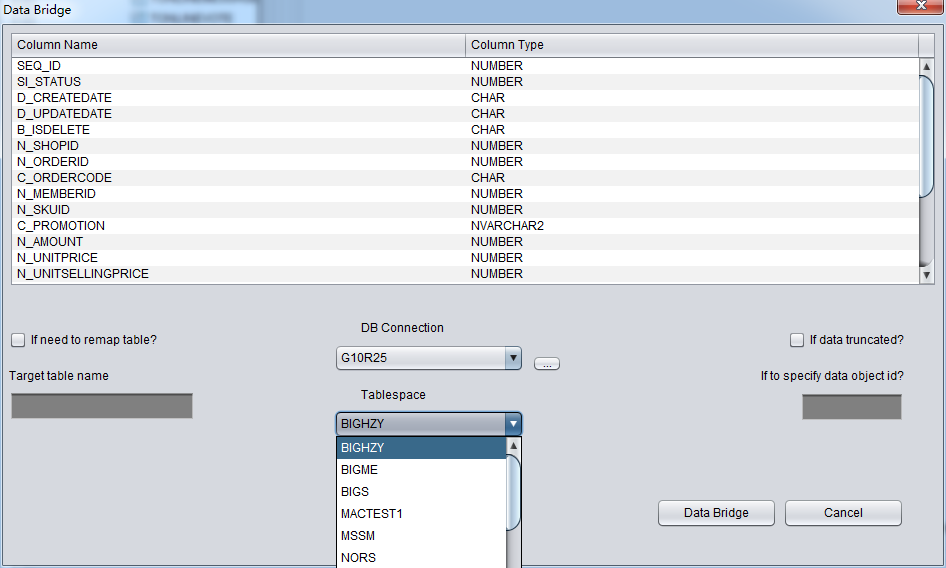
PRM-DUL-DUL32


Notes on recovering truncated/dropped table by DataBridge: when recovering truncated/dropped data and inserting back to source DB, users should choose another tablespace which differs from the original tablespace. If exporting data into the same tablespace, oracle will reuse the space which stores truncated/dropped table, and make data overwritten, thus we may lose the last resort to recover the data.

For example, we truncated a table and now use DataBridge to recover the data back to source database, but we do not want to use the original table name, for example, the original table name is torderdetail_his. Then the user can select “if need to remap table” and fill in the appropriate target table name as below:
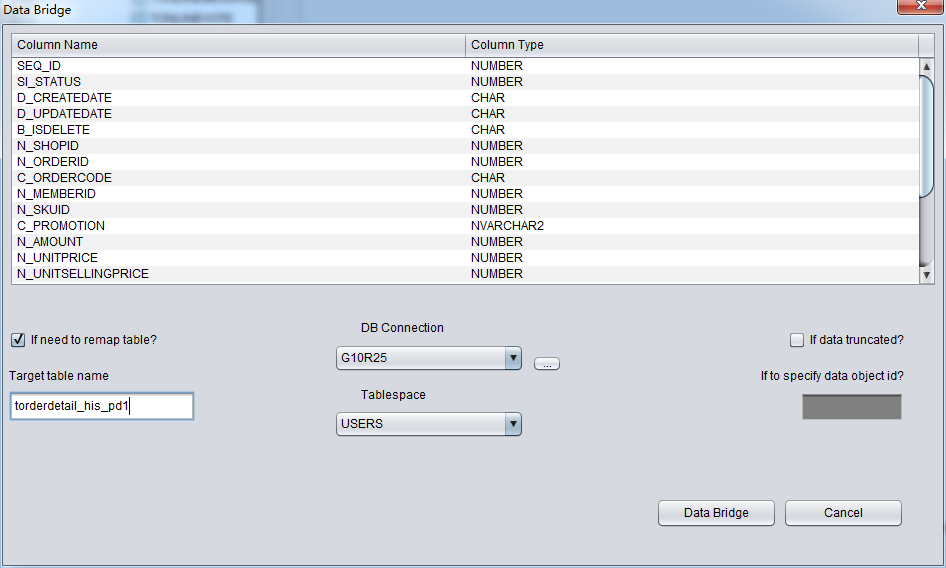
 

PRM-DUL-DUL33


Attention: 1) For destination DB which had the corresponding table name, PRM would not recreate a table but append all recovered data. 2) For destination DB which did not have corresponding table name, PRM would try to create table on specified tablespace and insert recovered data.


In this case, we need to recover truncated data, so please select “if data truncated”, Or, PRM will execute regular data extraction, which cannot extract the truncated data.


The mechanism of truncating data is: Oracle will only update table DATA_OBJECT_ID in data dictionary and segment header. And the real data will not be overwritten. Due to the difference between dictionary and DATA_OBJECT_ID, Oracle server process will not read data that was truncated but not yet overwritten while scanning table.


PRM will try to scan 10M-bytes blocks behind the table’s segment header, if some blocks with smaller DATA_OBJECT_ID than the object’s current DATA_OBJECT_ID were found, then PRM thinks it finds something useful.


There is a blank input field called “if to specify data object id”, which enables the user to input Data Object ID to be recovered. Generally, you don’t need to input any value, unless the recovery does not work. We suggest users contact ParnassusData for help.


Click the DataBridge button, then it will start extracting if the configuration is done.
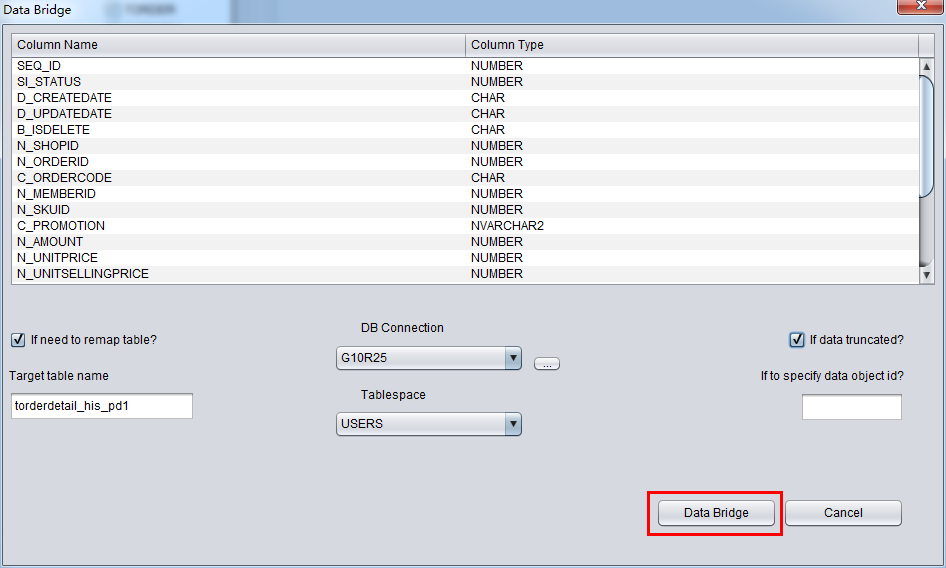
 

PRM-DUL-DUL34

DataBridge will display the successfully rescued rows and elapsed time.
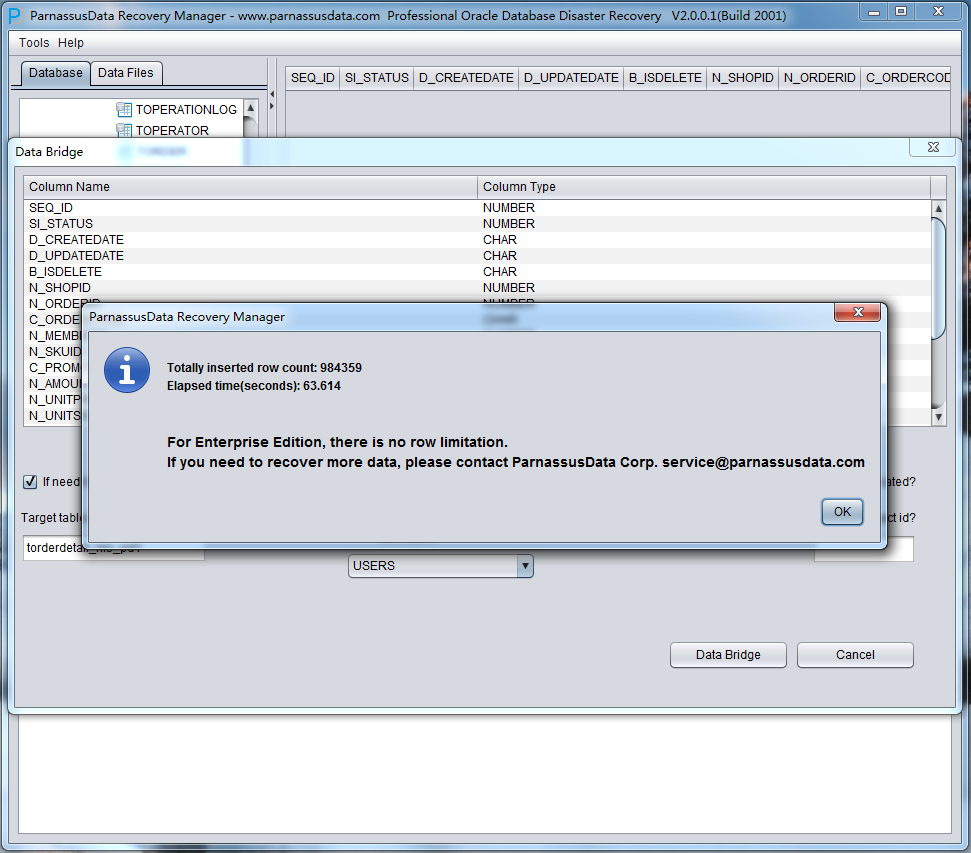
PRM-DUL-DUL35


Case 3: DB cannot be opened caused by corrupted Oracle Data Dictionary


DBA of Company D deleted SYS.TS$ (A bootstrap Table) by mistake, which causes Oracle DB cannot be opened.

Oracle Database 11g Enterprise Edition Release 11.2.0.3.0 – 64bit ProductionWith the Partitioning, Automatic Storage Management, OLAP, Data Miningand Real Application Testing optionsINSTANCE_NAME

—————-

ASMME


SQL>

SQL>

SQL> select count(*) from sys.ts$;


COUNT(*)

———-

5


SQL> delete ts$;


5 rows deleted.


SQL> commit;


Commit complete.


SQL> shutdown immediate;

Database closed.

Database dismounted.

ORACLE instance shut down.


Database mounted.

ORA-01092: ORACLE instance terminated. Disconnection forced

ORA-01405: fetched column value is NULL

Process ID: 5270

Session ID: 10 Serial number: 3


Undo initialization errored: err:1405 serial:0 start:3126020954 end:3126020954 diff:0 (0 seconds)

Errors in file /s01/diag/rdbms/asmme/ASMME/trace/ASMME_ora_5270.trc:

ORA-01405: fetched column value is NULL

Errors in file /s01/diag/rdbms/asmme/ASMME/trace/ASMME_ora_5270.trc:

ORA-01405: fetched column value is NULL

Error 1405 happened during db open, shutting down database

USER (ospid: 5270): terminating the instance due to error 1405

Instance terminated by USER, pid = 5270

ORA-1092 signalled during: ALTER DATABASE OPEN…

opiodr aborting process unknown ospid (5270) as a result of ORA-1092


In this case, data dictionary had been damaged, so it would be very hard to open the database normally.


Then, we can use PRM to rescue data in DB. Follow the steps as below:


  1. Recovery Wizard
  2. Select Data Dictionary Mode
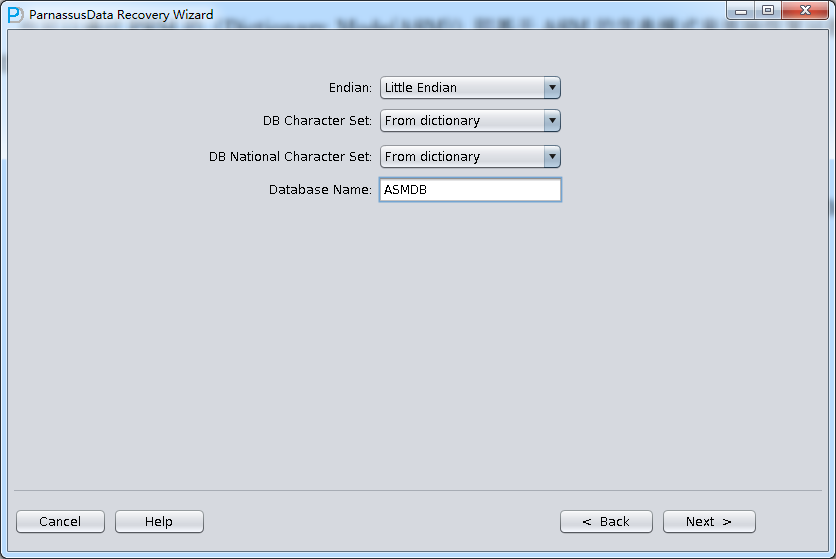
  3. Choose Big or Little Endian , and input DB NAME
  4. Click Load for database loading
  5. Restore the data in the table according to actual demand
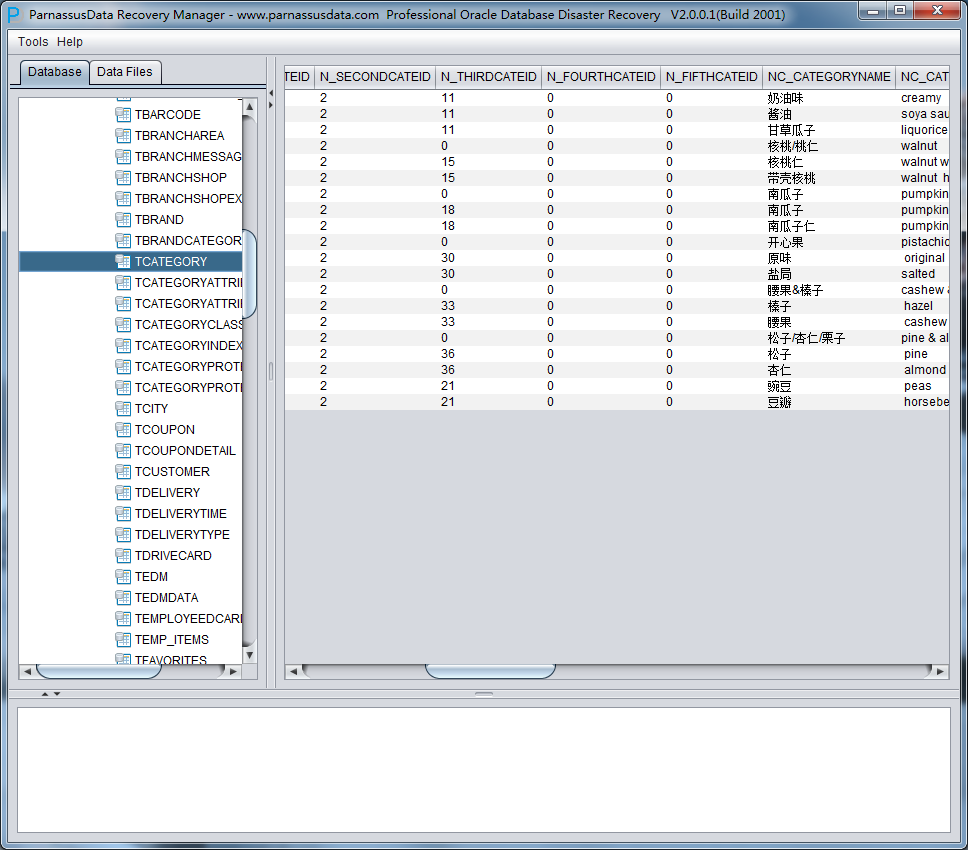
 

PRM-DUL-DUL36


Case 4: Mistakenly deleted or lost SYSTEM tablespace


A System Administrator of company D deleted SYSTEM tablespace by mistake, which caused DB unable to be opened. Unfortunately, there is no RMAN backup available. Therefore, company D try to use PRM to recover all data.


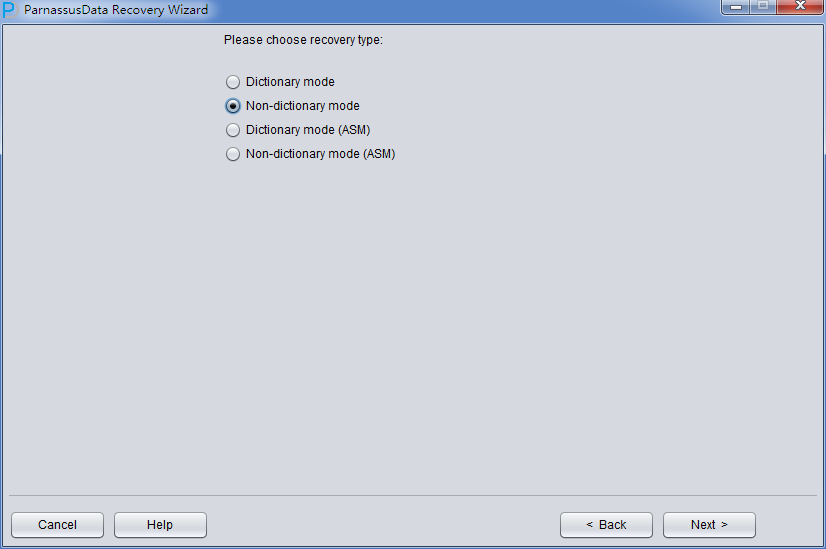
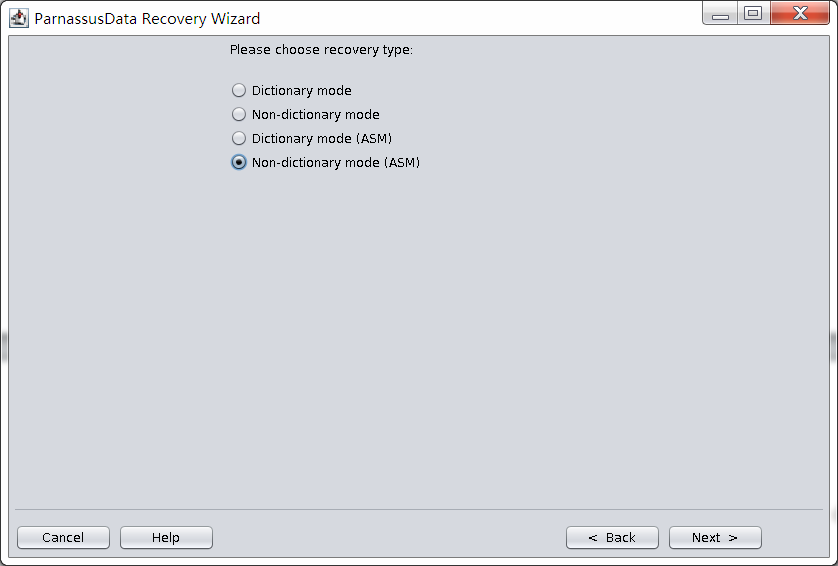
In this case, run PRM, enter Recovery Wizard, and select “Non-Dictionary mode”:
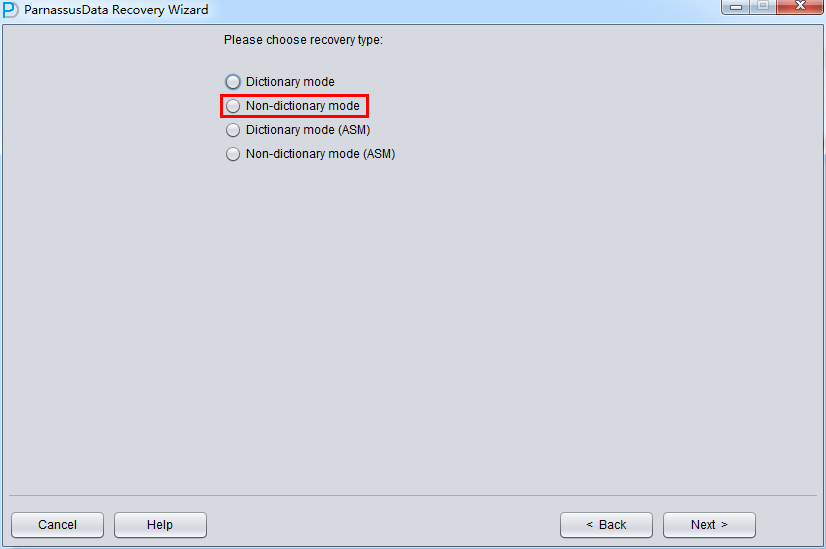
 

PRM-DUL-DUL37

PRM-DUL-DUL38

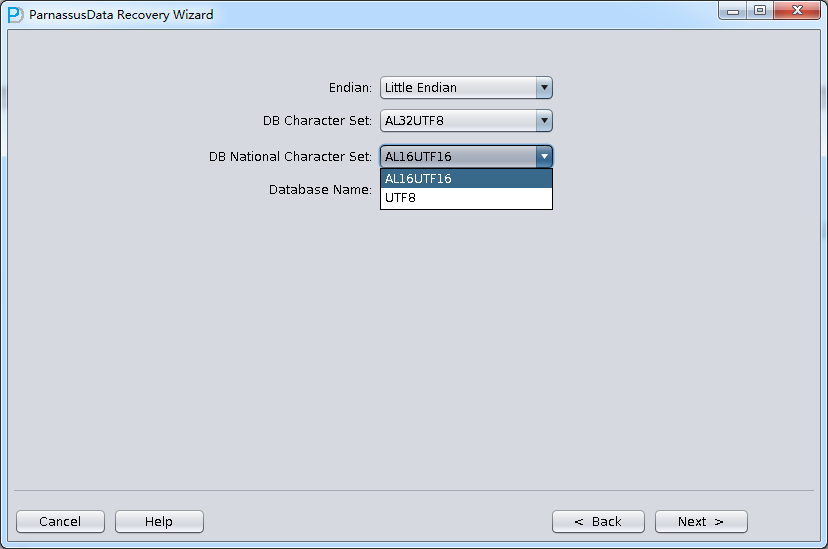
In Non-dictionary mode, we have to select User Specified Character Set and National Character


Set. This is because the character set information of database cannot be obtained due to the lost system tablespace.


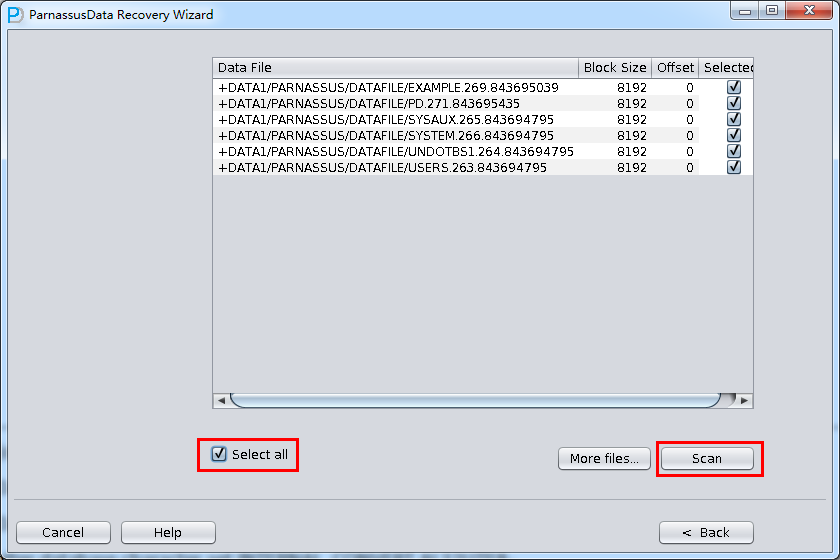
Similar to case 1, select all data (excluding temp file) and set correct Block Size and OFFSET.
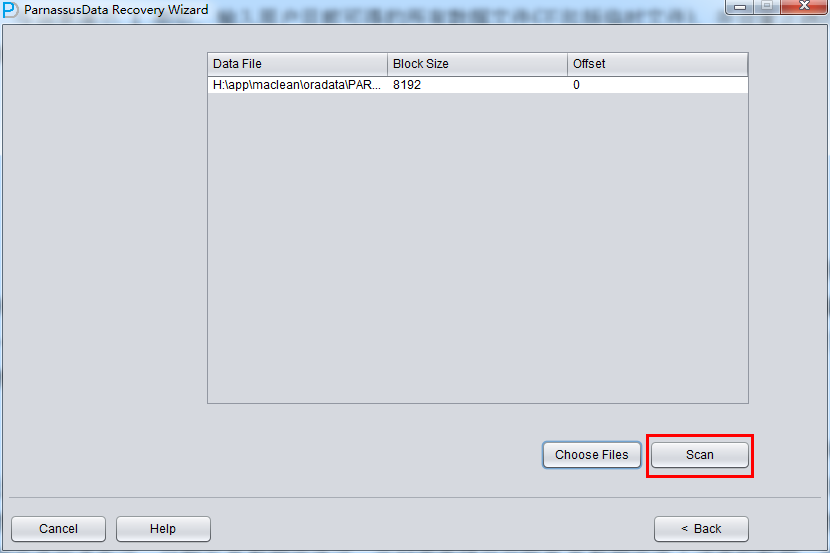
PRM-DUL-DUL39

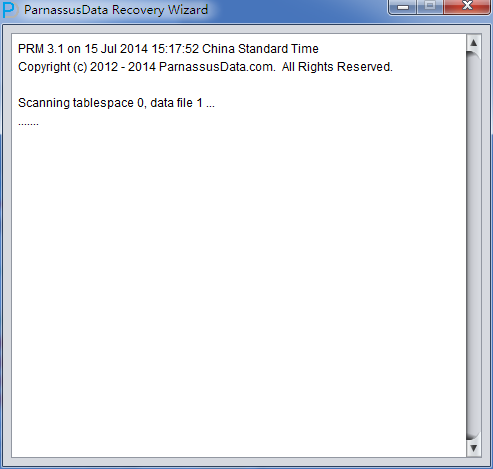
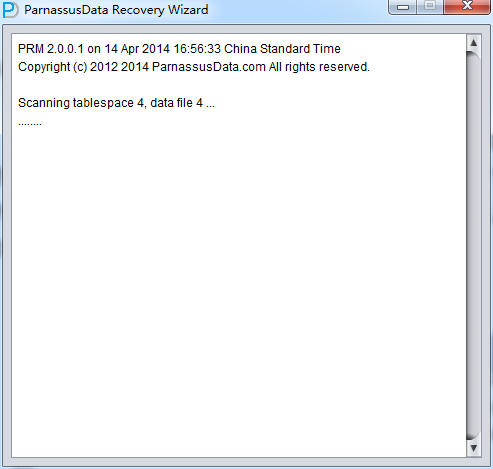
Then click the scan button. PRM will scan all segment header and extents in datafile, and record it into SEG$.DAT and EXT$.DAT. In Oracle, each partition table or non-partition table has a segment header. Once we find segment header, we could find the whole table extent map information. Through extent map, we can get all record on the table.


There is one exception, for example, there is one non-partition table that is stored in two database files. The segment header and half of data are stored in datafile A, and the others are stored in datafile B. But for some reasons, both system tablespace and datafile A are lost, PRM can’t find segment header associated with problem table. Instead, it can scan datafile B to get the rest extent map.

In order to recover data via segment header and extent map in no-dictionary mode.

PRM will create two files: SEG$.DAT (stores segment header info) and EXT$.DAT (stores extent info), and record them in PRM embedded database.
 

PRM-DUL-DUL41

PRM-DUL-DUL40

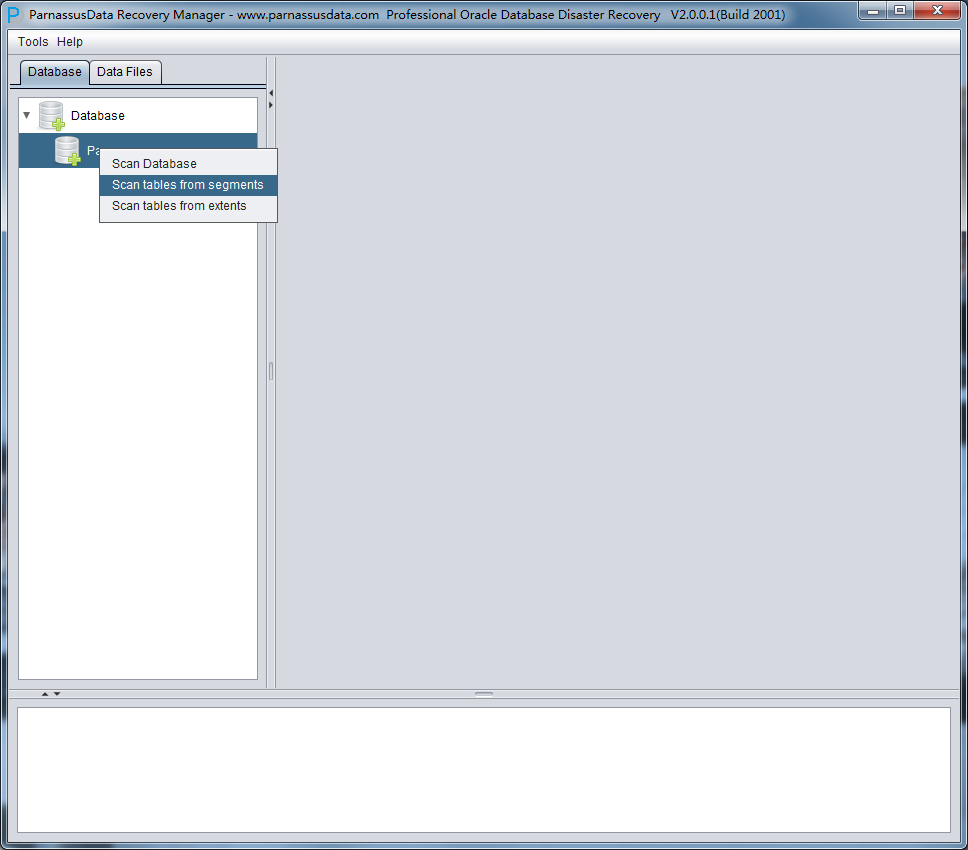
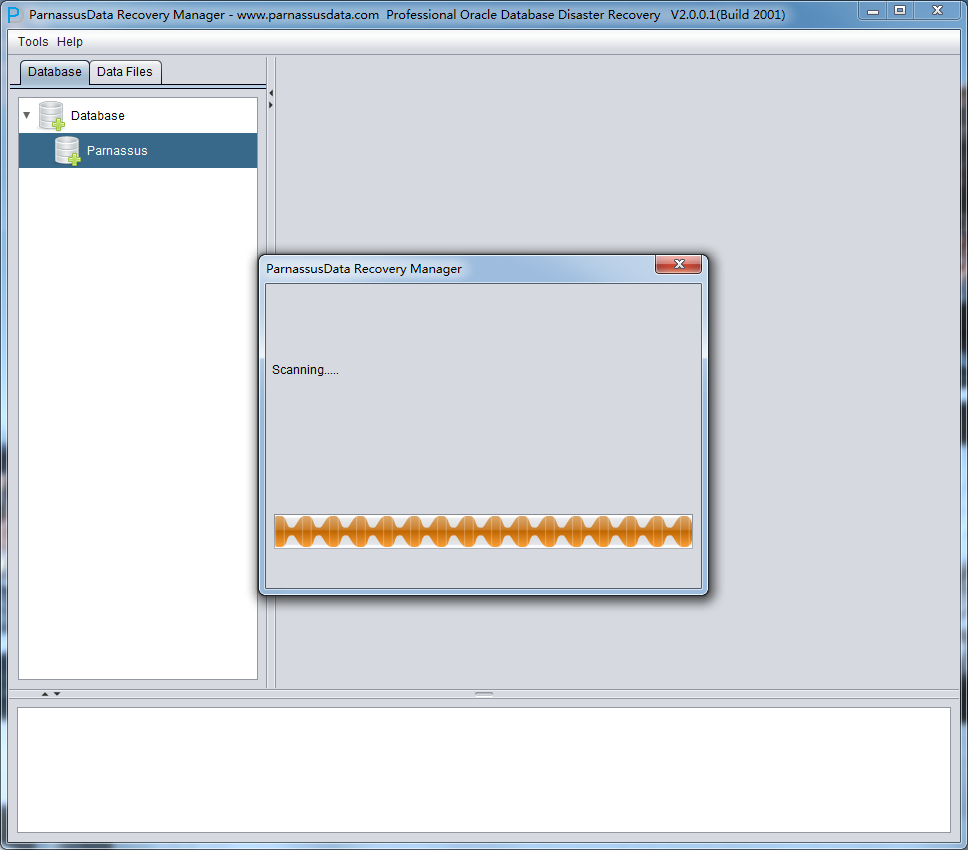
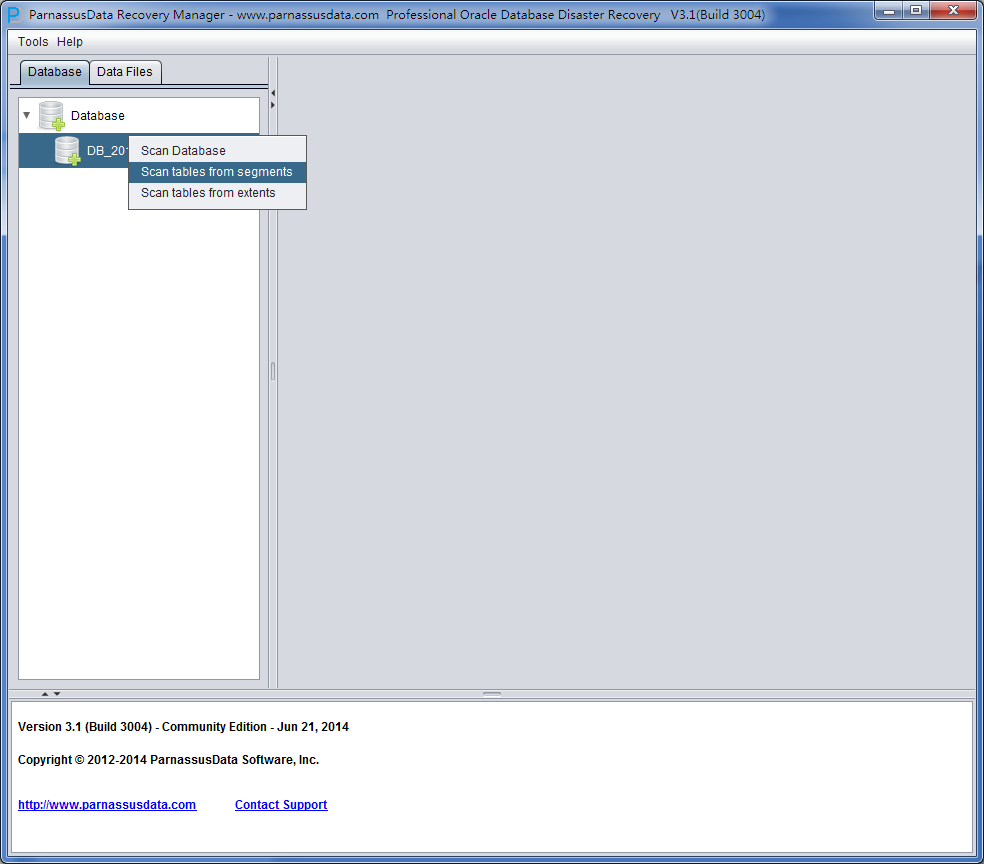
After scaning, there appears the database icon on the left. Now, there are 2 options:

1、 Scan Tables From Segments:

  • System tablespace is lost, but all application data tablespace exists

2、 Scan Tables From Extents

  • Doesn’t apply to data recovery of truncated data in Dictionary Mode.
  • Both system tablespace and datafile of segment header are lost.


It is not necessary to first use “Scan Tables From Extents” mode, unless you can’t find the needed data by “Scan Tables From Segment “mode.


Scan tables from segments should be your first choice.


PRM-DUL-DUL42


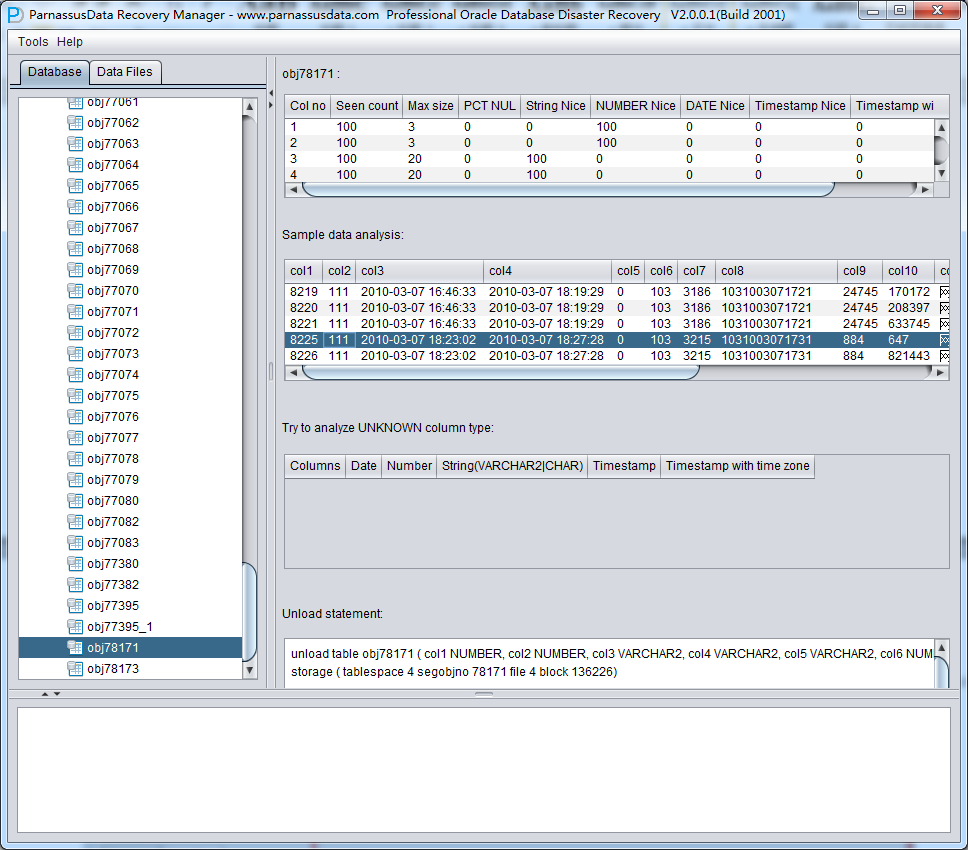
After scanning tables from segments, click the tree diagram on the left.
 
PRM-DUL-DUL43

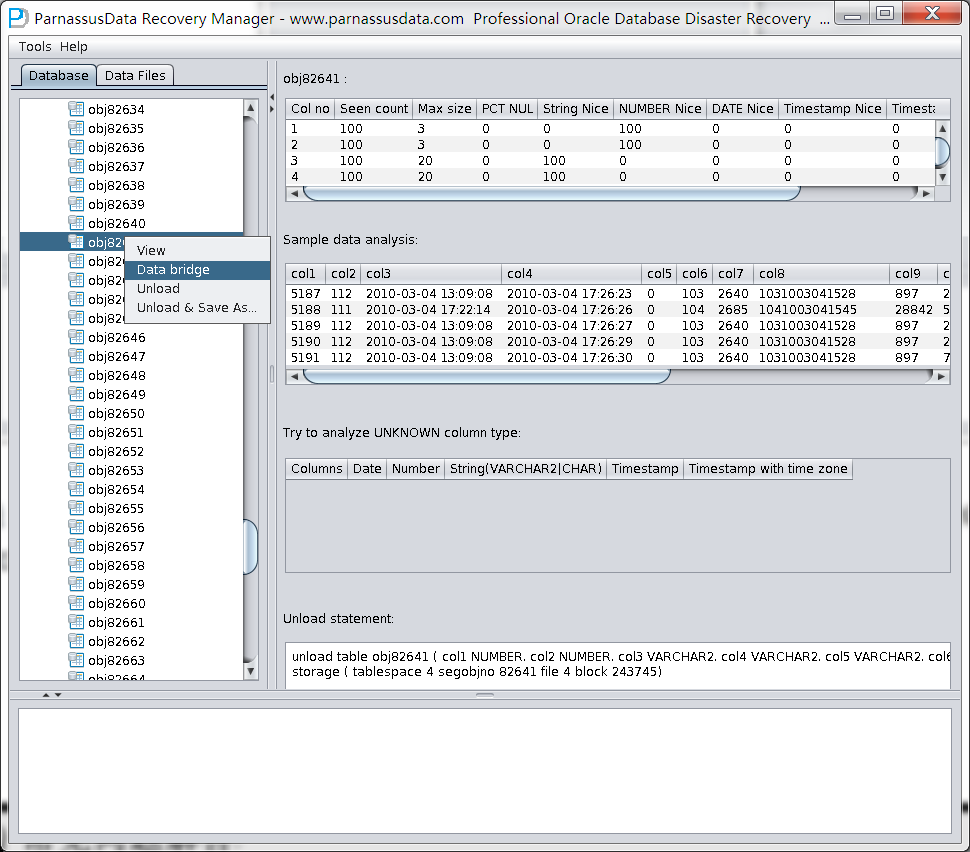
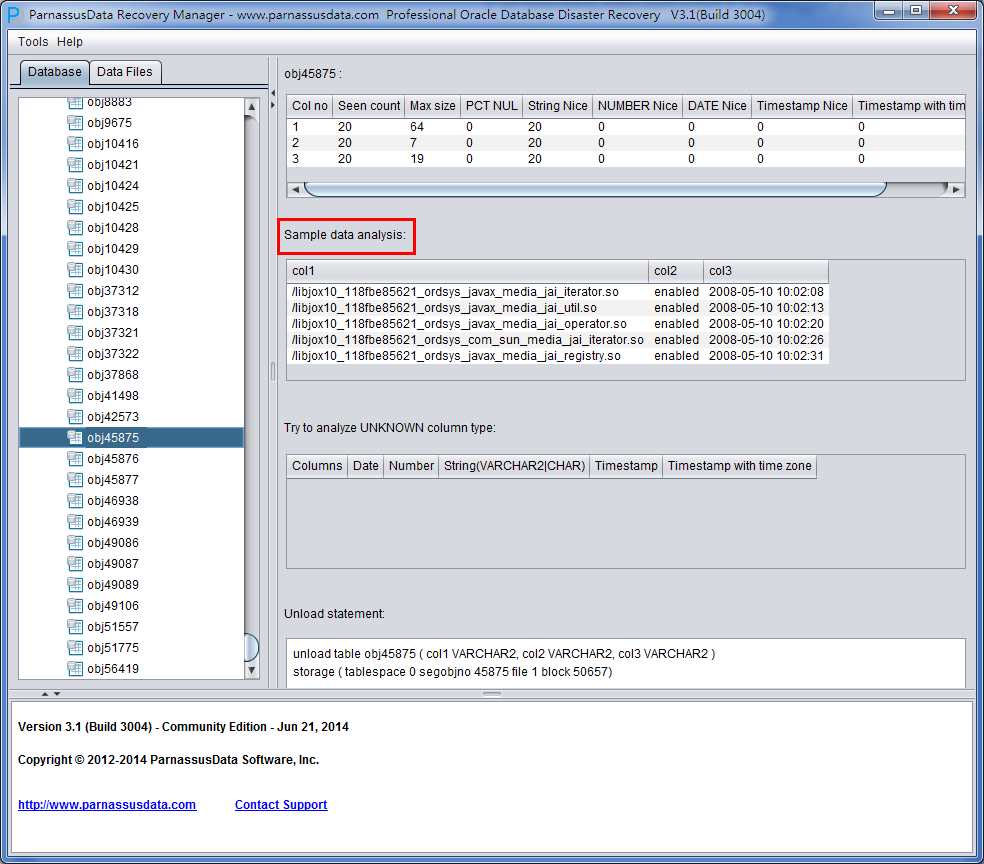
Scan Tables is for constructing the data based on segment header in SEG$. Each node in the diagram represent a data segment, which is named by DATA OBJECT ID recorded in obj+ segment.

Click on a node and observe the right side of main interface:


PRM-DUL-DUL44


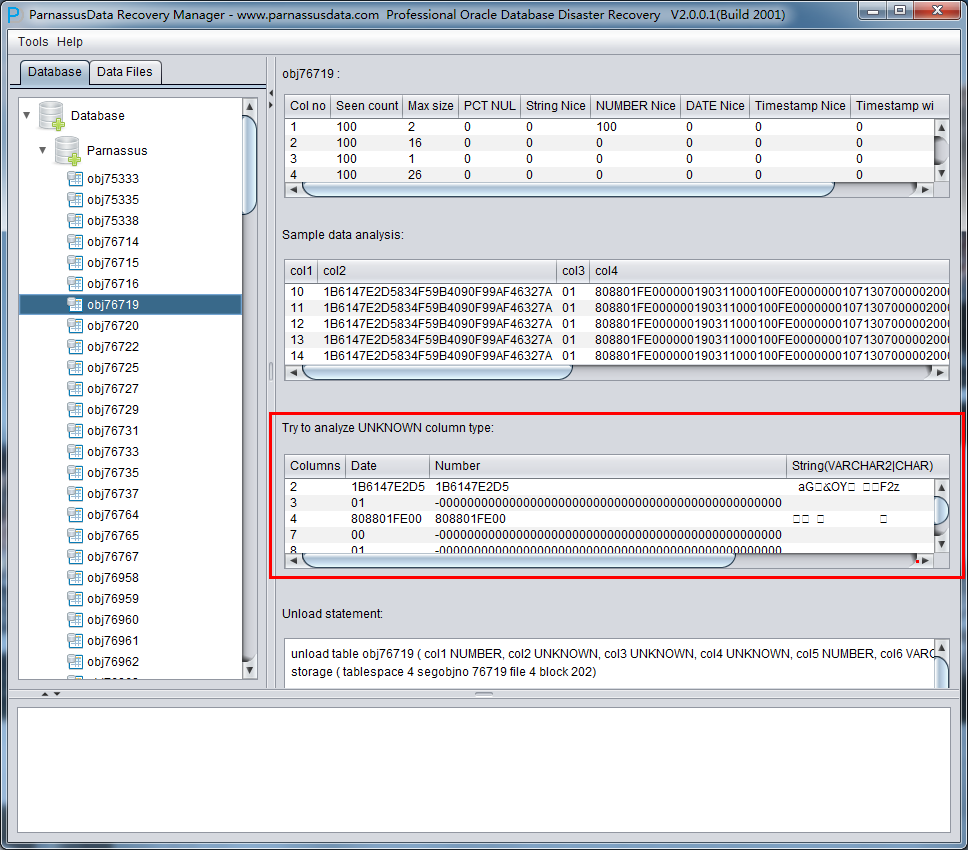
Intelligent field type analysis


Because of SYSTEM tablespace lost, there is not data structure information available in NO-Dictionary mode. The structure information includes field name and field type of the table. All these are stored in dictionary instead of table. Therefore, PRM needs to guess every field type.

PRM uses the advanced JAVA pre-analysis algorithm, and can parse up to 10 kinds of main data types.、


Intelligent analysis can successfully guess more than 90% of columns in most of cases.


The meaning of each field on the right side:


  • Col1 no
  • Seen Count


  • MAX SIZE
  • PCT NULL
  • String Nice
  • Number Nice
  • Date Nice
  • Timestamp Nice
  • Timestamp with timezone Nice


Sample Data Analysis:

PRM-DUL-DUL45


Intelligence Analysis will analyze 10 records and display the results. These results will help client to know the column information.


If the records on data segments are less than 10, it will displays all the records.

TRY TO ANALYZE UNKNOWN column type:
PRM-DUL-DUL46

If PRM cannot recognize the column’s data type, you can specify the data type by yourself.


So far, PRM does not support below types: XDB.XDB$RAW_LIST_T、XMLTYPE、User-defined type


Unload Statement:

Here are the UNLOAD statements PRM generated, and these statements can be only used by PRM development team and supporting engineers of ParnassusData.

PRM-DUL-DUL47

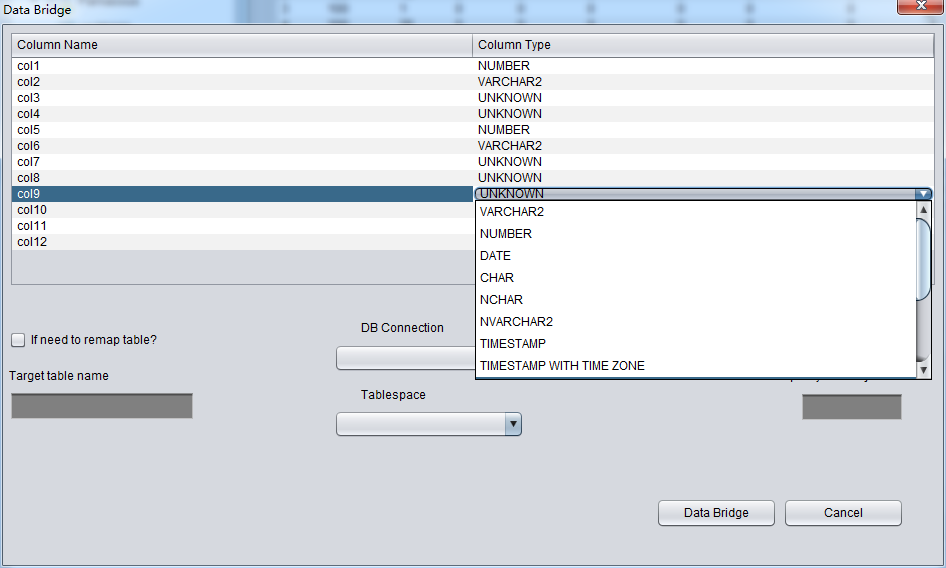
In “Non-Dictionary Mode”, the normal mode and Data Bridge are also applicable. Compared with” Dictionary Mode”, the user can perform the field type by themselves when using data bridge in Non-Dictionary Mode.  As below picture, the field type is UNKNOW. The field types might be types that PRM doesn’t supported yet, for instance:  XML.


If the user knows the data type in this table (from schema design documents), it is necessary to specify the correct column types manually.
PRM-DUL-DUL48


CASE 5: Deleted System Tablespace and Part of User tablespace datafile by mistake


The SA of Company D deleted the system tablespace and part of user tablespace datafile by mistake.

In this case, part of tablespace datafile were deleted, and they might include datafile which stored segment header. Therefore it is better to use “Scan Tables From Extents” than” Scan Tables From Segment Header”.


The brief steps are as follows:


  1. Enter Recovery Wizard, select No-Dictionary mode, and added all usable data file. Then perform scan
  2. Select database, and right click on Scan Tables From Extents
  3. Analyze the data and implement data extraction and Data Bright
  4. Following steps are the same with Case 4


CASE 6: Copy DB datafile from damaged ASM diskgroup

The Company D begins to uses ASM instead of other file system. Since there are many bugs in the version 11.2.0.1that it uses, causing that ASM DISKGROUP cannot be mounted and still does not work after repairing ASM Disk Header.

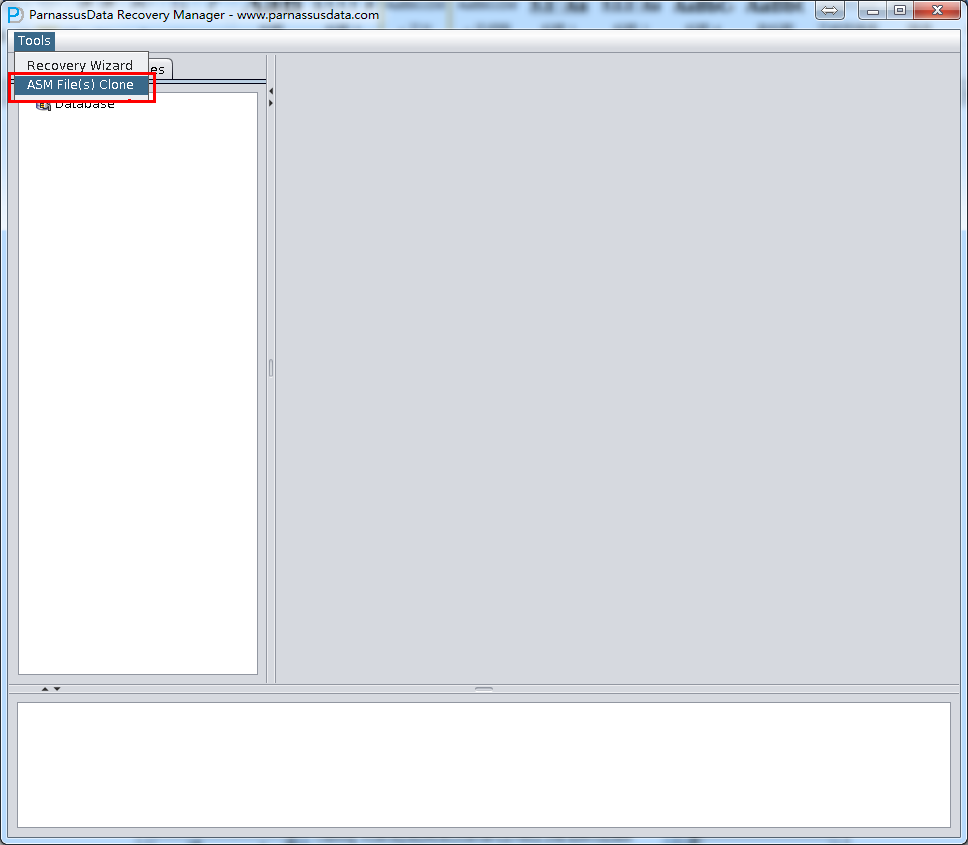
In this case, user can use the ASM Files Clone feature of PRM to rescue datafile from damaged ASM DiskGroup directly.


  1. Open main interface, and select ASM File(s) Clone under Tools:
PRM-DUL-DUL49


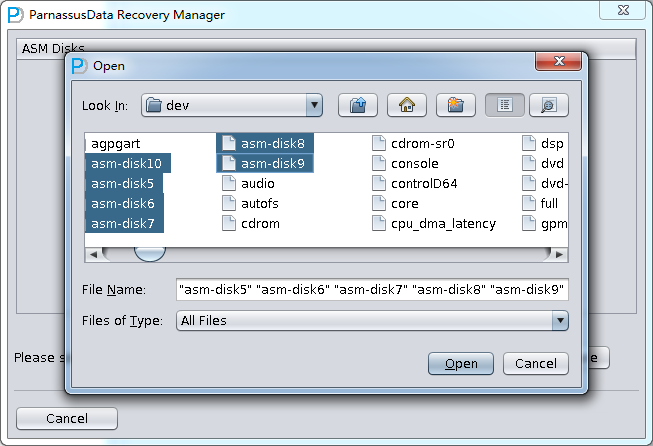
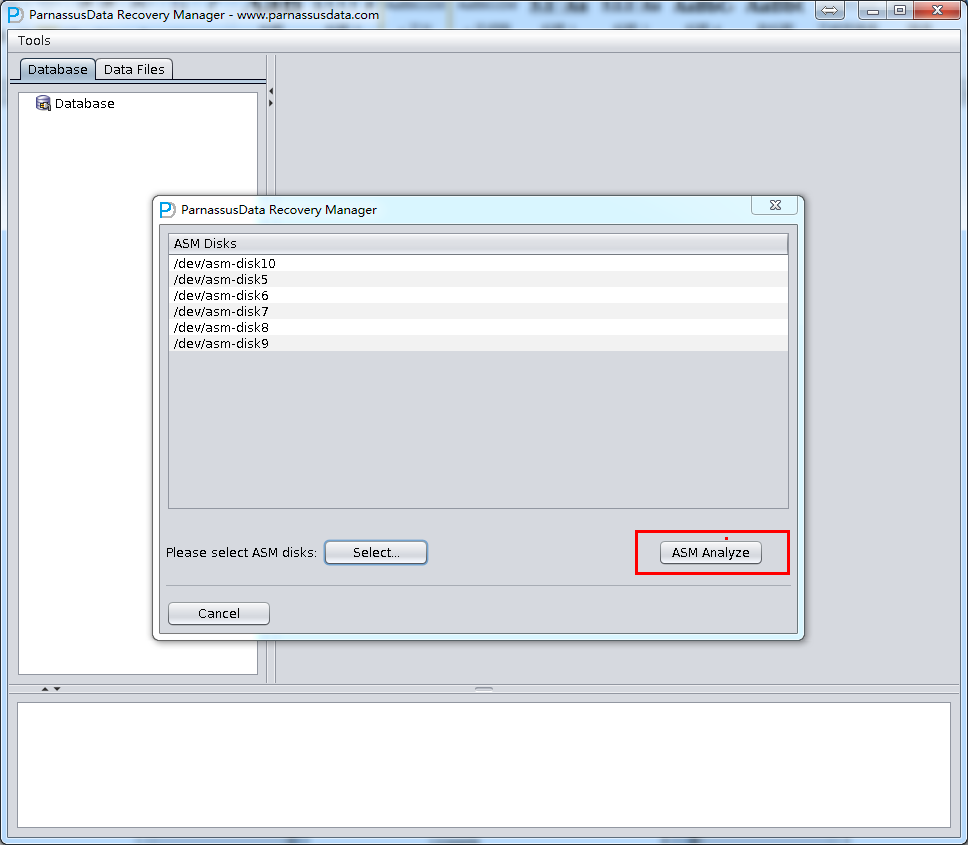
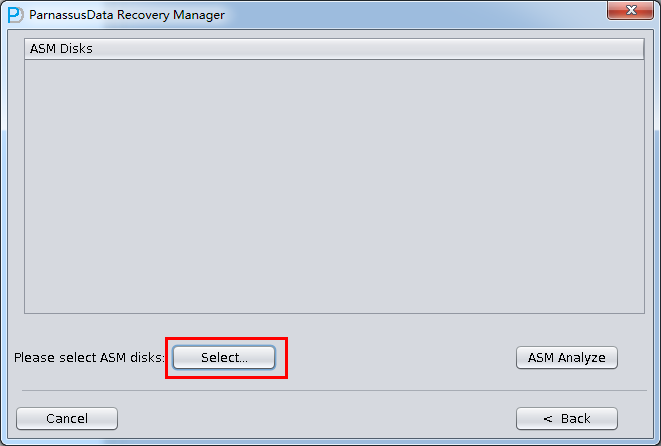
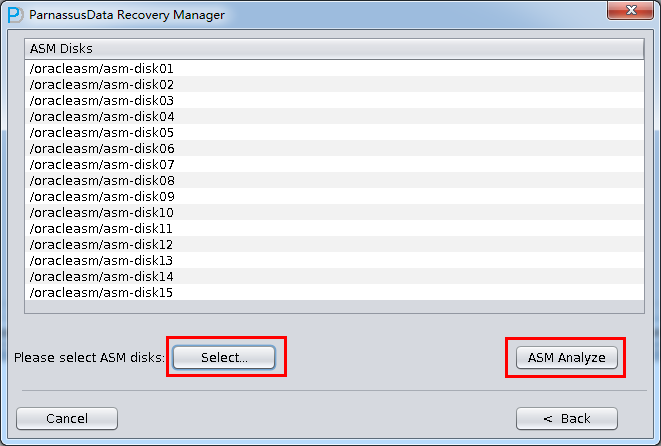
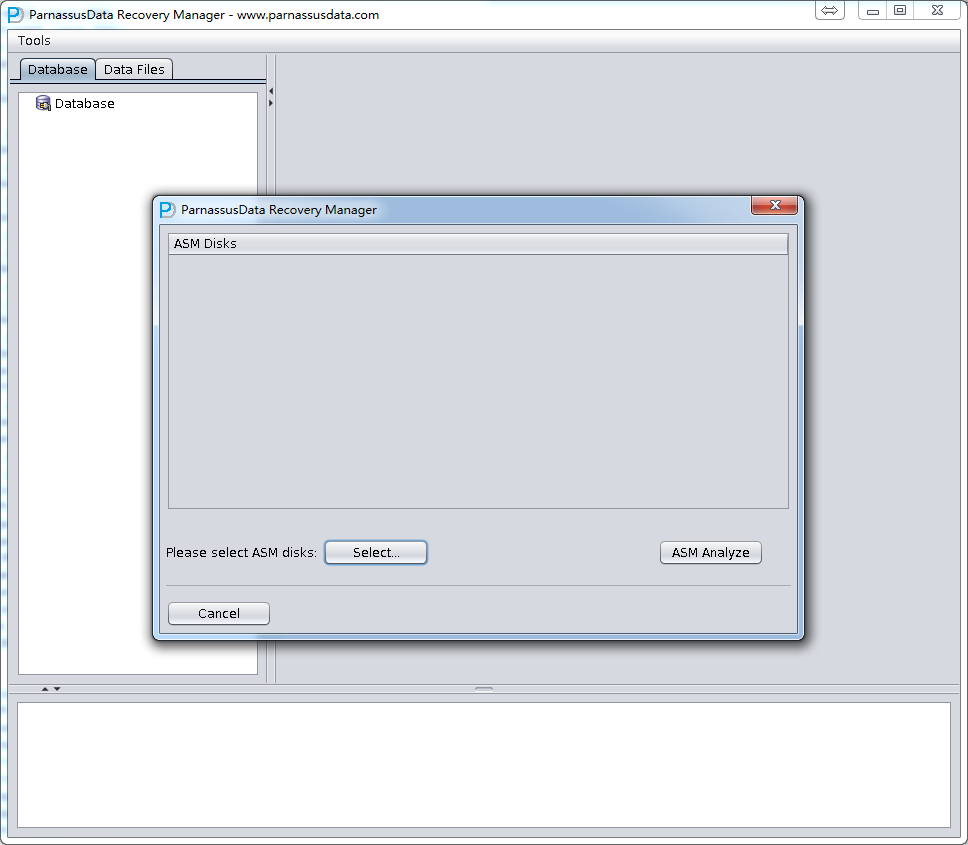
Enter ASM   Disks   Window,  click  SELECT…to  add  ASM  Disks, for  example:

/dev/asm-disk5(linux). Then click ASM  analyze.
PRM-DUL-DUL50

PRM-DUL-DUL51

PRM-DUL-DUL52


ASM Files Clone will analyze the specified ASM Disk header, in order to find corresponding files in Disk group and the File Extent Map. All of the information will be recorded into PRM embedded database for future use. PRM can collect, analyze and store all Metadata, and improve the basic functions of PRM in various forms, showing to users by diagram.
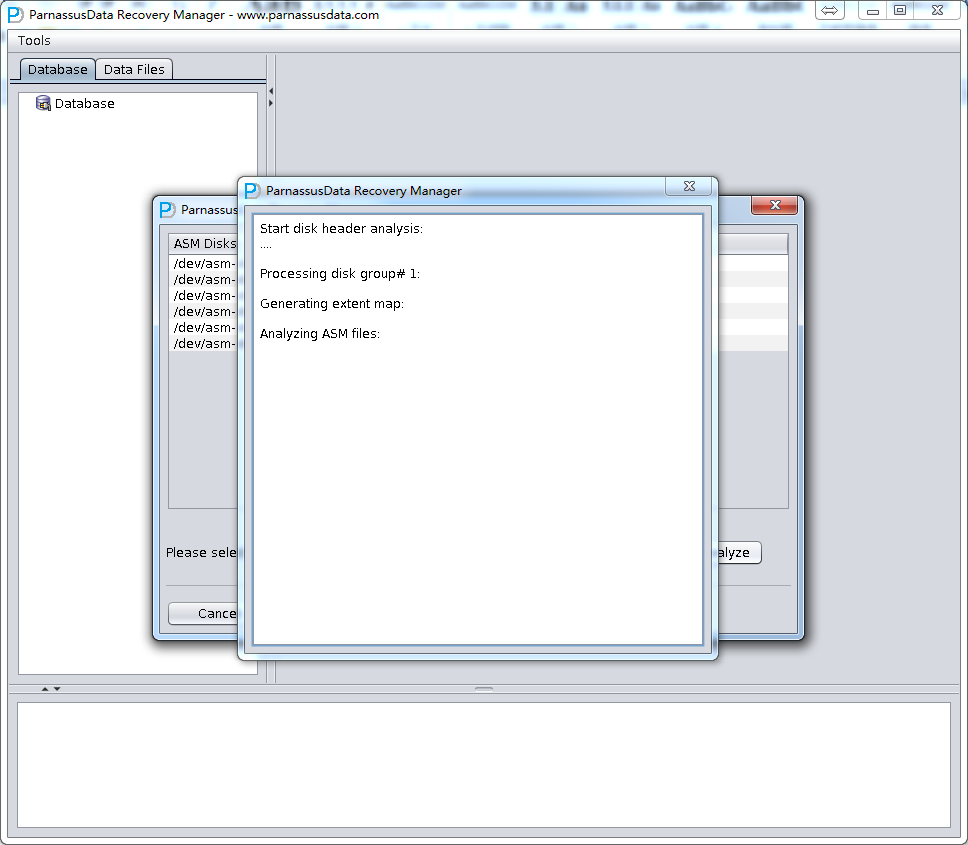
PRM-DUL-DUL53

After ASM Analyze, PRM will find the file list in Disk groups. So users can select the datafile/archivelog which need to be cloned to destination folder


Click ASM Clone to start file cloning…
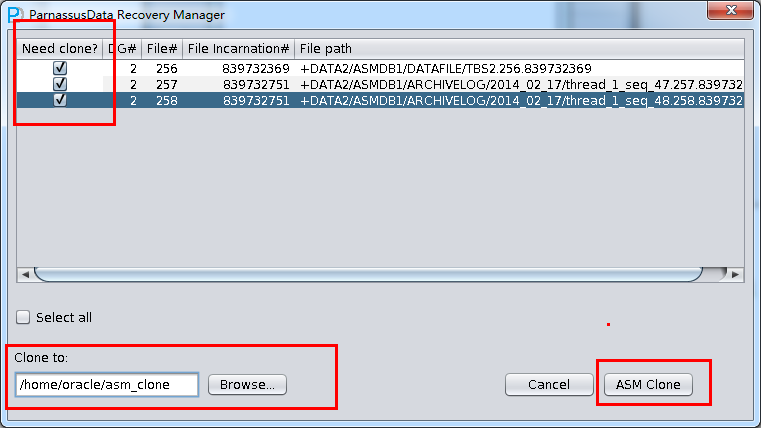
PRM-DUL-DUL54

There is a progress bar of file cloning.
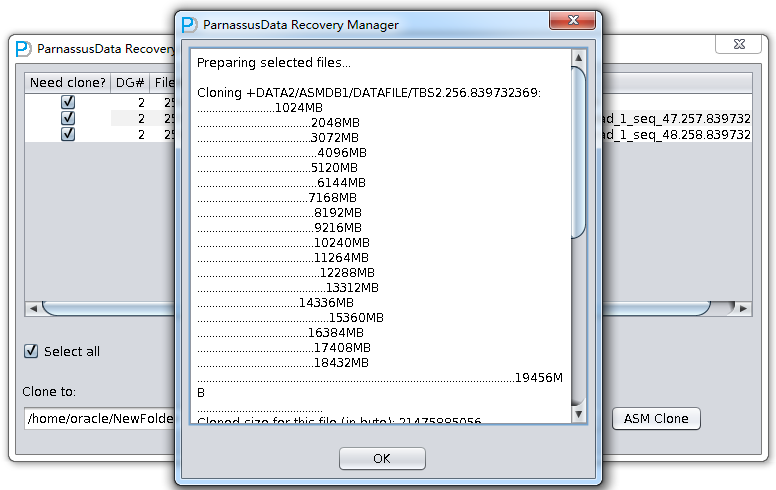
PRM-DUL-DUL55

ASM File Clone log as below:


Preparing selected files…Cloning +DATA2/ASMDB1/DATAFILE/TBS2.256.839732369:……………………..1024MB………………………………..2048MB………………………………..3072MB

………………………………….4096MB

………………………………..5120MB

………………………………….6144MB

……………………………….7168MB

…………………………………8192MB

…………………………………9216MB

…………………………………10240MB

…………………………………11264MB

…………………………………..12288MB

…………………………………….13312MB

…………………………….14336MB

……………………………………..15360MB

……………………………….16384MB

…………………………………17408MB

…………………………………18432MB

…………………………………………………………………………………………….19456MB

……………………………………

Cloned size for this file (in byte): 21475885056


Cloned successfully!


Cloning +DATA2/ASMDB1/ARCHIVELOG/2014_02_17/thread_1_seq_47.257.839732751:

……

Cloned size for this file (in byte): 29360128


Cloned successfully!


Cloning +DATA2/ASMDB1/ARCHIVELOG/2014_02_17/thread_1_seq_48.258.839732751:

……

Cloned size for this file (in byte): 1048576


Cloned successfully!


All selected files were cloned done.


It is necessary to validate cloned data via the “dbv” or “rman validate” command, for example:

rman target /RMAN> catalog datafilecopy ‘/home/oracle/asm_clone/TBS2.256.839732369.dbf’;cataloged datafile copy

datafile copy file name=/home/oracle/asm_clone/TBS2.256.839732369.dbf RECID=2 STAMP=839750901


RMAN> validate datafilecopy ‘/home/oracle/asm_clone/TBS2.256.839732369.dbf’;


Starting validate at 17-FEB-14

using channel ORA_DISK_1

channel ORA_DISK_1: starting validation of datafile

channel ORA_DISK_1: including datafile copy of datafile 00016 in backup set

input file name=/home/oracle/asm_clone/TBS2.256.839732369.dbf

channel ORA_DISK_1: validation complete, elapsed time: 00:03:35

List of Datafile Copies

=======================

File Status Marked Corrupt Empty Blocks Blocks Examined High SCN

—- —— ————– ———— ————— ———-

16   OK     0              2621313      2621440         1945051

File Name: /home/oracle/asm_clone/TBS2.256.839732369.dbf

Block Type Blocks Failing Blocks Processed

———- ————– —————-

Data       0              0

Index      0              0

Other      0              127


Finished validate at 17-FEB-14


How to use PRM in ASM environment with ASMLIB?

asmlib related ASM DISK will be stored in OS as ll /dev/oracleasm/disks.

For example: Add files under /dev/oracleasm/disks into PRM ASM  DISK


$ll /dev/oracleasm/diskstotal 0brw-rw—-  1 oracle dba 8,  97 Apr 28 15:20 VOL001brw-rw—-  1 oracle dba 8,  81 Apr 28 15:20 VOL002brw-rw—-  1 oracle dba 8,  65 Apr 28 15:20 VOL003brw-rw—-  1 oracle dba 8,  49 Apr 28 15:20 VOL004

brw-rw—-  1 oracle dba 8,  33 Apr 28 15:20 VOL005

brw-rw—-  1 oracle dba 8,  17 Apr 28 15:20 VOL006

brw-rw—-  1 oracle dba 8, 129 Apr 28 15:20 VOL007

brw-rw—-  1 oracle dba 8, 113 Apr 28 15:20 VOL008


CASE 7: DB stored in ASM cannot be opened

One of CRM database in company D can’t be opened due to I/O error in a few disks that are added into ASM diskgroup, which generated some corrupted block in system tablespace datafile, and caused DB cannot be opened.


In this case, we can use PRM ASM Diskgroup to clone all datafile out of ASM.


Or, users can also use “Dictionary Mode(ASM)” to recover data from this ASM environment . Steps are as below:


  1. Recovery Wizard
  2. Dictionary Mode(ASM)
  3. Add ASM DISK (all ASM DISK in the ASM Disk Group that you want to recover)
  4. Click ASM analyze
  5. Select suitable Endian
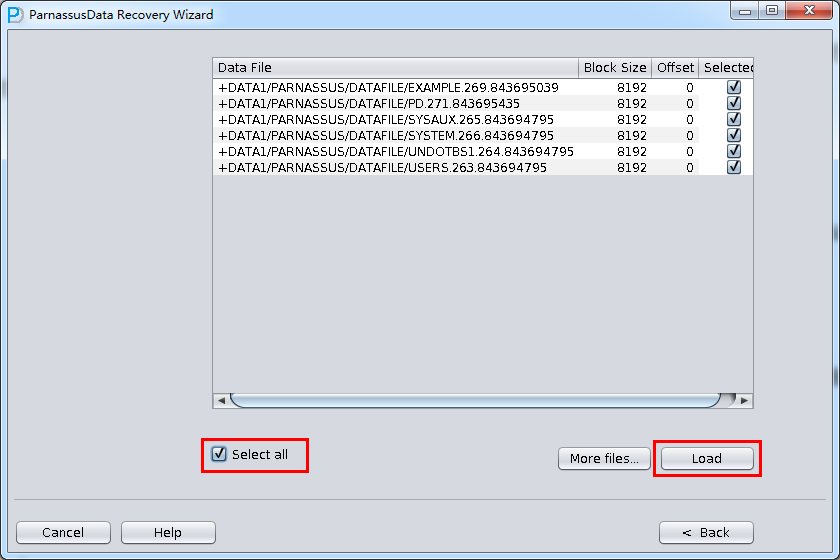
  6. Select the needed datafile from the datafile lists by ASM analyze, or click “select all”
  7. Click “load”, following steps are the same with case3
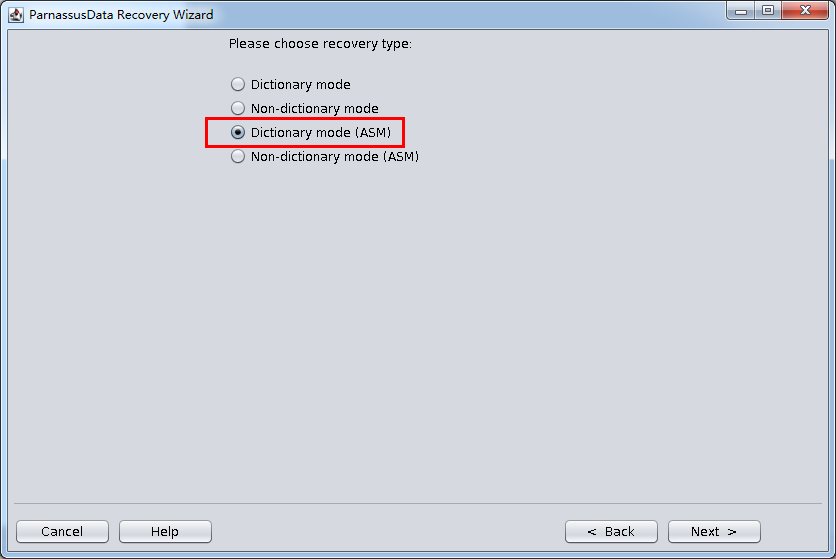
 

PRM-DUL-DUL56

PRM-DUL-DUL57

PRM-DUL-DUL58

PRM-DUL-DUL59

PRM-DUL-DUL60


CASE 8: Recovery of Mistakenly deleted or Lost system tablespace in ASM 

The operation staff of Company D deleted system tablespace FILE#=1 datafile and user tablespace by mistake, causing the database cannot be opened.

In this case, users can use” Non-Dictionary Mode (ASM)” to recover data.


Steps are as below:


  1. Recovery Wizard
  2. Non-Dictionary Mode (ASM)
  3. Add necessary ASM Disk
  4. Click ASM analyze
  5. Select the suitable Endian and Character set. (Manually select character set due to Non-Dictionary Mode)
  6. Select all data file, or click “Select all”
  7. Click “scan”, following steps are the same with Case 3
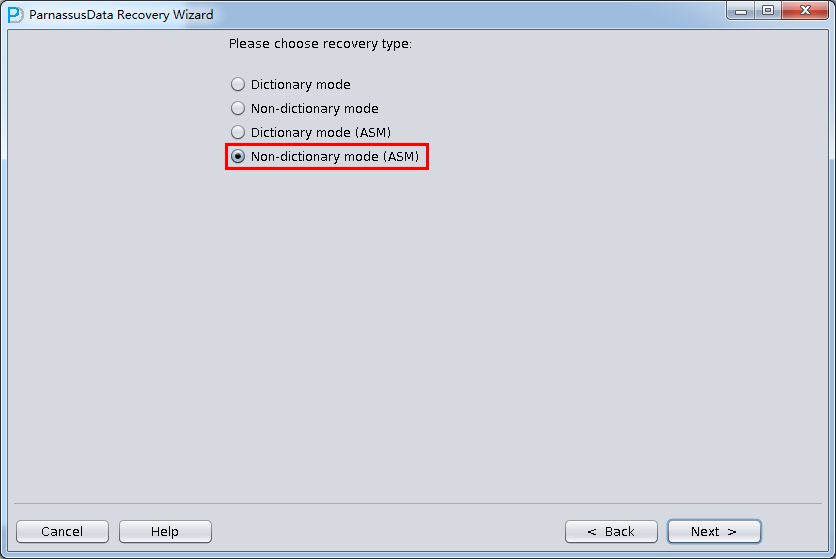
 

PRM-DUL-DUL61

PRM-DUL-DUL62

PRM-DUL-DUL63

PRM-DUL-DUL64


CASE 9: Data Recovery of Dropped Tablespace

Staffs of Company D dropped a tablespace(DROP TABLESAPCE INCLUDING CONTENTS) by mistake. They want to recover data resided in that tablespace, but there is no RMAN backup.

Now we can use PRM in No-Dictionary mode to recover data. In this way, we can recover most of the data. However, the data is not mapping to the dictionary. Users need to manually recognize the table. Since it changed data dictionary by DROPPING TABLE and deleted objects in OBJ$, we cannot know the corresponding relations between DATA_OBJECT_ID and OBJECT_NAME. Below is the instruction of getting mapping.


select tablespace_name,segment_type,count(*) from dba_segments where owner=’PARNASSUSDATA’  group by tablespace_name,segment_type;TABLESPACE SEGMENT_TYPE      COUNT(*)———- ————— ———-USERS      TABLE                  126

USERS      INDEX                  136


SQL> select count(*) from obj$;


COUNT(*)

———-

75698


SQL> select current_scn, systimestamp from v$database;


CURRENT_SCN

———–

SYSTIMESTAMP

—————————————————————————

1895940

25-4月 -14 09.18.00.628000 下午 +08:00


SQL> select file_name from dba_data_files where tablespace_name=’USERS’;


FILE_NAME

——————————————————————————–

H:\PP\MACLEAN\ORADATA\PARNASSUS\DATAFILE\O1_MF_USERS_9MNBMJYJ_.DBF


SQL> drop tablespace users including contents;


C:\Users\maclean>dir H:\APP\MACLEAN\ORADATA\PARNASSUS\DATAFILE\O1_MF_USERS_9MNBMJYJ_.DBF


The volume is entertainment in drive H and SN is A87E-B792


H:\APP\MACLEAN\ORADATA\PARNASSUS\DATAFILE


The drive can not find the file


Here, we can use file recovery tools, for example: Undeleter on Windows, to restore the accidentally deleted datafile.

PRM-DUL-DUL65


Start up PRM => recovery Wizard => No-Dictionary mode
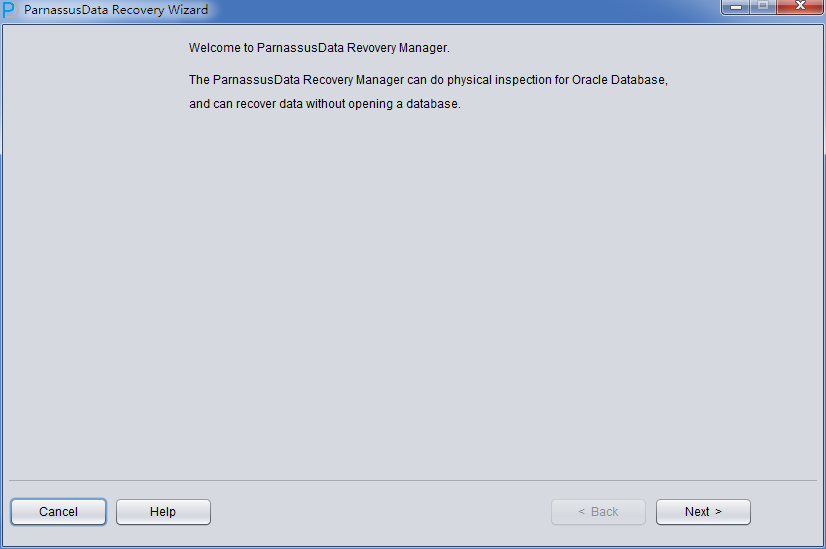
 

PRM-DUL-DUL66

PRM-DUL-DUL67

For it is in No-Dictionary mode, please select the correct character set manually.
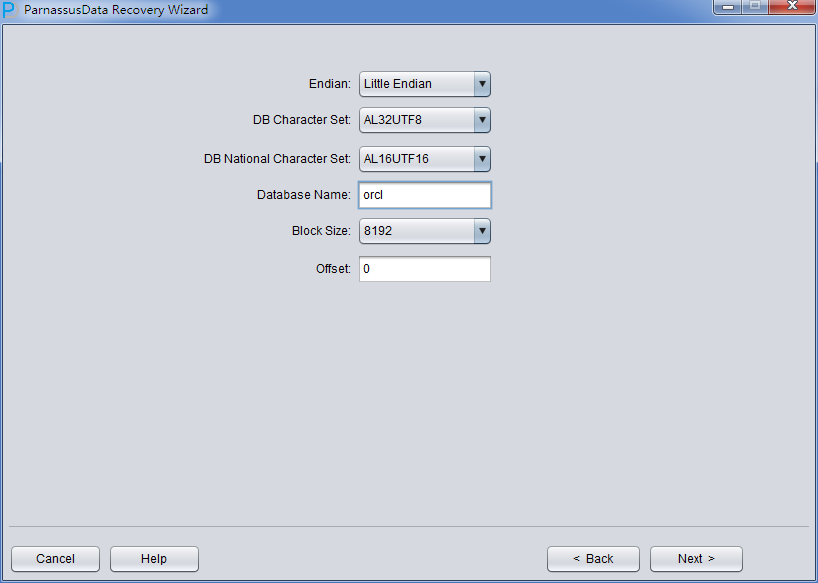
PRM-DUL-DUL68

Add the recovered files and Click scan.
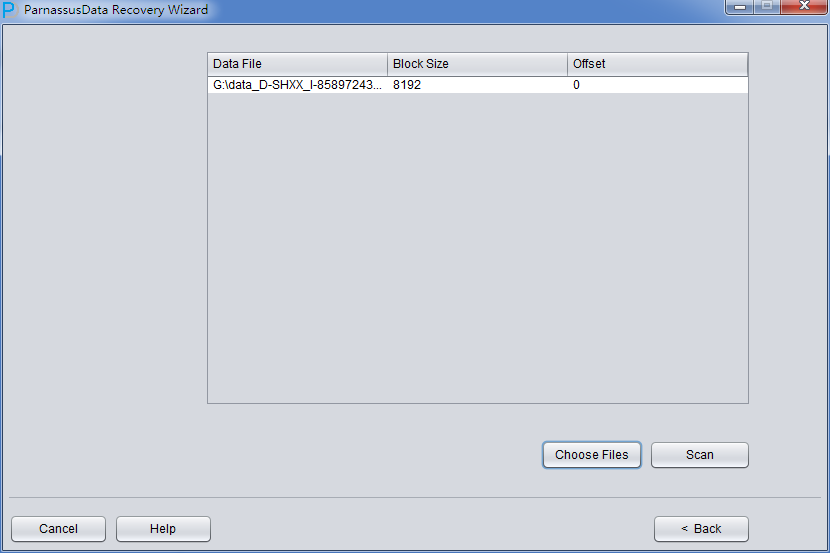
PRM-DUL-DUL69

PRM-DUL-DUL70

Then scan the table from the segment head/panel. If it fails to find all of the table from segment head, try to use extend scan:
PRM-DUL-DUL71

Now you can see lots of tables named OBJXXXXX, which is a combination of “OBJ” and

DATA_OBJECT_ID.     We   need   some   technicians   who are familiar   with schema design and application data, they can match this table with application tables through browsing sample data analysis.
 

PRM-DUL-DUL72

If no one can help clarify the relationship between data and table, try the following methods:


In this case, just the tablespace is dropped and Oracle still works, so we can use FLASHBACK QUERY to get the mapping between DATA_OBJECT_ID and table name.

SQL>  select count(*) from sys.obj$;COUNT(*)


———-

75436


SQL> select count(*) from sys.obj$ as of scn 1895940;

select count(*) from sys.obj$ as of scn 1895940

*

Error:

ORA-01555: Snapshot is too old,


Try to use DBA_HIST_SQL_PLAN of AWR and find the mapping between OBJECT# and OBJECT_NAME in recent 7 days.


SQL> desc DBA_HIST_SQL_PLAN

NAME                                        NULL? TYPE

—————————————– ——– ———————–

DBID                                      NOT NULL NUMBER

SQL_ID                                    NOT NULL VARCHAR2(13)

PLAN_HASH_VALUE                           NOT NULL NUMBER

ID                                        NOT NULL NUMBER

OPERATION                                          VARCHAR2(30)

OPTIONS                                            VARCHAR2(30)

OBJECT_NODE                                        VARCHAR2(128)

OBJECT#                                            NUMBER

OBJECT_OWNER                                       VARCHAR2(30)

OBJECT_NAME                                        VARCHAR2(31)

OBJECT_ALIAS                                       VARCHAR2(65)

OBJECT_TYPE                                        VARCHAR2(20)

OPTIMIZER                                          VARCHAR2(20)

PARENT_ID                                          NUMBER

DEPTH                                              NUMBER

POSITION                                           NUMBER

SEARCH_COLUMNS                                     NUMBER

COST                                               NUMBER

CARDINALITY                                        NUMBER

BYTES                                              NUMBER

OTHER_TAG                                          VARCHAR2(35)

PARTITION_START                                    VARCHAR2(64)

PARTITION_STOP                                     VARCHAR2(64)

PARTITION_ID                                       NUMBER

OTHER                                              VARCHAR2(4000)

DISTRIBUTION                                       VARCHAR2(20)

CPU_COST                                           NUMBER

IO_COST                                            NUMBER

TEMP_SPACE                                         NUMBER

ACCESS_PREDICATES                                  VARCHAR2(4000)

FILTER_PREDICATES                                  VARCHAR2(4000)

PROJECTION                                         VARCHAR2(4000)

TIME                                               NUMBER

QBLOCK_NAME                                        VARCHAR2(31)

REMARKS                                            VARCHAR2(4000)

TIMESTAMP                                          DATE

OTHER_XML                                          CLOB


For exmaple:


select object_owner,object_name,object# from DBA_HIST_SQL_PLAN where sql_id=’avwjc02vb10j4′


OBJECT_OWNER         OBJECT_NAME                                 OBJECT#

——————– —————————————- ———-


PARNASSUSDATA        TORDERDETAIL_HIS                              78688


Use below scrip for the mapping relationship between OBJECT_ID and OBJECT_NAME


Select * from

(select object_name,object# from DBA_HIST_SQL_PLAN

UNION select object_name,object# from GV$SQL_PLAN) V1 where V1.OBJECT# IS NOT NULL minus select name,obj# from sys.obj$;


select obj#,dataobj#, object_name from WRH$_SEG_STAT_OBJ where object_name not in (select name from sys.obJ$) order by object_name desc;


another script:

SELECT tab1.SQL_ID,

current_obj#,

tab2.sql_text

FROM DBA_HIST_ACTIVE_SESS_HISTORY tab1,

dba_hist_sqltext tab2

WHERE tab1.current_obj# NOT IN

(SELECT obj# FROM sys.obj$

)

AND current_obj#!=-1

AND tab1.sql_id  =tab2.sql_id(+);


Attention: Since it relies on AWR repository, the mapping table is not that accurate and exact.


CASE 10: Data Recovery of Dropped Table by mistake.

The application developers of Company D dropped one core application table in ASM without any backup.  Oracle has introduced recycle bin feature since 10g. First check whether the dropped table is in the recycle bin or not by viewing the DBA_RECYCLEBINS. If so, flashback to before drop via the recycle bin. Otherwise, use PRM for recovery as soon as possible.

The brief steps of Recovery by PRM:

  1. OFFLINE the tablespace where the dropped table
  2. Find the DATA_OBJECT_ID of dropped table by data dictionary query or logminer. If it fails, users have to recognize this table in No-dictionary
  3. Start PRM, enter No-dictionary mode, and add all datafiles of the dropped tablespace. Then SCAN DATABASE+SCAN TABLE from Extent MAP.
  4. Locate the data table by DATA_OBJECT_ID in object tree, and insert data back to source database by DataBridge.
SQL> select count(*) from “MACLEAN”.”TORDERDETAIL_HIS”;COUNT(*)———-984359 

SQL>

SQL> create table maclean.TORDERDETAIL_HIS1 as select * from  maclean.TORDERDETAIL_HIS;


Table created.


SQL> drop table maclean.TORDERDETAIL_HIS;


Table dropped.


We can get the general DATA_OBJECT_ID by logminer or the method provided in “CASE 9”:

EXECUTE DBMS_LOGMNR.ADD_LOGFILE( LOGFILENAME => ‘/oracle/logs/log1.f’, OPTIONS => DBMS_LOGMNR.NEW);EXECUTE DBMS_LOGMNR.ADD_LOGFILE( LOGFILENAME => ‘/oracle/logs/log2.f’, OPTIONS => DBMS_LOGMNR.ADDFILE);Execute DBMS_LOGMNR.START_LOGMNR(DBMS_LOGMNR.DICT_FROM_ONLINE_CATALOG+DBMS_LOGMNR.COMMITTED_DATA_ONLY); 

SELECT * FROM V$LOGMNR_CONTENTS ;


EXECUTE DBMS_LOGMNR.END_LOGMNR;


Even no DATA_OBJECT_ID can be obtained, we can still locate the data table that we need to recover through artificial data identification, provided the data table is not much.


First, OFFLINE the tablespace of dropped table.


SQL> select tablespace_name from dba_segments where segment_name=’TPAYMENT’;TABLESPACE_NAME——————————USERS 

SQL> select file_name from dba_data_files where tablespace_name=’USERS’;


FILE_NAME

—————————————————————-

+DATA1/parnassus/datafile/users.263.843694795


SQL> alter tablespace users offline;


Tablespace altered.


Start PRM in NON-DICT mode, add the corresponding datafile and select SCAN DATABASE+SCAN TABLE From Extents:
PRM-DUL-DUL73

PRM-DUL-DUL74


Add all of the related ASM Disks and click ASM Analyze:
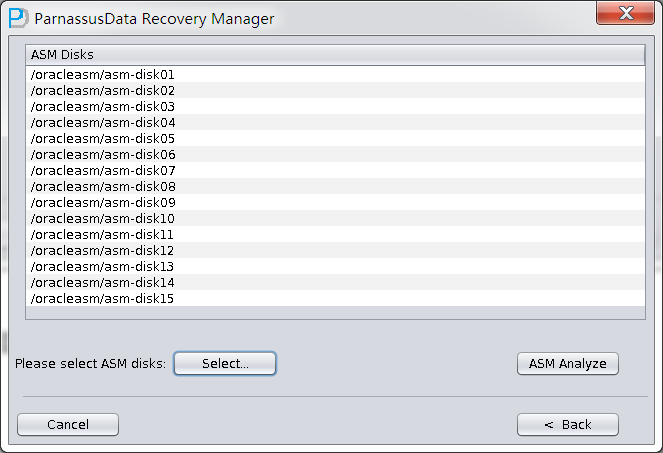
PRM-DUL-DUL75


Select the character set in Non-Dict  mode:

PRM-DUL-DUL76

Select the datafile of dropped table, and click scan:
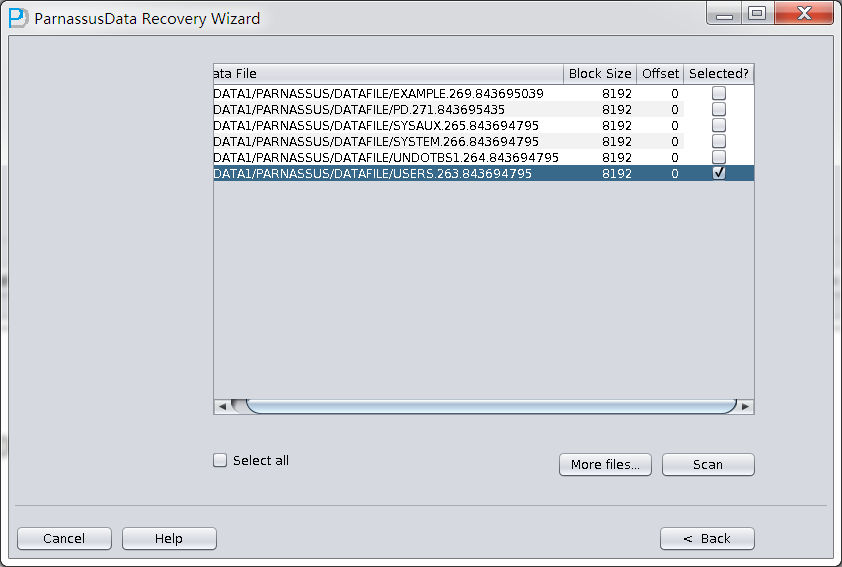
PRM-DUL-DUL77

PRM-DUL-DUL78

Click the generated database name and right click to select scan tables from extents:
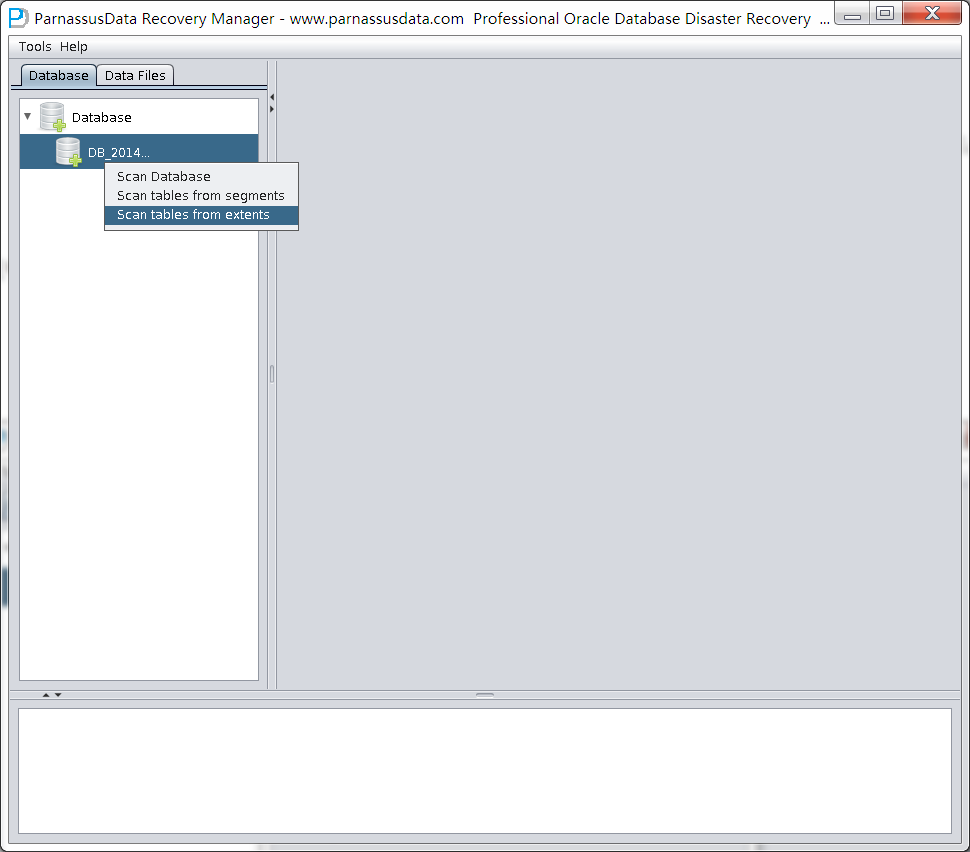
PRM-DUL-DUL79

PRM-DUL-DUL80

To find that the data of DATA_OBJECT_ID=82641 is mapped to the dropped TORDERDETAIL_HIS table through artificial identification, and pass them back to other tablespace in the source repository by DataBridge.
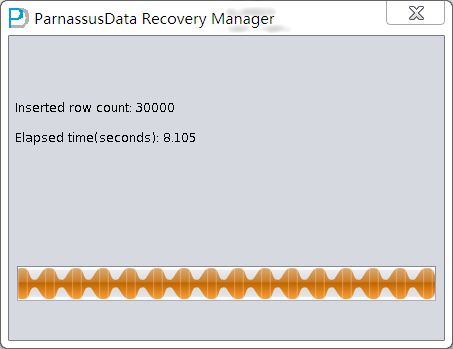
 

PRM-DUL-DUL81PRM-DUL-DUL82


PRM-DUL-DUL83


FAQ

  1. How to get my database character set information?


You can know your database character set information by Oracle Alert.log.

[oracle@mlab2 trace]$ grep     -i character alert_Parnassus.log Database Characterset is US7ASCII

Database Characterset is US7ASCII

alter database character set INTERNAL_CONVERT AL32UTF8

Updating character set in controlfile to AL32UTF8

Synchronizing connection with database character set information Refreshing type attributes with new character set information

Completed: alter database character set INTERNAL_CONVERT AL32UTF8

alter  database  national  character  set  INTERNAL_CONVERT  UTF8

Completed: alter database national character set INTERNAL_CONVERT UTF8 Database Characterset is AL32UTF8

Database Characterset is AL32UTF8

Database Characterset is AL32UTF8


  1. Why PRM failed with GC ” gc warning: Repeated allocation of very large block (appr.size 512000)”?


So far, most of the problems are caused by usage of Java environments that are not recommended. Especially, it easily leads to such problem to use redhat gcj java on Linux. ParnassusData suggests users use Open JDK 1.6 for PRM, or directly use $JAVA_HOME/bin/java –jar prm.jar to start PRM.


Open JDK for Linux download Link:


Open jdk x86_64 for Linux   5 http://pan.baidu.com/s/1qWO740O
Tzdata-java x86_64 for Linux 5 http://pan.baidu.com/s/1gdeiF6r
Open jdk x86_64 for Linux   6 http://pan.baidu.com/s/1mg0thXm
Open jdk x86_64 for Linux   6 http://pan.baidu.com/s/1sjQ7vjf
Open jdk x86 for Linux 5 http://pan.baidu.com/s/1kT1Hey7
Tzdata-java x86 for Linux  5 http://pan.baidu.com/s/1kT9iBAn
Open jdk x86 for Linux 6 http://pan.baidu.com/s/1sjQ7vjf


Tzdata-java x86 for Linux  6 http://pan.baidu.com/s/1kTE8u8n


JDK on Other platforms download link:


AIX JAVA SDK 7 http://pan.baidu.com/s/1i3JvAlv
JDK Windows x86 http://pan.baidu.com/s/1qW38LhM
JDK Windows x86-64 http://pan.baidu.com/s/1qWDcoOk
Solaris JDK 7 x86-64bit http://pan.baidu.com/s/1gdzgSvh
Solaris JDK 7 x86-32bit http://pan.baidu.com/s/1mgjxFlQ
Solaris JDK 7 Sparc http://pan.baidu.com/s/1pJjX3Ft


Oracle JDK download link:


http://www.oracle.com/technetwork/java/javasebusiness/downloads/java-archive-d ownloads-javase6-419409.html#jdk-6u45-oth-JPR


  1. If you find bugs in PRM, how to report the bug to ParnassusData?

Everyone is welcome to report bug to ParnassusData by sending emails to report_bugs@parnassusdata.com. Please enclose the detailed description of operating environment, including OS, Java environment and Oracle database versions, when reporting bug.


  1. What should I do if PRM failed with the following error?

Error:               no                `server’               JVM                 at               `D:\Program                 Files (x86)\Java\jre1.5.0_22\bin\server\jvm.dll’.

If users just installed JAVA Runtime Environment JRE without installing JDK, please start PRM without –server option. This option does not exist in the version before JRE 1.5.

ParnassusData recommends Open JDK 1.6 or above for running PRM.


The download link of JDK 1.6 on various OS: http://www.oracle.com/technetwork/java/javasebusiness/downloads/java-archive-d

ownloads-javase6-419409.html#jdk-6u45-oth-JPR


  1. Why does PRM display Chinese as messy code?


So far, there are two reasons for Chinese encoding problem:


  • The OS does not have Chinese language pack, thus PRM cannot display Chinese correctly
  • If OS have installed the necessary language package, please use Open JDK1.6 or above version. There might be some problem in 4.

Find More


Resource:                                http://www.parnassusdata.com/resources/ Technical Support:                                  service@parnassusdata.com

Sales:                                        sales@parnassusdata.com Download Software:                                                    http://www.parnassusdata.com/

Contact:                                   http://www.parnassusdata.com/zh-hans/contact


ParnassusData Corporation, Shanghai, GaoPing Road No. 733. China Phone: (+86) 13764045638

ParnassusData.com

Facebook: http://www.facebook.com/parnassusData Twitter:    http://twitter.com/ParnassusData

Weibo: http://weibo.com/parnassusdata


Copyright©2013, ParnassusData and/or its affiliates. All rights reserved. This document is provided for information purposes only and the contents hereof are subject to change without notice. This document is not warranted to be error-free, nor subject to any other warranties or conditions, whether expressed orally or implied in law, including implied warranties and conditions of merchantability or fitness for a particular purpose. We specifically disclaim any liability with respect to this document and no contractual obligations are formed either directly or indirectly by this document. This document may not be reproduced or transmitted in any form or by any means, electronic or mechanical, for any purpose, without our prior written permission.


Oracle and Java are registered trademarks of Oracle and/or its affiliates. Other names may be trademarks of their respective owners.


AMD, Opteron, the AMD logo, and the AMD Opteron logo are trademarks or registered trademarks of Advanced Micro Devices. Intel and Intel Xeon are trademarks or registered trademarks of Intel Corporation. All SPARC trademarks are used under license and are trademarks or registered trademarks of SPARC International, Inc. UNIX is a registered trademark licensed through X/Open Company, Ltd. 0410


Copyright © 2014 ParnassusData Corporation. All Rights Reserved.
Oracle PRM-DUL 我的数据在哪里?

我在2009年Oracle的研讨会的一大亮点是遇到了老胡 。 我觉得有些人一旦遇到,我就一定会和他们成为朋友。老胡 是其中一个。事实证明,我们的确有许多共同的品味和意见

不过他不像我,他是一个geek!他不会希望我这么说,因为他非常谦虚和低调,但他是我见过为数不多的操作水平与我曾一起工作的最好的游戏程序员相同的人。

他是过去我略有所知的DUL工具的开发者。这个工具与Oracle自己的工具,DUL执行类似的工作。它现在已经更名为PRM-DUL – 该工具实现unloading直接抽取数据文件中的数据。


PRM-DUL 等DUL类型的工具是在糟糕的DBA发现了损坏的数据库和备份不足时,尝试数据恢复的最后手段。通过直接从你的数据文件中读取数据(因为数据库是不太可能这个阶段打开),构建包含数据的SQL * Loader兼容数据文件,它提供你恢复的最后机会。最好是能够将数据加载到工作数据库中。这不是替代导出或快速数据unloader,而是一个重要的恢复工具。

我决定帮助老胡 在我的服务器上测试这个工具,因为如果真的需要使用,这能使我更了解它。而且我也对它挺感兴趣。这包括老胡 创建的的一个特定的时限,特定服务器的工具版本,这是购买的一种方式。之后我回过来讲这个。在测试过程中我主要学到的的有:

1)你必须做一些前期的配置。这不难,搞定JDK 然后把所有可获得的数据文件DBF文件都放到准备运行PRM-DUL的服务器上即可。

2)它最适合用Sun的JDK,而不是一些Linux的开源变体。这个问题让我们难倒了好半天 – 反复发送电子邮件,直到老胡 访问到我的服务器,他用一个晚上解决了。他用Java类和我的Linux Java运行时环境不喜欢的like做了一些很聪明的安全性混淆的东西。

3)一旦配置完成就轻而易举了,只要你习惯了所有命令行的结尾加上一个空格和分号。下面是它的外观(注意这一切发生在一个封闭的或损坏的数据库上)


prm-undelete1

prm-undelete2


prm-undelete4

prm-undelete5


加入所有oracle数据文件,不需要加入临时文件TEMPFILE、UNDO数据文件、控制文件、日志文件

prm-undelete6


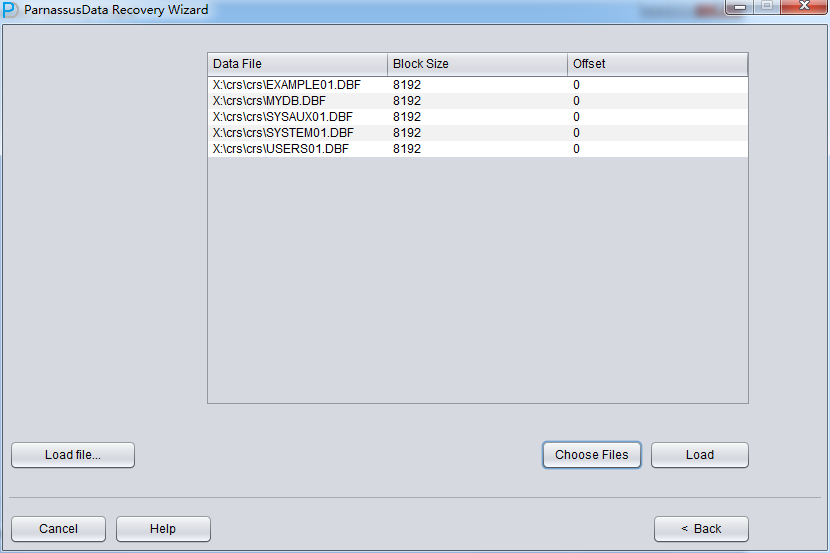
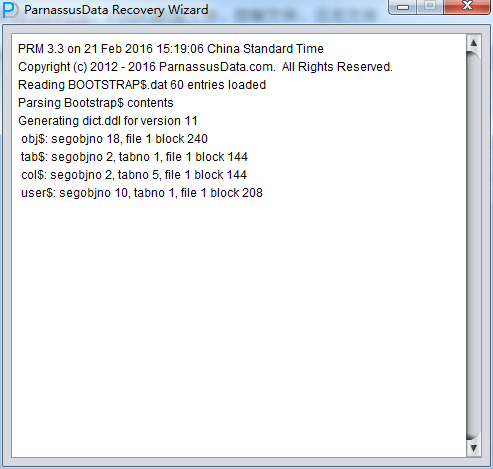
点击load 按钮,PRM会自动加载数据字典 即bootstrap动作


prm-undelete7


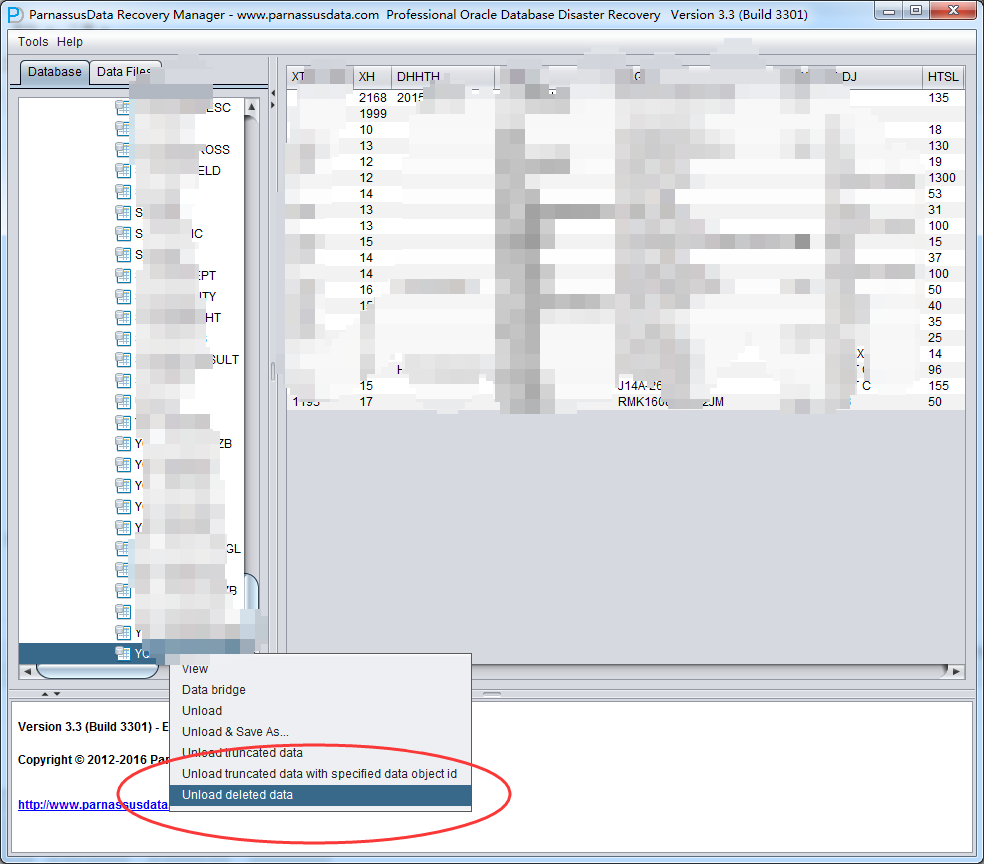
至此 PRM左侧将出现 树形的对象树,选择你需要恢复的用户下的对应数据表, 右击对象后选择 unload deleted data


prm-undelete8


prm-undelete9


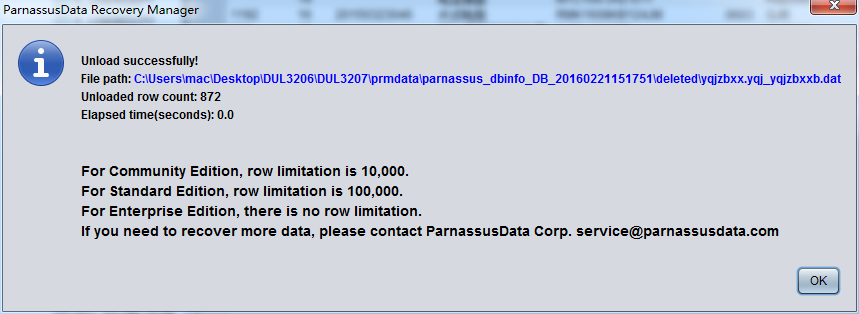
PRM-DUL 完成对已删除数据的恢复操作后会将 数据写出到  上图中 File path的位置, 示例的数据恢复情况如下:


prm-undelete10


www.parnassusdata.com 的网站有更多信息,包括完整的PDF格式的PRM-DUL入门。

多数人在大部分时间不会需要像PRM-DUL这样的工具,但每个DBA都至少应该知道它的存在,以防要用到它。如果你需要的话,有这样几个选项。一个是获得短时间的PRM-DUL的许可证,自己进行恢复。你也让诗檀软件的其他成员为你进行恢复。我现在对它已经有些熟悉,所以我建议在业务需要时用后一种方法。 (话说回来,如果你的业务依赖于不可恢复的数据库,你最好首先要反省为何会处于这样的情况。)老胡是非常聪明的人,他对他的工具和你的数据极其负责。我们在Oracle大会那时,他会工作到深夜帮助不同的时区人来解决问题。我不会详细地谈到成本,但PRM-DUL的方法会比获取Oracle咨询来工作便宜很多。无论如何,我觉得在这些数据库损坏的情况下,这样的成本率合情合理。

强调一下,你可以随时向Oracle咨询请求这项服务,但PRM-DUL是另一种选择。


ORACLE PRM-DUL 的恢复 :RAID损坏后提取ORACLE数据

上周五,客户发信息说在RAID崩溃后,他们无法打开一个Oracle 9i 数据库。在继续这个故事之前,我要声明这个数据库不在我们team的管理范畴内,我的团队根本不知道它的存在 – 有些客户让我们来管理他的一切,有些相对平衡。不过这都是他们的选择。离题了。

原来,这个数据库在NOARCHIVELOG模式,而且没有一个冷备份。他们甚至连一个数据库导出都没有。这样的事情总发生在周五!

首先,使用损坏的联机重做日志进行初始的崩溃恢复失败。然后客户尝试手动恢复,并没有帮助。更糟的是,在崩溃后他们没有立即创建冷备份,所以我也无法确定这些尝试是否有造成损害。


我试图通过缓慢递增SCN进行恢复,尝试不同的重做日志成员和其他一些技巧。但是恢复还是卡住,出现ORA-600 [3020],又名“错过写”。

用 _allow_resetlogs_corruption OPEN RESETLOGS 成功重置了日志文件,但数据库仍无法打开,返回错误信息 – 某些对象没有找到,ORA-600等

简而言之,似乎SYSTEM表空间不够完整导致无法打开数据库。


我还有几个想法,不过也想到了使用Oracle PRM-DUL 工具。PRM-DUL 代表通过Data Extraction进行Database Unloading。它所做的是从无法打开(包括数据库损坏的情况)的数据库中提取数据。当然,这取决于您的数据库的损坏程度,但说真的,它在我们的例子中的运作很神奇。


更多详细信息,请参阅白皮书 PRM-DUL 入门


如果你或你的客户不幸遇到这种情况并需要这个工具,你可以在www.parnassusdata.com 获得更多详情。简单地说,你可以获得一个特别版本在数据库上运作七天,或者使用数据提取服务。因为我已经知道如何使用PRM-DUL,我们就用第一种方法。


我只花了几个小时收集一些数据,老胡据此产生一个演示版本。在购买它之前,我们的客户首先希望确保这个工具能工作,尽管这个工具的价格相比较Oracle的咨询会更便宜。


通过演示版本,我能够提取所有表的前10行数据。在最终确认一切正常后,客户得到获得了七天许可证。我仅用了几分钟重新运行提取命令,然后PRM-DUL奇迹般地生成了所有表的转储文件。之后我只需要将它们复制到另一台机器,打包小的shell脚本来导入它们。


补充一下,PRM-DUL也产生了所有的序列和PL / SQL对象。通过转储几个SYS对象,我大概能提取索引和约束,但由于客户有另一个相同数据模型(但不同数据)的数据库,从那里提取定义会更容易。


客户对我们能够从这样的致命情况下进行恢复感到惊讶,这可能要归功于PRM-DUL和他的创造者:非常感谢老胡– 让我的周五有相对较短的工作时间!


ORACLE CHECKLIST FOR CORRUPTION AND DATABASE DOWN

If you cannot recover data by yourself, ask Parnassusdata, the professional ORACLE database recovery team for help.

Parnassusdata Software Database Recovery Team

Service Hotline:  +86 13764045638 E-mail: service@parnassusdata.com

STARTUP HANGS 
If the database hangs on startup: 
1.) Instruct the customer to do a STARTUP NOMOUNT (to see if the 
background processes will start). 
2.) Try an ALTER DATABASE MOUNT. 
3.) Try doing some SELECTs from any v$ view. 
4.) If this works, you can do an alter session 
set _trace_enabled=true in the init.ora. 
5.) Then do an ALTER DATABASE OPEN. 
6.) After the db has been hanging for a minute or so, use CTRL/C (depress 
and hold the CTRL key while pressing the 'c' key) to stop the 
process. See if the trace tells you which SQL statement it is 
hanging on (it could be dictionary corrupt). 
TABLESPACE, LOST DATAFILE 
After a tablespace has been created with its datafiles, the datafiles 
must exist for the life of the tablespace unless all objects in the 
tablespace are dropped first. The supported way to recover from a 
lost datafile is to have the customer restore the old datafile from 
an older, cold backup (full backup) or a hot backup (single tablespace 
backup while the database is online). 
If the database is in NOARCHIVELOG mode, you will only succeed in 
recovering the db if the datafile in the redo to be applied to it is 
within the range of your online REDO logs. 
If the customer has no backups of the datafile that is corrupt, there 
is a chance the events 10231 and 10233 can be set to skip the corrupted 
blocks so an export can be done. If that doesn't work or the corruption 
is in the datafile header, they will loose their data. 
CONTROL FILES 
If you are mirroring control files, and one is bad, delete it and copy 
the good one in its place. 
If you need to create a new control file or change the MAXLOGFILES, 
MAXLOGMEMBERS, MAXDATAFILES, MAXINSTANCES, or MAXLOGHISTORY parameters:


SVRMGRL> alter database backup controlfile to trace; 
Edit the trace file (it will be the latest one), take out the trace 
file header and trailer text and you have the commands to re-create 
your trace file. You can rename the file to something meaningful 
then @ the file from SVRMGRL. Be sure to shutdown the database and 
remove the old controlfiles first. 
SKIPPING BAD BLOCK 
When oracle hits a data block that is corrupt, it returns an ORA-1578 
error. To skip bad blocks to salvage data, you can set the following 
events in the init.ora: 
set events '10231 trace name context forever, level 10' (table 
set events '10233 trace name context forever, level 10' (index 
Be sure to drop the indexes first if the corruption is in a table as 
the 10231 will only work on a full table scan. The 10232 will check for 
corrupted blocks on modified index blocks and will mark the index as 
unusable. To check for index corruption, set this event and rebuild the 
index. 
ANALYZE INDEX VALIDATE STRUCTURE 
ANALYZE INDEX VALIDATE STRUCTURE may not reveal index corruption. 
ONLINE REDO LOG 
In the normal operation of a database, committed row changes are written 
to the online redo logs as changes are made to the database. The redo 
log data is used to recover the database should something happen. When 
a database is in archivelog mode, these redo logs are copied as they 
are filled to a directory where they can be used during recovery. If a 
database is not in archivelog mode, the redo logs will be filled in a 
round robin fashion. When the last log is filled, the first one is filled 
again, overwriting what was there before. The window of recovery is very 
short and if there are any datafiles that are corrupted, there is no 
recovery of that data 
WHAT ARE THE IMPLICATIONS OF OPEN RESETLOGS 
If the customer is in ARCHIVELOG mode they will no longer be able to apply 
any of their archive logs (roll forward). They will have to take another 
cold backup of their database and start a new set of archive logs. 
ROLL FORWARD/ROLL BACK VERVIE 
Hidden (undocumented) init.ora parameters can be used for many things 
including bypassing database safety checks during recovery. Be sure to 
tell The customer this is unsupported and may corrupt their database 
worse than it already is. However, if the customer has no backups and 
is not in archive log mode, they may have no choice. 
ALLOW_RESETLOGS_CORRUPTION=TRUE 
A common situation is corruption in the online redo logs. Usually the 
problem is the instance crashed and there are transactions in the redo 
that must be rolled back, but the redo is corrupt. Here are the steps 
to ATTEMPT to force the database open:

1) Add the parameter _ALLOW_RESETLOGS_CORRUPTION=TRUE to 
the init.ora file 
2) STARTUP MOUNT the database 
3) Issue the appropriate RECOVER DATABASE command: 
a) RECOVER DATABASE UNTIL CANCEL 
(Their controlfile is usable) 
-orb) 
RECOVER DATABASE USING BACKUP CONTROLFILE UNTIL CANCEL 
RECOVER DATABASE USING BACKUP CONTROLFILE 
(Their controlfile is not the current one) 
4) Enter CANCEL to cancel recovery - there are NO archive logs applied 
5) Enter ALTER DATABASE OPEN RESETLOG 
6) Try selecting from a table (i.e., SELECT SYSDATE FROM DUAL) 
Once the database is open, it is imperative that they export, rebuild 
the database, and then import. 
ROLLBACK SEGMENT PROBLEMS 
A rollback segment is a structure that holds before-commit data for a data 
table. If a datafile containing a rollback segment is gone, the 
transaction that was open at the time of the crash cannot be committed. 
This is a problem because the data block is marked as having an active 
transaction but the data is still sitting in the (missing) rollback 
segment. "Hidden" parameters in the init.ora. They can get around this 
but there will probably be logical data corruption. Have them set: 
_offline_rollback_segments = (,... 
STARTUP MOUNT and RECOVER DATABASE 
Either get the trace or have them search for "obj" in the trace file 
which should reveal the object trying to rollback. If you can locate 
the object, comment out the ROLLBACK_SEGMENTS parameter, open the 
database and try and drop the object. Then uncomment the 
ROLLBACK_SEGMENTS parameter and attempt to open the database. As a last 
resort you can set the hidden parameter: 
_corrupted_rollback_segments 
You can have the customer change: 
rollback_segments = ( ,....,  
- to - 
_corrupted_rollback_segments = ( ,....,  
The above list should contain all the rollbacks originally listed in the 
ROLLBACK_SEGMENTS parameter. 
SVRMGRL> startup open

SVRMGRL> ALTER DATABASE DROP TABLESPACE rollback_tbs INCLUDING CONTENTS 
There may be corruption in the database depending on what was happening 
at the time of the problem. 
DATABASE HANGING 
If the database is hanging and there are no errors, the best thing to do 
is have them get a systemstate dump (ALTER SESSION, etc. and have them 
either ftp or email it to you. Then get a copy of the ass.awk and run it 
against the trace file. Objects in brackets are what is being waited. 
BACKUP AND RESTORE 
If a customer has a corrupted database and needs to restore from a cold 
backup and has archive logs, have them restore the cold backup, make 
sure all the archive logs are in the archive log destination directory. 
Then have them do a STARTUP MOUNT, then RECOVER DATABASE. 
ALTER DATABASE RECOVER DATABASE. They will be prompted for archive logs. 
They can also set the recovery to be automatic so they are not prompted 
for each log. (See the ALTER DATABASE RECOVER command for more options.) 

難しいデータベースリカバリプロセス Oracle 11.2はかなり強大

ORACLEデータベース によくあるエラ の解決策

プロのOracle Databaseの復旧サービスを提供
携帯番号: +86 13764045638 メール:service@parnassusdata.com


これは単なる自己満足で、何の実な意味もない。ついでに、テストに見つけ出したことも後で述べる(未だにデータベースを起動できていないが、試し続けたいと思う。O(∩_∩)O ~。。。);
まずは言うべきなのは11.2の強さである。昔に大部分の場合のエラもリカバリできる。データベースを起動出来たら、損害に関係ないチェックを試す。
1, 11.2から、コントロールファイル自動バックアップが完成した情報はm000によって完成する。それに、ほかの仕事も完成できる。もちろん、別のプロセスが使われる時しか利用できない。
2,DBA_TABLESPACEとV$TABLESPACEの源が違っている。一つ目はコントロールファイルから、もう一つはベーステーブルts$から
3,ts$とfile$が番号をスキップできない。
4,DBMS_HMが強い(Health Manager)。定期的にデータベースにあるものをいちいちチェックして、m000プロセスでtraceを書く。
。。。

主なテストステップはあまり覚えていないが、主なシミュレーションステップは以下の通り:
私の環境: db 11.2.0.3 OEL 5.8
1,二つのテーブルスペースを作成し(一つもいい、数なんかどうでもいい、よりはっきり見えるためだけ)、ログを切り替えて、OSでUNDOTBSを含むデータファイル(普通なデータファイルとundoデータファイルでいい)
2,データベースを起動するときに、ファイルがなくしたあるいは壊された。このとき、エラになったファイルをoffline dropして、データベースが起動できるはず。バックグラウンドにm000によって作成されたtraceがあって、HealthManagerは持続的にm000を引き起こし、ほかの悪い情報をtraceに書き込む。
3,undo$のトラブルロールバックセグメントをクリンアップする
4,新たな普通データのテーブルスペースを作成して、例えば“UNDTBS333”、, UNDO_TABLESPACE=この普通のテーブルスペース(scope=spfile)を設定して、データベースを起動する————–これは当時初めての誤操作だった。
5,データベースがエラになった。具体的な内容も解決策も忘れていた。薄々覚えているのは、undoの隠しバラメタとか、正確なundoテーブルスペース(create undo tablespace …)を作成するだけ。
6,解決したあと、データベースが起動できた。delete from fs$ where name=前に誤操作したあの普通なデータテーブルスペースUNDTBS333’。こうするのはそのとき、リスクを考えず人工的にクリンアップした。
全部で人工的にやってもいいんだが、当時に考えすぎちゃったから、誤操作した。
7,実はこのようなデータベースがまだ起動できるが、DBMS_HM.RUN_CHECK(‘Dictionary Integrity Check’, ‘lunar-ck-Dict’)でテストして、データベースにundo$とts$ がfile$と一致していないが、ほかのデータオブジェクトに影響を与えていない。
けど、頭が熱くなって、二つ目の過ちを犯した:コントロールファイルを再構造する
v$tablespaceの内容が誤ったと映されているが、dba_tablespacesが正確だと映している。その定義を検索することで、v$tablespaceのデータはx$kcctsというベーステーブルから獲得できた。つまりコントロールファイルの情報から。それにdba_tablespacesはts$を元にしているから、コントロールファイルを再構造するという愚かな発想が生み出した。
8,コントロールファイルのプロセス自体が誤った、.。わかるよね。。。もちろん、後でこのトラブルを避けた。具体的なステップを忘れたが、いいんだ。別に難しくないから。
9,再びデータベースを救出できなかった
。。。。。

このプロセスは以下の文にエラがあった。Oracle2進数ファイルをテストすることで、みつかりやすい。これはデータベースを起動するときに、file$に対してインサートするから、つまり、bootstrap$によって、file$のブロックを見つけ出す。そのすべての内容をこのテーブルにインサートする:
select blocks,NVL(ts#,-1),status$,NVL(relfile#,0),maxextend,inc, crscnwrp,crscnbas,NVL(spare1,0) from file$ where file#=:1

それでbbedでfile$を修正するという手を考え出した。delete from fs$のテーブルスペースのデータファイルを削除状態に変更する。テストによると、ts$もfile$も番号をスキップできない。例えば、このfile#は3で、その状態を削除したと設定すれば、コントロールファイルを再構造するときに、file#>3が一致性テストの場合に削除する。

そして、仕方なくfile$をリカバリした。fs$でdeleteの記録をリカバリすることを考えたが、いい方法が見つからない。
もう一つの方法は10046によってトレースして、エラ文を探し出して、上のようなトラブルは忽ち解決できる:
select name,online$,contents$,undofile#,undoblock#,blocksize,dflmaxext,dflinit,dflincr,dflextpct,dflminext, dflminlen, owner#,scnwrp,scnbas, NVL(pitrscnwrp, 0), NVL(pitrscnbas, 0), dflogging, bitmapped, inc#, flags, plugged, NVL(spare1,0), NVL(spare2,0), affstrength from ts$ where ts#=:1
ここでは避けていない。Oracle2進数ファイルを修正することもいい策だと思うが、うまく使いこなさなかった。これは最後の手を使う例だが、なんかそこまでしたくない。

ではディクショナリーテストをgdbでスキップしてください:


(gdb) commands 
Type commands for when breakpoint 1 is hit, one per line.
End with a line saying just "end".
>set *0x60023388=0x0 
>cont 
>end 
(gdb) cont 
Continuing.
 
Breakpoint 1, 0x00000000022370e0 in kcfckdb ()
 
Program received signal SIGSEGV, Segmentation fault.
0x0000000002cbe19f in slaac_int ()
(gdb) 

そして、再びresetlogデータベースを起動するときに:

Sat Nov 30 12:03:37 2013
ARC3 started with pid=21, OS id=29788 
Undo initialization finished serial:0 start:127664534 end:127664564 diff:30 (0 seconds)
Verifying file header compatibility for 11g tablespace encryption..
Errors in file /u01/app/oracle/diag/rdbms/bb/bb/trace/bb_ora_28960.trc:
ORA-00604: error occurred at recursive SQL level 1
ORA-00376: file 1 cannot be read at this time
ORA-01110: data file 1: '/stage/system01.dbf'
Errors in file /u01/app/oracle/diag/rdbms/bb/bb/trace/bb_ora_28960.trc:
ORA-00604: error occurred at recursive SQL level 1
ORA-00376: file 1 cannot be read at this time
ORA-01110: data file 1: '/stage/system01.dbf'
Error 604 happened during db open, shutting down database
USER (ospid: 28960): terminating the instance due to error 604
Sat Nov 30 12:08:38 2013
USER (ospid: 29792): terminating the instance due to error 604
Termination issued to instance processes. Waiting for the processes to exit
Sat Nov 30 12:08:48 2013
Instance termination failed to kill one or more processes


それで、一つの断絶点を知る必要がある。どうやってその断絶点を設定するか。データベースを “Verifying file header compatibility for 11g tablespace encryption”しないようにしてください。

oracle DUL第二篇——DULでdmpファイルを抽出する

ORACLEデータベース によくあるエラ の解決策

プロのOracle Databaseの復旧サービスを提供
携帯番号: +86 13764045638 メール:service@parnassusdata.com


Dulによく使われるコマンド:
DUL> unload database ;
DUL> unload user ;
DUL> unload table ;
DUL> scan database;
DUL> scan tables;

テストテーブルの記録数を記してください:


SYS@lunar>select count(*) from lunar.lunar;
 
  COUNT(*)
----------
     17634  ここでは17634 行記録である
 
Elapsed: 00:00:00.09
SYS@lunar>

ほかの配置バラメタは第一篇に参考してくださいDUL 第一篇 —— DULは何か?
DULを起動してunpump headerを実行すれば、抽出できる:

DUL> unpump header dump file lunar.01.dmp;
Version is 769
check sum is 1864601239
data pump id is 6783164
master_obj_no is 18333
header blocks is 1
data pump file number is 1
block size is 4096
character set id is 873
master table block offset is 411
(Master table is at byte offset (411 -1) * 4096 = 1679360)
DUL> unpump table lunar.dmp (OWNER VARCHAR2(30),OBJECT_NAME VARCHAR2(128),SUBOBJECTNAME VARCHAR2(30),OBJECT_ID NUMBER,DATA_OBJECT_ID NUMBER,OBJECT_TYPE VARCHAR2(19),CREATED DATE,LAST_DDL_TIME DATE,TIMESTAMP VARCHAR2(19),STATUS VARCHAR2(7),TEMPORARY VARCHAR2(1),GENERATED VARCHAR2(1),SECONDARY VARCHAR2(1),NAMESPACE NUMBER,EDITION_NAME VARCHAR2(30)) dump file lunar.01.dmp from 15048 until 1676342; 
17634 rows unloaded
DUL> 


ここで17634 行記録は全部抽出できた。テストしたいであれば、より楽しくなる。一部のデータをddして、dulがどうやって働くかを確認できる。。
そして、データをインポートする。O(∩_∩)O

[oracle@lunar dul]$ sqlldr userid=lunar/lunar control=/home/oracle/test/dul/dump000.ctl
 
SQL*Loader: Release 11.2.0.3.0 - Production on Thu Mar 6 13:11:44 2014
 
Copyright (c) 1982, 2011, Oracle and/or its affiliates.  All rights reserved.
 
Commit point reached - logical record count 64
Commit point reached - logical record count 128
Commit point reached - logical record count 192
Commit point reached - logical record count 256
Commit point reached - logical record count 320
Commit point reached - logical record count 384
Commit point reached - logical record count 448
Commit point reached - logical record count 512
Commit point reached - logical record count 576
Commit point reached - logical record count 640
Commit point reached - logical record count 704
Commit point reached - logical record count 768
Commit point reached - logical record count 832
Commit point reached - logical record count 896
................
Commit point reached - logical record count 17270
Commit point reached - logical record count 17334
Commit point reached - logical record count 17398
Commit point reached - logical record count 17462
Commit point reached - logical record count 17526
Commit point reached - logical record count 17590
Commit point reached - logical record count 17634
[oracle@lunar dul]$

ここで、17634 行データ、すべてもテーブルにインポートした。

Oracle ORA-00604とORA-04024エラの解決策

ORACLEデータベース によくあるエラ の解決策

プロのOracle Databaseの復旧サービスを提供
携帯番号: +86 13764045638 メール:service@parnassusdata.com


一般的なOracleのbootstrap index(テーブルのインディクスと一部のコアオブジェクトをガイドする)も似たような方法で対応できる。例えば以下のクエリ文のI_OBJxxxxx。
.
テスト環境 11.2.0.3データベース:


[oracle@lunarpri ~]$ ss

SQL*Plus: Release 11.2.0.3.0 Production on Fri Mar 27 19:12:57 2015

Copyright (c) 1982, 2011, Oracle.  All rights reserved.


Connected to:
Oracle Database 11g Enterprise Edition Release 11.2.0.3.0 - 64bit Production
With the Partitioning and Real Application Testing options
SYS@lunar>col OBJECT_NAME for a30
SYS@lunar>select OWNER,OBJECT_NAME,OBJECT_TYPE,status,LAST_DDL_TIME from dba_objects where OBJECT_NAME like 'I_OBJ%';

OWNER                          OBJECT_NAME                    OBJECT_TYPE         STATUS  LAST_DDL_
------------------------------ ------------------------------ ------------------- ------- ---------
SYS                            I_OBJ#                         INDEX               VALID   08-FEB-13
SYS                            I_OBJ5                         INDEX               VALID   08-FEB-13
SYS                            I_OBJ3                         INDEX               VALID   08-FEB-13
SYS                            I_OBJ1                         INDEX               VALID   08-FEB-13
SYS                            I_OBJ2                         INDEX               VALID   08-FEB-13
SYS                            I_OBJ4                         INDEX               VALID   08-FEB-13
SYS                            I_OBJAUTH1                     INDEX               VALID   08-FEB-13
SYS                            I_OBJAUTH2                     INDEX               VALID   08-FEB-13
SYS                            I_OBJ#_INTCOL#                 INDEX               VALID   08-FEB-13
SYS                            I_OBJTYPE                      INDEX               VALID   08-FEB-13

10 rows selected.

Elapsed: 00:00:00.06
SYS@lunar>


データベースで、bootstrap indexを操作出来ない、例えば:
あるbootstrapインディクスはupgradeモードで修正できなくなる:

SYS@lunar>alter index SYS.I_OBJ5 unusable
*
ERROR at line 1:
ORA-00701: object necessary for warmstarting database cannot be altered


Elapsed: 00:00:00.01
SYS@lunar>alter index SYS.I_OBJ3 unusable
*
ERROR at line 1:
ORA-00701: object necessary for warmstarting database cannot be altered


Elapsed: 00:00:00.02
SYS@lunar>alter index SYS.I_OBJ1 unusable
*
ERROR at line 1:
ORA-00701: object necessary for warmstarting database cannot be altered


Elapsed: 00:00:00.01
SYS@lunar>


アップグレードモードを起動できる。このモードでデータベースは自動的にsystem triggerを禁止する操作を増やす。
一部のbootstrageオブジェクトの操作を実行できる、例えば:

SYS@lunar>startup upgrade
ORACLE instance started.

Total System Global Area        626327552 bytes
Fixed Size                        2230952 bytes
Variable Size                   184550744 bytes
Database Buffers                432013312 bytes
Redo Buffers                      7532544 bytes
Database mounted.
Database opened.
SYS@lunar>
SYS@lunar>alter index SYS.I_OBJAUTH2 unusable;
alter index SYS.I_OBJ#_INTCOL# unusable;
alter index SYS.I_OBJTYPE unusable;

Index altered.

Elapsed: 00:00:00.04
SYS@lunar>alter index SYS.I_OBJ# unusable

Index altered.

Elapsed: 00:00:00.20
SYS@lunar>
Index altered.

Elapsed: 00:00:00.03
SYS@lunar>
Index altered.

Elapsed: 00:00:00.03
SYS@lunar> 


アップグレードモード自動追加のバラメタは以下の通り:

Fri Mar 27 19:21:48 2015
MMNL started with pid=16, OS id=15218
ALTER SYSTEM enable restricted session;
ALTER SYSTEM SET _system_trig_enabled=FALSE SCOPE=MEMORY;
Autotune of undo retention is turned off.
ALTER SYSTEM SET _undo_autotune=FALSE SCOPE=MEMORY;
ALTER SYSTEM SET undo_retention=900 SCOPE=MEMORY;
ALTER SYSTEM SET aq_tm_processes=0 SCOPE=MEMORY;
ALTER SYSTEM SET enable_ddl_logging=FALSE SCOPE=MEMORY;
Resource Manager disabled during database migration: plan '' not set
ALTER SYSTEM SET resource_manager_plan='' SCOPE=MEMORY;
ALTER SYSTEM SET recyclebin='OFF' DEFERRED SCOPE=MEMORY;
Resource Manager disabled during database migration
replication_dependency_tracking turned off (no async multimaster replication found)


ここで、データディクショナリーが破壊されたから、それについての機能も効かなくなった:

SYS@lunar>col OBJECT_NAME for a30
SYS@lunar>select OWNER,OBJECT_NAME,OBJECT_TYPE,status,LAST_DDL_TIME from dba_objects where OBJECT_NAME like 'I_OBJ%';
select OWNER,OBJECT_NAME,OBJECT_TYPE,status,LAST_DDL_TIME from dba_objects where OBJECT_NAME like 'I_OBJ%'
                                                               *
ERROR at line 1:
ORA-00604: error occurred at recursive SQL level 1
ORA-01502: index 'SYS.I_OBJ#_INTCOL#' or partition of such index is in unusable state


Elapsed: 00:00:00.20
SYS@lunar>


起動するときにORA-00604 ORA-04024エラになる:

SYS@lunar>startup
ORACLE instance started.

Total System Global Area        626327552 bytes
Fixed Size                        2230952 bytes
Variable Size                   184550744 bytes
Database Buffers                432013312 bytes
Redo Buffers                      7532544 bytes
Database mounted.
ORA-00604: error occurred at recursive SQL level 4
ORA-04024: self-deadlock detected while trying to mutex pin cursor 0x07EF125E8


SYS@lunar>


正常にデータベースをクロスするのもできない。なら、原因は一部のコアアーカイブSQLを実行するときにトラブルがあったと意味している。shutdown abortしかできない:


SYS@lunar>shutdown immediate
ORA-00604: error occurred at recursive SQL level 4
ORA-04024: self-deadlock detected while trying to mutex pin cursor 0x07EF125E8
SYS@lunar>shutdown abort 
ORACLE instance shut down
SYS@lunar>


アップグレードモードでデータベースを起動して、インディクスをリカバリする:.

SYS@lunar>startup upgrade
ORACLE instance started.

Total System Global Area        626327552 bytes
Fixed Size                        2230952 bytes
Variable Size                   184550744 bytes
Database Buffers                432013312 bytes
Redo Buffers                      7532544 bytes
Database mounted.
Database opened.
SYS@lunar>

SYS@lunar>show parameter NLS_LENGTH_SEMANTICS
ORA-00604: error occurred at recursive SQL level 1
ORA-01502: index 'SYS.I_OBJ#_INTCOL#' or partition of such index is in unusable state


SYS@lunar>


ミニアップグレードスクリプトを実行してリカバリする:


SYS@lunar>ALTER SESSION SET NLS_LENGTH_SEMANTICS = BYTE;

Session altered.

Elapsed: 00:00:00.00
SYS@lunar>@?/rdbms/admin/utlmmig.sql

View created.

Elapsed: 00:00:01.32

PL/SQL procedure successfully completed.

Elapsed: 00:00:00.34

Commit complete.

Elapsed: 00:00:00.01

Table dropped.

Elapsed: 00:00:00.01

Table created.

Elapsed: 00:00:00.53

Index created.

Elapsed: 00:00:00.12

Index created.

Elapsed: 00:00:00.05

Index created.

Elapsed: 00:00:00.02

Index created.

Elapsed: 00:00:00.03

Index created.

Elapsed: 00:00:00.04

Table dropped.

Elapsed: 00:00:00.02

Table created.

Elapsed: 00:00:00.07

Index created.

Elapsed: 00:00:00.03

Index created.

Elapsed: 00:00:00.03

Table dropped.

Elapsed: 00:00:00.00

Table created.

Elapsed: 00:00:00.04

Table dropped.

Elapsed: 00:00:00.01

Table created.

Elapsed: 00:00:00.05
declare
*
ERROR at line 1:
ORA-01502: index 'SYS.I_OBJ#_INTCOL#' or partition of such index is in unusable state
ORA-06512: at line 13
ORA-06512: at line 137


Disconnected from Oracle Database 11g Enterprise Edition Release 11.2.0.3.0 - 64bit Production
With the Partitioning and Real Application Testing options
[oracle@lunarpri ~]$ 


ここでSYS.I_OBJ#_INTCOL#インディクスはunusableと見られる。アップグレードモードでリカバリできない。
けど10gのあと、このインディクスはevent 38003で禁止できる:


SYS@lunar>create pfile='/tmp/spfile.bak' from spfile;

File created.

Elapsed: 00:00:00.01
SYS@lunar>show parameter spfile 
ORA-00604: error occurred at recursive SQL level 1
ORA-01502: index 'SYS.I_OBJ#_INTCOL#' or partition of such index is in unusable state

SYS@lunar>shutdown immediate
Database closed.
Database dismounted.
ORACLE instance shut down.
SYS@lunar>

[oracle@lunarpri ~]$ tail /tmp/spfile.bak 
*.db_recovery_file_dest_size=10485760000
*.deferred_segment_creation=FALSE
*.diagnostic_dest='/u01/app/oracle'
*.open_cursors=300
*.pga_aggregate_target=153092096
*.processes=150
*.remote_login_passwordfile='EXCLUSIVE'
*.sga_target=629145600
*.undo_tablespace='UNDOTBS1'
*.EVENT="38003 trace name context forever, level 10"
[oracle@lunarpri ~]$ 

SYS@lunar>startup pfile=/tmp/spfile.bak  upgrade
ORACLE instance started.

Total System Global Area        626327552 bytes
Fixed Size                        2230952 bytes
Variable Size                   184550744 bytes
Database Buffers                432013312 bytes
Redo Buffers                      7532544 bytes
Database mounted.
Database opened.
SYS@lunar>col OBJECT_NAME for a30
SYS@lunar>select OWNER,OBJECT_NAME,OBJECT_TYPE,status,LAST_DDL_TIME from dba_objects where OBJECT_NAME like 'I_OBJ%';
select OWNER,OBJECT_NAME,OBJECT_TYPE,status,LAST_DDL_TIME from dba_objects where OBJECT_NAME like 'I_OBJ%'
                                                               *
ERROR at line 1:
ORA-00604: error occurred at recursive SQL level 1
ORA-01502: index 'SYS.I_OBJ#_INTCOL#' or partition of such index is in unusable state


Elapsed: 00:00:00.08
SYS@lunar>alter index SYS.I_OBJ#_INTCOL# rebuild;

Index altered.

Elapsed: 00:00:00.46
SYS@lunar>


ここで、壊されたインディクスをリカバリした。
そして、再び、ミニアップグレードスクリプトを実行する:
SYS@lunar>select OWNER,OBJECT_NAME,OBJECT_TYPE,status,LAST_DDL_TIME from dba_objects where OBJECT_NAME like 'I_OBJ%';

OWNER                          OBJECT_NAME                    OBJECT_TYPE         STATUS  LAST_DDL_
------------------------------ ------------------------------ ------------------- ------- ---------
SYS                            I_OBJ#                         INDEX               VALID   08-FEB-13
SYS                            I_OBJ5                         INDEX               VALID   08-FEB-13
SYS                            I_OBJ3                         INDEX               VALID   08-FEB-13
SYS                            I_OBJ1                         INDEX               VALID   08-FEB-13
SYS                            I_OBJ2                         INDEX               VALID   08-FEB-13
SYS                            I_OBJ4                         INDEX               VALID   08-FEB-13
SYS                            I_OBJAUTH1                     INDEX               VALID   27-MAR-15
SYS                            I_OBJAUTH2                     INDEX               VALID   27-MAR-15
SYS                            I_OBJ#_INTCOL#                 INDEX               VALID   27-MAR-15
SYS                            I_OBJTYPE                      INDEX               VALID   27-MAR-15
SYS                            I_OBJ_MIG1                     INDEX               VALID   27-MAR-15
SYS                            I_OBJ_MIG2                     INDEX               VALID   27-MAR-15
SYS                            I_OBJ_MIG3                     INDEX               VALID   27-MAR-15
SYS                            I_OBJ_MIG4                     INDEX               VALID   27-MAR-15
SYS                            I_OBJ_MIG5                     INDEX               VALID   27-MAR-15

15 rows selected.

Elapsed: 00:00:00.49
SYS@lunar>@?/rdbms/admin/utlmmig.sql

View created.

Elapsed: 00:00:00.69

PL/SQL procedure successfully completed.

Elapsed: 00:00:00.07

Commit complete.

Elapsed: 00:00:00.00

Table dropped.

Elapsed: 00:00:00.28

Table created.

Elapsed: 00:00:00.08

Index created.

Elapsed: 00:00:00.09

Index created.

Elapsed: 00:00:00.03

Index created.

Elapsed: 00:00:00.02

Index created.

Elapsed: 00:00:00.03

Index created.

Elapsed: 00:00:00.03

Table dropped.

Elapsed: 00:00:00.12

Table created.

Elapsed: 00:00:00.08

Index created.

Elapsed: 00:00:00.02

Index created.

Elapsed: 00:00:00.03

Table dropped.

Elapsed: 00:00:00.08

Table created.

Elapsed: 00:00:00.03

Table dropped.

Elapsed: 00:00:00.06

Table created.

Elapsed: 00:00:00.03

PL/SQL procedure successfully completed.

Elapsed: 00:00:00.20

PL/SQL procedure successfully completed.

Elapsed: 00:00:26.30

49 rows created.

Elapsed: 00:00:00.03

60 rows created.

Elapsed: 00:00:00.00

Commit complete.

Elapsed: 00:00:00.01

PL/SQL procedure successfully completed.

Elapsed: 00:00:00.14

PL/SQL procedure successfully completed.

Elapsed: 00:00:11.16

PL/SQL procedure successfully completed.

Elapsed: 00:00:00.09

10 rows deleted.

Elapsed: 00:00:00.03

Commit complete.

Elapsed: 00:00:00.00

10 rows created.

Elapsed: 00:00:00.01

Commit complete.

Elapsed: 00:00:00.00

PL/SQL procedure successfully completed.

Elapsed: 00:00:00.82

        COUNT(*)
----------------
              60

Elapsed: 00:00:00.00

        COUNT(*)
----------------
              60

Elapsed: 00:00:00.00

        COUNT(*)
----------------
              60

Elapsed: 00:00:00.01

        COUNT(*)
----------------
              60

Elapsed: 00:00:00.01

        COUNT(*)
----------------
              60

Elapsed: 00:00:00.00

        COUNT(*)
----------------
              60

Elapsed: 00:00:00.00

PL/SQL procedure successfully completed.

Elapsed: 00:00:00.15
Database closed.
Database dismounted.
ORACLE instance shut down.
SYS@lunar>

そして、データベースを起動する:
SYS@lunar>startup
ORACLE instance started.

Total System Global Area        626327552 bytes
Fixed Size                        2230952 bytes
Variable Size                   184550744 bytes
Database Buffers                432013312 bytes
Redo Buffers                      7532544 bytes
Database mounted.
Database opened.
SYS@lunar>
SYS@lunar>col OBJECT_NAME for a30
SYS@lunar>select OWNER,OBJECT_NAME,OBJECT_TYPE,status,LAST_DDL_TIME from dba_objects where OBJECT_NAME like 'I_OBJ%';

OWNER                          OBJECT_NAME                    OBJECT_TYPE         STATUS  LAST_DDL_
------------------------------ ------------------------------ ------------------- ------- ---------
SYS                            I_OBJ#                         INDEX               VALID   08-FEB-13
SYS                            I_OBJ_MIG1                     INDEX               VALID   08-FEB-13
SYS                            I_OBJ_MIG2                     INDEX               VALID   08-FEB-13
SYS                            I_OBJ_MIG3                     INDEX               VALID   08-FEB-13
SYS                            I_OBJ_MIG4                     INDEX               VALID   08-FEB-13
SYS                            I_OBJ_MIG5                     INDEX               VALID   08-FEB-13
SYS                            I_OBJAUTH1                     INDEX               VALID   27-MAR-15
SYS                            I_OBJAUTH2                     INDEX               VALID   27-MAR-15
SYS                            I_OBJ#_INTCOL#                 INDEX               VALID   27-MAR-15
SYS                            I_OBJTYPE                      INDEX               VALID   27-MAR-15
SYS                            I_OBJ1                         INDEX               VALID   27-MAR-15
SYS                            I_OBJ2                         INDEX               VALID   27-MAR-15
SYS                            I_OBJ3                         INDEX               VALID   27-MAR-15
SYS                            I_OBJ4                         INDEX               VALID   27-MAR-15
SYS                            I_OBJ5                         INDEX               VALID   27-MAR-15

15 rows selected.

Elapsed: 00:00:00.14
SYS@lunar>
初めて実行したミニアップグレードスクリプトを削除したのはエラによって、データベースに残された一時的なインディクスを削除する:
SYS@lunar>DROP INDEX SYS.I_OBJ_MIG1;

Index dropped.

Elapsed: 00:00:00.44
SYS@lunar>C/1/2          
  1* DROP INDEX SYS.I_OBJ_MIG2
SYS@lunar>/

Index dropped.

Elapsed: 00:00:00.06
SYS@lunar>C/2/3
  1* DROP INDEX SYS.I_OBJ_MIG3
SYS@lunar>/

Index dropped.

Elapsed: 00:00:00.05
SYS@lunar>C/3/4
  1* DROP INDEX SYS.I_OBJ_MIG4
SYS@lunar>/

Index dropped.

Elapsed: 00:00:00.08
SYS@lunar>C/4/5
  1* DROP INDEX SYS.I_OBJ_MIG5
SYS@lunar>/

Index dropped.

Elapsed: 00:00:00.05
SYS@lunar>
SYS@lunar>col OBJECT_NAME for a30
SYS@lunar>select OWNER,OBJECT_NAME,OBJECT_TYPE,status,LAST_DDL_TIME from dba_objects where OBJECT_NAME like 'I_OBJ%';

OWNER                          OBJECT_NAME                    OBJECT_TYPE         STATUS  LAST_DDL_
------------------------------ ------------------------------ ------------------- ------- ---------
SYS                            I_OBJ#                         INDEX               VALID   08-FEB-13
SYS                            I_OBJAUTH1                     INDEX               VALID   27-MAR-15
SYS                            I_OBJAUTH2                     INDEX               VALID   27-MAR-15
SYS                            I_OBJ#_INTCOL#                 INDEX               VALID   27-MAR-15
SYS                            I_OBJTYPE                      INDEX               VALID   27-MAR-15
SYS                            I_OBJ1                         INDEX               VALID   27-MAR-15
SYS                            I_OBJ2                         INDEX               VALID   27-MAR-15
SYS                            I_OBJ3                         INDEX               VALID   27-MAR-15
SYS                            I_OBJ4                         INDEX               VALID   27-MAR-15
SYS                            I_OBJ5                         INDEX               VALID   27-MAR-15

10 rows selected.

Elapsed: 00:00:00.07
SYS@lunar>shutdown immediate
Database closed.
Database dismounted.
ORACLE instance shut down.
SYS@lunar>startup
ORACLE instance started.

Total System Global Area        626327552 bytes
Fixed Size                        2230952 bytes
Variable Size                   184550744 bytes
Database Buffers                432013312 bytes
Redo Buffers                      7532544 bytes
Database mounted.
Database opened.
SYS@lunar>
SYS@lunar>col OBJECT_NAME for a30
SYS@lunar>select OWNER,OBJECT_NAME,OBJECT_TYPE,status,LAST_DDL_TIME from dba_objects where OBJECT_NAME like 'I_OBJ%';

OWNER                          OBJECT_NAME                    OBJECT_TYPE         STATUS  LAST_DDL_
------------------------------ ------------------------------ ------------------- ------- ---------
SYS                            I_OBJ#                         INDEX               VALID   08-FEB-13
SYS                            I_OBJAUTH1                     INDEX               VALID   27-MAR-15
SYS                            I_OBJAUTH2                     INDEX               VALID   27-MAR-15
SYS                            I_OBJ#_INTCOL#                 INDEX               VALID   27-MAR-15
SYS                            I_OBJTYPE                      INDEX               VALID   27-MAR-15
SYS                            I_OBJ1                         INDEX               VALID   27-MAR-15
SYS                            I_OBJ2                         INDEX               VALID   27-MAR-15
SYS                            I_OBJ3                         INDEX               VALID   27-MAR-15
SYS                            I_OBJ4                         INDEX               VALID   27-MAR-15
SYS                            I_OBJ5                         INDEX               VALID   27-MAR-15

10 rows selected.

Elapsed: 00:00:00.13
SYS@lunar>
ここで、完璧にリカバリした!


Oracle ORACDEBUG でデータベースSCNを修正する

ORACLEデータベース によくあるエラ の解決策

プロのOracle Databaseの復旧サービスを提供
携帯番号: +86 13764045638 メール:service@parnassusdata.com


1988年に、OracleがOracle V6をリリースした。このバーションに、Oracleはホットバックアップを導入した。同時に、SCN、48位ストレージの文法はコードに使えなくなった。12cまで使い続けた。(12cに八つのバイトでSCNをストレージする)。OracleのSCNは48位で表したから、最大値がは2の48乗に超えられない。
Oracleは48位のSCNが500年も使い続けるために、SCNを制約した。秒ごとにSCNの最大増速は16Kに超えられない。Oracleは1988年1月1日0点0分0秒を基準時間として、既存する秒を16Kに掛ける。つまり、既存するSCNの最大値はSCN HEADROOMである。
それで、SCN最大値の計算式は以下の通り:
(今の時間-19880101 000000)*16384–(current_scn)その中 16384はSCNの内部増速は16kで、これはコードの制約である。
この制約は11.2.0.2バーションの前に、scn の最大の伸び率は16k,在11.2.0.2版本开始,为32k。
この行は以下のようなバラメタ_max_reasonable_scn_rateによって、コントロールされる:


SQL> @paras
Enter value for paras: scn
old   6: AND x.ksppinm LIKE '%&paras%'
new   6: AND x.ksppinm LIKE '%scn%'
 
NAME                                               VALUE                DESCRIB
-------------------------------------------------- -------------------- ------------------------------------------------------------
。。。。。。。
_external_scn_rejection_threshold_hours            24                   Lag in hours between max allowed SCN and an external SCN
_max_reasonable_scn_rate                           32768                Max reasonable SCN rate
。。。。。
 
17 rows selected.
 
SQL> 


11.2でOracleはSCNの各秒の最大増速を16Kから32Kに増やして、SCN HEADROOMトラブルがあるシステムがその故障を別のシステムに伝えないために、しきい値も追加した。
この修正は以下のバッチに含んでいる:

scnheadroom1

もしSCNが突然増やしたら、alertに以下のようなアラームが現れる:

scnheadroom2


それで、以上のようなバッチを追加したら、前のバラメタでSCNを修正することができなくなった。

そして、データベースに一部の異常的なエラが現れる。SCNをふさわしい数値に変更する必要がある。例えば、一部のよくあるエラはデータベースに一部のブロックがデータベースSCNが一致していない。あるいは一部のundo$を持っているデータベースを起動するときに、失敗する:
ORA-600 [2256]
ORA-600 [2662]
ORA-600 [4000]
ORA-600 [kcsadjn1]

この前に、バラメタでSCNを修正した。例えば:
event=”10015 trace name adjust_scn level x” あるいは _minimum_giga_scn バラメタを使う。
前に言っていたとおり、前のバッチとバーションを利用したあと、使えなくなった。この場合に、以下のような方法を利用してください:
1,bbed直に修正(場合によってめんどくさくなる場合もある。例えば、修正する必要があるファイルが多い場合である)
2,ORACDEBUG で kcsgscnを修正する
3,制御ファイルを修正する
ここで、ORACDEBUG で kcsgscnを修正するという方法をテストする。
注意: 違ったENDIANとワード長と違っている。例えば、AIXではWRAP SCNが前にあって、BASE SCNが後ろにある。Linuxの場合はBASE SCNが前にあって、WRAP SCNが後ろにあるというフォーマットである。

今のデータベースのSCN


[oracle@lunar ~]$ ss
 
SQL*Plus: Release 11.2.0.4.0 Production on Tue Aug 5 06:16:39 2014
 
Copyright (c) 1982, 2013, Oracle.  All rights reserved.
 
 
Connected to:
Oracle Database 11g Enterprise Edition Release 11.2.0.4.0 - 64bit Production
With the Partitioning, Automatic Storage Management, OLAP, Data Mining
and Real Application Testing options
 
SQL> 
SQL> select checkpoint_change#,to_char(checkpoint_change#,'XXXXXXXXXXXXXXXXX')  from v$database;
 
CHECKPOINT_CHANGE# TO_CHAR(CHECKPOINT
------------------ ------------------
           1723797             1A4D95
 
SQL>


ここで、今のデータベースSCNが1723797で、100万を増やせば、2723797になる。


SQL> oradebug setmypid
Statement processed.
SQL> oradebug dumpvar sga kcsgscn_
kcslf kcsgscn_ [06001AE70, 06001AEA0) = 00000000 00000000 00000000 00000000 00000000 00000000 00000000 00000000 00000000 00000000 6001AB50 00000000
SQL> select checkpoint_change#,to_char(checkpoint_change#,'XXXXXXXXXXXXXXXXX')  from v$database;
 
CHECKPOINT_CHANGE# TO_CHAR(CHECKPOINT
------------------ ------------------
           1723797             1A4D95
 
SQL>


データベースがmount状態だから、ここで見られるkcsgscn_のSCNの数値が0である。
次に2723797に修正して、計算する:


SQL> select to_char(2723797,'XXXXXXXXXXXXXXXX') from dual;
 
TO_CHAR(2723797,'
-----------------
           298FD5
 
SQL> oradebug setmypid
Statement processed.
SQL> oradebug dumpvar sga kcsgscn_
kcslf kcsgscn_ [06001AE70, 06001AEA0) = 00000000 00000000 00000000 00000000 00000000 00000000 00000000 00000000 00000000 00000000 6001AB50 00000000
SQL> oradebug poke 0x06001AE70 8 0x0000000000298FD5 
BEFORE: [06001AE70, 06001AE78) = 00000000 00000000
AFTER:  [06001AE70, 06001AE78) = 00298FD5 00000000
SQL> oradebug dumpvar sga kcsgscn_
kcslf kcsgscn_ [06001AE70, 06001AEA0) = 00298FD5 00000000 00000000 00000000 00000000 00000000 00000000 00000000 00000000 00000000 6001AB50 00000000
SQL> 
SQL> alter database  open;
 
Database altered.
 
SQL>  select checkpoint_change#,checkpoint_change#/1024/1024/1024 SCN_WARP  from v$database;
 
CHECKPOINT_CHANGE#   SCN_WARP
------------------ ----------
           2723798 .002536735
 
SQL> 


ここで2723797になった。

DULでExadataのoracleデータベースを抽出する(ディスクのデータファイルを抽出する)


ORACLEデータベース によくあるエラ の解決策

プロのOracle Databaseの復旧サービスを提供
携帯番号: +86 13764045638 メール:service@parnassusdata.com


前に研究したdulはディスクを識別できない。そのときに、ある過ちを犯した、普通の環境(非exadata環境)はホストにディスクをスキャンする。Exadataのホストにディスクをスキャンしたが、ダメだった。具体的には以下を参考してください:

Exadataで、なぜ DULと ODUがASMデータベースのデータを読み取れないが、Kfedなら読み取れるか?

今日はexadataのストレージノード(cellノード)に配置したが、dulもoduもディスクをスキャンできる。もし、またexadataoracleデータベースが壊されたときに、わたしに連絡してくださいO(_)O
具体的なテストは以下の通り:


[root@dm01cel01 lunar]# ./dul
 
Data UnLoader: 10.2.0.6.5 - Internal Only - on Tue Jun 23 20:30:37 2015
with 64-bit io functions
 
Copyright (c) 1994 2015 Bernard van Duijnen All rights reserved.
 
 Strictly Oracle Internal Use Only
 
 
DUL: Warning: Could not open parameter file 
DUL: Warning: Compatible is set to 10 Values can be 6|7|8|9|10
DUL: Warning: no parameter file means no logfile
 
DUL: Warning: block 0 is not a disk header block
DUL: Warning: ASM Block type 32 not handled yet
...................
DUL>ディスクスキャン
 
............
DUL: Error: INCSEQ mismatch[8388877!=427426078]
DUL: Error: While processing unknown file unknown block
offset 33605120 possible block of size 512
DUL: Error: INCSEQ mismatch[8388892!=23134477]
DUL: Error: While processing unknown file unknown block
DUL: Error: block trailer mismatch found 0X0080011C expect 0X0A611C80
DUL: Error: checksum should be unused: 0x0a64
DUL: Error: While processing unknown file unknown block
DUL: Error: block trailer mismatch found 0X0080011B expect 0X02540C80
 
............
 
DUL: Error: block trailer mismatch found 0X00800888 expect 0X021B0D80
DUL: Error: checksum should be unused: 0x0229
DUL: Error: While processing unknown file unknown block
DUL: Error: INCSEQ mismatch[8390800!=961087622]
DUL: Error: While processing unknown file unknown block
Found file   2 block 88576 type 32 offs 46137344 delta 69398953984
extent of 512 blocks
Found file   1 block 102400 type 6 offs 50331648 delta 35148267520
extent of 473 blocks
Found file   2 block 98816 type 32 offs 54525952 delta 69474451456
extent of 512 blocks
Found file   2 block 107008 type 32 offs 58720256 delta 69537366016
extent of 512 blocks
Found file   2 block 111104 type 32 offs 62914560 delta 69566726144
extent of 512 blocks
Found file   2 block 125440 type 32 offs 67108864 delta 69679972352
extent of 512 blocks
Found file 352 block  7168 type 6 offs 71303168 delta 12094615322624
extent of 512 blocks
Found file 352 block 25600 type 6 offs 75497472 delta 12094762123264
extent of 512 blocks
Found file 352 block 44032 type 32 offs 79691776 delta 12094908923904
extent of 512 blocks
Found file 352 block 46592 type 6 offs 83886080 delta 12094925701120
extent of 512 blocks
Found file 352 block 58880 type 6 offs 88080384 delta 12095022170112
extent of 512 blocks
Found file 352 block 62464 type 32 offs 92274688 delta 12095047335936
extent of 512 blocks
Found file 352 block 66048 type 6 offs 96468992 delta 12095072501760
extent of 512 blocks
Found file 352 block 78848 type 32 offs 100663296 delta 12095173165056
extent of 512 blocks
Found file 352 block 80896 type 6 offs 104857600 delta 12095185747968
extent of 512 blocks
Found file 352 block 87552 type 6 offs 109051904 delta 12095236079616
extent of 512 blocks
Found file 352 block 89600 type 6 offs 113246208 delta 12095248662528
extent of 512 blocks
Found file 352 block 98304 type 6 offs 117440512 delta 12095315771392
extent of 512 blocks
Found file 352 block 99328 type 6 offs 121634816 delta 12095319965696
 
Found file 381 block 2410496 type 6 offs 54836330496 delta 13055970770944
extent of 512 blocks
Found file 381 block 2422272 type 32 offs 54840524800 delta 13056063045632
^C
[root@dm01cel01 lunar]# 


ここでcontrol+Cで中止したが、ディスクが大きすぎて、スキャン時間も長すぎた。上の情報はスキャンできると証明した。
normal externalについて、また後日で。
ファイルスキャンは以下の通り:

[root@dm01cel01 lunar]# ll
total 3172
-rw-r--r-- 1 root      root      71 Jun 23 20:30 control.dul
-rwxrwxr-x 1 celladmin 1000 1101896 May  5 00:14 dul
-rw-r--r-- 1 root      root  487424 Jun 23 20:36 IDX_DATA1.dat
[root@dm01cel01 lunar]# head IDX_DATA1.dat
D /dev/sdc
B 46137344 8477184 1 6687
T 46145536 8477185 7 6687
T 46202880 8477192 8 6643
T 46268416 8477200 8 6649
T 46333952 8477208 8 6651
T 46399488 8477216 8 6657
T 46465024 8477224 8 6653
T 46530560 8477232 8 6655
T 46596096 8477240 8 6687
[root@dm01cel01 lunar]#


Oracle BBEDツール


ORACLEデータベース によくあるエラ の解決策

プロのOracle Databaseの復旧サービスを提供
携帯番号: +86 13764045638 メール:service@parnassusdata.com


Oracle8i のBBEDはwindows プラットフォームの$ORACLE_HOME/binに見つけ出せる。
ORACLE9iデータベースの場合なら、%ORACLE_HOME%/binディクショナリーにbbedがある。Linuxにもあるが、自分で編集する必要がある。

9i/10g bbed:


cd $ORACLE_HOME/rdbms/lib
ls -al *bb*
make -f ins_rdbms.mk $ORACLE_HOME/rdbms/lib/bbed
mv bbed $ORACLE_HOME/bin

11gと12.1に10gの五つのファイルが必要としている(bbedzhs.msbは選択可能):

/rdbms/mesg/bbed*
bbedus.msb   bbedus.msg   bbedzhs.msb
 
cp /tmp/lunar/ssbbded.o $ORACLE_HOME/rdbms/lib/
cp /tmp/lunar/sbbdpt.o $ORACLE_HOME/rdbms/lib/
cp /tmp/lunar/bbedus.msg $ORACLE_HOME/rdbms/mesg/
cp /tmp/lunar/bbedus.msb $ORACLE_HOME/rdbms/mesg/
 
cd $ORACLE_HOME/rdbms/lib
ls -al *bb*
make -f ins_rdbms.mk $ORACLE_HOME/rdbms/lib/bbed
mv bbed $ORACLE_HOME/bin


BBEDのデフォルトのパスワードは blockedit:

[oracle@lunar ~]$ bbed
Password: blockedit(ディフォルト) 
 
BBED: Release 2.0.0.0.0 - Limited Production on Thu Jan 17 18:32:16 2013
 
Copyright (c) 1982, 2011, Oracle and/or its affiliates.  All rights reserved.
 
************* !!! For Oracle Internal Use only !!! ***************
 
BBED> 


一般的にはbbedを使っている。これは配置情報をあるバラメタファイルに書き込む。Bbedを使っていると、そのバラメタファイルを指定する。例えば:
v$datafileからfile#,name,bytesを獲得し、filelist.lstを組み立てる。


cat /tmp/lunar/filelist.lst
1 /u01/app/oracle/oradata/dave2/system01.dbf 1761607680
 
cat /tmp/lunar/bbed.par
blocksize=8192
listfile=/tmp/lunar/filelist.lst
mode=edit  
password=blockedit    
spool=yes  
 
[oracle@lunar ~]$bbed parfile=bbed.par
 
BBED: Release 2.0.0.0.0 - Limited Production on Thu Jan 17 18:32:16 2013
 
Copyright (c) 1982, 2011, Oracle and/or its affiliates.  All rights reserved.
 
************* !!! For Oracle Internal Use only !!! ***************
 
BBED> 


BBEDによく使われるコマンド:
set 既存する環境を設定する
show 既存する環境バラメタを確認する、sqlplusのコマンドに似ている。
dump 列で指定したブロックの内容をリストする
find 指定したブロックで指定した文字列を検索したが、結果に映したのは文字列とそのオフセットであった。オフセットとはブロックのバイト数である。
modify 指定したブロックに指定したオフセットを修正する、オンラインで使える。
copy あるブロックの内容を別のブロックにコピする
verify は既存する環境にベッドブロックがあるかをテストする
sumブロックのchecksumを計算して、modifyしたあとブロックがベッドブロックとマークされた。current checksumとreqired checksumに一致していない、sumコマンドは新たなchecksumを計算して既存するブロックに利用できる。
undo 今の修正操作をロールバックする。誤った場合にundoすればいい。
revert 既存するすべての修正操作をロールバックする。つまり、undo allである
Helpでbbedのコマンド文法を確認できる:

BBED> help all
SET DBA [ dba | file#, block# ]
SET FILENAME 'filename'
SET FILE file#
SET BLOCK [+/-]block#
SET OFFSET [ [+/-]byte offset | symbol | *symbol ]
SET BLOCKSIZE bytes
SET LIST[FILE] 'filename'
SET WIDTH character_count
SET COUNT bytes_to_display
SET IBASE [ HEX | OCT | DEC ]
SET OBASE [ HEX | OCT | DEC ]
SET MODE  [ BROWSE | EDIT ]
SET SPOOL [ Y | N ]
SHOW [  | ALL ]
INFO
MAP[/v] [ DBA | FILENAME | FILE | BLOCK ]
DUMP[/v] [ DBA | FILENAME | FILE | BLOCK | OFFSET | COUNT ]
PRINT[/x|d|u|o|c] [ DBA | FILE | FILENAME | BLOCK | OFFSET | symbol | *symbol ]
EXAMINE[/Nuf] [ DBA | FILE | FILENAME | BLOCK | OFFSET | symbol | *symbol ]
:
N - a number which specifies a repeat count.
u - a letter which specifies a unit size:
  b - b1, ub1 (byte)
  h - b2, ub2 (half-word)
  w - b4, ub4(word)
  r - Oracle table/index row
f - a letter which specifies a display format:
  x - hexadecimal
  d - decimal
  u - unsigned decimal
  o - octal
  c - character (native)
  n - Oracle number
  t - Oracle date
  i - Oracle rowid
FIND[/x|d|u|o|c] numeric/character string [ TOP | CURR ]
COPY [ DBA | FILE | FILENAME | BLOCK ] TO [ DBA | FILE | FILENAME | BLOCK ]
MODIFY[/x|d|u|o|c] numeric/character string
      [ DBA | FILE | FILENAME | BLOCK | OFFSET | symbol | *symbol ]
ASSIGN[/x|d|u|o] =
 : [ DBA | FILE | FILENAME | BLOCK | OFFSET | symbol | *symbol ]
 : [ value |  ]
SUM [ DBA | FILE | FILENAME | BLOCK ] [ APPLY ]
PUSH [ DBA | FILE | FILENAME | BLOCK | OFFSET ]
POP [ALL]
REVERT [ DBA | FILE | FILENAME | BLOCK ]
UNDO
HELP [  | ALL ]
VERIFY [ DBA | FILE | FILENAME | BLOCK ]
CORRUPT [ DBA | FILE | FILENAME | BLOCK ]
 
BBED>        


沪ICP备14014813号-2

沪公网安备 31010802001379号