Does Duplicate Target Database need Pre-existing DB backup?

之前有网友问我在10g中通过RMAN 的duplicate target database命令复制数据库时是否需要先完成全库的备份。

实际我在10g中并不常用duplicate target database 来帮助创建DataGuard Standby Database,所以虽然记忆中仍有些印象,却不能十分确定地回答了。

今天查了一下资料,发现原来Active database duplication 和 Backup-based duplication 是11g才引入的特性,换句话说10g中duplication是要求预先完成数据库的RMAN backup备份的。

具体关于以上2个特性见文档<RMAN ‘Duplicate Database’ Feature in 11G>,引文如下:

RMAN 'Duplicate Database' Feature in 11G

You can create a duplicate database using the RMAN duplicate command.
The duplicate database has a different DBID from the source database and functions
entirely independently.Starting from 11g you can do duplicate database in 2 ways.

1. Active database duplication
2. Backup-based duplication

Active database duplication copies the live target database over the network to the
auxiliary destination and then creates the duplicate database.Only difference is that you
don't need to have the pre-existing RMAN backups and copies.

The duplication work is performed by an auxiliary channel.
This channel corresponds to a server session on the auxiliary instance on the auxiliary host.

As part of the duplicating operation, RMAN automates the following steps:

1. Creates a control file for the duplicate database
2. Restarts the auxiliary instance and mounts the duplicate control file
3. Creates the duplicate datafiles and recovers them with incremental backups and archived redo logs.
4. Opens the duplicate database with the RESETLOGS option

For the active database duplication, RMAN does one extra step .i.e. copy the
target database datafiles over the network to the auxiliary instance

A RAC TARGET database can be duplicated as well. The procedure is the same as below.
If the auxiliary instance needs to be a RAC-database as well,
than start the duplicate procedure for to a single instance and convert
the auxiliary to RAC after the duplicate has succeeded.


而在10g 中不仅需要对目标数据库进行备份,还需要手动将备份集(backupset)拷贝至目标主机上,这确实过于繁琐了:


Oracle10G RMAN Database Duplication
 If you are using a disk backup solution and duplicate to a
remote node you must first copy the backupsets from the original hosts backup
location to the same mount and path on the remote server. Because duplication
uses auxiliary channels the files must be where the IO pipe is allocated. So the
IO will take place on the remote node and disk backups must be locally available.
11gR2新特性:STANDBY_MAX_DATA_DELAY

Active Data Guard 是 Oracle 11g 的亮点特性之一,而在11G release 2中对Active Data Guard引入了更多诱人的新特性,这些特性将Active Data Guard打造成Oracle 读写分离或报表查询的理想方案之一。


STANDBY_MAX_DATA_DELAY是11gr2中对Active Data Guard的最大增强(buffer)之一,这是一个可以在会话级别指定的参数(session parameter),该参数指定了在Primary Database已commit提交的变化与standby Database数据库上涉及相关变化的查询之间所允许的时间延迟,单位为second 秒(Specifies a limit for the amount of time (in seconds) allowed to elapse between when changes are committed on the primary and when those same changes can be queries  on the standby database)。


使用该STANDBY_MAX_DATA_DELAY参数的语法如下:

ALTER SESSION SET STANDBY_MAX_DATA_DELAY ={ NONE | INTEGER }


注意事项

  • 该参数无法为SYS用户所用,在SYS用户的SESSION下设置该参数将被忽略
  • 若没有指定STANDBY_MAX_DATA_DELAY,即使用其默认值NONE,那么无论主备库之间有多大的延迟,在Physical Standby上的查询都会被执行
  • 若查询延迟超过STANDBY_MAX_DATA_DELAY所指定的值那么,将报ORA-03172错误:


03172, 00000, "STANDBY_MAX_DATA_DELAY of %s seconds exceeded"
// *Cause:  Standby recovery fell behind the STANDBY_MAX_DATA_DELAY
//          requirement.
// *Action: Tune recovery and retry the query later, or switch to another
//          standby database within the data delay requirement.

在实际运用中STANDBY_MAX_DATA_DELAY保证了在Standby数据库上所作的报表查询不会得到过于陈旧的结果(stale result),通过该参数我们可以指定一个报表应用所容许的数据时间延迟。

当然也可以指定不容许任何数据延迟,即设置STANDBY_MAX_DATA_DELAY为零,以便做到实时数据查询。

配置Primary 与 Standby 数据库之间的实时查询或者说零延迟查询有以下注意事项:

  • 只有特定的应用程序才会对数据延迟有零容忍的需求,注意你的应用程序是否有如此苛刻的要求
  • 在Standby数据库上执行的查询语句必须返回和主库上查询的完全一致的结果
  • 必须设置STANDBY_MAX_DATA_DELAY 为0
  • 在查询开始的那一刻,Standby数据库必须同步到与Primary数据库一致的Current Scn
  • 若结果没有在200ms内返回,则查询会因ORA-03172而终止
  • Primary数据库必须采用最大可用(max availability)或最大保护(maximum protection)模式
  • redo 传输必须使用SYNC 选项
  • 必须启用 Real-Time Query 特性


实际使用


以下我们通过演示来了解该STANDBY_MAX_DATA_DELAY的效果:

SQL> select * from v$version;  

BANNER
--------------------------------------------------------------------------------
Oracle Database 11g Enterprise Edition Release 11.2.0.2.0 - 64bit Production
PL/SQL Release 11.2.0.2.0 - Production
CORE    11.2.0.2.0      Production
TNS for Linux: Version 11.2.0.2.0 - Production
NLSRTL Version 11.2.0.2.0 - Production

SQL> select * from global_name;

GLOBAL_NAME
--------------------------------------------------------------------------------
www.askmac.cn & www.askmac.cn

Primary Database  SQL> conn maclean/maclean
Connected.

Primary Database SQL> select database_role,protection_mode from v$database;

DATABASE_ROLE    PROTECTION_MODE
---------------- --------------------
PRIMARY          MAXIMUM AVAILABILITY

Primary Database SQL>  create table TSMDD tablespace users as select * From dba_objects;
Table created.

Standby Database SQL> conn maclean/maclean
Connected.

Standby Database SQL> select database_role,protection_mode from v$database;

DATABASE_ROLE    PROTECTION_MODE
---------------- --------------------
PHYSICAL STANDBY MAXIMUM AVAILABILITY

注意STANDBY_MAX_DATA_DELAY是一个会话参数session parameter,而非实例参数instance parameter

Standby Database SQL> select name from v$system_parameter where name='standby_max_data_delay';

no rows selected

Standby Database SQL> alter session set STANDBY_MAX_DATA_DELAY=0;

Session altered.

Standby Database SQL> select count(*) from TSMDD; 

  COUNT(*)
----------
     13378


实际测试可以发现当STANDBY_MAX_DATA_DELAY=0时,并不是查询语句执行时间超过200ms就返回ORA-03172错误,而是指从查询开始的200ms内,若备库没有追上主库的Current SCN时出现ORA-03172。


Standby Database SQL> alter session set STANDBY_MAX_DATA_DELAY=0;

Session altered.

Standby Database SQL> set timing on;

Standby Database SQL> select count(1) from TSMDD a, TSMDD b;

  COUNT(1)
----------
 178970884

Elapsed: 00:00:05.34

Standby Database SQL> alter session set events '10046 trace name context forever,level 12';
Session altered.

在主库上执行大数据量的insert操作,但是不提交commit;

Primary Database SQL> insert into /*+ append */  tsmdd select * from tsmdd;

此时在Standby 数据库 上执行查询语句将触发ORA-3172错误

Standby Database SQL> select count(*) from tsmdd
                     *
ERROR at line 1:
ORA-03172: STANDBY_MAX_DATA_DELAY of 0 seconds exceeded

Standby Database SQL>  /
select count(*) from tsmdd
*
ERROR at line 1:
ORA-03172: STANDBY_MAX_DATA_DELAY of 0 seconds exceeded


以上查询语句执行过程中的10046 trace如下:


PARSING IN CURSOR #47828795969456 len=26 dep=0 uid=34 oct=3 lid=34 tim=1316692536000853
hv=2314050071 ad='7115e798' sqlid='3smn48y4yv6hr'

select count(*) from tsmdd
END OF STMT
PARSE #47828795969456:c=0,e=61,p=0,cr=0,cu=0,mis=0,r=0,dep=0,og=1,plh=1739041831,tim=1316692536000852
WAIT #47828795969456: nam='standby query scn advance'
ela= 201440 p1=770798 p2=0 p3=20 obj#=13873 tim=1316692536202337
WAIT #47828795969456: nam='SQL*Net break/reset to client' ela= 25 driver id=1650815232
break?=1 p3=0 obj#=13873 tim=1316692536202528
WAIT #47828795969456: nam='SQL*Net break/reset to client' ela= 144 driver id=1650815232
break?=0 p3=0 obj#=13873 tim=1316692536202694
WAIT #47828795969456: nam='SQL*Net message to client' ela= 1 driver id=1650815232 #bytes=1
p3=0 obj#=13873 tim=1316692536202715

*** 2011-09-22 19:55:37.983
WAIT #47828795969456: nam='SQL*Net message from client' ela= 1781108 driver
id=1650815232 #bytes=1 p3=0 obj#=13873 tim=1316692537983884
CLOSE #47828795969456:c=0,e=24,dep=0,type=0,tim=1316692537984068

===============================================================================================

PARSING IN CURSOR #47828795969456 len=26 dep=0 uid=34 oct=3 lid=34 tim=1316692537984172
hv=2314050071 ad='7115e798' sqlid='3smn48y4yv6hr'
select count(*) from tsmdd
END OF STMT
PARSE #47828795969456:c=0,e=53,p=0,cr=0,cu=0,mis=0,r=0,dep=0,og=1,plh=1739041831,tim=1316692537984171
WAIT #47828795969456: nam='standby query scn advance' ela= 200546 p1=770914
p2=0 p3=20 obj#=13873 tim=1316692538184822
WAIT #47828795969456: nam='SQL*Net break/reset to client' ela= 10 driver
id=1650815232 break?=1 p3=0 obj#=13873 tim=1316692538184998
WAIT #47828795969456: nam='SQL*Net break/reset to client' ela= 103 driver
id=1650815232 break?=0 p3=0 obj#=13873 tim=1316692538185154
WAIT #47828795969456: nam='SQL*Net message to client' ela= 1 driver
id=1650815232 #bytes=1 p3=0 obj#=13873 tim=1316692538185182


注意这里出现的standby query scn advance等待事件,显然该等待事件是为了确认Primary与Standby之间的Scn差距,但这又是一个Internal的undocumented 等待事件。我猜测是P1是Standby数据库的Current Scn,而p3可能是Primary 与 Standby之间的Scn 差距。OBJ#是查询对象的object_id:


SQL> col owner for a20
SQL> col object_name for a20

SQL> select owner,object_name from dba_objects where object_id=13873;

OWNER                OBJECT_NAME
-------------------- --------------------
MACLEAN              TSMDD


使用技巧


在实际的使用过程中我们没有必要每次登录会话查询都去指定STANDBY_MAX_DATA_DELAY参数,可以通过创建AFTER LOGON触发器来简化工作。

在11 g Release 2中引入了USERENV Context的一种新属性DATABASE_ROLE,使用该属性可以便捷地定位用户所登录数据库的角色是Primary 还是 Standby,11g的SQL 和 PL/SQL客户端程序均可以通过 SYS_CONTEXT 函数获取该数据库角色信息。

通过创建以下登陆后触发器可以做到当应用程序登录到启用实时查询的Standby数据库上后即自动设置合适的STANDBY_MAX_DATA_DELAY参数。这样即避免了修改应用程序的代码,有做到了配置合理的最大数据延迟。

CREATE OR REPLACE TRIGGER AUTO_SMDD
  AFTER LOGON ON USER.SCHEMA
BEGIN
  IF (SYS_CONTEXT('USERENV', 'DATABASE_ROLE') IN ('PHYSICAL STANDBY')) THEN
    execute immediate 'alter session set standby_max_data_delay=5';
  END IF;
END;


注意以上trigger 只需要在Primary Database上以应用相关用户身份建立即可,会同步到Standby上:


Primary Database SQL>  conn maclean/maclean
Connected.

Primary Database SQL> CREATE OR REPLACE TRIGGER AUTO_SMDD
  2    AFTER LOGON ON MACLEAN.SCHEMA
  3  BEGIN
  4    IF (SYS_CONTEXT('USERENV', 'DATABASE_ROLE') IN ('PHYSICAL STANDBY')) THEN
  5      execute immediate 'alter session set standby_max_data_delay=0';
  6    END IF;
  7  END;
  8  /
Trigger created.

Slide:11g新特性-在线实施补丁online patching

Upgrade GI/CRS 11.1.0.7 to 11.2.0.2. Rootupgrade.sh Hanging

Upgrade grid 11.1.0.7 to 11.2.0.2. Rootupgrade.sh Hanging

We installed 11gR2 GI software and applied PSU2 patches upon getting runupgrade.sh prompt.runupgrade.sh hang on the first node.

[root@vrh8 client]# uname -a
Linux vrh8 2.6.18-238.5.1.el5 #1 SMP Mon Feb 21 05:52:39 EST 2011 x86_64

x86_64 x86_64 GNU/Linux
cluvfy passed with 2 ignorable errors:

[root@vrh8 vrh8]# cd /tmp
[root@vrh8 tmp]# df -lh .
Filesystem Size Used Avail Use% Mounted on
/dev/mapper/vg0-tmp 992M 263M 679M 28% /tmp

[root@vrh8 grid]# grep fail cluvfy_during_inst.log
/tmp l118464lwap1049 /tmp 713MB 1GB failed
Result: Free disk space check failed for “l118464lwap1049:/tmp”
/tmp vrh8 /tmp 692.131MB 1GB failed
Result: Free disk space check failed for “vrh8:/tmp”
Result: Check for multiple users with UID value 0 failed

[root@vrh8 vrh8]# cd /tmp
[root@vrh8 tmp]# df -lh .
Filesystem Size Used Avail Use% Mounted on
/dev/mapper/vg0-tmp 992M 263M 679M 28% /tmp

We installed 11gR2 GI software and applied PSU2 patches upon getting runupgrade.sh prompt.

runupgrade.sh hang on the first node. We followed “How to Proceed from Failed Upgrade to 11gR2

Grid Infrastructure on Linux/Unix [ID 969254.1]” 1A section, it didn’t help.

[root@vrh8 bin]# ./crsctl query crs activeversion
Oracle Clusterware active version on the cluster is [11.1.0.7.0]

rootupgrade.sh output:

[root@vrh8 11.2.0.2]# ./rootupgrade.sh
Running Oracle 11g root script…

The following environment variables are set as:
ORACLE_OWNER= oracrs
ORACLE_HOME= /d22/oracrs/11.2.0.2

Enter the full pathname of the local bin directory: [/usr/local/bin]:
The contents of “dbhome” have not changed. No need to overwrite.
The contents of “oraenv” have not changed. No need to overwrite.
The contents of “coraenv” have not changed. No need to overwrite.

Entries will be added to the /etc/oratab file as needed by
Database Configuration Assistant when a database is created
Finished running generic part of root script.
Now product-specific root actions will be performed.
Using configuration parameter file: /d22/oracrs/11.2.0.2/crs/install/crsconfig_params
LOCAL ADD MODE
Creating OCR keys for user ‘root’, privgrp ‘root’..
Operation successful.
OLR initialization – successful
Adding daemon to inittab
ACFS-9200: Supported
ACFS-9300: ADVM/ACFS distribution files found.
ACFS-9312: Existing ADVM/ACFS installation detected.
ACFS-9314: Removing previous ADVM/ACFS installation.
ACFS-9315: Previous ADVM/ACFS components successfully removed.
ACFS-9307: Installing requested ADVM/ACFS software.
ACFS-9308: Loading installed ADVM/ACFS drivers.
ACFS-9321: Creating udev for ADVM/ACFS.
ACFS-9323: Creating module dependencies – this may take some time.
ACFS-9327: Verifying ADVM/ACFS devices.
ACFS-9309: ADVM/ACFS installation correctness verified.

****hanging here for more than 2 hrs, so we cancelled it

INT at /d22/oracrs/11.2.0.2/crs/install/crsconfig_lib.pm line 1173.
/d22/oracrs/11.2.0.2/perl/bin/perl -I/d22/oracrs/11.2.0.2/perl/lib –

I/d22/oracrs/11.2.0.2/crs/install /d22/oracrs/11.2.0.2/crs/install/rootcrs.pl execution failed
Oracle root script execution aborted!

1. The below logs are required to analyze this issue.

NEW_GRID_HOME/cfgtoollogs/crsconfig/*.*
NEW_GRID_HOME/log/<nodename>/*.*

Please upload the logs under the above directories. Zip and upload the files including the subdirectories.

2. When the rootupgrade was handing, did you check the usage of /tmp. Was free space exhausting?

=== ODM Research ===

There has been multiple root script run for upgrade. I have taken the first incident from the file
rootcrs_vrh8.log:
—————————————–

2011-02-13 13:07:55: Successfully started requested Oracle stack daemons
2011-02-13 13:07:55: Upgrading the existing voting disks!
2011-02-13 13:07:55: Executing /d22/oracrs/11.2.0.2/bin/cssvfupgd
2011-02-13 13:07:55: Executing cmd: /d22/oracrs/11.2.0.2/bin/cssvfupgd <<<<<<<<<<<<<<< The root script seems to hang at this point.
2011-02-13 15:01:16: ###### Begin DIE Stack Trace ######
2011-02-13 15:01:16: Package File Line Calling
2011-02-13 15:01:16: ————— ——————– —- ———-
2011-02-13 15:01:16: 1: main rootcrs.pl 325 crsconfig_lib::dietrap
2011-02-13 15:01:16: 2: crsconfig_lib crsconfig_lib.pm 9301 main::__ANON__
2011-02-13 15:01:16: 3: crsconfig_lib crsconfig_lib.pm 9301 (eval)
2011-02-13 15:01:16: 4: crsconfig_lib crsconfig_lib.pm 9260 crsconfig_lib::system_cmd_capture1
2011-02-13 15:01:16: 5: crsconfig_lib crsconfig_lib.pm 9247 crsconfig_lib::system_cmd_capture
2011-02-13 15:01:16: 6: crsconfig_lib crsconfig_lib.pm 924 crsconfig_lib::system_cmd
2011-02-13 15:01:16: 7: oracss oracss.pm 275 crsconfig_lib::run_crs_cmd
2011-02-13 15:01:16: 8: crsconfig_lib crsconfig_lib.pm 1019 oracss::CSS_upgrade
2011-02-13 15:01:16: 9: crsconfig_lib crsconfig_lib.pm 1006 crsconfig_lib::start_cluster
2011-02-13 15:01:16: 10: main rootcrs.pl 697 crsconfig_lib::perform_start_cluster
2011-02-13 15:01:16: ####### End DIE Stack Trace #######

cssvfupgd.log:
——————–
Oracle Database 11g Clusterware Release 11.2.0.2.0 – Production Copyright 1996, 2010 Oracle. All rights reserved.
2011-02-13 13:07:55.356: [ OCRRAW][3605955376]prgval:buffer passed is too small
2011-02-13 13:07:55.361: [CSSVFUPG][3605955376]cssvfupgd_GetVFList: found voting file /s01/app/ocrvot/VOTEDISK/UAT2_vdisk1.dat
2011-02-13 13:07:55.365: [ OCRRAW][3605955376]prgval:buffer passed is too small
2011-02-13 13:07:55.369: [CSSVFUPG][3605955376]cssvfupgd_GetVFList: found voting file /s01/app/ocrvot/VOTEDISK/UAT2_vdisk2.dat
2011-02-13 13:07:55.373: [ OCRRAW][3605955376]prgval:buffer passed is too small
2011-02-13 13:07:55.377: [CSSVFUPG][3605955376]cssvfupgd_GetVFList: found voting file /s01/app/ocrvot/VOTEDISK/UAT2_vdisk3.dat
2011-02-13 13:07:55.402: [CSSVFUPG][3605955376]cssvfupgd_SetNum: Processing SYSTEM.css.misscount
2011-02-13 13:07:55.404: [CSSVFUPG][3605955376]cssvfupgd_SetNum: Processing SYSTEM.css.disktimeout
2011-02-13 13:07:55.406: [CSSVFUPG][3605955376]cssvfupgd_SetNum: Processing SYSTEM.css.reboottime
2011-02-13 13:07:55.408: [CSSVFUPG][3605955376]cssvfupgd_SetNum: Processing SYSTEM.css.diagwait
2011-02-13 13:07:55.414: [CSSVFUPG][3605955376]cssvfupgd_SetNum: Processing SYSTEM.css.pollinterval
2011-02-13 13:07:55.416: [CSSVFUPG][3605955376]cssvfupgd_GetGUID: Fetching GUID for /s01/app/ocrvot/VOTEDISK/UAT2_vdisk1.dat
2011-02-13 13:07:55.419: [ SKGFD][3605955376]NOTE: No asm libraries found in the system

2011-02-13 13:07:55.419: [ CLSF][3605955376]Allocated CLSF context
2011-02-13 13:07:55.419: [ SKGFD][3605955376]Discovery with str:/s01/app/ocrvot/VOTEDISK/UAT2_vdisk1.dat:

2011-02-13 13:07:55.419: [ SKGFD][3605955376]UFS discovery with :/s01/app/ocrvot/VOTEDISK/UAT2_vdisk1.dat:

2011-02-13 13:07:55.420: [ SKGFD][3605955376]Fetching UFS disk :/s01/app/ocrvot/VOTEDISK/UAT2_vdisk1.dat:

2011-02-13 13:07:55.420: [ SKGFD][3605955376]OSS discovery with :/s01/app/ocrvot/VOTEDISK/UAT2_vdisk1.dat:

2011-02-13 13:07:55.421: [ SKGFD][3605955376]Handle 0x124de360 from lib :UFS:: for disk :/s01/app/ocrvot/VOTEDISK/UAT2_vdisk1.dat:

2011-02-13 14:19:31.132: [ SKGFD][3605955376]WARNING:io_getevents timed out 2226 sec >>>>>>>>>>>>>>>>>>>> After about one hour it shows time out error.

2011-02-13 14:19:31.132: [ SKGFD][3605955376]WARNING:io_getevents timed out 2226 sec

The script has stalled at the voting disk upgrade phase. Please provide me the below details.

1. What cluster file system are you using for the voting files? provide its details and the mount options used.

for ocfs, get its mount options
mount | grep ocfs

3. Voting disks details
ls -l /s01/app/ocrvot/VOTEDISK/UAT2_vdisk*

4. Get the diagwait detail.
OLD_CRS_HOME/bin/crsctl get css diagwait

1. What cluster file system are you using for the voting files? provide its details and the mount options used
/dev/emcpowera1 on /s01/app/ocrvot type ocfs2 (rw,_netdev,datavolume,nointr,heartbeat=local)

2. Voting disks details

[root@vrh8 11.2.0.2]# ls -l /s01/app/ocrvot/VOTEDISK/UAT2_vdisk*
-rw-r—– 1 oracrs oinstall 21004288 Jun 11 07:31 /s01/app/ocrvot/VOTEDISK/UAT2_vdisk1.dat
-rw-r—– 1 oracrs oinstall 21004288 Jun 11 07:31 /s01/app/ocrvot/VOTEDISK/UAT2_vdisk2.dat
-rw-r—– 1 oracrs oinstall 21004288 Jun 11 07:31 /s01/app/ocrvot/VOTEDISK/UAT2_vdisk3.dat


3. Get the diagwait detail

crsctl get css diagwait
Failure 33 in main Oracle Cluster Registry context initialization: PROC-33: Oracle Cluster Registry is not configured Operating System error [No such file or directory] [2]

owc may not be required now as the issue we face is clear.

The diagwait should not error out, as explained in the following note,
11gR2 rootupgrade.sh Fails as cssvfupgd Can not Upgrade Voting Disk (Doc ID 1102283.1)

Make sure you are running ‘crsctl get css diagwait’ from the old crs home. You can also check it in multiple node. If it errors out, this has to be fixed as explained in the above note.

according to that note ,When I ./oprocd stop ,get error:
[root@l118464lwap1049 bin]# ./oprocd stop
Jun 16 23:24:42.966 | ERR | failed to connect to daemon, errno(111)

ACFS-9200: Supported
ACFS-9300: ADVM/ACFS distribution files found.
ACFS-9307: Installing requested ADVM/ACFS software.
ACFS-9308: Loading installed ADVM/ACFS drivers.
ACFS-9321: Creating udev for ADVM/ACFS.
ACFS-9323: Creating module dependencies – this may take some time.
ACFS-9327: Verifying ADVM/ACFS devices.
ACFS-9309: ADVM/ACFS installation correctness verified.

cssvfupgd.log
2011-02-13 23:36:49.311: [ OCRRAW][3394941744]prgval:buffer passed is too small
2011-02-13 23:36:49.315: [CSSVFUPG][3394941744]cssvfupgd_GetVFList: found voting
file /s01/app/ocrvot/VOTEDISK/UAT2_vdisk2.dat
2011-02-13 23:36:49.319: [ OCRRAW][3394941744]prgval:buffer passed is too small
2011-02-13 23:36:49.323: [CSSVFUPG][3394941744]cssvfupgd_GetVFList: found voting
file /s01/app/ocrvot/VOTEDISK/UAT2_vdisk3.dat
2011-02-13 23:36:49.351: [CSSVFUPG][3394941744]cssvfupgd_SetNum: Processing SYST
EM.css.misscount
2011-02-13 23:36:49.354: [CSSVFUPG][3394941744]cssvfupgd_SetNum: Processing SYST
EM.css.disktimeout
2011-02-13 23:36:49.356: [CSSVFUPG][3394941744]cssvfupgd_SetNum: Processing SYST
EM.css.reboottime
2011-02-13 23:36:49.358: [CSSVFUPG][3394941744]cssvfupgd_SetNum: Processing SYST
EM.css.diagwait
2011-02-13 23:36:49.367: [CSSVFUPG][3394941744]cssvfupgd_SetNum: Processing SYST
EM.css.pollinterval
2011-02-13 23:36:49.369: [CSSVFUPG][3394941744]cssvfupgd_GetGUID: Fetching GUID
for /s01/app/ocrvot/VOTEDISK/UAT2_vdisk1.dat
2011-02-13 23:36:49.371: [ SKGFD][3394941744]NOTE: No asm libraries found in t
he system

2011-02-13 23:36:49.372: [ CLSF][3394941744]Allocated CLSF context
2011-02-13 23:36:49.372: [ SKGFD][3394941744]Discovery with str:/s01/app/ocrvo
t/VOTEDISK/UAT2_vdisk1.dat:

2011-02-13 23:36:49.372: [ SKGFD][3394941744]UFS discovery with :/s01/app/ocrv
ot/VOTEDISK/UAT2_vdisk1.dat:

2011-02-13 23:36:49.372: [ SKGFD][3394941744]Fetching UFS disk :/s01/app/ocrvo
t/VOTEDISK/UAT2_vdisk1.dat:

2011-02-13 23:36:49.372: [ SKGFD][3394941744]OSS discovery with :/s01/app/ocrv
ot/VOTEDISK/UAT2_vdisk1.dat:

2011-02-13 23:36:49.372: [ SKGFD][3394941744]Handle 0x98c4360 from lib :UFS::
for disk :/s01/app/ocrvot/VOTEDISK/UAT2_vdisk1.dat:

Question:
in Your update about cssvfupgd.log You stated it was hanging there.
Is there an entry after about 70 minutes about a timeout in that log file like:

2011-02-13 23:36:49.372: [ SKGFD][3394941744]Handle 0x98c4360 from lib :UFS::
for disk :/s01/app/ocrvot/VOTEDISK/UAT2_vdisk1.dat:
2011-02-17 0:48:19.372: [ SKGFD][3394941744]WARNING:io_getevents timed out 4294 sec <<<< present ???

Please provide the following outputs:
rpm -qa|grep ocfs2
uname -a
cat /etc/redhat-release

[root@vrh8 ~]# rpm -qa|grep ocfs2
ocfs2console-1.4.4-1.el5
ocfs2-tools-1.4.4-1.el5
ocfs2-2.6.18-238.5.1.el5-1.4.7-1.el5
[root@vrh8 ~]# uname -a
Linux vrh8 2.6.18-238.5.1.el5 #1 SMP Mon Feb 21 05:52:39 EST 2011 x86_64 x86_64 x86_64 GNU/Linux
[root@vrh8 ~]# cat /etc/redhat-release
Red Hat Enterprise Linux Server release 5.6 (Tikanga)
[root@vrh8 ~]#

Combinations that install SUCCESSFUL:

OEL5.4+ocfs2-1.4.7-1+ocfs2-tools-1.4.4
OEL5.6+ocfs2-1.4.8-1+ocfs2-tools-1.6.3
OEL5.6+ocfs2-1.4.7-1+ocfs2-tools-1.4.4
RHLE5.6+OEL kernel(redhat compatible kernel)+ocfs2-1.4.8-1+ocfs2-tools-1.6.3
RHLE5.6+OEL kernel(redhat compatible kernel)+ocfs2-1.4.7-1+ocfs2-tools-1.4.4
RHEL5.4

Combinations that failed:
RHLE5.6(redhat kernel)+ocfs2-1.4.7-1+ocfs2-tools-1.4.4
RHLE5.6(redhat kernel)+ocfs2-1.4.8-1+ocfs2-tools-1.6.3

Problem reproduces with redhat kernel — RHEL 5.6 with 2.6.18-2xx kernels

Please review the following Note to change the location of your voting disk
Note 428681.1
Title: How to ADD/REMOVE/REPLACE/MOVE Oracle Cluster Registry (OCR) and Voting Disk

Pasting info from —
Oracle? Clusterware Administration and Deployment Guide
11g Release 2 (11.2)

3 Managing Oracle Cluster Registry and Voting Disks
Oracle Universal Installer for Oracle Clusterware 11g release 2 (11.2), does not support the use of raw or block devices. However, if you upgrade from a previous Oracle Clusterware release, then you can continue to use raw or block devices.

[oracrs@vrh8 grid]$ grep fail cluvfy_during_inst_061711.log
/tmp l118464lwap1049 /tmp 706MB 1GB failed
Result: Free disk space check failed for “l118464lwap1049:/tmp”
/tmp vrh8 /tmp 927.1312MB 1GB failed
Result: Free disk space check failed for “vrh8:/tmp”
Result: Check for multiple users with UID value 0 failed
PRVF-5431 : Oracle Cluster Voting Disk configuration check failed

[oracrs@vrh8 grid]$ ./runcluvfy.sh stage -pre crsinst -n vrh8,l118464lwap1049 -verbose|tee cluvfy_during_inst.log

Please upload the following Cluvfy trace log —
$ORA_CRS_HOME/cv/log/cvutrace.log.0

Please download the latest CVU from OTN:
http://www.oracle.com/technetwork/database/clustering/downloads/cvu-download-homepage-099973.html

Please upload
/s02/app/crs/11.2.0.2/log/vrh8/agent/ohasd/oraagent_oracrs/oraagent_oracrs.log

In addition pls upload
/s02/app/crs/11.2.0.2/log/vrh8/agent/ohasd/oracssdagent_root/oracssdagent_root.log

Please run this command on both the new setup and your existing production setup for a quick comparison —
rpm -qa|grep ocfs2

Server with issue:
[root@vrh8 ohasd]# rpm -qa|grep ocfs2
ocfs2console-1.4.4-1.el5
ocfs2-tools-1.4.4-1.el5
ocfs2-2.6.18-238.5.1.el5-1.4.7-1.el5

Prod:

[root@vrh9  bin]# rpm -qa|grep ocfs2
ocfs2-2.6.18-194.el5-1.4.7-1.el5
ocfs2console-1.4.4-1.el5
ocfs2-tools-1.4.4-1.el5
ocfs2-2.6.18-194.8.1.el5-1.4.7-1.el5

[root@vrh8 ~]# uname -a
Linux vrh8 2.6.18-238.5.1.el5 #1 SMP Mon Feb 21 05:52:39 EST 2011 x86_64 x86_64 x86_64 GNU/Linux

[root@vrh8 ~]# cat /etc/redhat-release
Red Hat Enterprise Linux Server release 5.6 (Tikanga)

rpm -qa|grep ocfs2
ocfs2console-1.4.4-1.el5
ocfs2-tools-1.4.4-1.el5
ocfs2-2.6.18-238.5.1.el5-1.4.7-1.el5

@ . from Bug 11876815 (Doc ID 1321757.1)
@ combinations that install SUCCESSFUL:
@ .
@ OEL5.4+ocfs2-1.4.7-1+ocfs2-tools-1.4.4
@ OEL5.6+ocfs2-1.4.8-1+ocfs2-tools-1.6.3
@ OEL5.6+ocfs2-1.4.7-1+ocfs2-tools-1.4.4
@ RHLE5.6+OEL kernel(redhat compatible kernel)+ocfs2-1.4.8-1+ocfs2-tools-1.6.3
@ RHLE5.6+OEL kernel(redhat compatible kernel)+ocfs2-1.4.7-1+ocfs2-tools-1.4.4
@ RHEL5.4
@ .
@ combinations that failed:
@ RHLE5.6(redhat kernel)+ocfs2-1.4.7-1+ocfs2-tools-1.4.4
@ RHLE5.6(redhat kernel)+ocfs2-1.4.8-1+ocfs2-tools-1.6.3
@ .
@ .
@ So that is clear that , it is redhat kernel’s problem.Since RHEL5.6 redhat
@ provided 2.6.18-2xx kernels, we can’t fix redhat kernels, please use Oracle
@ Enterprise kernel (redhat compatible) for installation.

As per last action plan (conveyed if any) you need to contact REDHAT support to know the cause of this issue. Workaround is to not use OCFS and go for raw device for upgrade to succeed.
A Oracle bug 11876815 was logged internally for this hang issue and few combinations of OEL, RHEL, OCFS2 were tried and tested and the combination you are using has not worked for us too (per bug internal updates given above)
The solution provided by Oracle bug developer is to use OEL and not RHEL or contact RHEL support for identifying the cause and solution (incase they have already tested this setup).
Let me know if RHEL support is already engaged and provide the case id so that I can open internal SR for Oracle/Red Hat Joint Escalation Team (JET) Engagement for both vendors to work together internally.

+ the SR issue of grid upgrade from 11.1 to 11.2.0.2.2 is resolved
– voting disk was moved from ocfs to raw device – as a workaround for Bug 11876815
– set TMP and TEMP env to new dir with availabe space before running the installer and prechecks to succeed
– applied GIPSU#2 before the rootupgrade.sh step
– rootupgrade.sh step was successful on all nodes
– verified post upgrade checks and logs to confirm GI upgrade was success !

+ DB upgrade to 11.2.0.2 Plus PSU#2 will be resumed shorlty

Slide:Upgrade 11.2.0.1 RAC DB/RDBMS to 11.2.0.2 in Linux By Maclean

Upgrade 11.2.0.1 DB/RDBMS to 11.2.0.2 in Linux

<Upgrade 11.2.0.1 GI/CRS to 11.2.0.2 in Linux>一文中我们介绍了升级11.2.0.1 GI/CRS到11.2.0.2的详细步骤,因为GI/CRS的版本总是要求大于DB/RDBMS,所以这是我们升级RDBMS数据库软件的前提条件。

接下来我们将具体介绍升级11.2.0.1 DB/RDBMS到 11.2.0.2的详细步骤:

一、 下载补丁介质

11.2.0.2的patchset目前没有公开的下载地址,因为updates.oracle.com目前已经不再提供ftp下载模式,所以我们只能通过登录My Oracle Support后进入Patch栏目搜索Patchid并获得加密的下载链接。

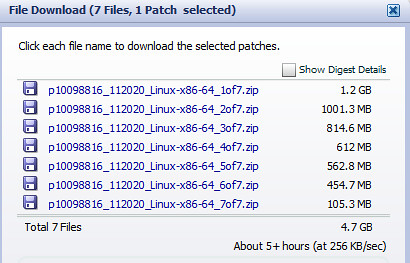
11.2.0.2补丁集的全称是11.2.0.2.0 PATCH SET FOR ORACLE DATABASE SERVER (Patchset)(patchid:10098816),可以通过10098816这个id到Patch栏目搜索,并找出对应平台的介质zip包。如在Linux x86-64平台上:

Patch 10098816 11.2.0.2.0 PATCH SET FOR ORACLE DATABASE SERVER_download


以上p10098816_112020_Linux-x86-64_1of7.zip和p10098816_112020_Linux-x86-64_2of7.zip ,这2个zip包对应为Database/RDBMS软件的介质,我们不需要下载所有的7个zip包,有这2个升级数据库软件就已经足够了。

完成以上2个软件的下载后,分别解压zip包:

unzip p10098816_112020_Linux-x86-64_1of7.zip -d  $PATCHHOME
unzip p10098816_112020_Linux-x86-64_2of7.zip -d  $PATCHHOME

二、以out of place方式安装11.2.0.2 DB数据库软件

因为11.2.0.2的Patchset以后都是out of place的,所以我们可以不用像在11gr2以前那样必须在原有安装低版本软件的基础上才能升级软件,而可以选择在别的位置完全新安装。

注意该步骤不需要停止数据库实例,可以在前期工作中完成。

以DB/RDBMS数据库软件的拥有者身份(oracle用户)启动方才解压目录下的oui安装界面:

su - oracle

(oracle)$ unset ORACLE_HOME ORACLE_BASE ORACLE_SID
(oracle)$ export DISPLAY=:0
(oracle)$ cd $PATCHHOME
(oracle)$ ./runInstaller

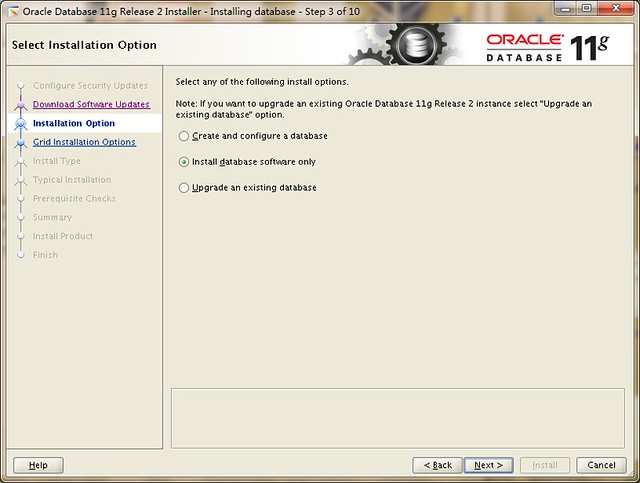
在Oracle Universal Installer界面下的Select Installation Options Screen选择install database only.

upgrade_110202_DB_1


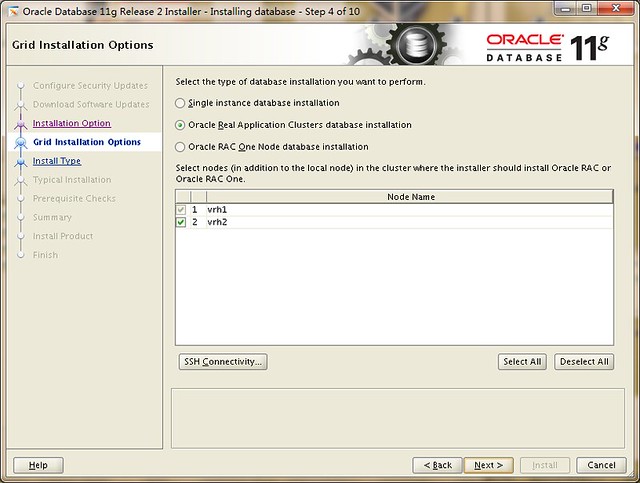
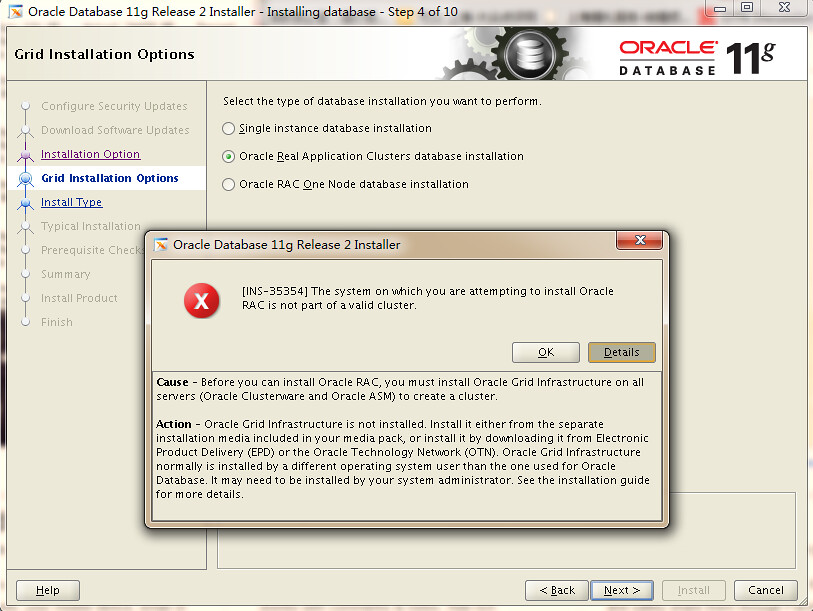
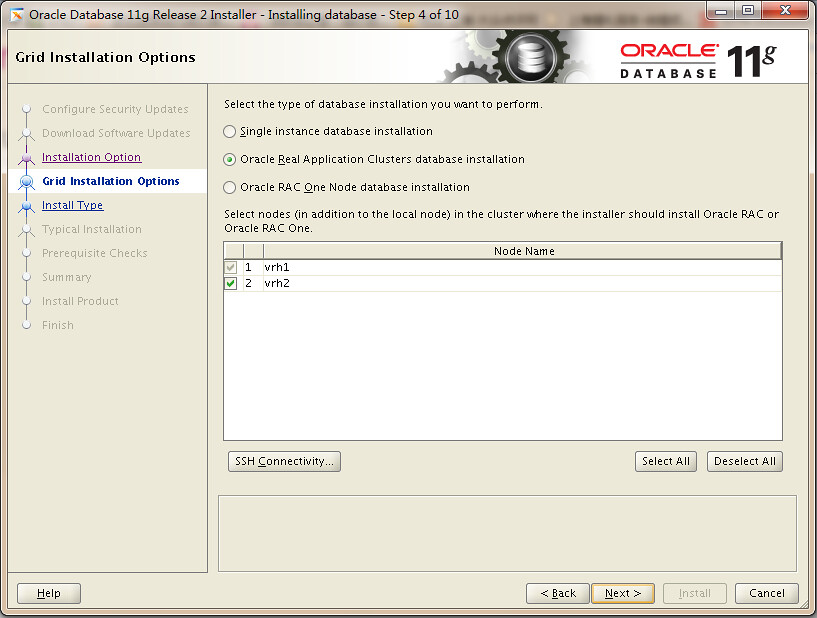
在Grid Installation Options下若是RAC 数据库则选择Oracle Real Application cluster database installation,注意如果在该屏幕下出现[FATAL] [INS-35354] The system on which you are attempting to install Oracle RAC is not part of a valid cluster则可能是在之前的安装Gird的过程中没有正确的Update Inventory更新信息库信息,见<11gr2 RAC安装INS-35354问题一例>

若是单节点数据库则选择Single instance database installation


upgrade_110202_DB_2


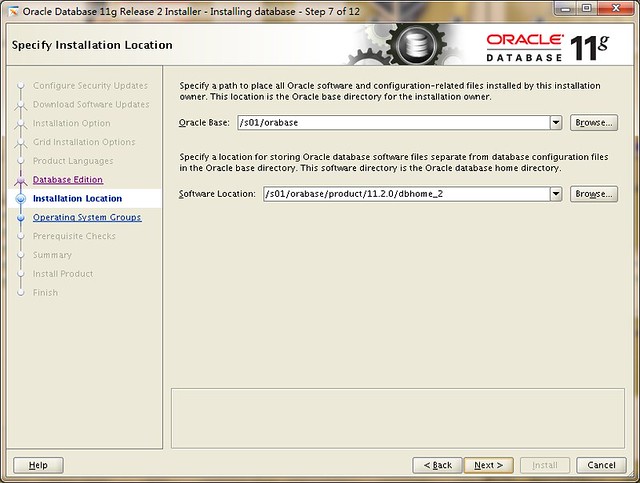
在Specify Installation Location Screen上一般OUI会帮你自动匹配一个$ORACLE_BASE变量下不同于原有数据库软件安装目录的新目录,确认这些目录下有足够的磁盘空间,保险起见空间应大于10GB。注意这里是out of place安装,所以千万不要填入原有的安装路径。


upgrade_110202_DB_3


以上安装完成后OUI会提示要在所有节点上以root身份执行root.sh脚本:

su - root
(root #) /s01/orabase/product/11.2.0/dbhome_2/root.sh

Running Oracle 11g root script...

The following environment variables are set as:
    ORACLE_OWNER= oracle
    ORACLE_HOME=  /s01/orabase/product/11.2.0/dbhome_2

Enter the full pathname of the local bin directory: [/usr/local/bin]:
The contents of "dbhome" have not changed. No need to overwrite.
The contents of "oraenv" have not changed. No need to overwrite.
The contents of "coraenv" have not changed. No need to overwrite.

Entries will be added to the /etc/oratab file as needed by
Database Configuration Assistant when a database is created
Finished running generic part of root script.
Now product-specific root actions will be performed.
Finished product-specific root actions.

三、升级前的准备工作
以上我们完成了11.2.0.2 数据库软件的安装工作,但是还没有升级实例和数据字典。
在正式升级之前,极有必要完成一系列的备份和准备工作,这些准备工作可以详见拙作<Oracle数据库升级前必要的准备工作>

1.清理数据字典中的无用数据,包括审计和回收站,它们可能拉慢数据字典升级的速度:

TRUNCATE TABLE SYS.AUD$;
purge DBA_RECYCLEBIN;


2.如果条件允许的话,建议使用RMAN全量备份数据库,前提是数据库没有达到TB级别。

rman target / catalog rman/rman@cata

backup as compressed backupset incremental level 0 database ;


3. 收集数据字典的统计信息,若dictionary的统计信息不准备可能导致catupgrd.sql字典升级脚本运行过久:

SQL> set timing on;

SQL> EXECUTE dbms_stats.gather_dictionary_stats;

PL/SQL procedure successfully completed.

Elapsed: 00:00:27.81


4.运行dbupgdiag.sql升级信息收集脚本, 该脚本可以提供数据库的一些版本信息和组建信息,以下为该脚本的示例输出内容:

cat db_upg_diag_VPROD_07-Sep-2011_0737.log

                          *** Start of LogFile ***

  Oracle Database Upgrade Diagnostic Utility       09-07-2011 19:37:23

===============
Database Uptime
===============

19:32 07-SEP-11

=================
Database Wordsize
=================

This is a 64-bit database

================
Software Version
================

Oracle Database 11g Enterprise Edition Release 11.2.0.1.0 - 64bit Production
PL/SQL Release 11.2.0.1.0 - Production
CORE    11.2.0.1.0      Production
TNS for Linux: Version 11.2.0.1.0 - Production
NLSRTL Version 11.2.0.1.0 - Production

=============
Compatibility
=============

Compatibility is set as 11.2.0.0.0

================
Component Status
================

Comp ID Component                          Status    Version        Org_Version    Prv_Version
------- ---------------------------------- --------- -------------- -------------- --------------
CATALOG Oracle Database Catalog Views      VALID     11.2.0.1.0
CATPROC Oracle Database Packages and Types VALID     11.2.0.1.0
OWM     Oracle Workspace Manager           VALID     11.2.0.1.0
RAC     Oracle Real Application Clusters   VALID     11.2.0.1.0

======================================================
List of Invalid Database Objects Owned by SYS / SYSTEM
======================================================

Number of Invalid Objects
------------------------------------------------------------------
There are no Invalid Objects

DOC>################################################################
DOC>
DOC> If there are no Invalid objects below will result in zero rows.
DOC>
DOC>################################################################
DOC>#

no rows selected

================================
List of Invalid Database Objects
================================

Number of Invalid Objects
------------------------------------------------------------------
There are no Invalid Objects

DOC>################################################################
DOC>
DOC> If there are no Invalid objects below will result in zero rows.
DOC>
DOC>################################################################
DOC>#

no rows selected

==============================================================
Identifying whether a database was created as 32-bit or 64-bit
==============================================================

DOC>###########################################################################
DOC>
DOC> Result referencing the string 'B023' ==> Database was created as 32-bit
DOC> Result referencing the string 'B047' ==> Database was created as 64-bit
DOC> When String results in 'B023' and when upgrading database to 10.2.0.3.0
DOC> (64-bit) , For known issue refer below articles
DOC>
DOC> Note 412271.1 ORA-600 [22635] and ORA-600 [KOKEIIX1] Reported While
DOC> Upgrading Or Patching Databases To 10.2.0.3
DOC> Note 579523.1 ORA-600 [22635], ORA-600 [KOKEIIX1], ORA-7445 [KOPESIZ] and
DOC> OCI-21500 [KOXSIHREAD1] Reported While Upgrading To 11.1.0.6
DOC>
DOC>###########################################################################
DOC>#

Metadata Initial DB Creation Info
-------- -----------------------------------
B047     Database was created as 64-bit

===================================================
Number of Duplicate Objects Owned by SYS and SYSTEM
===================================================

Counting duplicate objects ....

  COUNT(1)
----------
         4

=========================================
Duplicate Objects Owned by SYS and SYSTEM
=========================================

Querying duplicate objects ....

OBJECT_NAME                              OBJECT_TYPE
---------------------------------------- ----------------------------------------
AQ$_SCHEDULES                            TABLE
AQ$_SCHEDULES_PRIMARY                    INDEX
DBMS_REPCAT_AUTH                         PACKAGE BODY
DBMS_REPCAT_AUTH                         PACKAGE

DOC>
DOC>################################################################################
DOC>
DOC> If any objects found please follow below article.
DOC> Note 1030426.6 How to Clean Up Duplicate Objects Owned by SYS and SYSTEM schema
DOC> Read the Exceptions carefully before taking actions.
DOC>
DOC>################################################################################
DOC>#

================
JVM Verification
================

JAVAVM - NOT Installed. Below results can be ignored

================================================
Checking Existence of Java-Based Users and Roles
================================================

DOC>
DOC>################################################################################
DOC>
DOC> There should not be any Java Based users for database version 9.0.1 and above.
DOC> If any users found, it is faulty JVM.
DOC>
DOC>################################################################################
DOC>#

User Existence
---------------------------
No Java Based Users

DOC>
DOC>###############################################################
DOC>
DOC> Healthy JVM Should contain Six Roles.
DOC> If there are more or less than six role, JVM is inconsistent.
DOC>
DOC>###############################################################
DOC>#

Role
------------------------------
No JAVA related Roles

Roles

=========================================
List of Invalid Java Objects owned by SYS
=========================================

There are no SYS owned invalid JAVA objects

DOC>
DOC>#################################################################
DOC>
DOC> Check the status of the main JVM interface packages DBMS_JAVA
DOC> and INITJVMAUX and make sure it is VALID.
DOC> If there are no Invalid objects below will result in zero rows.
DOC>
DOC>#################################################################
DOC>#

no rows selected

INFO: Below query should succeed with 'foo' as result.
select dbms_java.longname('foo') "JAVAVM TESTING" from dual
       *
ERROR at line 1:
ORA-00904: "DBMS_JAVA"."LONGNAME": invalid identifier

                            *** End of LogFile ***

以上spool内容显示所要升级的数据库现有CATALOG、CATPROC、OWM和RAC组件,且没有安装JVM,升级JVM组建的数据字典将消耗较长的时间。

另外一个建议运行的脚本是utlu112i.sql,它位于新安装的$ORACLE_HOME/rdbms/admin目录下。

该脚本会给出一些升级前地建议,包括建议保证系统表空间和闪回区域有足够的空间,以及收集数据字典的统计信息,如以下输出:

SQL> @/s01/orabase/product/11.2.0/dbhome_2/rdbms/admin/utlu112i.sql
Oracle Database 11.2 Pre-Upgrade Information Tool 09-07-2011 20:02:30
Script Version: 11.2.0.2.0 Build: 001
.
**********************************************************************
Database:
**********************************************************************
--> name:          VPROD
--> version:       11.2.0.1.0
--> compatible:    11.2.0.0.0
--> blocksize:     8192
--> platform:      Linux x86 64-bit
--> timezone file: V11
.
**********************************************************************
Tablespaces: [make adjustments in the current environment]
**********************************************************************
--> SYSTEM tablespace is adequate for the upgrade.
.... minimum required size: 267 MB
--> SYSAUX tablespace is adequate for the upgrade.
.... minimum required size: 150 MB
--> UNDOTBS1 tablespace is adequate for the upgrade.
.... minimum required size: 253 MB
--> TEMP tablespace is adequate for the upgrade.
.... minimum required size: 61 MB
.
**********************************************************************
Flashback: ON
**********************************************************************
FlashbackInfo:
--> name:          +SYSTEMDG
--> limit:         4977 MB
--> used:          264 MB
--> size:          4977 MB
--> reclaim:       0 MB
--> files:         7
WARNING: --> Flashback Recovery Area Set.  Please ensure adequate disk space              in recover
y areas before performing an upgrade.
.
**********************************************************************
Update Parameters: [Update Oracle Database 11.2 init.ora or spfile]
Note: Pre-upgrade tool was run on a lower version 64-bit database.
**********************************************************************
--> If Target Oracle is 32-Bit, refer here for Update Parameters:
-- No update parameter changes are required.
.

--> If Target Oracle is 64-Bit, refer here for Update Parameters:
-- No update parameter changes are required.
.
**********************************************************************
Renamed Parameters: [Update Oracle Database 11.2 init.ora or spfile]
**********************************************************************
-- No renamed parameters found. No changes are required.
.
**********************************************************************
Obsolete/Deprecated Parameters: [Update Oracle Database 11.2 init.ora or spfile]
**********************************************************************
-- No obsolete parameters found. No changes are required
.

**********************************************************************
Components: [The following database components will be upgraded or installed]
**********************************************************************
--> Oracle Catalog Views         [upgrade]  VALID
--> Oracle Packages and Types    [upgrade]  VALID
--> Real Application Clusters    [upgrade]  VALID
--> Oracle Workspace Manager     [upgrade]  VALID
.
**********************************************************************
Miscellaneous Warnings
**********************************************************************
WARNING: --> The "cluster_database" parameter is currently "TRUE"
.... and must be set to "FALSE" prior to running a manual upgrade.
WARNING: --> Database is using a timezone file older than version 14.
.... After the release migration, it is recommended that DBMS_DST package
.... be used to upgrade the 11.2.0.1.0 database timezone version
.... to the latest version which comes with the new release.
WARNING: --> Your recycle bin is turned on and currently contains no objects.
.... Because it is REQUIRED that the recycle bin be empty prior to upgrading
.... and your recycle bin is turned on, you may need to execute the command:
        PURGE DBA_RECYCLEBIN
.... prior to executing your upgrade to confirm the recycle bin is empty.
.
**********************************************************************
Recommendations
**********************************************************************
Oracle recommends gathering dictionary statistics prior to
upgrading the database.
To gather dictionary statistics execute the following command
while connected as SYSDBA:

    EXECUTE dbms_stats.gather_dictionary_stats;

**********************************************************************
Oracle recommends removing all hidden parameters prior to upgrading.

To view existing hidden parameters execute the following command
while connected AS SYSDBA:

    SELECT name,description from SYS.V$PARAMETER WHERE name
        LIKE '\_%' ESCAPE '\'

Changes will need to be made in the init.ora or spfile.

**********************************************************************
Oracle recommends reviewing any defined events prior to upgrading.

To view existing non-default events execute the following commands
while connected AS SYSDBA:
  Events:
    SELECT (translate(value,chr(13)||chr(10),' ')) FROM sys.v$parameter2
      WHERE  UPPER(name) ='EVENT' AND  isdefault='FALSE'

  Trace Events:
    SELECT (translate(value,chr(13)||chr(10),' ')) from sys.v$parameter2
      WHERE UPPER(name) = '_TRACE_EVENTS' AND isdefault='FALSE'

Changes will need to be made in the init.ora or spfile.

**********************************************************************


5.如果数据库很大那么建议打开闪回数据库flashback database,并创建还原点,这样可以极大地缩短回退时间。

可以通过以下查询判断数据库是或否启用了flashback database功能:


SQL> select FLASHBACK_ON from v$database;

FLASHBACK_ON
------------------
NO


若显示NO则说明之前没有启用数据库闪回功能,若希望启用数据库闪回功能需要数据库短时间停机:


关闭所有的数据库实例

SQL> shutdown immediate;
Database closed.
Database dismounted.
ORACLE instance shut down.

启动某一套实例到mount 状态

SQL> startup mount;
ORACLE instance started.

Total System Global Area 1252663296 bytes
Fixed Size                  2212936 bytes
Variable Size             603982776 bytes
Database Buffers          637534208 bytes
Redo Buffers                8933376 bytes
Database mounted.

SQL> alter database flashback on;

Database altered.

在本节点打开数据库,并启动所有节点

SQL> alter database open;

Database altered.


以上在数据库级别启用了闪回flashback功能。

接着我们需要停止应用程序,注意在这一步之前的准备工作都可以在线完成,但是本步骤将要求停止一切应用程序的链接,关闭数据库,并启动到restrict限制模式,以便创建restore point,方便可能的升级回退。,strict模式避免了普通用户的链接。

在所有节点上关闭数据库实例,并在唯一节点上启动数据库到restrict模式。


startup restrict;

ORACLE instance started.

Total System Global Area 1252663296 bytes
Fixed Size 2212936 bytes
Variable Size 603982776 bytes
Database Buffers 637534208 bytes
Redo Buffers 8933376 bytes
Database mounted.
Database opened.

SQL> conn maclean/maclean
ERROR:
ORA-01035: ORACLE only available to users with RESTRICTED SESSION privilege

Warning: You are no longer connected to ORACLE.

conn / as sysdba

SQL> create restore point maclean_rollback guarantee flashback database;

Restore point created.

SQL> select * from v$restore_point;

       SCN DATABASE_INCARNATION# GUA STORAGE_SIZE
---------- --------------------- --- ------------
TIME
---------------------------------------------------------------------------
RESTORE_POINT_TIME                                                          PRE
--------------------------------------------------------------------------- ---
NAME
--------------------------------------------------------------------------------
    601958                     1 YES     15941632
07-SEP-11 07.52.59.000000000 PM
                                                                            YES
MACLEAN_ROLLBACK


四、正式升级数据库实例和数据字典

1. 关闭所有数据库实例

2. 复制相关的pfile或spfile形式的参数到新的ORACLE_HOME下,这里我们假设使用ASM存储共享的spfile,那么只需要在所有节点上将init$SID.ora形式的文件拷贝即可:


(oracle $) cat $ORACLE_HOME/dbs/initVPROD1.ora
SPFILE='+SYSTEMDG/VPROD/spfileVPROD.ora'

(oracle $) cp $ORACLE_HOME/dbs/initVPROD1.ora /s01/orabase/product/11.2.0/dbhome_2/dbs

设置ORACLE_HOME和PATH变量指向新的11.2.0.2数据库软件

(oracle $) export ORACLE_HOME=/s01/orabase/product/11.2.0/dbhome_2
(oracle $) export PATH=/s01/orabase/product/11.2.0/dbhome_2/bin:$PATH

设置正确的ORACLE_SID

(oracle $) export ORACLE_SID=VPROD1
(oracle $) unset LD_LIBRARY_PATH


3. 启动实例到nomount状态,并修改cluster_database参数到spfile:


SQL> startup nomount;
ORACLE instance started.

Total System Global Area 1252663296 bytes
Fixed Size                  2226072 bytes
Variable Size             402655336 bytes
Database Buffers          838860800 bytes
Redo Buffers                8921088 bytes

SQL> alter system set cluster_database=false scope=spfile;

System altered.


4. 重启实例到upgrade模式,升级数据字典,运行$ORACLE_HOME/rdbms/admin/catupgrd.sql脚本:


SQL> shutdown immediate;
ORA-01507: database not mounted

ORACLE instance shut down.
SQL> startup upgrade;
ORACLE instance started.

Total System Global Area 1252663296 bytes
Fixed Size                  2226072 bytes
Variable Size             402655336 bytes
Database Buffers          838860800 bytes
Redo Buffers                8921088 bytes
Database mounted.
Database opened.

SQL> set echo on  

SQL> SPOOL /tmp/upgrade.log

SQL> set time on; 

20:40:40 SQL> @/s01/orabase/product/11.2.0/dbhome_2/rdbms/admin/catupgrd.sql 

在以上catupgrd.sql脚本运行过程中可以通过DBA_SERVER_REGISTRY视图了解组件字典升级的进度

SQL> select * from DBA_SERVER_REGISTRY;
select * from DBA_SERVER_REGISTRY
              *
ERROR at line 1:
ORA-04063: view "SYS.DBA_SERVER_REGISTRY" has errors
or
ERROR at line 1:
ORA-04063: package body "SYS.DBMS_REGISTRY" has errors

在一开始会提示该视图有错误,这不要紧,稍等一会。

SQL> select comp_name,status,version from dba_server_registry;

COMP_NAME                                          STATUS                           VERSION
-------------------------------------------------- --------------------------       ------------------------------
Oracle Workspace Manager                           UPGRADING                        11.2.0.1.0
Oracle Database Catalog Views                      VALID                            11.2.0.2.0
Oracle Database Packages and Types                 VALID                            11.2.0.2.0
Oracle Real Application Clusters                   VALID                            11.2.0.2.0

20:50:40 SQL>
20:50:40 SQL> Rem *********************************************************************
20:50:40 SQL> Rem END catupgrd.sql
20:50:40 SQL> Rem *********************************************************************
20:50:40 SQL> 

以上catupgrd.sql脚本运行了10分钟左右

重启实例,运行utlrp.sql脚本编译失效对象

sqlplus  / as sysdba
startup;

@?/rdbms/admin/utlrp

TIMESTAMP
--------------------------------------------------------------------------------
COMP_TIMESTAMP UTLRP_BGN  2011-09-07 20:53:38

该脚本会自动根据cpu数目选择并行度

DOC>   This script automatically chooses serial or parallel recompilation
DOC>   based on the number of CPUs available (parameter cpu_count) multiplied
DOC>   by the number of threads per CPU (parameter parallel_threads_per_cpu).
DOC>   On RAC, this number is added across all RAC nodes.

TIMESTAMP
--------------------------------------------------------------------------------
COMP_TIMESTAMP UTLRP_END  2011-09-07 20:55:09

该脚本耗时约2分钟

修改cluster_database参数为true,并重启所有节点实例

SQL> alter system set cluster_database=true scope=spfile;

System altered.

可以看到以上在数据库仅安装了CATALOG、CATPROC、OWM和RAC Cluster View 4种组件的情况下,catupgrd.sql字典升级脚本仅耗时10分钟左右。 而实际的生产库可能安装了更多的组件,如JVM等组件将耗时较多。

以下总结了各Oracle组件升级字典的平均耗时,是一张十分有用的升级时间参考表:

DB Sample Upgrade Time

较少组件情况下

Component HH:MM:SS
Oracle Server 00:16:17
JServer JAVA Virtual Machine 00:05:19
Oracle XDK 00:00:48
Oracle Text 00:00:58
Oracle XML Database 00:04:09
Oracle Database Java Packages 00:00:33
Gathering Statistics 00:02:43
Total Upgrade Time: 00:30:47


较多组件情况下

Component HH:MM:SS
Oracle Server 00:16:17
JServer JAVA Virtual Machine 00:05:19
Oracle Workspace Manager 00:01:01
Oracle Enterprise Manager 00:10:13
Oracle XDK 00:00:48
Oracle Text 00:00:58
Oracle XML Database 00:04:09
Oracle Database Java Packages 00:00:33
Oracle Multimedia 00:07:43
Oracle Expression Filter 00:00:18
Oracle Rule Manager 00:00:12
Gathering Statistics 00:04:53
Total Upgrade Time: 00:52:31


5.使用srvctl命令更新ocr中DBHOME相关信息:


su  - oracle

srvctl upgrade database -d VPROD -o $NEW_ORACLE_HOME

srvctl upgrade database -d VPROD -o /s01/orabase/product/11.2.0/dbhome_2

[oracle@vrh1 ~]$ srvctl config database -d VPROD
Database unique name: VPROD
Database name: VPROD
Oracle home: /s01/orabase/product/11.2.0/dbhome_2
Oracle user: oracle
Spfile: +SYSTEMDG/VPROD/spfileVPROD.ora
Domain:
Start options: open
Stop options: immediate
Database role: PRIMARY
Management policy: AUTOMATIC
Server pools: VPROD
Database instances: VPROD1,VPROD2
Disk Groups: SYSTEMDG
Mount point paths:
Services:
Type: RAC
Database is administrator managed

[oracle@vrh1 ~]$ srvctl stop database -d VPROD
PRCC-1016 : VPROD was already stopped
[oracle@vrh1 ~]$ srvctl start database -d VPROD  

[oracle@vrh1 ~]$ srvctl status  database -d VPROD
Instance VPROD1 is running on node vrh1
Instance VPROD2 is running on node vrh2


6.修改oracle用户的profile配置文件指中的变量:


cat .bash_profile 

# .bash_profile

# Get the aliases and functions
if [ -f ~/.bashrc ]; then
        . ~/.bashrc
fi

# User specific environment and startup programs

ORACLE_HOME=/s01/orabase/product/11.2.0/dbhome_2
ORACLE_SID=VPROD1
ORACLE_BASE=/s01/orabase
PATH=$ORACLE_HOME/bin:$ORACLE_HOME/OPatch:$PATH:$HOME/bin

export PATH ORACLE_HOME ORACLE_SID ORACLE_BASE

SQL> select * from global_name;

GLOBAL_NAME
--------------------------------------------------------------------------------
www.askmac.cn

SQL> select * from v$version;

BANNER
--------------------------------------------------------------------------------
Oracle Database 11g Enterprise Edition Release 11.2.0.2.0 - 64bit Production
PL/SQL Release 11.2.0.2.0 - Production
CORE    11.2.0.2.0      Production
TNS for Linux: Version 11.2.0.2.0 - Production
NLSRTL Version 11.2.0.2.0 - Production


7. 数据库升级完成后进入一个pending area,建议在至少2个礼拜内,不要升级compatible参数和删除restore point。

在确认没有回退的必要后,修改compatible参数并删除restore point:


alter system set compatible=’11.2.0.2.0′ scope=spfile;

drop restore point  MACLEAN_ROLLBACK;

srvctl stop database -d VPROD 

srvctl start database -d VPROD

以上成功地将11.2.0.1的RAC数据库升级到了11.2.0.2。


五、回退升级操作(Database Downgrade)

我们可以选择2种回退办法:

  1. 通过restore point还原到11.2.0.1的数据库
  2. 执行catdwgrd.sql降级数据字典

针对第一种方法:

关闭所有节点实例

srvctl stop database -d VPROD

export ORACLE_HOME=$OLD_ORACLE_HOME
export PATH=$OLD_ORACLE_HOME/bin:$PATH
unset LD_LIBRARY_PATH

sqlplus  / as sysdba

SQL> select * from v$restore_point;

       SCN DATABASE_INCARNATION# GUA STORAGE_SIZE
---------- --------------------- --- ------------
TIME
---------------------------------------------------------------------------
RESTORE_POINT_TIME                                                          PRE
--------------------------------------------------------------------------- ---
NAME
--------------------------------------------------------------------------------
    601958                     1 YES    462307328
07-SEP-11 07.52.59.000000000 PM
                                                                            YES
MACLEAN_ROLLBACK

SQL> flashback database to restore point MACLEAN_ROLLBACK;

Flashback complete.

flashback database的速度 视乎flashback log多少而定,一般是很快的,在1分钟之内。

SQL> alter database open;
alter database open
*
ERROR at line 1:
ORA-01589: must use RESETLOGS or NORESETLOGS option for database open

SQL> alter database open resetlogs;

Database altered.

以上通过restore point的方法是我所推荐的,这种方法简单、省时省力、高效且问题少少,是一种绿色方案。同时不要忘记使用srvctl upgrade命令还原ocr中的DBHOME信息,以及还原profile文件。

针对第二种方法:
catdwgrd.sql的运行有诸多限制,其所消耗的时间可能要略长于catupgrd.sql。而且该脚本在运行过程中可能遇到各种错误,不推荐使用这种方法。

关于使用catdwgrd.sql脚本降级数据库11.2.0.2到11.2.0.1,可以参考MOS note <How To Downgrade From Database 11.2 To Previous Release (includes 11.2.0.2-11.2.0.1) [ID 883335.1]>

Upgrade 11.2.0.1 GI/CRS to 11.2.0.2 in Linux

11.2.0.2已经release 1年多了,相对于11.2.0.1要稳定很多。现在我们为客户部署新系统的时候一般都会推荐直接装11.2.0.2(out of place),并打到<Oracle Recommended Patches — Oracle Database>所推荐的PSU。

对于现有的系统则推荐在停机窗口允许的前提下尽可能升级到11.2.0.2上来,当然客户也可以更耐心的等待11.2.0.3版本的release。

针对11.2.0.1到11.2.0.2上的升级工程,其与10g中的升级略有区别。对于misson-critical的数据库必须进行有效的升级演练和备份操作,因为Oracle数据库软件的升级一直是一项复杂的工程,并且具有风险,不能不慎。

同时RAC数据库的升级又要较single-instance单实例的升级来的复杂,主要可以分成以下步骤:

1.  若使用Exadata Database Machine硬件,首先要检查是否需要升级Exadata Storage Software和Infiniband Switch的版本,<Database Machine and Exadata Storage Server 11g Release 2 (11.2) Supported Versions>

2. 完成rolling upgrade Grid Infrastructure的准备工作

3.滚动升级Gird Infrastructure GI软件

4.完成升级RDBMS数据库软件的准备工作

5.具体升级RDBMS数据库软件,包括升级数据字典、并编译失效对象等

这里我们重点介绍的是滚动升级GI/CRS集群软件的准备工作和具体升级步骤,因为11.2.0.2是11gR2的第一个Patchset,且又是首个out of place的大补丁集,所以绝大多数人对新的升级模式并不熟悉。


升级GI的准备工作


1.注意从11.2.0.1 GI/CRS滚动升级(rolling upgrade)到 11.2.0.2时可能出现意外错误,具体见<Pre-requsite for 11.2.0.1 to 11.2.0.2 ASM Rolling Upgrade>,这里一并引用:

Applies to:
Oracle Server - Enterprise Edition - Version: 11.2.0.1.0 to 11.2.0.2.0 - Release: 11.2 to 11.2
Oracle Server - Enterprise Edition - Version: 11.2.0.1 to 11.2.0.2   [Release: 11.2 to 11.2]
Information in this document applies to any platform.
Purpose
This note is to clarify the patch requirement when doing 11.2.0.1 to 11.2.0.2 rolling upgrade.
Scope and Application
Intended audience includes DBA, support engineers.
Pre-requsite for 11.2.0.1 to 11.2.0.2 ASM Rolling Upgrade

There has been some confusion as what patches need to be applied for 11.2.0.1 ASM rolling
upgrade to 11.2.0.2 to be successful. Documentation regarding this is not very clear
(at the time of writing) and a documentation bug has been filed and documentation will be updated in the future.

There are two bugs related to 11.2.0.1 ASM rolling upgrade to 11.2.0.2:

Unpublished bug 9413827: 11201 TO 11202 ASM ROLLING UPGRADE - OLD CRS STACK FAILS TO STOP

Unpublished bug 9706490: LNX64-11202-UD 11201 -> 11202, DG OFFLINE AFTER RESTART CRS STACK DURING UPGRADE

Some of the symptoms include error message when running rootupgrade.sh:

ORA-15154: cluster rolling upgrade incomplete (from bug: 9413827)

or

Diskgroup status is shown offline after the upgrade, crsd.log may have:

2010-05-12 03:45:49.029: [ AGFW][1506556224] Agfw Proxy Server sending the
last reply to PE for message:RESOURCE_START[ora.MYDG1.dg rwsdcvm44 1] ID 4098:1526
TextMessage[CRS-2674: Start of 'ora.MYDG1.dg' on 'rwsdcvm44' failed]
TextMessage[ora.MYDG1.dg rwsdcvm44 1]
ora.MYDG1.dg rwsdcvm44 1:

To overcome this issue, there are two actions you need to take:

a). apply proper patch.
b). change crsconfig_lib.pm

Applying Patch:

1). If $GI_HOME is on version 11.2.0.1.2 (i.e GI PSU2 is applied):

Action: You can apply Patch:9706490 for version 11.2.0.1.2.

Unpublished bug 9413827 is fixed in 11.2.0.1.2 GI PSU2. Patch:9706490 for version
11.2.0.1.2 is built on top of 11.2.0.1.2 GI PSU2 (i.e. includes the 11.2.0.1.2 GI PSU2,
hence includes the fix for 9413827). Applying Patch:9706490 includes both fixes.
opatch will recognize 9706490 is superset of 11.2.0.1.2 GI PSU2 (Patch: 9655006)
and rollback patch 9655006 before applying Patch: 9706490).

2). If $GI_HOME is on version 11.2.0.1.0 (i.e. no GI PSU applied).

Action: You can apply Patch:9706490 for version 11.2.0.1.2. This would make sure you have
applied 11.2.0.1.2 GI PSU2 plus both 9706490 and 9413827 (which is included in GI PSU2).

For platforms that do not have 11.2.0.1.2 GI PSU, then you can apply patch 9413827 on 11.2.0.1.0.

3). If $GI_HOME is on version 11.2.0.1.1 (GI PSU1) (this is rare since GI PSU1 was only
released for Linux platforms and was quite old).

Action: You can rollback GI PSU1 then apply Patch:9706490 on version 11.2.0.1.2
if your platform has 11.2.0.1.2 GI PSU. If your platform does not have 11.2.0.1.2GI PSU,
then apply patch 9413827.

Modify crsconfig_lib.pm

After patch is applied, modify $11.2.0.2_GI_HOME/crs/install/crsconfig_lib.pm:

Before the change:
# grep for bugs 9655006 or 9413827
@cmdout = grep(/(9655006|9413827)/, @output);

After the change:
# grep for bugs 9655006 or 9413827 or 9706490
@cmdout = grep(/(9655006|9413827|9706490)/, @output);

This would prevent rootupgrade.sh from failing when it validates the pre-requsite patches.

这里我们假设环境中的11.2.0.1 GI没有apply任何PSU补丁,为了解决这一”11201 TO 11202 ASM ROLLING UPGRADE – OLD CRS STACK FAILS TO STOP” bug,并成功滚动升级GI,需要在正式升级11.2.0.2 Patchset之前apply 9413827 bug的对应patch。

此外我们还推荐使用最新的opatch工具以避免出现11.2.0.1上opatch无法识别相关patch的问题。

所以我们为了升级GI到11.2.0.2,需要先从MOS下载  3个对应平台(platform)的补丁包,它们是

1.   11.2.0.2.0 PATCH SET FOR ORACLE DATABASE SERVER (Patchset)(patchid:10098816),注意实际上11.2.0.2的这个Patchset由多达7个zip文件组成,如在Linux x86-64平台上:

Patch 10098816 11.2.0.2.0 PATCH SET FOR ORACLE DATABASE SERVER_download

其中升级我们只需要下载1-3的zip包即可,第一、二包是RDBMS Database软件的out of place Patchset,而第三个包为Grid Infrastructure/CRS软件的out of place Patchset,实际在本篇文章(只升级GI)中仅会用到p10098816_112020_Linux-x86-64_3of7.zip这个压缩包。

2.  Patch 9413827: 11201 TO 11202 ASM ROLLING UPGRADE – OLD CRS STACK FAILS TO STOP(patchid:9413827)

3.  Patch 6880880: OPatch 11.2 (patchid:6880880),最新的opatch工具

2. 在所有节点上安装最新的opatch工具,该步骤不需要停止任何服务:

切换到GI拥有者用户,并移动原有的Opatch目录,将新的Opatch安装到CRS_HOME

su - grid

[grid@vrh1 ~]$ mv $CRS_HOME/OPatch $CRS_HOME/OPatch_old
[grid@vrh1 ~]$ unzip /tmp/p6880880_112000_Linux-x86-64.zip -d $CRS_HOME

确认opatch版本

[grid@vrh1 ~]$ $CRS_HOME/OPatch/opatch
Invoking OPatch 11.2.0.1.6

Oracle Interim Patch Installer version 11.2.0.1.6
Copyright (c) 2011, Oracle Corporation.  All rights reserved.

3.  在所有节点上滚动安装BUNDLE Patch for Base Bug 9413827补丁包:

1.切换到GI拥有者用户,并确认已经安装的补丁

su - grid 

opatch lsinventory -detail -oh $CRS_HOME

Invoking OPatch 11.2.0.1.6

Oracle Interim Patch Installer version 11.2.0.1.6
Copyright (c) 2011, Oracle Corporation.  All rights reserved.

Oracle Home       : /g01/11.2.0/grid
Central Inventory : /g01/oraInventory
   from           : /etc/oraInst.loc
OPatch version    : 11.2.0.1.6
OUI version       : 11.2.0.1.0
Log file location : /g01/11.2.0/grid/cfgtoollogs/opatch/opatch2011-09-04_19-08-33PM.log

Lsinventory Output file location :
/g01/11.2.0/grid/cfgtoollogs/opatch/lsinv/lsinventory2011-09-04_19-08-33PM.txt

--------------------------------------------------------------------------------
Installed Top-level Products (1): 

Oracle Grid Infrastructure                                           11.2.0.1.0
There are 1 products installed in this Oracle Home.
........................
###########################################################################

2. 解压之前下载的 p9413827_11201_$platform.zip的补丁包

 unzip p9413827_112010_Linux-x86-64.zip 

###########################################################################

3. 切换到DB HOME拥有者身份,在本地节点上停止RDBMS DB HOME相关的资源:

su - oracle

语法:
 % [RDBMS_HOME]/bin/srvctl stop home -o [RDBMS_HOME] -s [status file location] -n [node_name]

srvctl stop home -o $ORACLE_HOME  -n vrh1 -s stop_db_res           

cat stop_db_res
db-vprod

 hostname
www.askmac.cn

###########################################################################

4. 切换到root用户执行rootcrs.pl -unlock 命令

[root@vrh1 ~]# $CRS_HOME/crs/install/rootcrs.pl -unlock 

2011-09-04 20:46:53: Parsing the host name
2011-09-04 20:46:53: Checking for super user privileges
2011-09-04 20:46:53: User has super user privileges
Using configuration parameter file: /g01/11.2.0/grid/crs/install/crsconfig_params
CRS-2791: Starting shutdown of Oracle High Availability Services-managed resources on 'vrh1'
CRS-2673: Attempting to stop 'ora.crsd' on 'vrh1'
CRS-2790: Starting shutdown of Cluster Ready Services-managed resources on 'vrh1'
CRS-2673: Attempting to stop 'ora.LISTENER.lsnr' on 'vrh1'
CRS-2673: Attempting to stop 'ora.SYSTEMDG.dg' on 'vrh1'
CRS-2673: Attempting to stop 'ora.registry.acfs' on 'vrh1'
CRS-2673: Attempting to stop 'ora.DATA.dg' on 'vrh1'
CRS-2673: Attempting to stop 'ora.FRA.dg' on 'vrh1'
CRS-2677: Stop of 'ora.LISTENER.lsnr' on 'vrh1' succeeded
CRS-2673: Attempting to stop 'ora.vrh1.vip' on 'vrh1'
CRS-2677: Stop of 'ora.vrh1.vip' on 'vrh1' succeeded
CRS-2672: Attempting to start 'ora.vrh1.vip' on 'vrh2'
CRS-2677: Stop of 'ora.registry.acfs' on 'vrh1' succeeded
CRS-2676: Start of 'ora.vrh1.vip' on 'vrh2' succeeded
CRS-2677: Stop of 'ora.SYSTEMDG.dg' on 'vrh1' succeeded
CRS-2677: Stop of 'ora.FRA.dg' on 'vrh1' succeeded
CRS-2677: Stop of 'ora.DATA.dg' on 'vrh1' succeeded
CRS-2673: Attempting to stop 'ora.asm' on 'vrh1'
CRS-2677: Stop of 'ora.asm' on 'vrh1' succeeded
CRS-2673: Attempting to stop 'ora.ons' on 'vrh1'
CRS-2673: Attempting to stop 'ora.eons' on 'vrh1'
CRS-2677: Stop of 'ora.ons' on 'vrh1' succeeded
CRS-2673: Attempting to stop 'ora.net1.network' on 'vrh1'
CRS-2677: Stop of 'ora.net1.network' on 'vrh1' succeeded
CRS-2677: Stop of 'ora.eons' on 'vrh1' succeeded
CRS-2792: Shutdown of Cluster Ready Services-managed resources on 'vrh1' has completed
CRS-2677: Stop of 'ora.crsd' on 'vrh1' succeeded
CRS-2673: Attempting to stop 'ora.gpnpd' on 'vrh1'
CRS-2673: Attempting to stop 'ora.cssdmonitor' on 'vrh1'
CRS-2673: Attempting to stop 'ora.ctssd' on 'vrh1'
CRS-2673: Attempting to stop 'ora.evmd' on 'vrh1'
CRS-2673: Attempting to stop 'ora.asm' on 'vrh1'
CRS-2673: Attempting to stop 'ora.mdnsd' on 'vrh1'
CRS-2673: Attempting to stop 'ora.drivers.acfs' on 'vrh1'
CRS-2677: Stop of 'ora.cssdmonitor' on 'vrh1' succeeded
CRS-2677: Stop of 'ora.gpnpd' on 'vrh1' succeeded
CRS-2677: Stop of 'ora.evmd' on 'vrh1' succeeded
CRS-2677: Stop of 'ora.mdnsd' on 'vrh1' succeeded
CRS-2677: Stop of 'ora.ctssd' on 'vrh1' succeeded
CRS-2677: Stop of 'ora.drivers.acfs' on 'vrh1' succeeded
CRS-2677: Stop of 'ora.asm' on 'vrh1' succeeded
CRS-2673: Attempting to stop 'ora.cssd' on 'vrh1'
CRS-2677: Stop of 'ora.cssd' on 'vrh1' succeeded
CRS-2673: Attempting to stop 'ora.diskmon' on 'vrh1'
CRS-2673: Attempting to stop 'ora.gipcd' on 'vrh1'
CRS-2677: Stop of 'ora.gipcd' on 'vrh1' succeeded
CRS-2677: Stop of 'ora.diskmon' on 'vrh1' succeeded
CRS-2793: Shutdown of Oracle High Availability Services-managed resources on 'vrh1' has completed
CRS-4133: Oracle High Availability Services has been stopped.
Successfully unlock /g01/11.2.0/grid

###########################################################################

5.以RDBMS HOME拥有者用户执行patch目录下的prepatch.sh脚本

su - oracle

% custom/server/9413827/custom/scripts/prepatch.sh -dbhome [RDBMS_HOME]

[oracle@vrh1 tmp]$ 9413827/custom/server/9413827/custom/scripts/prepatch.sh -dbhome $ORACLE_HOME

9413827/custom/server/9413827/custom/scripts/prepatch.sh completed successfully.

###########################################################################

6.实际apply patch

以GI/CRS拥有者用户执行以下命令

 % opatch napply -local -oh [CRS_HOME] -id 9413827

su - grid

cd /tmp/9413827/

opatch napply -local -oh $CRS_HOME -id 9413827

Invoking OPatch 11.2.0.1.6

Oracle Interim Patch Installer version 11.2.0.1.6
Copyright (c) 2011, Oracle Corporation.  All rights reserved.

UTIL session

Oracle Home       : /g01/11.2.0/grid
Central Inventory : /g01/oraInventory
   from           : /etc/oraInst.loc
OPatch version    : 11.2.0.1.6
OUI version       : 11.2.0.1.0
Log file location : /g01/11.2.0/grid/cfgtoollogs/opatch/opatch2011-09-04_20-52-37PM.log

Verifying environment and performing prerequisite checks...
OPatch continues with these patches:   9413827  

Do you want to proceed? [y|n]
y
User Responded with: Y
All checks passed.
Provide your email address to be informed of security issues, install and
initiate Oracle Configuration Manager. Easier for you if you use your My
Oracle Support Email address/User Name.
Visit http://www.oracle.com/support/policies.html for details.
Email address/User Name: 

You have not provided an email address for notification of security issues.
Do you wish to remain uninformed of security issues ([Y]es, [N]o) [N]:  y

Please shutdown Oracle instances running out of this ORACLE_HOME on the local system.
(Oracle Home = '/g01/11.2.0/grid')

Is the local system ready for patching? [y|n]
y
User Responded with: Y
Backing up files...
Applying interim patch '9413827' to OH '/g01/11.2.0/grid'

Patching component oracle.crs, 11.2.0.1.0...
Patches 9413827 successfully applied.
Log file location: /g01/11.2.0/grid/cfgtoollogs/opatch/opatch2011-09-04_20-52-37PM.log

OPatch succeeded.

以DB/RDBMS拥有者用户执行以下命令

su - oracle
cd /tmp/9413827/

% opatch napply custom/server/ -local -oh [RDBMS_HOME] -id 9413827

opatch napply custom/server/ -local -oh $ORACLE_HOME -id 9413827

Verifying the update...
Inventory check OK: Patch ID 9413827 is registered in Oracle Home inventory with proper meta-data.
Files check OK: Files from Patch ID 9413827 are present in Oracle Home.
Running make for target install

The local system has been patched and can be restarted.

UtilSession: N-Apply done.

OPatch succeeded.

###########################################################################

7. 配置HOME目录

以root用户执行以下命令

 chmod +w $CRS_HOME/log/[nodename]/agent
 chmod +w $CRS_HOME/log/[nodename]/agent/crsd

以DB/RDBMS拥有者用户执行以下命令
su - oracle

 cd /tmp/9413827/

% custom/server/9413827/custom/scripts/postpatch.sh -dbhome [RDBMS_HOME]

[oracle@vrh1 9413827]$ custom/server/9413827/custom/scripts/postpatch.sh -dbhome $ORACLE_HOME
Reading /s01/orabase/product/11.2.0/dbhome_1/install/params.ora..
Parsing file /s01/orabase/product/11.2.0/dbhome_1/bin/racgwrap
Parsing file /s01/orabase/product/11.2.0/dbhome_1/bin/srvctl
Parsing file /s01/orabase/product/11.2.0/dbhome_1/bin/srvconfig
Parsing file /s01/orabase/product/11.2.0/dbhome_1/bin/cluvfy
Verifying file /s01/orabase/product/11.2.0/dbhome_1/bin/racgwrap
Verifying file /s01/orabase/product/11.2.0/dbhome_1/bin/srvctl
Verifying file /s01/orabase/product/11.2.0/dbhome_1/bin/srvconfig
Verifying file /s01/orabase/product/11.2.0/dbhome_1/bin/cluvfy
Reapplying file permissions on /s01/orabase/product/11.2.0/dbhome_1/bin/racgwrap
Reapplying file permissions on /s01/orabase/product/11.2.0/dbhome_1/bin/srvctl
Reapplying file permissions on /s01/orabase/product/11.2.0/dbhome_1/bin/srvconfig
Reapplying file permissions on /s01/orabase/product/11.2.0/dbhome_1/bin/cluvfy
Reapplying file permissions on /s01/orabase/product/11.2.0/dbhome_1/bin/racgmain
Reapplying file permissions on /s01/orabase/product/11.2.0/dbhome_1/bin/racgeut
Reapplying file permissions on /s01/orabase/product/11.2.0/dbhome_1/bin/diskmon.bin
Reapplying file permissions on /s01/orabase/product/11.2.0/dbhome_1/bin/lsnodes
Reapplying file permissions on /s01/orabase/product/11.2.0/dbhome_1/bin/osdbagrp
Reapplying file permissions on /s01/orabase/product/11.2.0/dbhome_1/bin/rawutl
Reapplying file permissions on /s01/orabase/product/11.2.0/dbhome_1/srvm/admin/ractrans
Reapplying file permissions on /s01/orabase/product/11.2.0/dbhome_1/srvm/admin/getcrshome
Reapplying file permissions on /s01/orabase/product/11.2.0/dbhome_1/bin/gnsd
Reapplying file permissions on /s01/orabase/product/11.2.0/dbhome_1/bin/crsdiag.pl
Reapplying file permissions on /s01/orabase/product/11.2.0/dbhome_1/lib/libhasgen11.so
Reapplying file permissions on /s01/orabase/product/11.2.0/dbhome_1/lib/libclsra11.so
Reapplying file permissions on /s01/orabase/product/11.2.0/dbhome_1/lib/libdbcfg11.so
Reapplying file permissions on /s01/orabase/product/11.2.0/dbhome_1/lib/libocr11.so
Reapplying file permissions on /s01/orabase/product/11.2.0/dbhome_1/lib/libocrb11.so
Reapplying file permissions on /s01/orabase/product/11.2.0/dbhome_1/lib/libocrutl11.so
Reapplying file permissions on /s01/orabase/product/11.2.0/dbhome_1/lib/libuini11.so
Reapplying file permissions on /s01/orabase/product/11.2.0/dbhome_1/lib/librdjni11.so
Reapplying file permissions on /s01/orabase/product/11.2.0/dbhome_1/lib/libgns11.so
Reapplying file permissions on /s01/orabase/product/11.2.0/dbhome_1/lib/libgnsjni11.so
Reapplying file permissions on /s01/orabase/product/11.2.0/dbhome_1/lib/libagfw11.so

###########################################################################

8.以root用户重启CRS进程

# $CRS_HOME/crs/install/rootcrs.pl -patch 

2011-09-04 21:03:32: Parsing the host name
2011-09-04 21:03:32: Checking for super user privileges
2011-09-04 21:03:32: User has super user privileges
Using configuration parameter file: /g01/11.2.0/grid/crs/install/crsconfig_params
CRS-4123: Oracle High Availability Services has been started.

# $ORACLE_HOME/bin/srvctl start home -o $ORACLE_HOME -s $STATUS_FILE -n nodename

###########################################################################

9. 使用opatch命令确认补丁安装成功

 opatch lsinventory -detail -oh $CRS_HOME
 opatch lsinventory -detail -oh $RDBMS_HOME

###########################################################################

10. 在其他节点上重复以上步骤,直到在所有节点上成功安装该补丁

###########################################################################

注意AIX平台上有额外的注意事项:

# Special Instruction for AIX
# ---------------------------
#
# During the application of this patch should you see any errors with regards
# to files being locked or opatch  being  unable to copy files then this
#
# could be as result of a process which requires termination or an additional
#
# file needing to be unloaded from the system cache.
#
#
# To try and identify the likely cause please execute the following  commands
#
# and provide the output to your support representative, who will be  able to
#
# identify the corrective steps.
#
#
#     genld -l | grep [CRS_HOME]
#
#     genkld | grep [CRS_HOME]    ( full or partial path will do )
#
#
# Simple Case Resolution:
#
# If genld returns data then a currently executing process has something open
# in
# the [CRS_HOME] directory, please terminate the process as
# required/recommended.
#
#
#  If genkld return data then please remove the enteries from the
#  OS system cache by using the slibclean command as root;
#
#
#     slibclean
#
###########################################################################
#
#  Patch Deinstallation Instructions:
#  ----------------------------------
#
#  To roll back the patch, follow all of the above steps 1-5. In step 6,
#  invoke the following opatch commands to roll back the patch in all homes.
#
#  % opatch rollback -id 9413827 -local -oh [CRS_HOME]
#
#  % opatch rollback -id 9413827 -local -oh [RDBMS_HOME]
#
#  Afterwards, continue with steps 7-9 to complete the procedure.
#
###########################################################################
#
#  If you have any problems installing this PSE or are not sure
#  about inventory setup please call Oracle support.
#
###########################################################################


正式升级GI到11.2.0.2


1. 解压软件包,如上所述第三个zip包为grid软件

unzip p10098816_112020_Linux-x86-64_3of7.zip


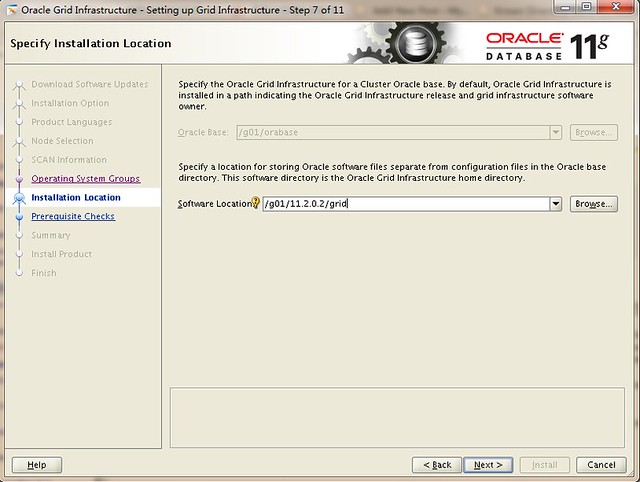
2. 以GI拥有者用户启动GI/CRS的OUI安装界面,并选择Out of Place的安装目录

(grid)$ unset ORACLE_HOME ORACLE_BASE ORACLE_SID
(grid)$ export DISPLAY=:0
(grid)$ cd /u01/app/oracle/patchdepot/grid
(grid)$ ./runInstaller
Starting Oracle Universal Installer…

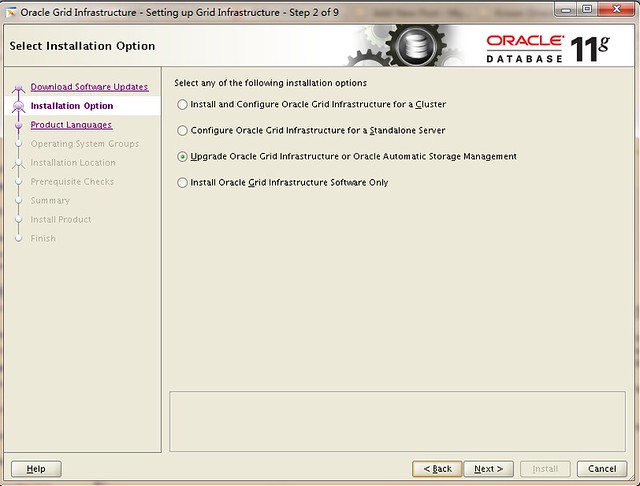
在”Select Installation Options”屏幕中选择Upgrade Oracle Grid Infrastructure or Oracle Automatic Storage Management


upgrade_110202_GI

upgrade_110202_GI_a


选择不同于现有GI软件的目录


upgrade_110202_GI_b

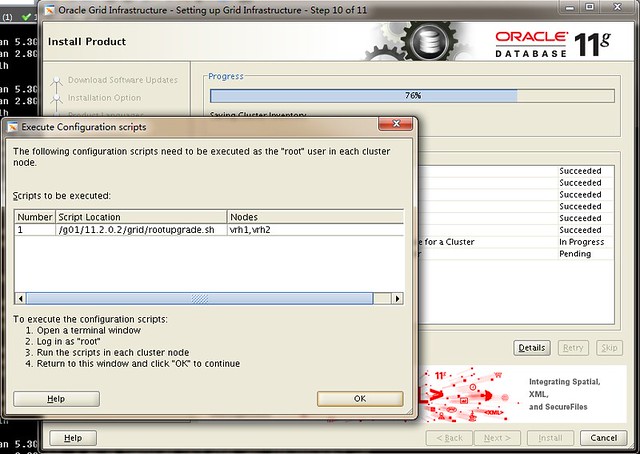
完成安装后会提示要以root用户执行rootupgrade.sh

upgrade_110202_GI_c

3. 注意在正式执行rootupgrade.sh之前数据库服务在所有节点上都是可用的,而在执行rootupgrade.sh脚本期间,本地节点的CRS将短暂关闭,也就是说滚动升级期间至少有一个节点不用

因为unpublished bug 10011084 and unpublished bug 10128494的关系,在执行rootupgrade.sh之前需要修改crsconfig_lib.pm参数文件,修改方式如下:

cp $NEW_CRS_HOME/crs/install/crsconfig_lib.pm $NEW_CRS_HOME/crs/install/crsconfig_lib.pm.bak
vi $NEW_CRS_HOME/crs/install/crsconfig_lib.pm

从以上配置文件中修改如下行,并使用diff命令确认

From
 @cmdout = grep(/$bugid/, @output);
To
  @cmdout = grep(/(9655006|9413827)/, @output);

From
my @exp_func = qw(check_CRSConfig validate_olrconfig validateOCR
To
my @exp_func = qw(check_CRSConfig validate_olrconfig validateOCR read_file

$ diff crsconfig_lib.pm.orig crsconfig_lib.pm
699c699
< my @exp_func = qw(check_CRSConfig validate_olrconfig validateOCR --- >
my @exp_func = qw(check_CRSConfig validate_olrconfig validateOCR read_file
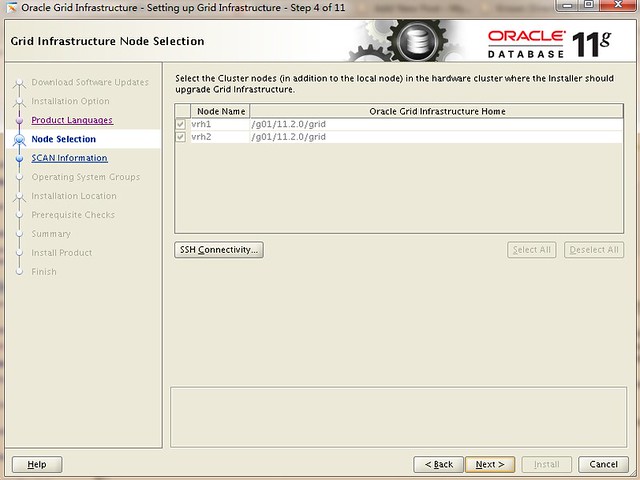
13277c13277
< @cmdout = grep(/$bugid/, @output); --- > @cmdout = grep(/(9655006|9413827)/, @output);

cp /g01/11.2.0.2/grid/crs/install/crsconfig_lib.pm /g01/11.2.0.2/grid/crs/install/crsconfig_lib.pm.bak

并在所有节点上复制该配置文件
scp /g01/11.2.0.2/grid/crs/install/crsconfig_lib.pm vrh2:/g01/11.2.0.2/grid/crs/install/crsconfig_lib.pm

如果觉得麻烦,那么也可以直接从这里下载修改好的crsconfig_lib.pm

由于 bug 10056593 和 bug 10241443 的缘故执行rootupgrde.sh的过程中还可能出现以下错误

Due to bug 10056593, rootupgrade.sh will report this error and continue. This error is ignorable.

Failed to add (property/value):('OLD_OCR_ID/'-1') for checkpoint:ROOTCRS_OLDHOMEINFO.Error code is 256

Due to bug 10241443, rootupgrade.sh may report the following error when installing the cvuqdisk package.
This error is ignorable.

    ls: /usr/sbin/smartctl: No such file or directory
    /usr/sbin/smartctl not found.

以上错误可以被忽略,不会影响到升级。

4.正式执行rootupgrade.sh脚本,建议从负载较高的节点开始

[root@vrh1 grid]# /g01/11.2.0.2/grid/rootupgrade.sh
Running Oracle 11g root script...

The following environment variables are set as:
ORACLE_OWNER= grid
ORACLE_HOME= /g01/11.2.0.2/grid

Enter the full pathname of the local bin directory: [/usr/local/bin]:
The contents of "dbhome" have not changed. No need to overwrite.
The contents of "oraenv" have not changed. No need to overwrite.
The contents of "coraenv" have not changed. No need to overwrite.

Entries will be added to the /etc/oratab file as needed by
Database Configuration Assistant when a database is created
Finished running generic part of root script.
Now product-specific root actions will be performed.
Using configuration parameter file: /g01/11.2.0.2/grid/crs/install/crsconfig_params
Creating trace directory
Failed to add (property/value):('OLD_OCR_ID/'-1') for checkpoint:ROOTCRS_OLDHOMEINFO.Error code is 256

ASM upgrade has started on first node.

CRS-2791: Starting shutdown of Oracle High Availability Services-managed resources on 'vrh1'
CRS-2673: Attempting to stop 'ora.crsd' on 'vrh1'
CRS-2790: Starting shutdown of Cluster Ready Services-managed resources on 'vrh1'
CRS-2673: Attempting to stop 'ora.LISTENER.lsnr' on 'vrh1'
CRS-2673: Attempting to stop 'ora.SYSTEMDG.dg' on 'vrh1'
CRS-2673: Attempting to stop 'ora.registry.acfs' on 'vrh1'
CRS-2677: Stop of 'ora.LISTENER.lsnr' on 'vrh1' succeeded
CRS-2673: Attempting to stop 'ora.vrh1.vip' on 'vrh1'
CRS-2677: Stop of 'ora.vrh1.vip' on 'vrh1' succeeded
CRS-2672: Attempting to start 'ora.vrh1.vip' on 'vrh2'
CRS-2677: Stop of 'ora.registry.acfs' on 'vrh1' succeeded
CRS-2676: Start of 'ora.vrh1.vip' on 'vrh2' succeeded
CRS-2677: Stop of 'ora.SYSTEMDG.dg' on 'vrh1' succeeded
CRS-2673: Attempting to stop 'ora.asm' on 'vrh1'
CRS-2677: Stop of 'ora.asm' on 'vrh1' succeeded
CRS-2673: Attempting to stop 'ora.ons' on 'vrh1'
CRS-2673: Attempting to stop 'ora.eons' on 'vrh1'
CRS-2677: Stop of 'ora.ons' on 'vrh1' succeeded
CRS-2673: Attempting to stop 'ora.net1.network' on 'vrh1'
CRS-2677: Stop of 'ora.net1.network' on 'vrh1' succeeded
CRS-2677: Stop of 'ora.eons' on 'vrh1' succeeded
CRS-2792: Shutdown of Cluster Ready Services-managed resources on 'vrh1' has completed
CRS-2677: Stop of 'ora.crsd' on 'vrh1' succeeded
CRS-2673: Attempting to stop 'ora.mdnsd' on 'vrh1'
CRS-2673: Attempting to stop 'ora.cssdmonitor' on 'vrh1'
CRS-2673: Attempting to stop 'ora.ctssd' on 'vrh1'
CRS-2673: Attempting to stop 'ora.evmd' on 'vrh1'
CRS-2673: Attempting to stop 'ora.asm' on 'vrh1'
CRS-2673: Attempting to stop 'ora.drivers.acfs' on 'vrh1'
CRS-2677: Stop of 'ora.cssdmonitor' on 'vrh1' succeeded
CRS-2677: Stop of 'ora.mdnsd' on 'vrh1' succeeded
CRS-2677: Stop of 'ora.evmd' on 'vrh1' succeeded
CRS-2677: Stop of 'ora.ctssd' on 'vrh1' succeeded
CRS-2677: Stop of 'ora.drivers.acfs' on 'vrh1' succeeded
CRS-2677: Stop of 'ora.asm' on 'vrh1' succeeded
CRS-2673: Attempting to stop 'ora.cssd' on 'vrh1'
CRS-2677: Stop of 'ora.cssd' on 'vrh1' succeeded
CRS-2673: Attempting to stop 'ora.gpnpd' on 'vrh1'
CRS-2673: Attempting to stop 'ora.diskmon' on 'vrh1'
CRS-2677: Stop of 'ora.diskmon' on 'vrh1' succeeded
CRS-2677: Stop of 'ora.gpnpd' on 'vrh1' succeeded
CRS-2673: Attempting to stop 'ora.gipcd' on 'vrh1'
CRS-2677: Stop of 'ora.gipcd' on 'vrh1' succeeded
CRS-2793: Shutdown of Oracle High Availability Services-managed resources on 'vrh1' has completed
CRS-4133: Oracle High Availability Services has been stopped.
Successfully deleted 1 keys from OCR.
Creating OCR keys for user 'root', privgrp 'root'..
Operation successful.
OLR initialization - successful
Adding daemon to inittab
ACFS-9200: Supported
ACFS-9300: ADVM/ACFS distribution files found.
ACFS-9312: Existing ADVM/ACFS installation detected.
ACFS-9314: Removing previous ADVM/ACFS installation.
ACFS-9315: Previous ADVM/ACFS components successfully removed.
ACFS-9307: Installing requested ADVM/ACFS software.
ACFS-9308: Loading installed ADVM/ACFS drivers.
ACFS-9321: Creating udev for ADVM/ACFS.
ACFS-9323: Creating module dependencies - this may take some time.
ACFS-9327: Verifying ADVM/ACFS devices.
ACFS-9309: ADVM/ACFS installation correctness verified.
clscfg: EXISTING configuration version 5 detected.
clscfg: version 5 is 11g Release 2.
Successfully accumulated necessary OCR keys.
Creating OCR keys for user 'root', privgrp 'root'..
Operation successful.
Preparing packages for installation...
cvuqdisk-1.0.9-1
Configure Oracle Grid Infrastructure for a Cluster ... succeeded


最后执行rootupgrade.sh脚本的节点会出现以下GI/CRS成功升级的信息:


Successfully deleted 1 keys from OCR.
Creating OCR keys for user 'root', privgrp 'root'..
Operation successful.
OLR initialization - successful
Adding daemon to inittab
ACFS-9200: Supported
ACFS-9300: ADVM/ACFS distribution files found.
ACFS-9312: Existing ADVM/ACFS installation detected.
ACFS-9314: Removing previous ADVM/ACFS installation.
ACFS-9315: Previous ADVM/ACFS components successfully removed.
ACFS-9307: Installing requested ADVM/ACFS software.
ACFS-9308: Loading installed ADVM/ACFS drivers.
ACFS-9321: Creating udev for ADVM/ACFS.
ACFS-9323: Creating module dependencies - this may take some time.
ACFS-9327: Verifying ADVM/ACFS devices.
ACFS-9309: ADVM/ACFS installation correctness verified.
clscfg: EXISTING configuration version 5 detected.
clscfg: version 5 is 11g Release 2.
Successfully accumulated necessary OCR keys.
Creating OCR keys for user 'root', privgrp 'root'..
Operation successful.
Started to upgrade the Oracle Clusterware. This operation may take a few minutes.
Started to upgrade the CSS.
Started to upgrade the CRS.
The CRS was successfully upgraded.
Oracle Clusterware operating version was successfully set to 11.2.0.2.0

ASM upgrade has finished on last node.

Preparing packages for installation...
cvuqdisk-1.0.9-1
Configure Oracle Grid Infrastructure for a Cluster ... succeeded

5. 确认GI/CRS的版本

su - grid

$ crsctl query crs activeversion
Oracle Clusterware active version on the cluster is [11.2.0.2.0]

 hostname
www.askmac.cn

/g01/11.2.0.2/grid/OPatch/opatch lsinventory -oh /g01/11.2.0.2/grid
Invoking OPatch 11.2.0.1.1

Oracle Interim Patch Installer version 11.2.0.1.1
Copyright (c) 2009, Oracle Corporation.  All rights reserved.

Oracle Home       : /g01/11.2.0.2/grid
Central Inventory : /g01/oraInventory
   from           : /etc/oraInst.loc
OPatch version    : 11.2.0.1.1
OUI version       : 11.2.0.2.0
OUI location      : /g01/11.2.0.2/grid/oui
Log file location : /g01/11.2.0.2/grid/cfgtoollogs/opatch/opatch2011-09-05_02-17-19AM.log

Patch history file: /g01/11.2.0.2/grid/cfgtoollogs/opatch/opatch_history.txt

Lsinventory Output file location : /g01/11.2.0.2/grid/cfgtoollogs/opatch/lsinv/lsinventory2011-09-05_02-17-19AM.txt

--------------------------------------------------------------------------------
Installed Top-level Products (1): 

Oracle Grid Infrastructure                                           11.2.0.2.0
There are 1 products installed in this Oracle Home.

6.更新bash_profile , 将CRS_HOME、ORACLE_HOME、PATH等变量指向新的GI目录

Oracle软件的美学变迁

1999年发售的Oracle 8i是Oracle走向繁荣的重要版本,其中的i意为”internet ready”,在上个世纪90年代互联网业务意气风发,存在这样一种思潮,人们都认为进入网络时代后我们不在需要传统意义上的计算机了,像SUN这样走在时代前沿的公司更提出了”网络就是计算机的”响亮口号,可以说是今天大热的云计算的先驱者,可惜出师未捷身先死了。

在这个以”Internet”为时髦的时代,无数厂商拜倒在WWW万维网门下,显然8i是其中的成功者。

style_8i

从8i安装介质的索引页面可以看到已经存在之后GRID网格计算的雏形。另外8i的LOGO中Oracle仍在使用一种红、黑、灰三色的风格。其实这是一种很后现代的风格,给人以硬朗的感觉,充满了一种千年纪的幻想。

2001年发售的9i是继8i以后的有一扛鼎作品,在8i的基础上加入了400多个特性,最令人瞩目的可能还是OPS到RAC的脱变。相比起8i来说9i更稳定一些,和整个IT行业一样挤掉了很多泡沫走向了成熟。

在整个时代已经出现了红底白字的Oracle商标,这种风格延续到了今天。但是9i仍旧是以黑色为主打色的一个版本。

style_9i

2003年的10g R1中你仍可以找到以前版本黑色风格的影子:

oracle_10g

但总的来说我最偏爱10g的安装界面风格,显得十分清新、不造作、稳健可信,而且启动迅速:

style_10g


2007年发售的11g号称是Oracle 20年来最具影响力的产品,11g中R1和R2的风格有着很大的区别,R1的界面风格同10g还是比较像的,虽然换成了蓝色色调,从11g R1开始Oracle似乎彻底摆脱了黑灰风格,显得更有活力、朝气。

11gr1_style

2009年发布的11G R2似乎立志要不走寻找路,在这个版本中Oracle美学风格发生了极大的改变,由10g的简朴发展到一种光芒四射、略嫌奢华的Style,有人说这和BEA的的风格有些相似。

我个人还是更为喜欢10g的简约,而且11g R2的OUI在启动时间上和资源消耗上更多:

style_11g

11gr2_style

为11.2.0.2 Grid Infrastructure添加节点

在之前的文章中我介绍了为10g RAC Cluster添加节点的具体步骤。在11gr2中Oracle CRS升级为Grid Infrastructure,通过GI我们可以更方便地控制CRS资源如:VIP、ASM等等,这也导致了在为11.2中的GI添加节点时,同10gr2相比有着较大的差异。

这里我们要简述在11.2中为GI ADD NODE的几个要点:

一、准备工作

准备工作是不可忽略的,在10g RAC Cluster添加节点中我列举了必须完成的先决条件,在11.2 GI中这些条件依然有效,但请注意以下2点:

1.不仅要为oracle用户配置用户等价性,也要为grid(GI安装用户)用户配置;除非你同时使用oracle安装GI和RDBMS,这是不推荐的

2.在11.2 GI中推出了octssd(Oracle Cluster Synchronization Service Daemon)时间同步服务,如果打算使用octssd的话那么建议禁用ntpd事件服务,具体方法如下:

# service ntpd stop
Shutting down ntpd:                                        [  OK  ]
# chkconfig ntpd off
# mv /etc/ntp.conf /etc/ntp.conf.orig
# rm /var/run/ntpd.pid

3.使用cluster verify工具验证新增节点是否满足cluster的要求:

cluvfy stage -pre nodeadd -n <NEW NODE>

具体用法如:

su - grid

[grid@vrh1 ~]$ cluvfy stage -pre nodeadd -n vrh3

Performing pre-checks for node addition 

Checking node reachability...
Node reachability check passed from node "vrh1"

Checking user equivalence...
User equivalence check passed for user "grid"

Checking node connectivity...

Checking hosts config file...

Verification of the hosts config file successful

Check: Node connectivity for interface "eth0"
Node connectivity passed for interface "eth0"

Node connectivity check passed

Checking CRS integrity...

CRS integrity check passed

Checking shared resources...

Checking CRS home location...
The location "/g01/11.2.0/grid" is not shared but is present/creatable on all nodes
Shared resources check for node addition passed

Checking node connectivity...

Checking hosts config file...

Verification of the hosts config file successful

Check: Node connectivity for interface "eth0"
Node connectivity passed for interface "eth0"

Check: Node connectivity for interface "eth1"
Node connectivity passed for interface "eth1"

Node connectivity check passed

Total memory check passed
Available memory check passed
Swap space check passed
Free disk space check passed for "vrh3:/tmp"
Free disk space check passed for "vrh1:/tmp"
Check for multiple users with UID value 54322 passed
User existence check passed for "grid"
Run level check passed
Hard limits check failed for "maximum open file descriptors"
Check failed on nodes:
        vrh3
Soft limits check passed for "maximum open file descriptors"
Hard limits check passed for "maximum user processes"
Soft limits check passed for "maximum user processes"
System architecture check passed
Kernel version check passed
Kernel parameter check passed for "semmsl"
Kernel parameter check passed for "semmns"
Kernel parameter check passed for "semopm"
Kernel parameter check passed for "semmni"
Kernel parameter check passed for "shmmax"
Kernel parameter check passed for "shmmni"
Kernel parameter check passed for "shmall"
Kernel parameter check passed for "file-max"
Kernel parameter check passed for "ip_local_port_range"
Kernel parameter check passed for "rmem_default"
Kernel parameter check passed for "rmem_max"
Kernel parameter check passed for "wmem_default"
Kernel parameter check passed for "wmem_max"
Kernel parameter check passed for "aio-max-nr"
Package existence check passed for "make-3.81( x86_64)"
Package existence check passed for "binutils-2.17.50.0.6( x86_64)"
Package existence check passed for "gcc-4.1.2 (x86_64)( x86_64)"
Package existence check passed for "libaio-0.3.106 (x86_64)( x86_64)"
Package existence check passed for "glibc-2.5-24 (x86_64)( x86_64)"
Package existence check passed for "compat-libstdc++-33-3.2.3 (x86_64)( x86_64)"
Package existence check passed for "elfutils-libelf-0.125 (x86_64)( x86_64)"
Package existence check passed for "elfutils-libelf-devel-0.125( x86_64)"
Package existence check passed for "glibc-common-2.5( x86_64)"
Package existence check passed for "glibc-devel-2.5 (x86_64)( x86_64)"
Package existence check passed for "glibc-headers-2.5( x86_64)"
Package existence check passed for "gcc-c++-4.1.2 (x86_64)( x86_64)"
Package existence check passed for "libaio-devel-0.3.106 (x86_64)( x86_64)"
Package existence check passed for "libgcc-4.1.2 (x86_64)( x86_64)"
Package existence check passed for "libstdc++-4.1.2 (x86_64)( x86_64)"
Package existence check passed for "libstdc++-devel-4.1.2 (x86_64)( x86_64)"
Package existence check passed for "sysstat-7.0.2( x86_64)"
Package existence check passed for "ksh-20060214( x86_64)"
Check for multiple users with UID value 0 passed
Current group ID check passed

Checking OCR integrity...

OCR integrity check passed

Checking Oracle Cluster Voting Disk configuration...

Oracle Cluster Voting Disk configuration check passed
Time zone consistency check passed

Starting Clock synchronization checks using Network Time Protocol(NTP)...

NTP Configuration file check started...
No NTP Daemons or Services were found to be running

Clock synchronization check using Network Time Protocol(NTP) passed

User "grid" is not part of "root" group. Check passed
Checking consistency of file "/etc/resolv.conf" across nodes

File "/etc/resolv.conf" does not have both domain and search entries defined
domain entry in file "/etc/resolv.conf" is consistent across nodes
search entry in file "/etc/resolv.conf" is consistent across nodes
All nodes have one search entry defined in file "/etc/resolv.conf"
PRVF-5636 : The DNS response time for an unreachable node exceeded "15000" ms on following nodes: vrh3

File "/etc/resolv.conf" is not consistent across nodes

Pre-check for node addition was unsuccessful on all the nodes.

一般来说如果我们不使用DNS解析域名方式的话,那么resolv.conf不一直的问题可以忽略,但在slient安装模式下可能造成我们的操作无法完成,这个后面会介绍。

二、向GI中加入新的节点

注意11.2.0.2 GI添加节点的关键脚本addNode.sh可能存在Bug,如官方文档所述当希望使用Interactive Mode交互模式启动OUI界面添加节点时,只要运行addNode.sh脚本即可,实际情况则不是这样:

documentation said:
Go to CRS_home/oui/bin and run the addNode.sh script on one of the existing nodes.
Oracle Universal Installer runs in add node mode and the Welcome page displays.
Click Next and the Specify Cluster Nodes for Node Addition page displays.

we done:

运行addNode.sh要求以GI拥有者身份运行该脚本,一般为grid用户,要求在已有的正运行GI的节点上启动脚本

[grid@vrh1 ~]$ cd $ORA_CRS_HOME/oui/bin

[grid@vrh1 bin]$ ./addNode.sh
ERROR:
Value for CLUSTER_NEW_NODES not specified.

USAGE:
/g01/11.2.0/grid/cv/cvutl/check_nodeadd.pl  {-pre|-post} 

/g01/11.2.0/grid/cv/cvutl/check_nodeadd.pl -pre [-silent] CLUSTER_NEW_NODES={}
/g01/11.2.0/grid/cv/cvutl/check_nodeadd.pl -pre [-silent] CLUSTER_NEW_NODES={} 
CLUSTER_NEW_VIRTUAL_HOSTNAMES={}

/g01/11.2.0/grid/cv/cvutl/check_nodeadd.pl -pre [-silent] -responseFile
/g01/11.2.0/grid/cv/cvutl/check_nodeadd.pl -post [-silent]

我们的本意是期望使用图形化的交互界面的OUI(runInstaller -addnode)来新增节点,然而addNode.sh居然让我们输入一些参量,而且其调用的check_nodeadd.pl脚本使用的是silent模式。

在MOS和GOOGLE上搜了一圈,基本所有的文档都推荐使用silent模式来添加节点,无法只好转到静默添加上来。实际上静默添加所需要提供的参数并不多,这可能是这种方式得到推崇的原因之一,但是这里又碰到问题了:

语法SYNTAX:
./addNode.sh –silent 
"CLUSTER_NEW_NODES={node2}" 
"CLUSTER_NEW_PRIVATE_NODE_NAMES={node2-priv}" "CLUSTER_NEW_VIRTUAL_HOSTNAMES={node2-vip}"

在我们的例子中具体命令如下

./addNode.sh -silent
"CLUSTER_NEW_NODES={vrh3}" "CLUSTER_NEW_VIRTUAL_HOSTNAMES={vrh3-vip}"
"CLUSTER_NEW_PRIVATE_NODE_NAMES={vrh3-priv}" 

以上命令因为采用silent模式所以没有任何窗口输出(实际上会输出到 /tmp/silentInstall.log日志文件中),去掉-silent参数

./addNode.sh  "CLUSTER_NEW_NODES={vrh3}"
"CLUSTER_NEW_VIRTUAL_HOSTNAMES={vrh3-vip}" "CLUSTER_NEW_PRIVATE_NODE_NAMES={vrh3-priv}"

Performing pre-checks for node addition 

Checking node reachability...
Node reachability check passed from node "vrh1"

Checking user equivalence...
User equivalence check passed for user "grid"

Checking node connectivity...

Checking hosts config file...

Verification of the hosts config file successful

Check: Node connectivity for interface "eth0"
Node connectivity passed for interface "eth0"

Node connectivity check passed

Checking CRS integrity...

CRS integrity check passed

Checking shared resources...

Checking CRS home location...
The location "/g01/11.2.0/grid" is not shared but is present/creatable on all nodes
Shared resources check for node addition passed

Checking node connectivity...

Checking hosts config file...

Verification of the hosts config file successful

Check: Node connectivity for interface "eth0"
Node connectivity passed for interface "eth0"

Check: Node connectivity for interface "eth1"
Node connectivity passed for interface "eth1"

Node connectivity check passed

Total memory check passed
Available memory check passed
Swap space check passed
Free disk space check passed for "vrh3:/tmp"
Free disk space check passed for "vrh1:/tmp"
Check for multiple users with UID value 54322 passed
User existence check passed for "grid"
Run level check passed
Hard limits check failed for "maximum open file descriptors"
Check failed on nodes:
        vrh3
Soft limits check passed for "maximum open file descriptors"
Hard limits check passed for "maximum user processes"
Soft limits check passed for "maximum user processes"
System architecture check passed
Kernel version check passed
Kernel parameter check passed for "semmsl"
Kernel parameter check passed for "semmns"
Kernel parameter check passed for "semopm"
Kernel parameter check passed for "semmni"
Kernel parameter check passed for "shmmax"
Kernel parameter check passed for "shmmni"
Kernel parameter check passed for "shmall"
Kernel parameter check passed for "file-max"
Kernel parameter check passed for "ip_local_port_range"
Kernel parameter check passed for "rmem_default"
Kernel parameter check passed for "rmem_max"
Kernel parameter check passed for "wmem_default"
Kernel parameter check passed for "wmem_max"
Kernel parameter check passed for "aio-max-nr"
Package existence check passed for "make-3.81( x86_64)"
Package existence check passed for "binutils-2.17.50.0.6( x86_64)"
Package existence check passed for "gcc-4.1.2 (x86_64)( x86_64)"
Package existence check passed for "libaio-0.3.106 (x86_64)( x86_64)"
Package existence check passed for "glibc-2.5-24 (x86_64)( x86_64)"
Package existence check passed for "compat-libstdc++-33-3.2.3 (x86_64)( x86_64)"
Package existence check passed for "elfutils-libelf-0.125 (x86_64)( x86_64)"
Package existence check passed for "elfutils-libelf-devel-0.125( x86_64)"
Package existence check passed for "glibc-common-2.5( x86_64)"
Package existence check passed for "glibc-devel-2.5 (x86_64)( x86_64)"
Package existence check passed for "glibc-headers-2.5( x86_64)"
Package existence check passed for "gcc-c++-4.1.2 (x86_64)( x86_64)"
Package existence check passed for "libaio-devel-0.3.106 (x86_64)( x86_64)"
Package existence check passed for "libgcc-4.1.2 (x86_64)( x86_64)"
Package existence check passed for "libstdc++-4.1.2 (x86_64)( x86_64)"
Package existence check passed for "libstdc++-devel-4.1.2 (x86_64)( x86_64)"
Package existence check passed for "sysstat-7.0.2( x86_64)"
Package existence check passed for "ksh-20060214( x86_64)"
Check for multiple users with UID value 0 passed
Current group ID check passed

Checking OCR integrity...

OCR integrity check passed

Checking Oracle Cluster Voting Disk configuration...

Oracle Cluster Voting Disk configuration check passed
Time zone consistency check passed

Starting Clock synchronization checks using Network Time Protocol(NTP)...

NTP Configuration file check started...
No NTP Daemons or Services were found to be running

Clock synchronization check using Network Time Protocol(NTP) passed

User "grid" is not part of "root" group. Check passed
Checking consistency of file "/etc/resolv.conf" across nodes

File "/etc/resolv.conf" does not have both domain and search entries defined
domain entry in file "/etc/resolv.conf" is consistent across nodes
search entry in file "/etc/resolv.conf" is consistent across nodes
All nodes have one search entry defined in file "/etc/resolv.conf"
PRVF-5636 : The DNS response time for an unreachable node exceeded "15000" ms on following nodes: vrh3

File "/etc/resolv.conf" is not consistent across nodes

Checking VIP configuration.
Checking VIP Subnet configuration.
Check for VIP Subnet configuration passed.
Checking VIP reachability
Check for VIP reachability passed.

Pre-check for node addition was unsuccessful on all the nodes.

在addNode.sh正式添加节点之前它也会调用cluvfy工具来验证新加入节点是否满足条件,如果不满足则拒绝下一步操作。因为我们在之前已经验证过了新节点的可用性,所以这里完全可以跳过addNode.sh的验证,具体来看一下addNode.sh脚本的内容:

[grid@vrh1 bin]$ cat addNode.sh 

#!/bin/sh
OHOME=/g01/11.2.0/grid
INVPTRLOC=$OHOME/oraInst.loc
ADDNODE="$OHOME/oui/bin/runInstaller -addNode -invPtrLoc $INVPTRLOC ORACLE_HOME=$OHOME $*"
if [ "$IGNORE_PREADDNODE_CHECKS" = "Y" -o ! -f "$OHOME/cv/cvutl/check_nodeadd.pl" ]
then
        $ADDNODE
else
        CHECK_NODEADD="$OHOME/perl/bin/perl $OHOME/cv/cvutl/check_nodeadd.pl -pre $*"
        $CHECK_NODEADD
        if [ $? -eq 0 ]
        then
        $ADDNODE
        fi
fi

可以看到存在一个IGNORE_PREADDNODE_CHECKS环境变量可以控制是否进行节点新增的预检查,我们手动设置该变量,之后再次运行addNode.sh脚本:

export IGNORE_PREADDNODE_CHECKS=Y

./addNode.sh  "CLUSTER_NEW_NODES={vrh3}"
"CLUSTER_NEW_VIRTUAL_HOSTNAMES={vrh3-vip}" "CLUSTER_NEW_PRIVATE_NODE_NAMES={vrh3-priv}"
> add_node.log  2>&1

另开一个窗口可以监控新增节点的过程日志

tail -f add_node.log 

Starting Oracle Universal Installer...

Checking swap space: must be greater than 500 MB.   Actual 5951 MB    Passed
Checking monitor: must be configured to display at least 256 colors.    Actual 16777216    Passed
Oracle Universal Installer, Version 11.2.0.2.0 Production
Copyright (C) 1999, 2010, Oracle. All rights reserved.

Performing tests to see whether nodes vrh2,vrh3 are available
............................................................... 100% Done.

.
-----------------------------------------------------------------------------
Cluster Node Addition Summary
Global Settings
   Source: /g01/11.2.0/grid
   New Nodes
Space Requirements
   New Nodes
      vrh3
         /: Required 6.66GB : Available 32.40GB
Installed Products
   Product Names
      Oracle Grid Infrastructure 11.2.0.2.0
      Sun JDK 1.5.0.24.08
      Installer SDK Component 11.2.0.2.0
      Oracle One-Off Patch Installer 11.2.0.0.2
      Oracle Universal Installer 11.2.0.2.0
      Oracle USM Deconfiguration 11.2.0.2.0
      Oracle Configuration Manager Deconfiguration 10.3.1.0.0
      Enterprise Manager Common Core Files 10.2.0.4.3
      Oracle DBCA Deconfiguration 11.2.0.2.0
      Oracle RAC Deconfiguration 11.2.0.2.0
      Oracle Quality of Service Management (Server) 11.2.0.2.0
      Installation Plugin Files 11.2.0.2.0
      Universal Storage Manager Files 11.2.0.2.0
      Oracle Text Required Support Files 11.2.0.2.0
      Automatic Storage Management Assistant 11.2.0.2.0
      Oracle Database 11g Multimedia Files 11.2.0.2.0
      Oracle Multimedia Java Advanced Imaging 11.2.0.2.0
      Oracle Globalization Support 11.2.0.2.0
      Oracle Multimedia Locator RDBMS Files 11.2.0.2.0
      Oracle Core Required Support Files 11.2.0.2.0
      Bali Share 1.1.18.0.0
      Oracle Database Deconfiguration 11.2.0.2.0
      Oracle Quality of Service Management (Client) 11.2.0.2.0
      Expat libraries 2.0.1.0.1
      Oracle Containers for Java 11.2.0.2.0
      Perl Modules 5.10.0.0.1
      Secure Socket Layer 11.2.0.2.0
      Oracle JDBC/OCI Instant Client 11.2.0.2.0
      Oracle Multimedia Client Option 11.2.0.2.0
      LDAP Required Support Files 11.2.0.2.0
      Character Set Migration Utility 11.2.0.2.0
      Perl Interpreter 5.10.0.0.1
      PL/SQL Embedded Gateway 11.2.0.2.0
      OLAP SQL Scripts 11.2.0.2.0
      Database SQL Scripts 11.2.0.2.0
      Oracle Extended Windowing Toolkit 3.4.47.0.0
      SSL Required Support Files for InstantClient 11.2.0.2.0
      SQL*Plus Files for Instant Client 11.2.0.2.0
      Oracle Net Required Support Files 11.2.0.2.0
      Oracle Database User Interface 2.2.13.0.0
      RDBMS Required Support Files for Instant Client 11.2.0.2.0
      RDBMS Required Support Files Runtime 11.2.0.2.0
      XML Parser for Java 11.2.0.2.0
      Oracle Security Developer Tools 11.2.0.2.0
      Oracle Wallet Manager 11.2.0.2.0
      Enterprise Manager plugin Common Files 11.2.0.2.0
      Platform Required Support Files 11.2.0.2.0
      Oracle JFC Extended Windowing Toolkit 4.2.36.0.0
      RDBMS Required Support Files 11.2.0.2.0
      Oracle Ice Browser 5.2.3.6.0
      Oracle Help For Java 4.2.9.0.0
      Enterprise Manager Common Files 10.2.0.4.3
      Deinstallation Tool 11.2.0.2.0
      Oracle Java Client 11.2.0.2.0
      Cluster Verification Utility Files 11.2.0.2.0
      Oracle Notification Service (eONS) 11.2.0.2.0
      Oracle LDAP administration 11.2.0.2.0
      Cluster Verification Utility Common Files 11.2.0.2.0
      Oracle Clusterware RDBMS Files 11.2.0.2.0
      Oracle Locale Builder 11.2.0.2.0
      Oracle Globalization Support 11.2.0.2.0
      Buildtools Common Files 11.2.0.2.0
      Oracle RAC Required Support Files-HAS 11.2.0.2.0
      SQL*Plus Required Support Files 11.2.0.2.0
      XDK Required Support Files 11.2.0.2.0
      Agent Required Support Files 10.2.0.4.3
      Parser Generator Required Support Files 11.2.0.2.0
      Precompiler Required Support Files 11.2.0.2.0
      Installation Common Files 11.2.0.2.0
      Required Support Files 11.2.0.2.0
      Oracle JDBC/THIN Interfaces 11.2.0.2.0
      Oracle Multimedia Locator 11.2.0.2.0
      Oracle Multimedia 11.2.0.2.0
      HAS Common Files 11.2.0.2.0
      Assistant Common Files 11.2.0.2.0
      PL/SQL 11.2.0.2.0
      HAS Files for DB 11.2.0.2.0
      Oracle Recovery Manager 11.2.0.2.0
      Oracle Database Utilities 11.2.0.2.0
      Oracle Notification Service 11.2.0.2.0
      SQL*Plus 11.2.0.2.0
      Oracle Netca Client 11.2.0.2.0
      Oracle Net 11.2.0.2.0
      Oracle JVM 11.2.0.2.0
      Oracle Internet Directory Client 11.2.0.2.0
      Oracle Net Listener 11.2.0.2.0
      Cluster Ready Services Files 11.2.0.2.0
      Oracle Database 11g 11.2.0.2.0
-----------------------------------------------------------------------------

Instantiating scripts for add node (Monday, August 15, 2011 10:15:35 PM CST)
.                                                                 1% Done.
Instantiation of add node scripts complete

Copying to remote nodes (Monday, August 15, 2011 10:15:38 PM CST)
...............................................................................................                                 96% Done.
Home copied to new nodes

Saving inventory on nodes (Monday, August 15, 2011 10:21:02 PM CST)
.                                                               100% Done.
Save inventory complete
WARNING:A new inventory has been created on one or more nodes in this session.
However, it has not yet been registered as the central inventory of this system.
To register the new inventory please run the script at '/g01/oraInventory/orainstRoot.sh'
with root privileges on nodes 'vrh3'.
If you do not register the inventory, you may not be able to update or
patch the products you installed.
The following configuration scripts need to be executed as the "root" user in each cluster node.
/g01/oraInventory/orainstRoot.sh #On nodes vrh3
/g01/11.2.0/grid/root.sh #On nodes vrh3
To execute the configuration scripts:
    1. Open a terminal window
    2. Log in as "root"
    3. Run the scripts in each cluster node

The Cluster Node Addition of /g01/11.2.0/grid was successful.
Please check '/tmp/silentInstall.log' for more details.

以上GI软件的安装成功了,接下来我们还需要在新加入的节点上运行2个关键的脚本,千万不要忘记这一点!:

运行orainstRoot.sh 和 root.sh脚本要求以root身份
su - root 

[root@vrh3]# cat /etc/oraInst.loc
inventory_loc=/g01/oraInventory                     --这里是oraInventory的位置
inst_group=asmadmin

[root@vrh3 ~]# cd /g01/oraInventory

[root@vrh3 oraInventory]# ./orainstRoot.sh
Creating the Oracle inventory pointer file (/etc/oraInst.loc)
Changing permissions of /g01/oraInventory.
Adding read,write permissions for group.
Removing read,write,execute permissions for world.

Changing groupname of /g01/oraInventory to asmadmin.
The execution of the script is complete.

运行CRS_HOME下的root.sh脚本,可能会有警告但不要紧

[root@vrh3 ~]# cd $ORA_CRS_HOME

[root@vrh3 g01]# /g01/11.2.0/grid/root.sh
Running Oracle 11g root script...

The following environment variables are set as:
    ORACLE_OWNER= grid
    ORACLE_HOME=  /g01/11.2.0/grid

Enter the full pathname of the local bin directory: [/usr/local/bin]:
   Copying dbhome to /usr/local/bin ...
   Copying oraenv to /usr/local/bin ...
   Copying coraenv to /usr/local/bin ...

Creating /etc/oratab file...
Entries will be added to the /etc/oratab file as needed by
Database Configuration Assistant when a database is created
Finished running generic part of root script.
Now product-specific root actions will be performed.

Using configuration parameter file: /g01/11.2.0/grid/crs/install/crsconfig_params
Creating trace directory
LOCAL ADD MODE
Creating OCR keys for user 'root', privgrp 'root'..
Operation successful.
OLR initialization - successful
Adding daemon to inittab
ACFS-9200: Supported
ACFS-9300: ADVM/ACFS distribution files found.
ACFS-9307: Installing requested ADVM/ACFS software.
ACFS-9308: Loading installed ADVM/ACFS drivers.
ACFS-9321: Creating udev for ADVM/ACFS.
ACFS-9323: Creating module dependencies - this may take some time.
ACFS-9327: Verifying ADVM/ACFS devices.
ACFS-9309: ADVM/ACFS installation correctness verified.
CRS-4402: The CSS daemon was started in exclusive mode but found an active CSS daemon on node vrh1, number 1, and is terminating
An active cluster was found during exclusive startup, restarting to join the cluster
clscfg: EXISTING configuration version 5 detected.
clscfg: version 5 is 11g Release 2.
Successfully accumulated necessary OCR keys.
Creating OCR keys for user 'root', privgrp 'root'..
Operation successful.
/g01/11.2.0/grid/bin/srvctl start listener -n vrh3 ... failed
Failed to perform new node configuration at /g01/11.2.0/grid/crs/install/crsconfig_lib.pm line 8255.
/g01/11.2.0/grid/perl/bin/perl -I/g01/11.2.0/grid/perl/lib -I/g01/11.2.0/grid/crs/install 
/g01/11.2.0/grid/crs/install/rootcrs.pl execution failed

以上会出现了2个小错误:

1.新增节点上LISTENER启动失败的问题可以忽略,这是因为RDBMS_HOME仍未安装,但CRS尝试去启动相关的监听

[root@vrh3 g01]# /g01/11.2.0/grid/bin/srvctl start listener -n vrh3
PRCR-1013 : Failed to start resource ora.CRS_LISTENER.lsnr
PRCR-1064 : Failed to start resource ora.CRS_LISTENER.lsnr on node vrh3
CRS-5010: Update of configuration file "/s01/orabase/product/11.2.0/dbhome_1/network/admin/listener.ora" failed: details at "(:CLSN00014:)" in "/g01/11.2.0/grid/log/vrh3/agent/crsd/oraagent_oracle/oraagent_oracle.log"
CRS-5013: Agent "/g01/11.2.0/grid/bin/oraagent.bin" failed to start process "/s01/orabase/product/11.2.0/dbhome_1/bin/lsnrctl" for action "check": details at "(:CLSN00008:)" in "/g01/11.2.0/grid/log/vrh3/agent/crsd/oraagent_oracle/oraagent_oracle.log"
CRS-2674: Start of 'ora.CRS_LISTENER.lsnr' on 'vrh3' failed
CRS-5013: Agent "/g01/11.2.0/grid/bin/oraagent.bin" failed to start process "/s01/orabase/product/11.2.0/dbhome_1/bin/lsnrctl" for action "clean": details at "(:CLSN00008:)" in "/g01/11.2.0/grid/log/vrh3/agent/crsd/oraagent_oracle/oraagent_oracle.log"
CRS-5013: Agent "/g01/11.2.0/grid/bin/oraagent.bin" failed to start process "/s01/orabase/product/11.2.0/dbhome_1/bin/lsnrctl" for action "check": details at "(:CLSN00008:)" in "/g01/11.2.0/grid/log/vrh3/agent/crsd/oraagent_oracle/oraagent_oracle.log"
CRS-2678: 'ora.CRS_LISTENER.lsnr' on 'vrh3' has experienced an unrecoverable failure
CRS-0267: Human intervention required to resume its availability.
PRCC-1015 : LISTENER was already running on vrh3
PRCR-1004 : Resource ora.LISTENER.lsnr is already running

2.rootcrs.pl脚本运行失败的话,一般重新运行一次即可:

[root@vrh3 bin]# /g01/11.2.0/grid/perl/bin/perl -I/g01/11.2.0/grid/perl/lib
-I/g01/11.2.0/grid/crs/install /g01/11.2.0/grid/crs/install/rootcrs.pl

Using configuration parameter file: /g01/11.2.0/grid/crs/install/crsconfig_params
PRKO-2190 : VIP exists for node vrh3, VIP name vrh3-vip
PRKO-2420 : VIP is already started on node(s): vrh3
Preparing packages for installation...
cvuqdisk-1.0.9-1
Configure Oracle Grid Infrastructure for a Cluster ... succeeded

3.建议在新增节点上重启crs,并使用cluvfy验证nodeadd顺利完成 :

[root@vrh3 ~]# crsctl stop crs

[root@vrh3 ~]# crsctl start crs

[root@vrh3 ~]# su - grid

[grid@vrh3 ~]$ cluvfy stage -post nodeadd -n vrh1,vrh2,vrh3

Performing post-checks for node addition 

Checking node reachability...
Node reachability check passed from node "vrh1"

Checking user equivalence...
User equivalence check passed for user "grid"

Checking node connectivity...

Checking hosts config file...

Verification of the hosts config file successful

Check: Node connectivity for interface "eth0"
Node connectivity passed for interface "eth0"

Node connectivity check passed

Checking cluster integrity...

Cluster integrity check passed

Checking CRS integrity...

CRS integrity check passed

Checking shared resources...

Checking CRS home location...
The location "/g01/11.2.0/grid" is not shared but is present/creatable on all nodes
Shared resources check for node addition passed

Checking node connectivity...

Checking hosts config file...

Verification of the hosts config file successful

Check: Node connectivity for interface "eth0"
Node connectivity passed for interface "eth0"

Check: Node connectivity for interface "eth1"
Node connectivity passed for interface "eth1"

Node connectivity check passed

Checking node application existence...

Checking existence of VIP node application (required)
VIP node application check passed

Checking existence of NETWORK node application (required)
NETWORK node application check passed

Checking existence of GSD node application (optional)
GSD node application is offline on nodes "vrh3,vrh2,vrh1"

Checking existence of ONS node application (optional)
ONS node application check passed

Checking Single Client Access Name (SCAN)...

Checking TCP connectivity to SCAN Listeners...
TCP connectivity to SCAN Listeners exists on all cluster nodes

Checking name resolution setup for "vrh.cluster.oracle.com"...

ERROR:
PRVF-4664 : Found inconsistent name resolution entries for SCAN name "vrh.cluster.oracle.com"

ERROR:
PRVF-4657 : Name resolution setup check for "vrh.cluster.oracle.com" (IP address: 192.168.1.190) failed

ERROR:
PRVF-4664 : Found inconsistent name resolution entries for SCAN name "vrh.cluster.oracle.com"

Verification of SCAN VIP and Listener setup failed

User "grid" is not part of "root" group. Check passed

Checking if Clusterware is installed on all nodes...
Check of Clusterware install passed

Checking if CTSS Resource is running on all nodes...
CTSS resource check passed

Querying CTSS for time offset on all nodes...
Query of CTSS for time offset passed

Check CTSS state started...
CTSS is in Active state. Proceeding with check of clock time offsets on all nodes...
Check of clock time offsets passed

Oracle Cluster Time Synchronization Services check passed

Post-check for node addition was successful.

11gr2 RAC安装INS-35354问题一例

今天在安装一套11.2.0.2 RAC数据库时出现了INS-35354的问题:
11gR2-GI-INS-35354

因为之前已经成功安装了11.2.0.2的GI,而且Cluster的一切状态都正常,出现这错误都少有点意外:

[grid@vrh1 ~]$ crsctl check crs
CRS-4638: Oracle High Availability Services is online
CRS-4537: Cluster Ready Services is online
CRS-4529: Cluster Synchronization Services is online
CRS-4533: Event Manager is online

去MOS搜了一圈,发现有可能是oraInventory中的inventory.xml更新不正确导致的:

Applies to:
Oracle Server - Enterprise Edition - Version: 11.2.0.1 to 11.2.0.2 - Release: 11.2 to 11.2
Information in this document applies to any platform.
Symptoms

Installing 11gR2 database software in a Grid Infrastrsucture environment fails with the error INS-35354:

The system on which you are attempting to install Oracle RAC is not part of a valid cluster.

Grid Infrastructure (Oracle Clusterware) is running on all nodes in the cluster which can be verified with:

crsctl check crs

Changes
This is a new install.
Cause
As per 11gR2 documentation the error description is:

INS-35354: The system on which you are attempting to install Oracle RAC is not part of a valid cluster.

Cause: Prior to installing Oracle RAC, you must create a valid cluster. 
This is done by deploying Grid Infrastructure software, 
which will allow configuration of Oracle Clusterware and Automatic Storage Management.

However, the problem at hand may be that the central inventory is missing the "CRS=true" flag 
(for the Grid Infrastructure Home).
<inventory.xml>
-------------

<HOME_LIST>
<HOME NAME="Ora11g_gridinfrahome1" LOC="/u01/grid" TYPE="O" IDX="1">
<NODE_LIST>
<NODE NAME="node1"/>
<NODE NAME="node2"/>
</NODE_LIST>

 -------------

From the inventory.xml, we see that the HOME NAME line is missing the CRS="true" flag.

The error INS-35354 will occur when the central inventory entry for the Grid Infrastructure 
home is missing the flag that identifies it as CRS-type home.
Solution
Use the -updateNodeList option for the installer command to fix the the inventory.

The full syntax is:

./runInstaller -updateNodeList "CLUSTER_NODES={node1,node2}"
ORACLE_HOME="" ORACLE_HOME_NAME="" LOCAL_NODE="Node_Name" CRS=[true|false]

Execute the command on any node in the cluster.

Examples:

For a two-node RAC cluster on UNIX:

Node1:
cd /u01/grid/oui/bin
./runInstaller -updateNodeList "CLUSTER_NODES={node1,node2}" ORACLE_HOME="/u01/crs" 
ORACLE_HOME_NAME="GI_11201" LOCAL_NODE="node1" CRS=true

For a 2-node RAC cluster on Windows:

Node 1:
cd e:\app\11.2.0\grid\oui\bin
e:\app\11.2.0\grid\oui\bin\setup -updateNodeList "CLUSTER_NODES={RACNODE1,RACNODE2}" 
ORACLE_HOME="e:\app\11.2.0\grid" ORACLE_HOME_NAME="OraCrs11g_home1" LOCAL_NODE="RACNODE1" CRS=true

我环境中的inventory.xml内容如下:

[grid@vrh1 ContentsXML]$ cat inventory.xml 
<?xml version="1.0" standalone="yes" ?>
<!-- Copyright (c) 1999, 2010, Oracle. All rights reserved. -->
<!-- Do not modify the contents of this file by hand. -->
<INVENTORY>
<VERSION_INFO>
   <SAVED_WITH>11.2.0.2.0</SAVED_WITH>
   <MINIMUM_VER>2.1.0.6.0</MINIMUM_VER>
</VERSION_INFO>
<HOME_LIST>
<HOME NAME="Ora11g_gridinfrahome1" LOC="/g01/11.2.0/grid" TYPE="O" IDX="1" >
   <NODE_LIST>
      <NODE NAME="vrh1"/>
      <NODE NAME="vrh2"/>
   </NODE_LIST>
</HOME>
</HOME_LIST>
</INVENTORY>

显然是在<HOME NAME这里缺少了CRS=”true”的标志,导致OUI安装界面在检测时认为该节点没有安装GI。

解决方案其实很简单只要加入CRS=”true”在重启runInstaller即可,不需要如文档中介绍的那样使用runInstaller -updateNodeList的复杂命令组合。

[grid@vrh1 ContentsXML]$ cat /g01/oraInventory/ContentsXML/inventory.xml 
<?xml version="1.0" standalone="yes" ?>
<!-- Copyright (c) 1999, 2010, Oracle. All rights reserved. -->
<!-- Do not modify the contents of this file by hand. -->
<INVENTORY>
<VERSION_INFO>
   <SAVED_WITH>11.2.0.2.0</SAVED_WITH>
   <MINIMUM_VER>2.1.0.6.0</MINIMUM_VER>
</VERSION_INFO>
<HOME_LIST>
<HOME NAME="Ora11g_gridinfrahome1" LOC="/g01/11.2.0/grid" TYPE="O" IDX="1" CRS="true">
   <NODE_LIST>
      <NODE NAME="vrh1"/>
      <NODE NAME="vrh2"/>
   </NODE_LIST>
</HOME>
</HOME_LIST>
</INVENTORY>

如上修改后问题解决,安装界面正常:
11gr2-RAC-Installing-db-step-4-10

沪ICP备14014813号-2

沪公网安备 31010802001379号