Known Oracle Internal Stack Call Meaning

 ksedmp             # KSE: dump the process state
 ksfdmp             # Call relevant dump routine
 kgeasi             # Raise an error on an ASSERTION failure (IGNORE)
 ktcrab             KTC: Kernel Transaction Control Real ABort - Abort a
transaction.
 ktcsod             KTC: Transaction Control: STATE OBJECT PROCEDURE VECTOR
DEFINITION
 kssdch_stage       
 kssdch             KSS: delete children of state obj.
 ksures             
 ktmres             ktmres - KTM Resource cleanup routine.
 ktmmon             KTM: TX Monitor: background timeout action
 ksbrdp             KSB: run a detached (background) process
 opirip             # Oracle Program Interface Run Independent Process
(IGNORE)
 opidrv             # opidrv - ORACLE Program Interface DRiVer (IGNORE)
 sou2o              # Main Oracle executable entry point
 main               # Standard executable entry point
Function Based Indexes and Global Temporary Tables

A nonunique index can be used to enforce a primary key or unique constraint.

In Oracle8i indexes can be rebuilt without locking the table.

The DROP COLUMN option of the ALTER TABLE command is restartable.

The MOVE option of the ALTER TABLE command retains the constraints of the table.

Data rows in the global temporary table are always deleted when A user session is terminated

1.    As user Scott, create a table with three columns.  Create an index on all three columns in the order they appear in the table.  Then add a primary key constraint using the first two columns with the second column of the table appearing first.  Verify that only one index, the index being used to enforce the constraint, has been defined for the table.

Hint: if the columns in the table were labeled A, B, and C, the index would be on (A, B, C) while the constraint would be on columns (B, A).

Solution:


connect scott/tiger


CREATE TABLE acct

( acct_no       NUMBER(10),

customer_id           NUMBER(10),

acct_comment VARCHAR2(200),

CONSTRAINT pk_cid_aid  PRIMARY KEY(customer_id, acct_no) DISABLE

)

/

CREATE INDEX I_ANO_CNO_ACOMM

ON acct(acct_no, customer_id, acct_comment)

ONLINE

/

ALTER TABLE acct

ENABLE CONSTRAINT pk_cid_aid

/


select index_name, table_name from user_indexes

where table_name = ‘ACCT’

/

2. As user Scott create a table containing three columns.  Remove the third column using one of the new methods introduced in Oracle8i.  Verify that the column is no longer part of the table.

Solution:

connect scott/tiger


CREATE TABLE acct_col

( acct_col_no         NUMBER(10),

customer_id           NUMBER(10),

acct_col_comment    VARCHAR2(200)

)

/

ALTER TABLE acct_col

SET UNUSED COLUMN acct_col_comment

/


desc acct_col


SELECT * FROM user_unused_col_tabs

/

ALTER TABLE acct_col

DROP UNUSED COLUMNS

/

SELECT * FROM user_unused_col_tabs

/


3. As user SYS create a global temporary table containing three columns.  The inserted rows should remain available until explicitly deleted or the session ends.  Make the table available to anyone who wishes to use it.  The users should not have to know the table owner in order to make use of it.

Solution:

connect / as sysdba


CREATE GLOBAL TEMPORARY TABLE emp_temp_X

(eno NUMBER,

ename VARCHAR2(20),

sal NUMBER)

ON COMMIT PRESERVE ROWS;


connect / AS SYSDBA


CREATE PUBLIC SYNONYM emp_temp for emp_temp_x

/

GRANT ALL ON emp_temp TO PUBLIC

/

col object_name format a20

SELECT owner, object_name, object_type FROM dba_objects

WHERE object_name LIKE ‘%EMP_TEMP%’

/

connect scott/tiger


desc emp_temp


select * from emp_temp

/


Materialized Views and Dimensions

Materialized Views and Refresh Types

This practice will familiarize you with the various features and privileges to ensure successful creation of a materialized view from a base table.

1) Grant the necessary privileges for user Scott to create materialized views and allow query rewrite on the materialized views owned by schema Scott.

As user SYSTEM, execute the following command:> grant CREATE MATERIALIZED VIEW, QUERY REWRITE to scott;

2) As user Scott, create a materialized view name STAFF_MV_SIMPLE from the Employees table. You want the materialized view to only store data  for the job of a STAFF, and you want a complete refresh.  You need to first create the EMPLOYEES table by importing employees.dmp.

As user Scott, execute the following command:> CREATE MATERIALIZED VIEW staff_mv_simple
REFRESH COMPLETE
AS SELECT * FROM EMPLOYEES  WHERE JOB = ‘STAFF’;

3) Create a materialized view name STAFF_MV_REFRESH, still only storing data  for the job of a STAFF,  but you want a refresh feature that will only apply the changes made to the base table since the last time you refresh the materialized view.  You will be creating a materialized view with a fast refresh.

As user Scott, execute the following command: > CREATE MATERIALIZED VIEW staff_mv_refresh
REFRESH FAST
AS SELECT * FROM EMPLOYEES  WHERE JOB = ‘STAFF’;

4) Create a materialized view name STAFF_MV_QR, still only storing data  for the job of a STAFF, using 2 parallel processes, allowing query rewrite, and you
want a complete refresh.

As user Scott, execute the following command: > CREATE MATERIALIZED VIEW staff_mv_qr
PARALLEL (DEGREE 2)
REFRESH COMPLETE
ENABLE QUERY REWRITE
AS SELECT * FROM EMPLOYEES WHERE JOB = ‘STAFF’;

Query Rewrites

This practice will familiarize you with the various features of creating a materialized view with query rewrite capabilty.

1) Alter your session to allow query rewrite.

As user Scott, execute the following command: > alter session set QUERY_REWRITE_ENABLED = true;

2) Use EXPLAIN PLAN to verify that rewrite has taken place. Confirm you have a Plan_Table.  If you do not, please create it by running the utlxplan.sql file.
It should be located in the subdirectory where you installed Oracle.

For example, if Oracle 8.1.6 is install on c:oracle, then the file will be in the c:oracleora81rdbmsadmin

Create the Plan_table for schema Scott if it does not exist already.

As user Scott, execute the following command: > @c:oracleora81rdbmsadminutlxplan.sql

Confirm the plan_table exists.

As user Scott, execute the following command: > describe plan_table

3) Confirm materialized view STAFF_MV_QR will be use in a query rewrite request.

As user Scott, execute the following command: >delete from plan_table;

This is to ensure there are no row the the plan_table before populaing it with the explain plan results.

>explain plan for
> SELECT * FROM EMPLOYEES WHERE JOB = ‘STAFF’

>col Operation format a30
col Options   format a20
col Object    format a20

>select lpad(‘ ‘, 2*LEVEL) || OPERATION ||
decode( ID, 0, ‘ Cost = ‘||POSITION) “Operation”,
OPTIONS “Options”, OBJECT_NAME “Object”
from PLAN_TABLE
connect by prior ID = PARENT_ID  start with ID = 0
order by ID
/

Dimensions

This practice will familiarize you with the various features of creating a dimension, storing the hierachy definition in the database, and being familiar with the the data dictionary views that can be used to gather information regarding dimensions.

1) Confirm user Scott has the privilege to create a dimension.  If not,  grant that privilege to Scott.

As user System, execute the following command: > select grantee, privilege
from dba_sys_privs
where grantee = ‘SCOTT’; 

If you don’t see user Scott has the CREATE DIMENSION privilege, grant it to user Scott.

> grant create dimension to scott;

2) As user Scott, create a dimension name mv_time_dim from the time table with a hierarchy name scott_calendar.  Frist create the time table by exporting from
the file time.dmp.

As user Scott execute the following command: >CREATE DIMENSION mv_time_dim
LEVEL sdate IS time.sdate
LEVEL month IS time.month
LEVEL qtr   IS time.quarter
LEVEL yr    IS time.year
HIERARCHY scott_calendar
(sdate CHILD OF month CHILD OF qtr CHILD OF  yr)
ATTRIBUTE month DETERMINES month_name;

3) Determine the levels of the dimersion you have created.  To see that information, query the user_dim_levels view.
As user Scott execute the following command:

>select dimension_name, level_name, detailobj_name
from user_dim_levels;

Summary Management

1) After you have set up Oracle Trace Manager to monitor the utilization of your materialized views. you can determine if you should keep the materialized views you have created by querying the mview$_recommendations view.
As user Scott execute the following command:

>SELECT recommended_action, mview_name, group_by_columns, measures_list
FROM mview$_recommendations;

EVENT: 10231 "skip corrupted blocks on _table_scans_"

Event: 10231
Text:  skip corrupted blocks on _table_scans_
-------------------------------------------------------------------------------
Cause:
Action: Corrupt blocks are skipped in table scans, and listed in trace files.

Explanation:
        This is NOT an error but is a special EVENT code.
        It should *NOT* be used unless explicitly requested by ST support.

   8.1 onwards:
   ~~~~~~~~~~~~
        The "7.2 onwards" notes below still apply but in Oracle8i
        there is a PL/SQL <Package:DBMS_REPAIR> which can be used
        to check corrupt blocks.  See <DocIndex:DBMS_REPAIR>.

        It is possible to simulate 10231 on a table using
        DBMS_REPAIR.SKIP_CORRUPT_BLOCKS('schema','table').
        The SKIP_CORRUPT column of DBA_TABLES shows tables which
        have been marked to allow skipping of corrupt blocks.

   7.2 onwards:
   ~~~~~~~~~~~~
	Event 10231 causes SOFTWARE CORRUPT or MEDIA corrupt blocks
	to be skipped on FULL TABLE SCANS only.  (E.g: on export)
	Software corrupt blocks are defined below.  Media corrupt
        blocks are Oracle blocks where the header field information
        is not what was expected.  These can now be skipped with
	the 10231 event.

   Before 7.2:
   ~~~~~~~~~~~
        Event 10231 causes SOFTWARE CORRUPT blocks to be skipped on
        FULL TABLE SCANS only.  (E.g: on export).

        A 'software corrupt' block is a block that has a SEQ number of ZERO.
        This raises an ORA-1578 error.

	NB: Blocks may be internally corrupt and still cause problems or
	    raise ORA-1578.  If a block is physically corrupt and the SEQ
	    is not set to ZERO, you cannot use 10231 to skip it.  You have
	    to try to scan around the block instead.

	    To manually corrupt a block and cause it to be skipped you
	    must: Set SEQ to ZERO.
		  Set the INCSEQ at the end of the block to match.


	You can set event numbers 10210, 10211, and 10212 to check blocks
        at the data level and mark them software corrupt if they are found
        to be corrupt.  You CANNOT use these events to mark a physically
        corrupt block as software corrupt because the block never reaches
        the data layer.

        When a block is skipped, any data in the block is totally ignored.


Usage:  Event="10231 trace name context forever, level 10".
	This should be removed from the instance parameters immediately after
	it has been used.

        Alternatively it can be set at session level:
        alter session set events '10231 trace name context forever, level 10'

@Articles:
@       Customer FAX Explaining How to Use Event 10231	 Note 33405.1
@       Data, Index & Cluster Block  <Event:10210><Event:10211><Event:10212>
@	Skip Blocks on Index Range Scan			 <Event:10233>
@	Physical Oracle Data Block Layout		 Note 33242.1

DBMS_REPAIR example


PURPOSE

 This document provides an example of DBMS_REPAIR as introduced in Oracle 8i.
 Oracle provides different methods for detecting and correcting data block
 corruption - DBMS_REPAIR is one option.

 WARNING: Any corruption that involves the loss of data requires analysis to
 understand how that data fits into the overall database system. Depending on
 the nature of the repair, you may lose data and logical inconsistencies can
 be introduced; therefore you need to carefully weigh the gains and losses
 associated with using DBMS_REPAIR.

SCOPE & APPLICATION

 This article is intended to assist an experienced DBA working with an Oracle
 Worldwide Support analyst only.  This article does not contain general
 information regarding the DBMS_REPAIR package, rather it is designed to provide
 sample code that can be customized by the user (with the assistance of
 an Oracle support analyst) to address database corruption.  The
 "Detecting and Repairing Data Block Corruption" Chapter of the Oracle8i
 Administrator's  Guide should be read and risk assessment analyzed prior to
 proceeding.

RELATED DOCUMENTS

  Oracle 8i Administrator's Guide,  DBMS_REPAIR Chapter

Introduction
=============

Note: The DBMS_REPAIR package is used to work with corruption in the
transaction layer and the data layer only (software corrupt blocks).
Blocks with physical corruption (ex. fractured block) are marked as
the block is read into the buffer cache and DBMS_REPAIR ignores all
blocks marked corrupt.

The only block repair in the initial release of DBMS_REPAIR is to
*** mark the block software corrupt ***.

DB_BLOCK_CHECKING and DB_BLOCK_CHECKSUM must both be set to FALSE.

A backup of the file(s) with corruption should be made before using package.

Database Summary
===============

A corrupt block exists in table T1.

SQL> desc t1
 Name                                      Null?    Type
 ----------------------------------------- -------- ----------------------------
 COL1                                      NOT NULL NUMBER(38)
 COL2                                               CHAR(512)

SQL> analyze table t1 validate structure;
analyze table t1 validate structure
*
ERROR at line 1:
ORA-01498: block check failure - see trace file

---> Note: In the trace file produced from the ANALYZE, it can be determined
---        that the corrupt block contains 3 rows of data (nrows = 3).
---        The leading lines of the trace file follows:

Dump file /export/home/oracle/product/8.1.5/admin/V815/udump/v815_ora_2835.trc
Oracle8 Enterprise Edition Release 8.1.5.0.0 - Beta
With the Partitioning option

*** 1998.12.16.15.53.02.000
*** SESSION ID:(7.6) 1998.12.16.15.53.02.000
kdbchk: row locked by non-existent transaction
        table=0   slot=0
        lockid=32   ktbbhitc=1
Block header dump:  0x01800003
 Object id on Block? Y
 seg/obj: 0xb6d  csc: 0x00.1cf5f  itc: 1  flg: -  typ: 1 - DATA
     fsl: 0  fnx: 0x0 ver: 0x01

 Itl           Xid                  Uba         Flag  Lck        Scn/Fsc
0x01   xid:  0x0002.011.00000121    uba: 0x008018fb.0345.0d  --U-    3  fsc
0x0000.0001cf60

data_block_dump
===============
tsiz: 0x7b8
hsiz: 0x18
pbl: 0x28088044
bdba: 0x01800003
flag=-----------
ntab=1
nrow=3
frre=-1
fsbo=0x18
fseo=0x19d
avsp=0x185
tosp=0x185
0xe:pti[0]      nrow=3  offs=0
0x12:pri[0]     offs=0x5ff
0x14:pri[1]     offs=0x3a6
0x16:pri[2]     offs=0x19d
block_row_dump:

[... remainder of file not included]

end_of_block_dump

DBMS_REPAIR.ADMIN_TABLES (repair and orphan key
================================================

ADMIN_TABLES provides administrative functions for repair and orphan key tables.

SQL> @adminCreate
SQL> connect sys/change_on_install
Connected.
SQL>
SQL> -- Repair Table
SQL>
SQL> declare
  2  begin
  3  -- Create repair table
  4  dbms_repair.admin_tables (
  5  --    table_name => 'REPAIR_TABLE',
  6      table_type => dbms_repair.repair_table,
  7      action => dbms_repair.create_action,
  8      tablespace => 'USERS');          -- default TS of SYS if not specified
  9  end;
 10  /

PL/SQL procedure successfully completed.

SQL> select owner, object_name, object_type
  2  from dba_objects
  3  where object_name like '%REPAIR_TABLE';

OWNER                 OBJECT_NAME                      OBJECT_TYPE
------------------------------------------------------------------
SYS                   DBA_REPAIR_TABLE                 VIEW
SYS                   REPAIR_TABLE                     TABLE

SQL>
SQL> -- Orphan Key Table
SQL>
SQL> declare
  2  begin
  3  -- Create orphan key table
  4  dbms_repair.admin_tables (
  5      table_type => dbms_repair.orphan_table,
  6      action => dbms_repair.create_action,
  7      tablespace => 'USERS');          -- default TS of SYS if not specified
  8  end;
  9  /

PL/SQL procedure successfully completed.

SQL> select owner, object_name, object_type
  2  from dba_objects
  3  where object_name like '%ORPHAN_KEY_TABLE';

OWNER                 OBJECT_NAME                      OBJECT_TYPE
------------------------------------------------------------------
SYS                   DBA_ORPHAN_KEY_TABLE             VIEW
SYS                   ORPHAN_KEY_TABLE                 TABLE

DBMS_REPAIR.CHECK_OBJECT
=========================

CHECK_OBJECT procedure checks the specified object and populates the repair
table with information about corruption and repair directive(s).  Validation
consists of block checking all blocks in the object.  All blocks previously
marked corrupt will be skipped.

Note: In the initial release of DBMS_REPAIR the only repair is to mark the
      block as software corrupt.

SQL> @checkObject
SQL> set serveroutput on
SQL>
SQL> declare
  2     rpr_count int;
  3  begin
  4     rpr_count := 0;
  5  dbms_repair.check_object (
  6     schema_name => 'SYSTEM',
  7     object_name => 'T1',
  8     repair_table_name => 'REPAIR_TABLE',
  9     corrupt_count => rpr_count);
 10     dbms_output.put_line('repair count: ' || to_char(rpr_count));
 11  end;
 12  /
repair count: 1

PL/SQL procedure successfully completed.

SQL> desc repair_table
 Name                                      Null?    Type
 ----------------------------------------- -------- ----------------------------
 OBJECT_ID                                 NOT NULL NUMBER
 TABLESPACE_ID                             NOT NULL NUMBER
 RELATIVE_FILE_ID                          NOT NULL NUMBER
 BLOCK_ID                                  NOT NULL NUMBER
 CORRUPT_TYPE                              NOT NULL NUMBER
 SCHEMA_NAME                               NOT NULL VARCHAR2(30)
 OBJECT_NAME                               NOT NULL VARCHAR2(30)
 BASEOBJECT_NAME                                    VARCHAR2(30)
 PARTITION_NAME                                     VARCHAR2(30)
 CORRUPT_DESCRIPTION                                VARCHAR2(2000)
 REPAIR_DESCRIPTION                                 VARCHAR2(200)
 MARKED_CORRUPT                            NOT NULL VARCHAR2(10)
 CHECK_TIMESTAMP                           NOT NULL DATE
 FIX_TIMESTAMP                                      DATE
 REFORMAT_TIMESTAMP                                 DATE

SQL> select object_name, block_id, corrupt_type, marked_corrupt,
  2  corrupt_description, repair_description
  3  from repair_table;

OBJECT_NAME                      BLOCK_ID CORRUPT_TYPE MARKED_COR
------------------------------ ---------- ------------ ----------
CORRUPT_DESCRIPTION
--------------------------------------------------------------------------------
REPAIR_DESCRIPTION
--------------------------------------------------------------------------------
T1                                      3            1 FALSE
kdbchk: row locked by non-existent transaction
        table=0   slot=0
        lockid=32   ktbbhitc=1
mark block software corrupt

Data Extraction
===============

The repair table indicates that block 3 of file 6 is corrupt - but remember
that this block has not yet been marked as corrupt, therefore now is the
time to extract any meaningful data.  After the block is marked corrupt,
the entire block must be skipped.

1. Determine the number of rows in the block from ALTER SYSTEM DUMP (nrows = 3).
2. Query the corrupt object and extract as much information as possible.

SQL> -- The following query can be used to salvage data from a corrupt block.
SQL> -- Creating a temporary table facilitates data insertion.

SQL> create table temp_t1 as
  2  select * from system.t1
  3  where dbms_rowid.rowid_block_number(rowid) = 3
  4  and dbms_rowid.rowid_to_absolute_fno (rowid, 'SYSTEM','T1') = 6;

Table created.

SQL> select col1 from temp_t1;

      COL1
----------
         2
         3

DBMS_REPAIR.FIX_CORRUPT_BLOCKS  (ORA-1578)
============================================

FIX_CORRUPT_BLOCKS procedure fixes the corrupt blocks in the specified objects
based on information in the repair table.  After the block has been marked as
corrupt,  an ORA-1578 results when a full table scan is performed.

SQL> declare
  2     fix_count int;
  3  begin
  4     fix_count := 0;
  5  dbms_repair.fix_corrupt_blocks (
  6     schema_name => 'SYSTEM',
  7     object_name => 'T1',
  8     object_type => dbms_repair.table_object,
  9     repair_table_name => 'REPAIR_TABLE',
 10     fix_count => fix_count);
 11     dbms_output.put_line('fix count: ' || to_char(fix_count));
 12  end;
 13  /
fix count: 1

PL/SQL procedure successfully completed.

SQL> select object_name, block_id, marked_corrupt
  2  from repair_table;

OBJECT_NAME                      BLOCK_ID MARKED_COR
------------------------------ ---------- ----------
T1                                      3 TRUE

SQL> select * from system.t1;
select * from system.t1
                     *
ERROR at line 1:
ORA-01578: ORACLE data block corrupted (file # 6, block # 3)
ORA-01110: data file 6: '/tmp/ts_corrupt.dbf'

DBMS_REPAIR.DUMP_ORPHAN_KEYS
==============================

DUMP_ORPHAN_KEYS reports on index entries that point to rows in corrupt data
blocks.

SQL> select index_name from dba_indexes
  2  where table_name in (select distinct object_name from repair_table);

INDEX_NAME
------------------------------
T1_PK

SQL> @dumpOrphanKeys
SQL> set serveroutput on
SQL>
SQL> declare
  2     key_count int;
  3  begin
  4     key_count := 0;
  5  dbms_repair.dump_orphan_keys (
  6     schema_name => 'SYSTEM',
  7     object_name => 'T1_PK',
  8     object_type => dbms_repair.index_object,
  9     repair_table_name => 'REPAIR_TABLE',
 10     orphan_table_name => 'ORPHAN_KEY_TABLE',
 11     key_count => key_count);
 12     dbms_output.put_line('orphan key count: ' || to_char(key_count));
 13  end;
 14  /
orphan key count: 3
PL/SQL procedure successfully completed.

SQL> desc orphan_key_table
 Name                                      Null?    Type
 ----------------------------------------- -------- ----------------------------
 SCHEMA_NAME                               NOT NULL VARCHAR2(30)
 INDEX_NAME                                NOT NULL VARCHAR2(30)
 IPART_NAME                                         VARCHAR2(30)
 INDEX_ID                                  NOT NULL NUMBER
 TABLE_NAME                                NOT NULL VARCHAR2(30)
 PART_NAME                                          VARCHAR2(30)
 TABLE_ID                                  NOT NULL NUMBER
 KEYROWID                                  NOT NULL ROWID
 KEY                                       NOT NULL ROWID
 DUMP_TIMESTAMP                            NOT NULL DATE

SQL> select index_name, count(*) from orphan_key_table
  2  group by index_name;

INDEX_NAME                       COUNT(*)
------------------------------ ----------
T1_PK                                   3

Note: Index entry in the orphan key table implies that the index should be
rebuilt to guarantee the a table probe and an index probe return the same
result set.

DBMS_REPAIR.SKIP_CORRUPT_BLOCKS
===============================

SKIP_CORRUPT_BLOCKS enables/disables the skipping of corrupt blocks during
index and table scans of a specified object.

Note: If an index and table are out of sync, then a SET TRANSACTION READ ONLY
transaction may be inconsistent in situations where one query probes only
the index and then a subsequent query probes both the index and the table.
If the table block is marked corrupt, then the two queries will return
different results.

Suggestion: If SKIP_CORRUPT_BLOCKS is enabled, then rebuild any indexes
identified in the orphan key table (or all index associated with object
if DUMP_ORPHAN_KEYS was omitted).

SQL> @skipCorruptBlocks
SQL> declare
  2  begin
  3  dbms_repair.skip_corrupt_blocks (
  4     schema_name => 'SYSTEM',
  5     object_name => 'T1',
  6     object_type => dbms_repair.table_object,
  7     flags => dbms_repair.skip_flag);
  8  end;
  9  /

PL/SQL procedure successfully completed.

SQL> select table_name, skip_corrupt from dba_tables
  2  where table_name = 'T1';

TABLE_NAME                     SKIP_COR
------------------------------ --------
T1                             ENABLED

SQL> -- rows in corrupt block skipped, no errors on full table scan
SQL> select * from system.t1;

COL1              COL2
--------------------------------------------------------------------------------
4                 dddd
5                 eeee

--> Notice the pk index has not yet been corrected.

SQL> insert into system.t1 values (1,'aaaa');
insert into system.t1 values (1,'aaaa')
                   *
SQL> select * from system.t1 where col1 = 1;

no rows selected

DBMS_REPAIR.REBUILD_FREELISTS
===============================

REBUILD_FREELISTS rebuilds freelists for the specified object.

SQL> declare
  2  begin
  3  dbms_repair.rebuild_freelists (
  4     schema_name => 'SYSTEM',
  5     object_name => 'T1',
  6     object_type => dbms_repair.table_object);
  7  end;
  8  /

PL/SQL procedure successfully completed.

Rebuild Index
=============

Note:  Every index identified in the orphan key table should be rebuilt to
ensure consistent results.

SQL> alter index system.t1_pk rebuild online;

Index altered.

SQL> insert into system.t1 values (1, 'aaaa');

1 row created.

SQL> select * from system.t1;

COL1              COL2
--------------------------------------------------------------------------------
4                 dddd
5                 eeee
1                 aaaa

Note - The above insert statement was used to provide a simple example.
This is the perfect world - we know the data that was lost.  The temporary
table (temp_t1) should also be used to include all rows extracted from
the corrupt block.

Conclusion
==========

At this point the table T1 is available but data loss was incurred.  In general,
data loss must be seriously considered before using the DBMS_REPAIR package for
mining the index segment and/or table block dumps is very complicated and
logical inconsistencies may be introduced.  In the initial release, the only
repair affected by DBMS_REPAIR is to mark the block as software corrupt.

<<End of Article>

Setting an Oracle event:The structure of the trace syntax

PURPOSE
-------

The purpose of this article is to explain briefly the structure of the syntax to
event-based trace generation.

Setting an event: The structure of the trace syntax
---------------------------------------------------

@ A comprehensive/full overview of the event syntax can be found in:
@ Note:9331.1 - Full Event Syntax (from ksdp.c)
@ Note:45217.1 - Summary Event Syntax for WWCS

0. "Setting an Event" - Abstract definition:
============================================

   "Setting an event" means to tell oracle to generate information in form of a
   so called trace file in the context of the event.

1. Event Classes to be traced:
==============================

   There are 4 Classes of traceable events:

   Class 1 "Dump something": Traces are generated upon so called unconditioned,
                             immediate, events. This is the case when oracle data has
			     to be dumped like, e.g., the headers of all redolog files
			     or the contents of the controlfile. These events can not
			     be set in the init<SID>.ora.

   Class 2 "Trap on Error" : Setting this class of (error-) events cause oracle to
                             generate a so called errorstack everytime the event happens.

   Class 3 "Change execution path" : Setting such an event will cause oracle to
                             change the execution path for some specific code segment.
			     For example, setting event "10269" prevents SMON from doing
			     free space coalescing.

   Class 4 "Trace something": Events from this class are set to obtain traces that are
                             used for, e.g., sql tuning. A common event is "10046" which
			     will cause oracle to trace  the sql access path on each
			     sql-statement.

II. Event based trace generation syntax - Overview and examples:
================================================================

   1. Session:         alter session set events '10181 trace name context forever, level 1000';
   2. init<sid>.ora:   event="10181 trace name context forever, level 1000";

   -------------------------------------------------------------------------------------------
  | TRACE      |                        TRACE SYNTAX                                          |
  | CLASS      |                                                                              |
  |-------------------------------------------------------------------------------------------|
  |            | <event name> |                     <action>                                  |
  |-------------------------------------------------------------------------------------------|
  |            |              | <action key word> | "name" | <trace name> | <trace qualifier> |
   -------------------------------------------------------------------------------------------|
  |            |              |                   |        |              |                   |
  |            |  immediate   |   trace           | "name" | blockdump    |    level 67110390 |
  |            |  immediate   |   trace           | "name" | redohdr      |    level 10       |
  |            |  immediate   |   trace           | "name" | file_hdrs    |    level 10       |
  | "Dump      |  immediate   |   trace           | "name" | controlf     |    level 10       |
  | Something" |  immediate   |   trace           | "name" | systemstate  |    level 10       |
  |            |              |                   |        |              |                   |
  |-------------------------------------------------------------------------------------------
  |            |              |                   |        |              |                   |
  |            |        942   |   trace           | "name" | errorstack   |    forever        |
  |            |        942   |   trace           | "name" | errorstack   |    off            |
  | "Trap      |         60   |   trace           | "name" | errorstack   |    level 1        |
  | on         |       6501   |   trace           | "name" | processstate |    level 10       |
  | Error"     |       4030   |   trace           | "name" | heapdump     |    level 2        |
  |            |              |                   |        |              |                   |
  |-------------------------------------------------------------------------------------------
  |            |              |                   |        |              |                   |
  | "Change    |      10269   |   trace           | "name" | context      | forever, level 10 |
  | Execution  |              |                   |        |              |                   |
  | path"      |              |                   |        |              |                   |
  |            |              |                   |        |              |                   |
  |-------------------------------------------------------------------------------------------
  |            |              |                   |        |              |                   |
  |            |      10046   |   trace           | "name" | context      | forever, level 12 |
  | "Trace     |      10046   |   trace           | "name" | context      | off               |
  | something" |              |                   |        |              |                   |
  |            |              |                   |        |              |                   |
   -------------------------------------------------------------------------------------------

III: Trace syntax: Annotations
===============================

   0. There are tools like oradebug that allow for setting an event in another
      session; this is useful, e.g., for tracing the export utility.
      @Setting Events from Oracle Tools <Note:45219.1">
      @For a list of common ACTIONS see <Event:List>
      @For COMMON numeric events see    <event:Numeric>
   1. The general syntax of setting an event is:  <event name>  <action>
      <action> consists of three parts:           <action key word> <trace name> <trace qualifier>
      @<action key word> can be either "trace", "crash", or "debug".
      @ See <Note:9331.1">
      <event name> is either "immediate", by this indicating an unconditioned event
      or an event name given as a symbolic number from the system event name table.
      An unconditioned event (keyword "immediate") cannot be set in the parameter file.
      <trace qualifier> "forever" means: Activate a trace whenever this event occurs.
      <trace name> "context" is a special trace name and pertains only to events set up
      to either trace a diagnostic event or to change the behaviour of the oracle
      code execution path. It cannot be used in conjunction with errorstack- ("errorstack")
      or dump-generating ("immediate") events.
   2. There are exactly 2 types of events, session-events and process-events.
      Process-events are initialized in the parameter file, session-events
      are initialized with the "alter session..." or "alter system ..."command.
      When checking for posted events, the oracle server first checks for session events
      then for process-events.

RELATED DOCUMENTS
-----------------
@     Event Syntax for most common forms of event setting <Note:45217.1>
@     The FULL Event syntax <Note:9331.1>
@     Setting Events from Oracle Tools <Note:45219.1>
@     List of common ACTIONS <Event:List>
@     COMMON numeric events <Event:Numeric>

Script to Collect RAC Diagnostic Information (racdiag.sql)

Script:

-- NAME: RACDIAG.SQL
-- SYS OR INTERNAL USER, CATPARR.SQL ALREADY RUN, PARALLEL QUERY OPTION ON
-- ------------------------------------------------------------------------
-- AUTHOR:
-- Michael Polaski - Oracle Support Services
-- Copyright 2002, Oracle Corporation
-- ------------------------------------------------------------------------
-- PURPOSE:
-- This script is intended to provide a user friendly guide to troubleshoot
-- RAC hung sessions or slow performance scenerios. The script includes
-- information to gather a variety of important debug information to determine
-- the cause of a RAC session level hang. The script will create a file
-- called racdiag_.out in your local directory while dumping hang analyze
-- dumps in the user_dump_dest(s) and background_dump_dest(s) on all nodes.
--
-- ------------------------------------------------------------------------
-- DISCLAIMER:
-- This script is provided for educational purposes only. It is NOT
-- supported by Oracle World Wide Technical Support.
-- The script has been tested and appears to work as intended.
-- You should always run new scripts on a test instance initially.
-- ------------------------------------------------------------------------
-- Script output is as follows:

set echo off
set feedback off
column timecol new_value timestamp
column spool_extension new_value suffix
select to_char(sysdate,'Mondd_hhmi') timecol,
'.out' spool_extension from sys.dual;
column output new_value dbname
select value || '_' output
from v$parameter where name = 'db_name';
spool racdiag_&&dbname&×tamp&&suffix
set lines 200
set pagesize 35
set trim on
set trims on
alter session set nls_date_format = 'MON-DD-YYYY HH24:MI:SS';
alter session set timed_statistics = true;
set feedback on
select to_char(sysdate) time from dual;

set numwidth 5
column host_name format a20 tru
select inst_id, instance_name, host_name, version, status, startup_time
from gv$instance
order by inst_id;

set echo on

-- Taking Hang Analyze dumps
-- This may take a little while...
oradebug setmypid
oradebug unlimit
oradebug -g all hanganalyze 3
-- This part may take the longest, you can monitor bdump or udump to see if
-- the file is being generated.
oradebug -g all dump systemstate 267

-- WAITING SESSIONS:
-- The entries that are shown at the top are the sessions that have
-- waited the longest amount of time that are waiting for non-idle wait
-- events (event column). You can research and find out what the wait
-- event indicates (along with its parameters) by checking the Oracle
-- Server Reference Manual or look for any known issues or documentation
-- by searching Metalink for the event name in the search bar. Example
-- (include single quotes): [ 'buffer busy due to global cache' ].
-- Metalink and/or the Server Reference Manual should return some useful
-- information on each type of wait event. The inst_id column shows the
-- instance where the session resides and the SID is the unique identifier
-- for the session (gv$session). The p1, p2, and p3 columns will show
-- event specific information that may be important to debug the problem.
-- To find out what the p1, p2, and p3 indicates see the next section.
-- Items with wait_time of anything other than 0 indicate we do not know
-- how long these sessions have been waiting.
--
set numwidth 10
column state format a7 tru
column event format a25 tru
column last_sql format a40 tru
select sw.inst_id, sw.sid, sw.state, sw.event, sw.seconds_in_wait seconds,
sw.p1, sw.p2, sw.p3, sa.sql_text last_sql
from gv$session_wait sw, gv$session s, gv$sqlarea sa
where sw.event not in
('rdbms ipc message','smon timer','pmon timer',
'SQL*Net message from client','lock manager wait for remote message',
'ges remote message', 'gcs remote message', 'gcs for action', 'client message',
'pipe get', 'null event', 'PX Idle Wait', 'single-task message',
'PX Deq: Execution Msg', 'KXFQ: kxfqdeq - normal deqeue',
'listen endpoint status','slave wait','wakeup time manager')
and sw.seconds_in_wait > 0
and (sw.inst_id = s.inst_id and sw.sid = s.sid)
and (s.inst_id = sa.inst_id and s.sql_address = sa.address)
order by seconds desc;

-- EVENT PARAMETER LOOKUP:
-- This section will give a description of the parameter names of the
-- events seen in the last section. p1test is the parameter value for
-- p1 in the WAITING SESSIONS section while p2text is the parameter
-- value for p3 and p3 text is the parameter value for p3. The
-- parameter values in the first section can be helpful for debugging
-- the wait event.
--
column event format a30 tru
column p1text format a25 tru
column p2text format a25 tru
column p3text format a25 tru
select distinct event, p1text, p2text, p3text
from gv$session_wait sw
where sw.event not in ('rdbms ipc message','smon timer','pmon timer',
'SQL*Net message from client','lock manager wait for remote message',
'ges remote message', 'gcs remote message', 'gcs for action', 'client message',
'pipe get', 'null event', 'PX Idle Wait', 'single-task message',
'PX Deq: Execution Msg', 'KXFQ: kxfqdeq - normal deqeue',
'listen endpoint status','slave wait','wakeup time manager')
and seconds_in_wait > 0
order by event;

-- GES LOCK BLOCKERS:
-- This section will show us any sessions that are holding locks that
-- are blocking other users. The inst_id will show us the instance that
-- the session resides on while the sid will be a unique identifier for
-- the session. The grant_level will show us how the GES lock is granted to
-- the user. The request_level will show us what status we are trying to
-- obtain.  The lockstate column will show us what status the lock is in.
-- The last column shows how long this session has been waiting.
--
set numwidth 5
column state format a16 tru;
column event format a30 tru;
select dl.inst_id, s.sid, p.spid, dl.resource_name1,
decode(substr(dl.grant_level,1,8),'KJUSERNL','Null','KJUSERCR','Row-S (SS)',
'KJUSERCW','Row-X (SX)','KJUSERPR','Share','KJUSERPW','S/Row-X (SSX)',
'KJUSEREX','Exclusive',request_level) as grant_level,
decode(substr(dl.request_level,1,8),'KJUSERNL','Null','KJUSERCR','Row-S (SS)',
'KJUSERCW','Row-X (SX)','KJUSERPR','Share','KJUSERPW','S/Row-X (SSX)',
'KJUSEREX','Exclusive',request_level) as request_level,
decode(substr(dl.state,1,8),'KJUSERGR','Granted','KJUSEROP','Opening',
'KJUSERCA','Canceling','KJUSERCV','Converting') as state,
s.sid, sw.event, sw.seconds_in_wait sec
from gv$ges_enqueue dl, gv$process p, gv$session s, gv$session_wait sw
where blocker = 1
and (dl.inst_id = p.inst_id and dl.pid = p.spid)
and (p.inst_id = s.inst_id and p.addr = s.paddr)
and (s.inst_id = sw.inst_id and s.sid = sw.sid)
order by sw.seconds_in_wait desc;

-- GES LOCK WAITERS:
-- This section will show us any sessions that are waiting for locks that
-- are blocked by other users. The inst_id will show us the instance that
-- the session resides on while the sid will be a unique identifier for
-- the session. The grant_level will show us how the GES lock is granted to
-- the user. The request_level will show us what status we are trying to
-- obtain.  The lockstate column will show us what status the lock is in.
-- The last column shows how long this session has been waiting.
--
set numwidth 5
column state format a16 tru;
column event format a30 tru;
select dl.inst_id, s.sid, p.spid, dl.resource_name1,
decode(substr(dl.grant_level,1,8),'KJUSERNL','Null','KJUSERCR','Row-S (SS)',
'KJUSERCW','Row-X (SX)','KJUSERPR','Share','KJUSERPW','S/Row-X (SSX)',
'KJUSEREX','Exclusive',request_level) as grant_level,
decode(substr(dl.request_level,1,8),'KJUSERNL','Null','KJUSERCR','Row-S (SS)',
'KJUSERCW','Row-X (SX)','KJUSERPR','Share','KJUSERPW','S/Row-X (SSX)',
'KJUSEREX','Exclusive',request_level) as request_level,
decode(substr(dl.state,1,8),'KJUSERGR','Granted','KJUSEROP','Opening',
'KJUSERCA','Cancelling','KJUSERCV','Converting') as state,
s.sid, sw.event, sw.seconds_in_wait sec
from gv$ges_enqueue dl, gv$process p, gv$session s, gv$session_wait sw
where blocked = 1
and (dl.inst_id = p.inst_id and dl.pid = p.spid)
and (p.inst_id = s.inst_id and p.addr = s.paddr)
and (s.inst_id = sw.inst_id and s.sid = sw.sid)
order by sw.seconds_in_wait desc;

-- LOCAL ENQUEUES:
-- This section will show us if there are any local enqueues. The inst_id will
-- show us the instance that the session resides on while the sid will be a
-- unique identifier for. The addr column will show the lock address. The type
-- will show the lock type. The id1 and id2 columns will show specific
-- parameters for the lock type.
--
set numwidth 12
column event format a12 tru
select l.inst_id, l.sid, l.addr, l.type, l.id1, l.id2,
decode(l.block,0,'blocked',1,'blocking',2,'global') block,
sw.event, sw.seconds_in_wait sec
from gv$lock l, gv$session_wait sw
where (l.sid = sw.sid and l.inst_id = sw.inst_id)
and l.block in (0,1)
order by l.type, l.inst_id, l.sid;

-- LATCH HOLDERS:
-- If there is latch contention or 'latch free' wait events in the WAITING
-- SESSIONS section we will need to find out which proceseses are holding
-- latches. The inst_id will show us the instance that the session resides
-- on while the sid will be a unique identifier for. The username column
-- will show the session's username. The os_user column will show the os
-- user that the user logged in as. The name column will show us the type
-- of latch being waited on. You can search Metalink for the latch name in
-- the search bar. Example (include single quotes):
-- [ 'library cache' latch ]. Metalink should return some useful information
-- on the type of latch.
--
set numwidth 5
select distinct lh.inst_id, s.sid, s.username, p.username os_user, lh.name
from gv$latchholder lh, gv$session s, gv$process p
where (lh.sid = s.sid and lh.inst_id = s.inst_id)
and (s.inst_id = p.inst_id and s.paddr = p.addr)
order by lh.inst_id, s.sid;

-- LATCH STATS:
-- This view will show us latches with less than optimal hit ratios
-- The inst_id will show us the instance for the particular latch. The
-- latch_name column will show us the type of latch. You can search Metalink
-- for the latch name in the search bar. Example (include single quotes):
-- [ 'library cache' latch ]. Metalink should return some useful information
-- on the type of latch. The hit_ratio shows the percentage of time we
-- successfully acquired the latch.
--
column latch_name format a30 tru
select inst_id, name latch_name,
round((gets-misses)/decode(gets,0,1,gets),3) hit_ratio,
round(sleeps/decode(misses,0,1,misses),3) "SLEEPS/MISS"
from gv$latch
where round((gets-misses)/decode(gets,0,1,gets),3) < .99
and gets != 0
order by round((gets-misses)/decode(gets,0,1,gets),3);

-- No Wait Latches:
--
select inst_id, name latch_name,
round((immediate_gets/(immediate_gets+immediate_misses)), 3) hit_ratio,
round(sleeps/decode(immediate_misses,0,1,immediate_misses),3) "SLEEPS/MISS"
from gv$latch
where round((immediate_gets/(immediate_gets+immediate_misses)), 3) < .99 and immediate_gets + immediate_misses > 0
order by round((immediate_gets/(immediate_gets+immediate_misses)), 3);

-- GLOBAL CACHE CR PERFORMANCE
-- This shows the average latency of a consistent block request.
-- AVG CR BLOCK RECEIVE TIME should typically be about 15 milliseconds
-- depending on your system configuration and volume, is the average
-- latency of a consistent-read request round-trip from the requesting
-- instance to the holding instance and back to the requesting instance. If
-- your CPU has limited idle time and your system typically processes
-- long-running queries, then the latency may be higher. However, it is
-- possible to have an average latency of less than one millisecond with
-- User-mode IPC. Latency can be influenced by a high value for the
-- DB_MULTI_BLOCK_READ_COUNT parameter. This is because a requesting process
-- can issue more than one request for a block depending on the setting of
-- this parameter. Correspondingly, the requesting process may wait longer.
-- Also check interconnect badwidth, OS tcp settings, and OS udp settings if
-- AVG CR BLOCK RECEIVE TIME is high.
--
set numwidth 20
column "AVG CR BLOCK RECEIVE TIME (ms)" format 9999999.9
select b1.inst_id, b2.value "GCS CR BLOCKS RECEIVED",
b1.value "GCS CR BLOCK RECEIVE TIME",
((b1.value / b2.value) * 10) "AVG CR BLOCK RECEIVE TIME (ms)"
from gv$sysstat b1, gv$sysstat b2
where b1.name = 'global cache cr block receive time' and
b2.name = 'global cache cr blocks received' and b1.inst_id = b2.inst_id
or b1.name = 'gc cr block receive time' and
b2.name = 'gc cr blocks received' and b1.inst_id = b2.inst_id ;

-- GLOBAL CACHE LOCK PERFORMANCE
-- This shows the average global enqueue get time.
-- Typically AVG GLOBAL LOCK GET TIME should be 20-30 milliseconds. the
-- elapsed time for a get includes the allocation and initialization of a
-- new global enqueue. If the average global enqueue get (global cache
-- get time) or average global enqueue conversion times are excessive,
-- then your system may be experiencing timeouts. See the 'WAITING SESSIONS',
-- 'GES LOCK BLOCKERS', GES LOCK WAITERS', and 'TOP 10 WAIT EVENTS ON SYSTEM'
-- sections if the AVG GLOBAL LOCK GET TIME is high.
--
set numwidth 20
column "AVG GLOBAL LOCK GET TIME (ms)" format 9999999.9
select b1.inst_id, (b1.value + b2.value) "GLOBAL LOCK GETS",
b3.value "GLOBAL LOCK GET TIME",
(b3.value / (b1.value + b2.value) * 10) "AVG GLOBAL LOCK GET TIME (ms)"
from gv$sysstat b1, gv$sysstat b2, gv$sysstat b3
where b1.name = 'global lock sync gets' and
b2.name = 'global lock async gets' and b3.name = 'global lock get time'
and b1.inst_id = b2.inst_id and b2.inst_id = b3.inst_id
or b1.name = 'global enqueue gets sync' and
b2.name = 'global enqueue gets async' and b3.name = 'global enqueue get time'
and b1.inst_id = b2.inst_id and b2.inst_id = b3.inst_id;

-- RESOURCE USAGE
-- This section will show how much of our resources we have used.
--
set numwidth 8
select inst_id, resource_name, current_utilization, max_utilization,
initial_allocation
from gv$resource_limit
where max_utilization > 0
order by inst_id, resource_name;

-- DLM TRAFFIC INFORMATION
-- This section shows how many tickets are available in the DLM. If the
-- TCKT_WAIT columns says "YES" then we have run out of DLM tickets which
-- could cause a DLM hang. Make sure that you also have enough TCKT_AVAIL.
--
set numwidth 5
select * from gv$dlm_traffic_controller
order by TCKT_AVAIL;

-- DLM MISC
--
set numwidth 10
select * from gv$dlm_misc;

-- LOCK CONVERSION DETAIL:
-- This view shows the types of lock conversion being done on each instance.
--
select * from gv$lock_activity;

-- TOP 10 WRITE PINGING/FUSION OBJECTS
-- This view shows the top 10 objects for write pings accross instances.
-- The inst_id column shows the node that the block was pinged on. The name
-- column shows the object name of the offending object. The file# shows the
-- offending file number (gc_files_to_locks). The STATUS column will show the
-- current status of the pinged block. The READ_PINGS will show us read
-- converts and the WRITE_PINGS will show us objects with write converts.
-- Any rows that show up are objects that are concurrently accessed across
-- more than 1 instance.
--
set numwidth 8
column name format a20 tru
column kind format a10 tru
select inst_id, name, kind, file#, status, BLOCKS,
READ_PINGS, WRITE_PINGS
from (select p.inst_id, p.name, p.kind, p.file#, p.status,
count(p.block#) BLOCKS, sum(p.forced_reads) READ_PINGS,
sum(p.forced_writes) WRITE_PINGS
from gv$ping p, gv$datafile df
where p.file# = df.file# (+)
group by p.inst_id, p.name, p.kind, p.file#, p.status
order by sum(p.forced_writes) desc)
where rownum < 11
order by WRITE_PINGS desc;

-- TOP 10 READ PINGING/FUSION OBJECTS
-- This view shows the top 10 objects for read pings. The inst_id column shows
-- the node that the block was pinged on. The name column shows the object
-- name of the offending object. The file# shows the offending file number
-- (gc_files_to_locks). The STATUS column will show the current status of the
-- pinged block. The READ_PINGS will show us read converts and the WRITE_PINGS
-- will show us objects with write converts. Any rows that show up are objects
-- that are concurrently accessed across more than 1 instance.
--
set numwidth 8
column name format a20 tru
column kind format a10 tru
select inst_id, name, kind, file#, status, BLOCKS,
READ_PINGS, WRITE_PINGS
from (select p.inst_id, p.name, p.kind, p.file#, p.status,
count(p.block#) BLOCKS, sum(p.forced_reads) READ_PINGS,
sum(p.forced_writes) WRITE_PINGS
from gv$ping p, gv$datafile df
where p.file# = df.file# (+)
group by p.inst_id, p.name, p.kind, p.file#, p.status
order by sum(p.forced_reads) desc)
where rownum < 11
order by READ_PINGS desc;

-- TOP 10 FALSE PINGING OBJECTS
-- This view shows the top 10 objects for false pings. This can be avoided by
-- better gc_files_to_locks configuration. The inst_id column shows the node
-- that the block was pinged on. The name column shows the object name of the
-- offending object. The file# shows the offending file number
-- (gc_files_to_locks). The STATUS column will show the current status of the
-- pinged block. The READ_PINGS will show us read converts and the WRITE_PINGS
-- will show us objects with write converts. Any rows that show up are objects
-- that are concurrently accessed across more than 1 instance.
--
set numwidth 8
column name format a20 tru
column kind format a10 tru
select inst_id, name, kind, file#, status, BLOCKS,
READ_PINGS, WRITE_PINGS
from (select p.inst_id, p.name, p.kind, p.file#, p.status,
count(p.block#) BLOCKS, sum(p.forced_reads) READ_PINGS,
sum(p.forced_writes) WRITE_PINGS
from gv$false_ping p, gv$datafile df
where p.file# = df.file# (+)
group by p.inst_id, p.name, p.kind, p.file#, p.status
order by sum(p.forced_writes) desc)
where rownum < 11
order by WRITE_PINGS desc;

-- INITIALIZATION PARAMETERS:
-- Non-default init parameters for each node.
--
set numwidth 5
column name format a30 tru
column value format a50 wra
column description format a60 tru
select inst_id, name, value, description
from gv$parameter
where isdefault = 'FALSE'
order by inst_id, name;

-- TOP 10 WAIT EVENTS ON SYSTEM
-- This view will provide a summary of the top wait events in the db.
--
set numwidth 10
column event format a25 tru
select inst_id, event, time_waited, total_waits, total_timeouts
from (select inst_id, event, time_waited, total_waits, total_timeouts
from gv$system_event where event not in ('rdbms ipc message','smon timer',
'pmon timer', 'SQL*Net message from client','lock manager wait for remote message',
'ges remote message', 'gcs remote message', 'gcs for action', 'client message',
'pipe get', 'null event', 'PX Idle Wait', 'single-task message',
'PX Deq: Execution Msg', 'KXFQ: kxfqdeq - normal deqeue',
'listen endpoint status','slave wait','wakeup time manager')
order by time_waited desc)
where rownum < 11 order by time_waited desc; -- SESSION/PROCESS REFERENCE: -- This section is very important for most of the above sections to find out -- which user/os_user/process is identified to which session/process. --  set numwidth 7 column event format a30 tru column program format a25 tru column username format a15 tru select p.inst_id, s.sid, s.serial#, p.pid, p.spid, p.program, s.username, p.username os_user, sw.event, sw.seconds_in_wait sec from gv$process p, gv$session s, gv$session_wait sw where (p.inst_id = s.inst_id and p.addr = s.paddr) and (s.inst_id = sw.inst_id and s.sid = sw.sid) order by p.inst_id, s.sid; -- SYSTEM STATISTICS: -- All System Stats with values of > 0. These can be referenced in the
-- Server Reference Manual
--
set numwidth 5
column name format a60 tru
column value format 9999999999999999999999999
select inst_id, name, value
from gv$sysstat
where value > 0
order by inst_id, name;

-- CURRENT SQL FOR WAITING SESSIONS:
-- Current SQL for any session in the WAITING SESSIONS list
--
set numwidth 5
column sql format a80 wra
select sw.inst_id, sw.sid, sw.seconds_in_wait sec, sa.sql_text sql
from gv$session_wait sw, gv$session s, gv$sqlarea sa
where sw.sid = s.sid (+)
and sw.inst_id = s.inst_id (+)
and s.sql_address = sa.address
and sw.event not in ('rdbms ipc message','smon timer','pmon timer',
'SQL*Net message from client','lock manager wait for remote message',
'ges remote message', 'gcs remote message', 'gcs for action', 'client message',
'pipe get', 'null event', 'PX Idle Wait', 'single-task message',
'PX Deq: Execution Msg', 'KXFQ: kxfqdeq - normal deqeue',
'listen endpoint status','slave wait','wakeup time manager')
and sw.seconds_in_wait > 0
order by sw.seconds_in_wait desc;

-- Taking Hang Analyze dumps
-- This may take a little while...
oradebug setmypid
oradebug unlimit
oradebug -g all hanganalyze 3
-- This part may take the longest, you can monitor bdump or udump to see
-- if the file is being generated.
oradebug -g all dump systemstate 267

set echo off

select to_char(sysdate) time from dual;

spool off

-- ---------------------------------------------------------------------------
Prompt;
Prompt racdiag output files have been written to:;
Prompt;
host pwd
Prompt alert log and trace files are located in:;
column host_name format a12 tru
column name format a20 tru
column value format a60 tru
select distinct i.host_name, p.name, p.value
from gv$instance i, gv$parameter p
where p.inst_id = i.inst_id (+)
and p.name like '%_dump_dest'
and p.name != 'core_dump_dest';

Sample Output:

TIME
--------------------
AUG-11-2001 12:06:36

1 row selected.

INST_ID INSTANCE_NAME    HOST_NAME            VERSION        STATUS  STARTUP_TIME
------- ---------------- -------------------- -------------- ------- ------------
      1 V9201            opcbsol1             9.2.0.1.0      OPEN    AUG-01-2002
      2 V9202            opcbsol2             9.2.0.1.0      OPEN    JUL-09-2002

2 rows selected.

SQL>
SQL> -- Taking Hanganalyze Dumps
SQL> -- This may take a little while...
SQL> oradebug setmypid
Statement processed.
SQL> oradebug unlimit
Statement processed.
SQL> oradebug setinst all
Statement processed.
SQL> oradebug -g def hanganalyze 3
Hang Analysis in /u02/32bit/app/oracle/admin/V9232/bdump/v92321_diag_29495.trc
SQL>
SQL> -- WAITING SESSIONS:
SQL> -- The entries that are shown at the top are the sessions that have
SQL> -- waited the longest amount of time that are waiting for non-idle wait
SQL> -- events (event column).  You can research and find out what the wait
SQL> -- event indicates (along with its parameters) by checking the Oracle
SQL> -- Server Reference Manual or look for any known issues or documentation
SQL> -- by searching Metalink for the event name in the search bar.  Example
SQL> -- (include single quotes): [ 'buffer busy due to global cache' ].
SQL> -- Metalink and/or the Server Reference Manual should return some useful
SQL> -- information on each type of wait event.  The inst_id column shows the
SQL> -- instance where the session resides and the SID is the unique identifier
SQL> -- for the session (gv$session).  The p1, p2, and p3 columns will show
SQL> -- event specific information that may be important to debug the problem.
SQL> -- To find out what the p1, p2, and p3 indicates see the next section.
SQL> -- Items with wait_time of anything other than 0 indicate we do not know
SQL> -- how long these sessions have been waiting.
SQL> --

Know Oracle Date And Time Function

Oracle9i provides extended date and time support across different time zones with the help of new datetime data types and functions. To understand the working of these data types and functions, it is necessary to be familiar with the concept of time zones.

This topic group introduces you to the concepts of time such as Coordinated Universal Time, time zones, and daylight saving time.

Objectives

After completing this topic group, you should be able to:

Calculate the date and time for any time zone region using time zone offsets.

Time Zones

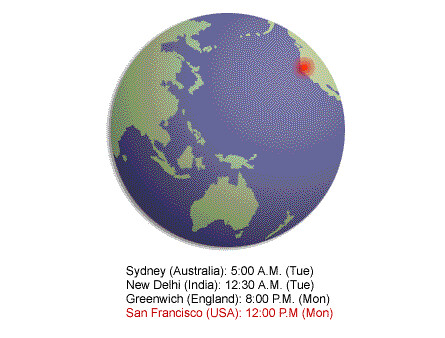
The hours of the day are measured by the turning of the earth. The time of day at any particular moment depends on where you are.
100000

The earth is divided into twenty four time zones, one for each hour of the day. The time along the prime meridian in Greenwich, England is known as Coordinated Universal Time, or UTC (formerly known as Greenwich Mean Time, or GMT ). UTC is the time standard against which all other time zones are referenced.

Note: The following topics discuss prime meridian and UTC in more detail.

Coordinated Universal Time

100001

Since time began, the time flow on earth has been ruled by the apparent position of the sun in the sky.

In the past, when methods of transportation made even short travels last for several days, no one, except astronomers, understood that solar time at any given moment is different from place to place.

Around the 1800s with the development of faster modes of transportation and a need for accurate time references for sea navigation, Greenwich mean time (GMT), which later became known as Coordinated Universal Time (UTC), was introduced.

The earth surface is divided into 24 adjacent, equal, and equatorially perpendicular zones, called time zones. Each time zone is delimited by 2 meridians. UTC is the time standard against which all other time zones in the world are referenced.

UTC is measured with astronomical techniques at the Greenwich astronomical observatory in England.

Daylight Saving Time

“Just as sunflowers turn their heads to catch every sunbeam, there is a simple way to get more from the sun.”

Purpose of Daylight Saving Time

100004

The main purpose of daylight saving time (called Summer Time in many places around the world) is to make better use of daylight. By switching clocks an hour forward in summer, we can save a lot of energy and enjoy sunny summer evenings. Today approximately 70 countries use daylight saving time.

When Is Daylight Saving Time Observed Around the World?

Country Begin Daylight Saving Time Back to Standard time
US; Mexico; Canada 2:00 a.m. on the first Sunday of April 2:00 a.m. on the last Sunday of October
European Union 1:00 a.m. on the last Sunday in March 2:00 a.m. on the last Sunday of October

Equatorial and tropical countries from the lower latitudes do not observe daylight saving time. Because the daylight hours are similar during every season, there is no advantage to moving clocks forward during the summer.

How Is This Information Relevant To Time Zones?

The world is divided into 24 time zones and UTC is the time standard against which all other time zones in the world are referenced. When daylight saving time comes into effect in certain countries, the time zone offset for that country is adjusted to accomodate the change in time.

For example: The standard time zone offset for Geneva, Switzerland is UTC +01:00 hour. But when daylight saving time comes into effect the time zone offset changes to UTC +02:00 hours. The time zone offset changes to UTC +01:00 hour again, on the last Sunday in October, when the daylight saving time comes to an end.

Summary

The key learning points in this topic group included:

Coordinated Universal Time:
UTC is the time standard against which all other time zones in the world are referenced.

UTC Conversion:
To convert UTC to local time, you add or subtract hours from it. For regions
west of the zero meridian to the international date line (which includes all of North
America), hours are subtracted from UTC to convert to local time.

Daylight Saving Time:
Daylight saving time is used to make better use of daylight hours by switching clocks an hour forward in summer.

All this information is necessary to understand how the Oracle9i server provides support for time zones in its multi geography applications.

The next topic group “Database Time Zone Versus Session Time Zone” discusses the difference between Database Time Zone and Session Time Zone.

Database Time Zone Versus Session Time Zone

100015

Database Time Zone
Database time zone refers to the time zone in which the database is located.

Session Time Zone
Session time zone refers to the user’s time zone, from where he or she has logged on to the database.

Global Corporation is a finance company with offices around the world. The company head office is located in Barcelona (time zone : +01 hours). The company database is located in New York (time zone : -05 hours). Miguel from Sydney (time zone : +10 hours) has established a connection to the database.

DBTIMEZONE

The DBTIMEZONEfunction returns the value of the database time zone. The default database time zone is the same as the operating system’s time zone.

The return type is a time zone offset (a character type in the format ‘[+ | -]TZH:TZM‘ ) or a time zone region name, depending on how the user specified the database time zone value in the most recent CREATE DATABASE or
ALTER DATABASE
statement.

100016

You can set the database’s default time zone by specifying the SET TIME_ZONE clause of the CREATE DATABASE statement. If omitted, the default database time zone is the operating system time zone.


SESSIONTIMEZONE

The SESSIONTIMEZONEfunction returns the value of the session’s time zone.

The return type is a time zone offset (a character type in the format ‘[+|-]TZH:TZM’) or a time zone region name, depending on how the user specified the session time zone value in the most recent ALTER SESSION statement.

Altering the Session Time Zone

How can I change the session time zone?

The session time zone for a session can be changed with an ALTER SESSIONcommand.

Syntax

ALTER SESSION
SET TIME ZONE = ‘[+ |-] hh:mm’;


The key learning points in this topic group included:

Database Time Zone:
Database time zone refers to the time zone in which the database is located. You can use the DBTIMEZONE function to query the value of the database time zone.

Session Time Zone:
Session time zone refers to the time zone from which the user has logged on to the database. You can use the SESSIONTIMEZONE function to query the value of the session time zone.

TIMESTAMP

The TIMESTAMP data type is an extension of the DATEdata type.

It stores the year, month, and day of the DATE data type; the hour, minute, and second values; as well as the fractional second value.

Format

TIMESTAMP [(fractional_seconds_precision)]

The fractional_seconds_precision is used to specify the number of digits in the fractional part of the SECOND datetime field and can be a number in the range 0 to 9. The default is 6.

Grand Prix Qualifying Run

The line-up position for the Formula 1 Grand Prix is determined by the results of the qualifying run. Because the difference between the finishing times of the various drivers is very close, the finishing time of each driver is measured in fractional seconds. To store this kind of information, you can use the new TIMESTAMP data type.

TIMESTAMP WITH TIME ZONE

TIMESTAMP WITH TIME ZONE is a variant of the TIMESTAMP data type, that includes a time zone displacementin its value.

Format

TIMESTAMP[(fractional_seconds_precision)] WITH TIME ZONE

Earthquake Monitoring Station

Earthquake monitoring stations around the world record the details of tremors detected in their respective regions. The date and time of the occurrence of these tremors are stored, along with the time zone displacement, using the new TIMESTAMP WITH TIME ZONE data type. This helps people who analyze the information from locations around the world obtain an accurate perspective of the time when the event occurred.

TIMESTAMP WITH LOCAL TIME ZONE

TIMESTAMP WITH LOCAL TIME ZONE is another variant of the TIMESTAMPdata type. This data type also includes a time zone displacement.

Format

TIMESTAMP[(fractional_seconds_precision)] WITH LOCAL TIME ZONE

The TIMESTAMP WITH LOCAL TIME ZONE datatype differs from TIMESTAMP WITH TIME ZONE in that when you insert a value into a database column, the time zone displacement is used to convert the value to the database time zone.

Example

When a New York client inserts TIMESTAMP’1998-1-23 6:00:00-5:00′ into a TIMESTAMP WITH LOCAL TIME ZONE column in the San Francisco database. The inserted data is stored in San Francisco as binary value 1998-1-23 3:00:00.

The time-zone displacement is not stored in the database column.When you retrieve the value, Oracle returns it in your local session time zone.

When the New York client selects that inserted data from the San Francisco database, the value displayed in New York is `1998-1-23 6:00:00′. A San Francisco client, selecting the same data, gets the value ‘1998-1-23 3:00:00’.

New Year Celebration Broadcast

A television company is planning a live broadcast of New Year celebrations across the globe. To schedule a broadcast of the various events from across the globe, they use an application that stores the broadcast time using the TIMESTAMP WITH LOCAL TIME ZONE data type. Reporters located in different time zones can easily query to find out when to start and end their broadcasts, the output of which will be in their respective time zones.

TIMESTAMP:
With the new TIMESTAMP data type you can store the year, month, and day of the DATE data type; hour, minute, and second values; as well as the fractional second value.

TIMESTAMP WITH TIME ZONE:
The TIMESTAMP WITH TIME ZONE data type is a variant of the TIMESTAMP data type, that includes a time zone displacement in its value.

TIMESTAMP WITH LOCAL TIME ZONE:
The data stored in a column of type TIMESTAMP WITH LOCAL TIME ZONE is converted and normalized to the database time zone. Whenever a user queries the column data, Oracle returns the data in the user’s local session time zone.

TZ_OFFSET

Richard, a marketing executive, travels frequently to cities across the globe. He carries his laptop while travelling and updates the database located at the head office in San Francisco with information about his activities at the end of each day.

Since Richard is using a laptop for his work, he needs to update the session time zone every time he visits a new city.

Richard uses the TZ_OFFSET function to find the time zone offset for that city.

Syntax

SELECT TZ_OFFSET(‘Canada/Pacific’) FROM DUAL;

Note: For a listing of valid time zone name values, you can query the V$TIMEZONE_NAMES dynamic performance view.

ALTER SESSION Command

After Richard finds the time zone offset for the city he is visiting, he alters his session time zone using the ALTER SESSION command.

ALTER SESSION
SET TIME_ZONE = ‘-08:00’;

Richard then uses any of the following functions to view the current date and time in the session time zone.

CURRENT_DATE
CURRENT_TIMESTAMP
LOCAL_TIMESTAMP

Note: The following pages contain a detailed explanation of the functions listed above.

CURRENT_DATE

The CURRENT_DATE function returns the current date in the session’s time zone.The return value is a date in the Gregorian calendar. (The ALTER SESSION command can be used to set the date format to ‘DD-MON-YYYY HH24:MI:SS’.)

The CURRENT_DATE function is sensitive to the session time zone.

When Richard alters his session time zone to the time zone of the city that he is visiting, the output of the CURRENT_DATE function changes.

Example

Before the Session Time Zone is Altered

After the Session Time Zone is Altered

Observe in the output that the value of CURRENT_DATE changes when the TIME_ZONE parameter value is changed to -08:00.

Note: The SYSDATE remains the same irrespective of the change in the TIME_ZONE.
SYSDATE is not sensitive to the session’s time zone.

CURRENT_TIMESTAMP

The CURRENT_TIMESTAMP function returns the current date and time in the session time zone, as a value of the TIMESTAMP WITH TIME ZONE data type.

The time zone displacement reflects the local time zone of the SQL session.

Format

CURRENT_TIMESTAMP (precision)

Where precision is an optional argument that specifies the fractional second precision of the time value returned.

LOCALTIMESTAMP


The LOCALTIMESTAMP function returns the current date and time in the session time zone in a value of TIMESTAMP data type.

The difference between this function and the CURRENT_TIMESTAMP function is that LOCALTIMESTAMP returns a TIMESTAMP value, whereas CURRENT_TIMESTAMP returns a TIMESTAMP WITH TIME ZONE value.

Format

LOCALTIMESTAMP (TIMESTAMP_precision)

Where TIMESTAMP_precision is an optional argument that specifies the fractional second precision of the TIMESTAMP value returned.

EXTRACT

So far you have learned how Richard can alter his session date and view the current date and time in the session time zone.

Now observe how Richard can query a specified datetime field from a datetime or interval value expression using the EXTRACT function.

Format

SELECT EXTRACT ([YEAR] [MONTH] [DAY] [HOUR] [MINUTE] [SECOND]  [TIMEZONE_HOUR] [TIMEZONE_MINUTE] [TIMEZONE_REGION] [TIMEZONE_ABBR]
FROM [datetime_value_expression] [interval_value_expression]);

Using the EXTRACT function, Richard can extract any of the components mentioned in the preceding syntax.

Example

Richard can query the time zone displacement for the current session as follows:

SELECT EXTRACT(TIMEZONE_HOUR FROM CURRENT_TIMESTAMP) "Hour",                         
EXTRACT(TIMEZONE_MINUTE FROM CURRENT_TIMESTAMP) "Minute" FROM DUAL;

Datetime Functions: Conversion

Now examine some additional functions that help convert a CHAR value to a TIMESTAMP value, a TIMESTAMP value to a TIMESTAMP WITH TIME ZONEvalue, and so on.

The functions are:

TO_TIMESTAMP
TO_TIMESTAMP_TZ
FROM_TZ

TO_TIMESTAMP
The TO_TIMESTAMP function converts a string of CHAR, VARCHAR2, NCHAR, or NVARCHAR2 data type to a value of TIMESTAMPdata type.

Format

TO_TIMESTAMP(char,[fmt],[‘nlsparam’])

The optional fmt specifies the format of char. If you omit fmt, the string must be in the default format of the TIMESTAMP data type.

The optional nlsparam specifies the language in which month and day names and abbreviations are returned. If you omit nlsparams, this function uses the default date language for your session.

Example

SELECT TO_TIMESTAMP(‘2000-12-01 11:00:00’,
‘YYYY-MM-DD HH:MI:SS’)
FROM DUAL;

TO_TIMESTAMP_TZ

The TO_TIMESTAMP_TZ function converts a string of CHAR, VARCHAR2, NCHAR, or NVARCHAR2 data type to a value of TIMESTAMP WITH TIME ZONEdata type.

Format

TO_TIMESTAMP_TZ
(char,[fmt],[‘nlsparam’])

The optional fmt specifies the format of char. If you omit fmt, the string must be in the default format of the TIMESTAMP data type.

The optional nlsparam specifies the language in which month and day names and abbreviations are returned. If you omit nlsparams, this function uses the default date language for your session.

Example

SELECT TO_TIMESTAMP_TZ(‘2000-12-01 11:00:00 -08:00’,
‘YYYY-MM-DD HH:MI:SS TZH:TZM’)
FROM DUAL;

Note: The TO_TIMESTAMP_TZ function does not convert character strings to TIMESTAMP WITH LOCAL TIME ZONE.

FROM_TZ

The FROM_TZ function converts a timestamp value to a TIMESTAMP WITH TIME ZONEvalue.

Format

FROM_TZ(timestamp_value, time_zone_value)

Time_zone_value can be a character string in the format ‘TZH:TZM’ format or a character expression that returns a string in TZR (time zone region) format with optional TZD (time zone displacement) format.

Example Using the Format TZH:TZM

SELECT from_tz(TIMESTAMP ‘2000-12-01 11:00:00’,
‘-8:00’) “FROM_TZ”
FROM DUAL;

Example Using TZR

SELECT FROM_TZ(TIMESTAMP ‘2000-12-01 11:00:00’, ‘AUSTRALIA/NORTH’) “FROM_TZ”
FROM DUAL;

INTERVAL Data Type

The INTERVALdata type is used to represent the precise difference between two datetime values.

The two INTERVAL data types introduced in Oracle9i are:

INTERVAL YEAR TO MONTH
INTERVAL DAY TO SECOND

Usage of the INTERVAL Datatype

The INTERVAL data type can be used to set a reminder for a time in the future or check whether a certain period of time has elapsed since a particular date.
For example: You can use it to record the time between the start and end of a race.

INTERVAL YEAR TO MONTH

You can use the INTERVAL YEAR TO MONTHdata type to store and manipulate intervals of years and months.

Format

INTERVAL YEAR[(precision)] TO MONTH

Where precision specifies the number of digits in the years field.

You cannot use a symbolic constant or variable to specify the precision; you must use an integer literal in the range 0-4. The default value is 2.

Automated Generation of Expiration Date

The packaging department of Home Food Products Ltd has decided to automate the generation of the expiration date details of its products.

INTERVAL DAY TO SECOND

INTERVAL DAY TO SECONDstores a period of time in terms of days, hours, minutes, and seconds.

Format

INTERVAL DAY[(day_precision)]
TO SECOND[(fractional_seconds_precision)]

Where day_precision is the number of digits in the DAY datetime field. Accepted values are 0 to 9. The default is 2.

Fractional_seconds_precision is the number of digits in the fractional part of the SECOND datetime field. Accepted values are 0 to 9. The default is 6.

Automated Generation of the Arrival Time

The Railway Enquiry department wants to automate the generation of the arrival time for all of its trains.

You have just learned about the new INTERVAL data types introduced with the Oracle9iserver.

INTERVAL YEAR TO MONTH:

The data type INTERVAL YEAR TO MONTH is used to store and manipulate intervals of years and months.

TO_YMINTERVAL function:

The TO_YMINTERVAL function converts a character string of CHAR, VARCHAR2, NCHAR, or NVARCHAR2 data type to an INTERVAL YEAR TO MONTH type, where CHAR is the character string to be converted.

INTERVAL DAY TO SECOND:

The INTERVAL DAY TO SECOND data type stores a period of time in terms of days, hours, minutes, and seconds.

TO_DSINTERVAL function:

The TO_DSINTERVAL function converts a character string of CHAR, VARCHAR2, NCHAR, or NVARCHAR2 data type to an INTERVAL DAY TO SECOND data type.


Rollback Segment Utilization:Extent, Wrap and Shrink

This practice will demonstrate the  concept of extent, wrap and shrink in rollback segment utilization. You will:

  • Use the create rollback segment and alter rollback segment syntax.
  • Examine the V$ROLLSTAT view.
  • Determine what would be required to force an extent, a wrap and a shrink.

ASSUMPTIONS

  • The directory and filenames referenced in the commands in this practice reference the UNIX operating system.  However, simply changing the directory and filename references to match the operating system you are using will allow all the commands to work properly on your operating system.
  • The database version must be Oracle8i release 2, or higher.
  • The database blocksize is 2048 bytes.
  • The output produced in these instructions is from a UNIX operating system.  There may be some variance in your output data.

INSTRUCTIONS:

1.    Create a rollback segment of initial 10k, next 10k and minextents of 2.

Ensure there is only one user rollback segment online so that all the transactions have to use this newly created rollback segment.

SQL> create rollback segment RBS4

storage (initial 10K next 10K minextents 2);

Rollback segment created.


SQL> alter rollback segment RBS4 online;

Rollback segment altered.


Note:  Put all the other user RBSs offline


2.    Create two user sessions that use the rollback segment RBS4.   In Session 1 create TAB111 and insert a value.  Do not commit.  In Session 2, issue create table TAB112 as select * from sys.obj$ where 1=2;

Examine the statistics in V$ROLLSTAT and select the number of shrinks, wraps and extends.  Check how many extents and blocks belong to this rollback segment. Determine what would be required to force an extent, a wrap and a shrink.

 Session 1


SQL> create table TAB111 ( a number);

Table created.


SQL> insert into TAB111 values (1);

1 row created.


Note: This session does not commit.  This means that the first extent cannot be reused.


Session 2


SQL> create table TAB112

as select *

   from sys.obj$

   where 1 = 2;

Table created.


SQL> select hwmsize, shrinks, wraps, extends

from v$rollstat

where usn = 5;

HWMSIZE    SHRINKS      WRAPS    EXTENDS

———- ———- ———- ———-

129024          0          0          0


SQL> insert into TAB112 select * from sys.obj$;

3121 rows created.


SQL> select hwmsize, shrinks, wraps, extends

from v$rollstat

where usn = 5;


HWMSIZE    SHRINKS      WRAPS    EXTENDS

———- ———- ———- ———-

260096          0          3          2


Note: Session 2 has run a long running transaction.  Initially, the current extent is extent 0 (which is where the other transaction started running).  Every new transaction gets allocated blocks in the current extent as long as they are available.  When extent 0 is full, the transaction moves on to extent 1 (making it now the current extent).  The number of wraps increases by one when moving from one extent to the next.

Again, new blocks are allocated from this extent until none is available. Then, we try to wrap back into extent 0 (remember, initially there are only two extents).  However, this is not allowed as session 1 has an active transaction in extent 0.  Every time the head of the extent list catches up with the tail, a new extent must be added. Extends is now increased and since we are moving to the newly allocated extent, wraps is also increased (now it would have the value 2).

This process is repeated one more time, and we end up with the solution displayed: wraps=3,

extends = 2.

3.        Commit both active transactions and re-examine v$rollstat.   Force RBS4 to shrink and re-examine v$rollstat to see the changes.

Session 1


SQL> commit;

Commit complete.


Session 2


SQL> commit;

Commit complete.


SQL> select hwmsize, shrinks, wraps, extends

from v$rollstat

where usn = 5;


HWMSIZE    SHRINKS      WRAPS    EXTENDS

———- ———- ———- ———-

260096          0          3          2


SQL> alter rollback segment rbs4 shrink;

Rollback segment altered.


SQL> select hwmsize, shrinks, wraps, extends

from v$rollstat

where usn = 5;


HWMSIZE    SHRINKS      WRAPS    EXTENDS

———- ———- ———- ———-

260096          1          3          2


SQL> select optsize, extents

from v$rollstat

where usn=5;

OPTSIZE    EXTENTS

———- ———-

2


Note: When optimal is not set, the shrink command reduces the size of the rollback segment to 2.

4.        To demonstrate clearly how the number of wraps increases every time a different extent becomes the current one, repeat the same exercise above but create the rollback segment with three extents to start with.

SQL> alter rollback segment RBS4 offline;Rollback segment altered.


SQL> drop rollback segment RBS4;

Rollback segment dropped.


SQL> create rollback segment RBS4

storage (initial 10K next 10K minextents 3);

Rollback segment created.


SQL> alter rollback segment RBS4 online;

Rollback segment altered.


Note:  Put all the other user RBSs offline


5.        Create two user sessions and examine the statistics in V$ROLLSTAT.

Session 1 

SQL> insert into TAB111 values (1);

1 row created.


Note: This session does not commit.  This means that the first extent cannot be reused.


Session 2


SQL> select hwmsize, shrinks, wraps, extends

from v$rollstat

where usn = 5;

HWMSIZE    SHRINKS      WRAPS    EXTENDS

———- ———- ———- ———-

129024          0          0          0


SQL> insert into TAB112 select * from sys.obj$;

3121 rows created.


SQL> select hwmsize, shrinks, wraps, extends

from v$rollstat

where usn = 5;


HWMSIZE    SHRINKS      WRAPS    EXTENDS

———- ———- ———- ———-

260096          0          3          1


Note: We need a total of four extents to perform both transactions.  If the rollback segment has 2 extents to start with, there will be a need for an additional 2 (extends = 2).  If minextents is 3, then only one additional extent is necessary (extends = 1).


However, the wraps occur when we move from extent 0 to extent 1, from 1 to 2 and from 2 to 3 (wraps = 3).

6.        Re-execute the transaction for session 2, and examine V$ROLLSTAT.

Session 2 

SQL> insert into TAB112 select * from sys.obj$;

3121 rows created.


SQL> select hwmsize, shrinks, wraps, extends

from v$rollstat

where usn = 5;


HWMSIZE    SHRINKS      WRAPS    EXTENDS

———- ———- ———- ———-

456704          0          6          4


Note: Another run of the transaction forces the allocation of three more extents and the number of wraps continues to increase accordingly even though extent 0 has never been reused because the transaction in session 1 is preventing this.

7.        Commit both transactions and re-execute the insert into TAB112.

Session 1 

SQL> commit;

Commit complete.


Session 2


SQL> commit;

Commit complete.


SQL> insert into TAB112 select * from sys.obj$;

3121 rows created.


SQL> select hwmsize, shrinks, wraps, extends

from v$rollstat

where usn = 5;


HWMSIZE    SHRINKS      WRAPS    EXTENDS

———- ———- ———- ———-

456704          0         10          4


Note: Both transactions have committed now, so there is no need to allocate new extents but as we continue to move from one extent to the next, the number of wraps increases.


8.        Force RBS4 to shrink and re-examine V$ROLLSTAT.


SQL> alter rollback segment rbs4 shrink;

Rollback segment altered.


SQL> select hwmsize, shrinks, wraps, extends

from v$rollstat

where usn = 5;


HWMSIZE    SHRINKS      WRAPS    EXTENDS

———- ———- ———- ———-

456704          1         10          4


SQL> select optsize, extents

from v$rollstat

where usn=5;

OPTSIZE    EXTENTS

———- ———-

2


Note: When optimal is not set, the shrink reduces the size of the rollback segment to 2 not to minextents which in this case was set to 3.

9.    The following exercises illustrate what happens when optimal is set.  With optimal set, we first check whether we need to perform a shrink before crossing the extent boundary.

Create a rollback segment with minextents of 2 and optimal of 20k.  Ensure all other rollback segments are offline.

SQL> alter rollback segment RBS4 offline;

Rollback segment altered.


SQL> drop rollback segment RBS4;

Rollback segment dropped.


SQL> create rollback segment RBS4

storage (initial 10K next 10K minextents 2 optimal 20k);

Rollback segment created.


SQL> alter rollback segment RBS4 online;

Rollback segment altered.


Note:  Put all the other user RBSs offline


10.     Create two user sessions and start a transaction in Session 1 by inserting a value.  Do not commit this session.

In Session 2, examine V$ROLLSTAT for extents and wraps.  Issue insert into TAB112 as select * from sys.obj$;   Re-examine V$ROLLSTAT and note the changes.


Session 1 

SQL> insert into TAB111 values (1);

1 row created.


Session 2


SQL> select hwmsize, shrinks, wraps, extends

from v$rollstat

where usn = 5;

HWMSIZE    SHRINKS      WRAPS    EXTENDS

———- ———- ———- ———-

129024          0          0          0


SQL> insert into TAB112 select * from sys.obj$;

3121 rows created.


SQL> select hwmsize, shrinks, wraps, extends

from v$rollstat

where usn = 5;


HWMSIZE    SHRINKS      WRAPS    EXTENDS

———- ———- ———- ———-

260096          0          3          2


Session 2


SQL> insert into TAB112 select * from sys.obj$;

3121 rows created.


SQL> select hwmsize, shrinks, wraps, extends

from v$rollstat

where usn = 5;


HWMSIZE    SHRINKS      WRAPS    EXTENDS

———- ———- ———- ———-

456704          0          6          5


Note: Another run of the transaction forces the allocation of three more extents and the number of wraps continues to increase accordingly even though extent 0 has never been reused because the transaction in session 1 is preventing this.

  1. Commit both sessions. In Session 2, re-execute the insert from sys.obj$ and examine the shrinks, wraps and extends from V$ROLLSTAT.

Determine the optimal size from V$ROLLSTAT and explain the results.

 Session 1


SQL> commit;

Commit complete.


Session 2


SQL> commit;

Commit complete.


SQL> insert into TAB112 select * from sys.obj$;

3121 rows created.


SQL> select hwmsize, shrinks, wraps, extends

from v$rollstat

where usn = 5;


HWMSIZE    SHRINKS      WRAPS    EXTENDS

———- ———- ———- ———-

456704          1         10          8


SQL> select optsize, extents

from v$rollstat

where usn=5;


OPTSIZE    EXTENTS

———- ———-

20480          5


Note: At the time of the shrink there were 7 extents in the rollback segment, the two we started with plus 5 extends.  Optimal was set to 20kb = 2 extents. The current extent (number 7) cannot be deallocated and neither can the initial extent. The shrink brings the rollback segment size down to optimal.  As the transaction runs, it required 3 more extents, hence extends is now 8 and the number of extents is back to 5.

Know about Oracle Network Security

Good network security is accomplished by utilizing port and protocol screening with routers, firewalls,
and Intrusion Detection Systems.Port and protocol screening with routers, firewalls,
and Intrusion Detection Systems create a bastion against network attacks.

A device that routes and translates information between interconnected networks is called a firewall.
Firewalls have a different function
Routers, not firewalls, use destination address and origin address to select the best path to route traffic.

When installing a firewall, the first action is to stop all communication.
After installation, the System Administrator adds rules that allow specific types of traffic to pass through the new firewall.
After installation of a firewall, the System Administrator adds rules
that allow specific types of traffic to pass through the new firewall

A switch is a data link layer device that forwards traffic based on MAC addresses.
Switching is performed in hardware instead of software, so it is significantly faster.

Network Security Wizards Dragon 4.0 is an example of vendors that offer  Intrusion Detection Systems or IDS

1.
Authentication is the process of verifying the identity of a user, device, or other entity.
Once the identity is verified, a trust relationship is established and further network interaction is possible.

2.
Authorization is the process of assigning various levels of access and capabilities for the authenticated user.
In other words, authorization allows assigned levels of access in the database environment.

3.
Oracle 8i supports 3 models for storing Authorizations in a centralized directory service. Public Key Infrastructure,
Microsoft Active Directory, or Distributed Computing Environment. PKI together with Oracle Internet Directory is the optimal method.

4.
Most issues of data security can be handled by Oracle8i authentication mechanisms.

5.
The init.ora file, or instance configuration file, is one of the key configuration files
in an Oracle database environment that must be protected.
This file contains all the initialization parameters: the configurable parameters that are applied when an instance is started up.

6.
A file transfer copy of the tnsnames.ora configuration file is a common way for hackers to discover whether the
AUDIT function is enabled. If they determine that AUDIT is enabled, they can take steps to cover their activities,
or even delete the audit trail.

7.
To protect the key configuration files at the operating system level,
the system administrator should ensure that UNIX file permissions and
the umask environment variable are set for the optimal combination of file restrictions in that environment.
The default value of umask is 022, but the UNIX system administrator responsible for that environment may
decide that a more restrictive value is appropriate.

8.
In Sun Solaris UNIX environments, a low level of security can be achieved using access control
utilities such as GETFACL and SETFACL. These access control list utilities are specific to the Sun Solaris UNIX platform

9.
Controlling access by using database object privileges is called DAC, or discretionary access control.
DAC controls access to any given object by granting specific privileges to user objects or roles.

10.
Giving a database user object the authority to perform INSERT or DELETE commands in a given table is an example of a privilege.
This privilege applies to a given user object, unlike a role which applies to a group of user objects.

11.
Virtual Private Database technology allows security access controls to be applied directly to views or tables.
Unlike other access control methods, defined access controls apply directly to the table or view, not the user object.

12.
Oracle Label Security provides fine-grained access control within the database by using access control tables and a security policy.
Label Security augments Virtual Private Databases to provide a tighter security for data.

13.
The transformation of data by using cryptography to make it unintelligible is known as encryption.
To encrypt a file is to render that file completely unreadable until it has been properly decrypted.

14.
DES and RC4 are examples of symmetric key encryption. 3DES, DES40 and RC2 are additional symmetrical encryption algorithms.

15.
Cryptography that requires key agreement, or keys on both sides of the session, is known as Diffie-Hellman cryptography.
This allows mutual authentication with the same common key. Advanced Security Option uses Diffie-Hellman cryptography.

16.
Cryptography that provides for private communications within a public network without trusting anyone to keep secrets is
called public key infrastructure, or PKI. HTTP and LDAP protocols are included within the public key infrastructure.

17.
The most widely used PKI application that supplies data integrity and encryption in the transport layer of the
Open Systems Interconnection (OSI) model is the secure sockets layer, or SSL, protocol.
SSL is typically used for authenticating servers and for the traffic encryption of credit cards and passwords.

18.
A data dictionary table called sys.aud$ is the database audit trail.
The database audit trail stores records which audit database statements, schema objects, and privileges.

19.
An entry in the operating system audit trail is always created when instance startup or instance shutdown occurs,
or when the sys user object logs in. The instance startup entry is necessary in order to
maintain a complete audit trail when the data dictionary is not available.

20.
The type of audit trail that efficiently consolidates audit records from multiple sources
(including Oracle databases and other applications which use the audit trail) is the operating system audit trail.
Operating system audit trails allow all audit records to reside in one place, including database audit trails.

21.
You can use Oracle Reports to create customized reports of audit information when the database audit trail is in use.
You can analyze database audit trail information and produce good reports from that analysis,
which is an advantage over using the operating system audit trail method.

22.
To protect the database audit trail from unauthorized deletions,
grant the Delete Any Table system privilege to security administrators only.
An unauthorized user with this system privilege can severely damage a database security trail, or even delete all the data.
Assign this privilege very carefully.

23.
Advanced Security Option provides a single source of integration with network encryption, single-sign-on services,
and security protocols. ASO is the centralized source for all of these security features.

24.
ASO ensures that data is not disclosed or stolen during Net8 transmissions by means of RSA encryption,
DES encryption, and Triple-DES encryption.

25.
The SSL feature of ASO allows you to use the SHA, or secure hash algorithm.
The SHA is slightly slower than MD5, but it is more secure against brute-force collision and inversion attacks.

26.
he SSO, or single sign-on, feature of ASO allows access to multiple accounts and applications with a single password.
SSO simplifies the management of user accounts and passwords for system administrators.

27.
LDAP stands for Lightweight Directory Access Protocol, which is a directory service standard based on the ISO X.500 specification.
LDAP is a protocol defined and maintained by the same task force which defined the HTTP and TCP/IP protocols.

28.
OID means Oracle Internet Directory, which is the LDAP directory available from Oracle.
OID is a directory service compliant with LDAP v. 3, and it offers scalability, security, and high availability.

29.
The scalability of OID allows thousands of LDAP clients to be connected together without harming performance.
Much of this scalability is accomplished using connection pooling and multithreaded server implementations.

30.
The Java-based tool for administering OID is called Directory Manager.
The Directory Manager tool provides administrative transparency for the Oracle environment,
and is based on Oracle Enterprise Manager.

32.
OID security controls data access at the authentication level, by using access control lists.
Data access is controlled with anonymous authentication methods, either password-based or certificate-based (through SSL).

33.
An enterprise user is defined and managed in a directory. All enterprise users have a unique identity which spans the enterprise.

34.
Enterprise User Security Management allows large user communities to access multiple applications with a single sign-on.
User credentials and authorizations are stored in a directory.
This allows single sign-ons using x.509v3 certificates over SSL.

35.
Groups of global roles are called enterprise roles, which are assigned to enterprise users in order to avoid
granting roles to hundreds or thousands of individual users.

36.
You can remove the need to create duplicate user objects in every database by using the shared schemas feature.
The benefit of shared schemas is fewer user accounts.

37.
The current user database link feature allows user objects to connect to another database instance as the procedure owner.
A current user database link requires global users and SSL.

38.
The Login server provides a single, enterprisewide authentication mechanism. This authentication mechanism allows users to
identify themselves securely to multiple applications through a single authentication step, or single sign-on (SSO).

39.
The single sign-on feature allows the storage of passwords in LDAP-compliant directory services such as Oracle Internet Directory.
Storing usernames and passwords in a directory improves efficiency by centralizing this administrative duty.

40.
A partner application can accept authentication directly from the Login server.
Partner applications are modified to work within the SSO framework.

41.
External applications are not modified to work within the SSO framework.
The Login server does not store the username and password, but only supplies this native information from the external application.
The benefits of LDAP directories are not available to external applications.

42.
During Oracle product installations, user objects are created with default passwords. SYS, SYSTEM,
and ORACLE are the most critical to examine, but all objects that may have default passwords should be examined.

43.
V_$PWFILE_USERS is the view that shows which user objects have been granted SYSDBA or SYSOPER privileges.
It is normal for INTERNAL and SYS objects to have the privileges, but suspect any other user objects that have these privileges.
When in doubt, revoke the privilege and monitor the change.

44.
Users with unlimited tablespace can accidentally or intentionally use 100 percent of available tablespace.
Review this ability by examining the DBA_TS_QUOTES view. User objects have unlimited tablespace
if that object displays MAX_BLOCKS or MAX_BYTES columns equal to -1.
Any user object that has this privilege should be examined closely for verification of need.

45.
Invoke SQL*Plus with the NOLOG switch to remove the plain-text password entry from the UNIX process table.
Sessions started with this /nolog SQL*Plus switch cannot reveal the password
when another session uses the Ps -ef|grep SQL*Plus command.

46.
The data dictionary view, DBA_ROLES, will reveal the names of all roles and their current password status.
It is a good view for reviewing any potential security risks related to roles and their respective passwords.
Review this view regularly to verify that these roles are not being misused,
and that a secure password policy is in place for all roles.

47.
Virtual Private Databases is a good security product but requires programming to implement.
Oracle Label Security provides similar row-level security out-of-the-box without this same need.
Oracle Label Security provides row-level security in databases without the need for programming that VPD requires.

48.
The Oracle Label Security administrative tool that allows you to quickly implement a security policy on a table is named Policy Manager.
Oracle Policy Manager allows administrators to use predefined security policies to quickly implement row-level security on any table.

49.
Oracle Label Security controls access to rows in database tables based on a label contained
in the row and the label privileges given to each user session. Beyond Directory Access Controls restrictions,
row-level security provides a finer level of security by using these two labels to implement further restrictions
and provide ease of administration.

50.
The user label specifies the data that a user or stored program unit has access to.
This is one element of security using Oracle Label Security.

51.
The row label specifies the sensitivity of the data placed under control. The row label has a different function than the user label.
The row label provides security on the data, not the user session or stored program unit.

52.
Oracle AUDIT performs the monitoring and recording of selected user database actions.
Oracle AUDIT is used to watch over user actions in a database instance.

53.
The AUDIT_TRAIL init.ora parameter is used to stop, start, and configure the AUDIT function for any given instance.
NONE is the default value of this parameter; the OS value of this parameter
enables all audit records to go to the operating system's audit trail,
and the dB value of this parameter enables database auditing.

54.
Minimize auditing. If only user login monitoring is required, listener log monitoring is an alternative to using AUDIT.
All sessions route through the listener, and an entry is made in the listener log for each session.

55.
To maintain optimal performance, you should periodically issue the SQL command truncate on the audit table. Old,
unnecessary data should be purged regularly. The length of time between truncate command invocations
that will maintain the optimal audit table size will vary by the volume of audit information retained.

56.
The most critical role to control is the DELETE_ANY_CATALOG role. Only DBAs should have this role.
This is key to protecting the audit trail. Restricting this role will ensure that the audit trail is protected from deletion.
Hackers will often remove or edit the audit trail to cover their activities.

57.
Advanced Security Option (ASO) encrypts all protocols in the database. Net8 connections to the database are encrypted,
as are all connections to the database.

58.
Data integrity is provided by the checksumming algorithm. The checksumming technique detects replay attacks,
where a valid $100.00 withdrawal is resubmitted 100 unauthorized times.

59.
DES is an example of native ASO cryptography. An example of an SSL cryptography that expands on DES is the 3 DES cryptography.
Triple Data Encryption Standard (DES) makes three passes during the cryptography process, providing a higher level of security.

60.
A system that uses polices and procedures to establish a secure information exchange is
called the public key infrastructure, or PKI.
Several elements of PKI include SSL, x.509v3 certificates, and the Certificate Authority.

61.
Benefits of using the public key infrastructure include the ability to scale to the Internet and accommodate millions of users.
Efficiency is paramount when millions of users are part of the community.

沪ICP备14014813号-2

沪公网安备 31010802001379号