为Oracle Clusterware修改公用及私有网络接口

出于种种原因我们可能需要为已安装的Oracle集群软件修改其使用的公用或私有网络所使用的网络接口(How to Change Interconnect/Public Interface IP or Subnet in Oracle Clusterware),这些共有或私有网络(public/private network)被保存在ocr中,我们需要以root用户的身份执行oifcfg命令来对这些网络接口信息进行修改:

/* 使用ocrdump命令转储ocr信息 */

[oracle@vrh1 ~]$ ocrdump ocr

[oracle@vrh1 ~]$ cat ocr

[SYSTEM.css.interfaces]UNDEF 
[SYSTEM.css.interfaces.global]UNDEF 
[SYSTEM.css.interfaces.global.eth0]UNDEF 
[SYSTEM.css.interfaces.global.eth0.131|d32|d1|d0]UNDEF 
[SYSTEM.css.interfaces.global.eth0.131|d32|d1|d0]ORATEXT : public

[SYSTEM.css.interfaces.global.eth1]UNDEF
[SYSTEM.css.interfaces.global.eth1.131|d33|d1|d0]UNDEF :
[SYSTEM.css.interfaces.global.eth1.131|d33|d1|d0]ORATEXT : cluster_interconnect

.............

/* 实际上css的misscount参数和voting disk所在的位置也存在ocr文件中  */

[SYSTEM.css.misscount]UB4 (10) : 60
[SYSTEM.css.diskfile]ORATEXT : /dev/raw/raw2

1.首先我们可以通过oifcfg getif了解当前的public/interconnect网络配置情况:

[root@vrh1 ~]# who am i
root     pts/1        2011-04-18 18:23 (192.168.0.1)

[root@vrh1 ~]# cd $ORA_CRS_HOME/bin

[root@vrh1 bin]# oifcfg getif
eth0  131.32.1.0  global  public
eth1  131.33.1.0  global  cluster_interconnect

/* 可以看到这里分别用131.32.1/2网段配置了public和cluster_interconnect网络  */

2.确认在/etc/hosts文件中为新的网络接口IP做了必要的修改,之后我们要保证当前CRS已经启动(否则将出现PRIF-10: failed to initialize the cluster registry错误而无法配置),使用oifcfg setif命令首先添加新的public公用网络接口:

[root@vrh1 bin]# oifcfg delif -global eth0

/* 首先删除旧有的公用网络接口信息  */

[root@vrh1 bin]# oifcfg setif -global eth0/192.168.1.0:public

/* 注意这里制定192.168.1.0这个网段即可,不用输入完整的ip */

/* 因为以上操作是global全局操作,在单个节点完成即可 */

3.修改内联网络(cluster_interconnect)接口的方法也是类似的:

[root@vrh1 bin]# oifcfg delif -global eth1

[root@vrh1 bin]# oifcfg setif -global eth1/192.168.0.0:cluster_interconnect

/* 与public network配置时类似指定网段即可  */

4.确认网络接口的修改情况,以及当前数据库使用的inter connecter状况:

[oracle@vrh1 ~]$ oifcfg getif
eth0  192.168.1.0  global  public
eth1  192.168.0.0  global  cluster_interconnect

SQL> select * from x$skgxpia;

ADDR           INDX    INST_ID PUB_SKGXPI PICKED_SKGXPIA
-------- ---------- ---------- ---------- -----------------------------------
NAME_SKGXPIA    IP_SKGXPIA
--------------- ----------------
4572EC54          0          1 N          OSD
eth1            131.33.1.107

/* 可以看到当前数据库实例仍使用旧有的inter connect网络 */

[root@vrh1 ~]# crsctl stop crs

[root@vrh1 ~]# crsctl start crs

[oracle@vrh1 ~]$ sqlplus / as sysdba

Oracle Database 10g Enterprise Edition Release 10.2.0.4.0 - Production
With the Partitioning, Real Application Clusters, OLAP, Data Mining
and Real Application Testing options

SQL> 
SQL> select * from x$skgxpia;

ADDR           INDX    INST_ID PUB_SKGXPI PICKED_SKGXPIA
-------- ---------- ---------- ---------- -----------------------------------
NAME_SKGXPIA    IP_SKGXPIA
--------------- ----------------
4572EC54          0          1 N          OSD
eth1            192.168.0.107

/* 这里需要重启CRS后实例才能正确使用更新后的cluster interconnect网络接口 */
Convert your single instance to 10g RAC by manual

随着RAC在国内的流行,出现了不少将原本单节点数据库转换成RAC的需求;事实上这种single instance到RAC的转换并不困难,可以直接在原有单节点数据库上修改一些初始化参数并运行脚本来完成转换;这里我们通过实例向大家展示转换工作的大致步骤和注意事项。

示例环境中的节点名与示例名对应关系如下,注意Instance Name为PROD21和PROD22。

Node Name Instance Name DB NAME
vrh1 PROD21 PROD2
vrh2 PROD22 PROD2

以下操作均应当在1号节点上完成

一、在各节点上安装clusterware,并确保CRS正常启动;针对clusterware的安装在这里不做展开

[oracle@vrh1 u01]$ crsctl check crs
CSS appears healthy
CRS appears healthy
EVM appears healthy

/* 应当确保所有RAC节点上的CRS均正常启动 */

[oracle@vrh1 u01]$ crsctl query crs activeversion
CRS active version on the cluster is [10.2.0.4.0]

二、在各个节点上以Real Application Cluster选项安装Oracle Database Software软件,一般我们要求DB的版本要与clusterware的版本一致,所以如我们的环境中CRS的版本是10.2.0.4.0,那么DB的版本最好也是10.2.0.4.0;Database Software可以安装在共享存储上(shared storage),也可以是各节点上独立的文件系统上; 同时我们有必要修改一系列的环境变量如ORACLE_HOME、LD_LIBRARY_PATH到新软件的相应目录下,以及为RAC设置Oracle所推荐的一些操作系统内核参数如net.core.wmem_max等;

三、从新安装的DB Software目录下启动Netca工具,为Cluster配置新的Listener监听器;在完成新Listener的配置后;最终将老的单节点的Listener关闭掉

四、备份原单节点的数据库,并将之还原到今后RAC使用的共享存储(shared storage)上;如果今后使用ASM作为共享存储方案的话,那么可以 参考文档Note 452758.1 <How to Convert a Single-Instance ASM to Cluster ASM>

五、备份原单节点实例的参数文件,并加入下列参数:

*.cluster_database = TRUE
*.cluster_database_instances = 2
*.undo_management=AUTO
<SID1>.undo_tablespace=undotbs (undo tablespace which already exists)
<SID1>.instance_name=<SID1>
<SID1>.instance_number=1
<SID1>.thread=1
<SID1>.local_listener=<LISTENERNAME>_<HOSTNAME1>
<SID2>.instance_name=<SID2>
<SID2>.instance_number=2
<SID2>.local_listener=<LISTENERNAME>_<HOSTNAME2>
<SID2>.thread=2
<SID2>.undo_tablespace=UNDOTBS2
<SID2>.cluster_database = TRUE
<SID2>.cluster_database_instances = 2 

如在我们的示例环境中:

SQL> create pfile from spfile;
File created.

[oracle@vrh1 u01]$ cd $ORACLE_HOME/dbs

[oracle@vrh1 dbs]$ cp initPROD2.ora initPROD2.ora.bak

/* 以上备份了pfile形式的参数文件 */

*.cluster_database = TRUE
*.cluster_database_instances = 2
*.undo_management=AUTO
PROD21.undo_tablespace=undotbs
PROD21.instance_name=PROD21
PROD21.instance_number=1
PROD21.thread=1
PROD21.local_listener=LISTENER

PROD22.instance_name=PROD22
PROD22.instance_number=2
PROD22.local_listener=LISTENER
PROD22.thread=2

PROD22.undo_tablespace=undotbs2
PROD22.cluster_database= TRUE
PROD22.cluster_database_instances= 2

/* 以上为示例环境中我们加入参数文件的RAC相关initial parameter */

如之前说明的<SID1>对应于<DB_NAME>1; 而<SID2>对应于<DB_NAME>2;因为这里的DB_NAME为PROD2,所以2个实例的名字为PROD21和PROD22,希望不会造成你的困惑。

六、修改参数文件中的”control_files”参数即将控制文件指向到新的共享存储的路径下

七、从pfile的文本参数文件上创建Server parameter file即SPFILE;如果我们将来不使用共享的SPFILE的话,那么因为原单节点上的实例名从原来的PROD2装换成PROD21,所以这里spfile的名字应当是spfilePROD21.ora;如果我们希望使用共享的SPFILE的话,则follow下一个步骤

SQL> create spfile='?/dbs/spfilePROD2.ora' from pfile='?/dbs/initPROD2.ora';
File created.

八、一般我们使用共享的SPFILE,那么就要将以上创建的SPFILE拷贝到共享存储上,并在本地的ORACLE_HOME/dbs/initSID.ora参数文件中留下共享SPFILE的路径:

[oracle@vrh1 dbs]$ cp spfilePROD2.ora /share1

[oracle@vrh1 dbs]$ cat initPROD21.ora
spfile='/share1/spfilePROD2.ora'

九、以新的SID为实例创建密码文件:

[oracle@vrh2 dbs]$ cd $ORACLE_HOME/dbs
[oracle@vrh1 dbs]$ orapwd file=orapwPROD21 password=oracle entries=10

十、启动实例到mount状态
[oracle@vrh1 dbs]$ echo $ORACLE_SID
PROD21

SQL> startup mount;

ORACLE instance started.

Total System Global Area 629145600 bytes
Fixed Size 1269016 bytes
Variable Size 318767848 bytes
Database Buffers 301989888 bytes
Redo Buffers 7118848 bytes
Database mounted.

十一、注意将数据文件(datafile),在线日志文件(redo log)重命名(rename)到共享设备上,如:

SQL> select member from v$logfile;

MEMBER
--------------------------------------------------------------------------------
/share1/redo01.log
/share1/redo02.log
/share1/redo03.log

SQL> alter database rename file '/share1/redo01.log' to '/u01/redo01.log';
Database altered.

SQL>  alter database rename file '/share1/redo02.log' to '/u01/redo02.log';
Database altered.
......................

/* 不要忘记临时文件 */

SQL> select name from v$tempfile;

NAME
--------------------------------------------------------------------------------
/share1/temp01.dbf

SQL> alter database rename file '/share1/temp01.dbf' to '/u01/temp01.dbf';
Database altered.

十二、加入2号线程的重做日志组,并启用2号线程

SQL> alter database add logfile thread 2 group 4 '/u01/redo04.log' size 50M;
Database altered.
SQL> alter database add logfile thread 2 group 5 '/u01/redo05.log' size 50M;
Database altered.

SQL> alter database enable public thread 2;
Database altered.

............

十三、从1号节点打开数据库,并创建供二号实例(或其他更多实例)使用的撤销表空间UNDO TABLESPACE:

SQL> alter database open;
Database altered.

SQL>  CREATE UNDO TABLESPACE UNDOTBS2 DATAFILE '/u01/undotbs02.dbf' size 100M;
Tablespace created.

十四、从1号节点上运行?/rdbms/admin/catclust.sql脚本创建cluster相关的视图:

SQL> @?/rdbms/admin/catclust
...........

Grant succeeded.

Synonym created.

PL/SQL procedure successfully completed.


以下操作应当在2号或其他更多节点上执行

十五、在2号节点上设置合理的ORACLE_HOME(指向新安装的DB软件目录)和ORACLE_SID(我们的环境中为PROD22)环境变量;你可能还需要为2号实例创建必要的audit_file_dest审计文件存放目录和background_dump_dest后台转储文件存放目录等,如果实例无法正确获取这些目录可能出现”ORA-09925: Unable to create audit trail file”错误。如步骤2所述也需要在2号节点上配置推荐的操作系统内核参数等。

十六、创建$ORACLE_HOME/dbs/initSID.ora PFILE参数文件指向共享的SPFILE文件,如步骤8所示

[oracle@vrh2 ~]$ echo $ORACLE_SID
PROD22

[oracle@vrh2 ~]$ cd $ORACLE_HOME/dbs

[oracle@vrh2 dbs]$ cat initPROD22.ora
spfile='/u01/spfilePROD2.ora'

十七、在2号节点上创建形如orapwSID的密码文件:

[oracle@vrh2 dbs]$ cd $ORACLE_HOME/dbs
[oracle@vrh2 dbs]$ orapwd file=orapwPROD22 password=oracle entries=10

十八、启动2号节点的实例,并打开数据库:

SQL> startup mount;
ORACLE instance started.

Total System Global Area  629145600 bytes
Fixed Size                  1269016 bytes
Variable Size             318767848 bytes
Database Buffers          301989888 bytes
Redo Buffers                7118848 bytes
Database mounted.

SQL> alter database open;
Database altered.

SQL> select instance_name,status from gv$instance;

INSTANCE_NAME    STATUS
---------------- ------------
PROD22           OPEN
PROD21           OPEN

以上完成了对单节点数据库到RAC数据库的转换,但该RAC数据库的资源尚未注册到OCR中,因此无法使用例如srvctl、crs_stat等命令配置或监控这些资源,我们需要手动将这些资源加入到OCR中。

以下操作在任意一节点上完成即可
:

srvctl add database -d <database name> -o <ORACLE_HOME path> -p <spfile location and name> 

srvctl add instance -d <database name> -i <instance 1 name> -n <node 1 name > 

srvctl add instance -d <database name> -i <instance 2 name> -n <node 2 name >

如在我们的示例环境中可以如下添加:
[oracle@vrh2 ~]$ srvctl add database -d PROD2 -o $ORACLE_HOME -p /u01/spfilePROD2.ora 

[oracle@vrh2 ~]$ srvctl add instance -d PROD2 -i PROD21 -n vrh1

[oracle@vrh2 ~]$ srvctl add instance -d PROD2 -i PROD22 -n vrh2

[oracle@vrh2 ~]$ crs_start ora.PROD2.db

[oracle@vrh2 ~]$ crs_stat -t
Name           Type           Target    State     Host       
------------------------------------------------------------
ora....21.inst application    ONLINE    ONLINE    vrh1       
ora....22.inst application    ONLINE    ONLINE    vrh2       
ora.PROD2.db   application    ONLINE    ONLINE    vrh1       
ora.vrh1.gsd   application    ONLINE    ONLINE    vrh1       
ora.vrh1.ons   application    ONLINE    ONLINE    vrh1       
ora.vrh2.gsd   application    ONLINE    ONLINE    vrh2       
ora.vrh2.ons   application    ONLINE    ONLINE    vrh2

为10g RAC Cluster添加节点

RAC体系为系统扩容开创了一条新的道路:只需要不断向集群Cluster中加入新的服务器就可以了。这里我们就来介绍一下如何为10g RAC Cluster增加节点;实际上这并不复杂,甚至可以说是很简单的。为现有的Oracle 10g RAC添加节点大致包括以下步骤:

  1. 配置新的服务器节点上的硬件及操作系统环境
  2. 向Cluster集群中加入该节点
  3. 在新节点上安装Oracle Database software
  4. 为新的节点配置监听器LISTENER
  5. 通过DBCA为新的节点添加实例

我们假设当前RAC环境中存在2个节点,分别为vrh1和vrh2;该RAC环境中clusterware和database的版本均为10.2.0.4,需要加入该Cluster的新节点为vrh3。

一、在新的服务器节点上配置操作系统环境

  1. 这包括配置该节点今后使用的public network公用网络和private network接口,不要忘记在hosts文件中加入之前节点的网络信息,并将该份完整的hosts文件传到集群Cluster中已有的节点上,保证处处可以访问
  2. 同时需要在原有的基础上配置oracle(或其他DBA)用户的身份等价性,这需要将新节点上生成的id_rsa.pub和id_dsa.pub文件中的信息追加到authorized_keys文件中,并保证在所有节点上均有这样一份相同的authorized_keys文件
  3. 调整新节点上的操作系统内核参数,保证其满足今后在该节点上运行实例的内存要求以及10g RAC Cluster的推荐的udp网络参数
  4. 调整新节点上的系统时间以保持同其他节点一致,或者配置NTP服务
  5. 保证原有Cluster中所有节点上的CRS都正常运行,否则addNode时会报错
  6. 配置clusterware和database软件的安装目录,要求路径和原有节点上的一致

二.向Rac Cluster中加入新的节点
1.在原有RAC节点上(vrh1)以oracle用户身份登录,设置合理的DISPLAY显示环境变量,并运行$ORA_CRS_HOME/oui/bin目录下的addNode.sh脚本

[oracle@vrh1 ~]$ export DISPLAY=IP:0.0
[oracle@vrh1 ~]$ cd $ORA_CRS_HOME/oui/bin
[oracle@vrh1 bin]$ ./addNode.sh

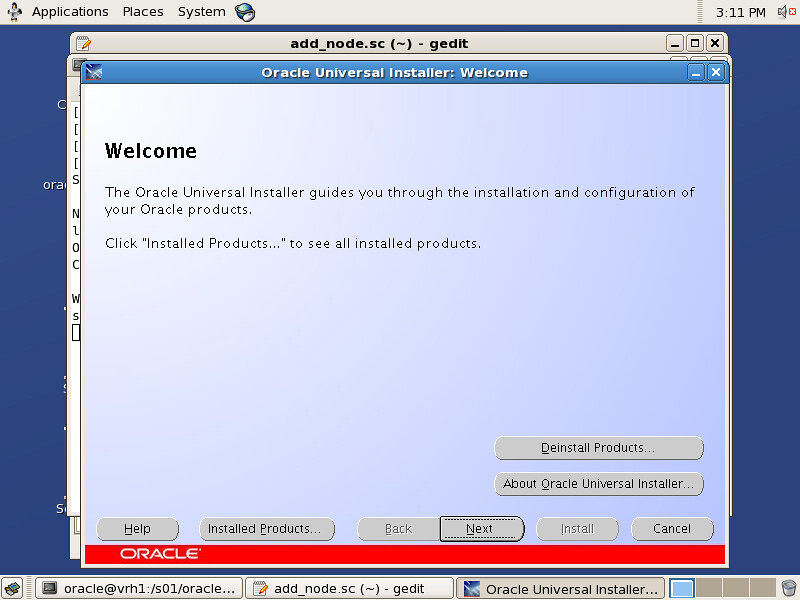
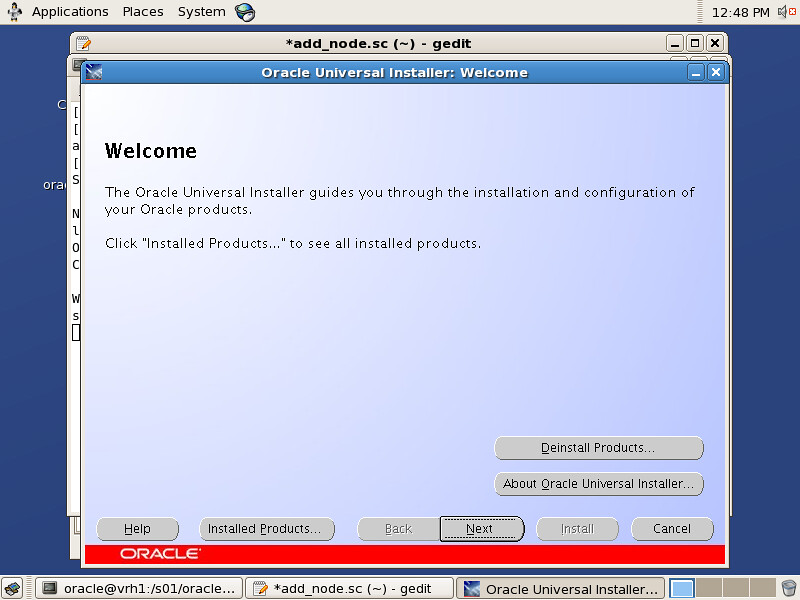
2.若OUI被正常调用则会出现欢迎界面,并点击NEXT:
Screenshot

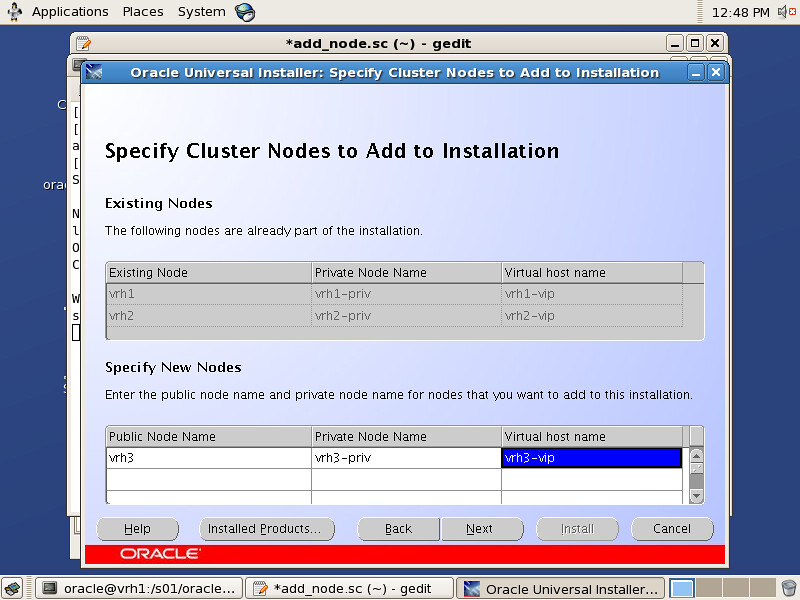
3.在”Specify Cluster Nodes to Add to Installation”界面下输入公共节点名、私有节点名和VIP节点名(之前应当在所有节点的/etc/hosts文件中都配置了):
Screenshot-1

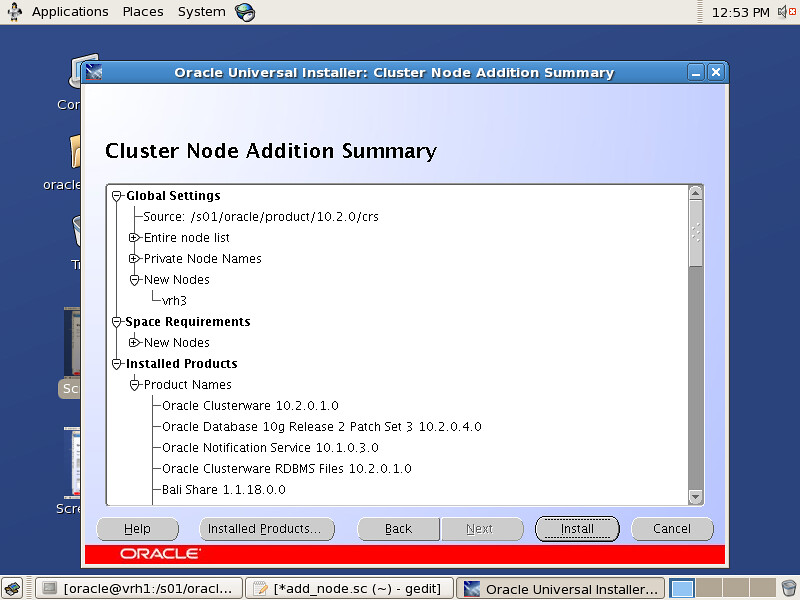
4.出现”Cluster Node Addition Summary”界面Review一遍Summary信息,并点击NEXT:
Screenshot-2

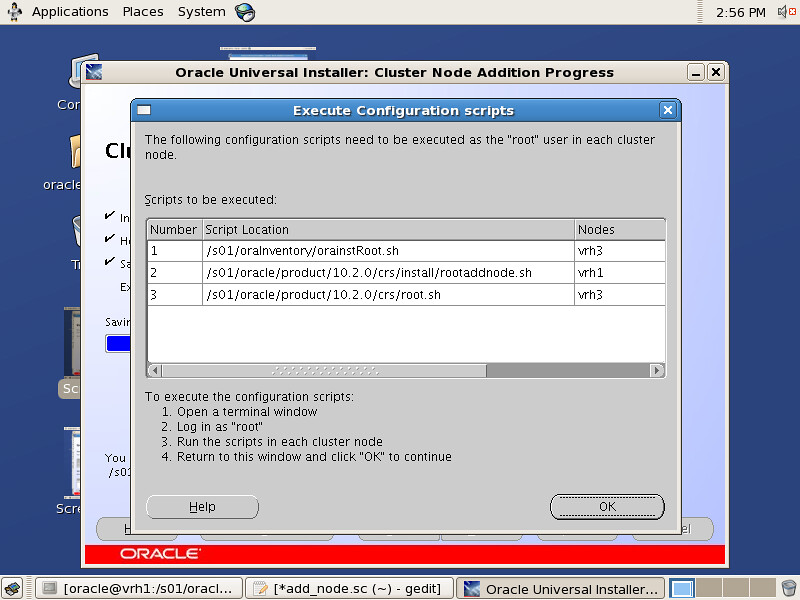
5.出现”Cluster Node Addition Progress”界面,OUI成功将安装好的clusterware软件传输到新的节点后,会提示用户运行多个脚本包括:orainstRoot.sh(新节点)、rootaddnode.sh(运行OUI的原有节点)、root.sh(新节点):
Screenshot-3

6.运行之前提示的三个脚本:

/* 在新节点上运行orainstRoot.sh脚本 */

[root@vrh3 ~]# /s01/oraInventory/orainstRoot.sh 
Changing permissions of /s01/oraInventory to 770.
Changing groupname of /s01/oraInventory to oinstall.
The execution of the script is complete

/* 在运行OUI的原有节点上运行rootaddnode.sh脚本 */

[root@vrh1 ~]# /s01/oracle/product/10.2.0/crs/install/rootaddnode.sh
clscfg: EXISTING configuration version 3 detected.
clscfg: version 3 is 10G Release 2.
Attempting to add 1 new nodes to the configuration
Using ports: CSS=49895 CRS=49896 EVMC=49898 and EVMR=49897.
node {nodenumber}: {nodename} {private interconnect name} {hostname}
node 3: vrh3 vrh3-priv vrh3
Creating OCR keys for user 'root', privgrp 'root'..
Operation successful.
/s01/oracle/product/10.2.0/crs/bin/srvctl add nodeapps -n vrh3 -A vrh3-vip/255.255.255.0/eth0 -o /s01/oracle/product/10.2.0/crs

/* 在新节点上运行root.sh脚本 */

[root@vrh3 ~]# /s01/oracle/product/10.2.0/crs/root.sh 
WARNING: directory '/s01/oracle/product/10.2.0' is not owned by root
WARNING: directory '/s01/oracle/product' is not owned by root
WARNING: directory '/s01/oracle' is not owned by root
WARNING: directory '/s01' is not owned by root
Checking to see if Oracle CRS stack is already configured
/etc/oracle does not exist. Creating it now.
OCR LOCATIONS =  /dev/raw/raw1
OCR backup directory '/s01/oracle/product/10.2.0/crs/cdata/crs' does not exist. Creating now
Setting the permissions on OCR backup directory
Setting up NS directories
Oracle Cluster Registry configuration upgraded successfully
WARNING: directory '/s01/oracle/product/10.2.0' is not owned by root
WARNING: directory '/s01/oracle/product' is not owned by root
WARNING: directory '/s01/oracle' is not owned by root
WARNING: directory '/s01' is not owned by root
clscfg: EXISTING configuration version 3 detected.
clscfg: version 3 is 10G Release 2.
Successfully accumulated necessary OCR keys.
Using ports: CSS=49895 CRS=49896 EVMC=49898 and EVMR=49897.
node {nodenumber}: {nodename} {private interconnect name} {hostname}
node 1: vrh1 vrh1-priv vrh1
node 2: vrh2 vrh2-priv vrh2
clscfg: Arguments check out successfully.

NO KEYS WERE WRITTEN. Supply -force parameter to override.
-force is destructive and will destroy any previous cluster
configuration.
Oracle Cluster Registry for cluster has already been initialized
Startup will be queued to init within 30 seconds.
Adding daemons to inittab
Expecting the CRS daemons to be up within 600 seconds.
CSS is active on these nodes.
        vrh1
        vrh2
        vrh3
CSS is active on all nodes.
Waiting for the Oracle CRSD and EVMD to start
Oracle CRS stack installed and running under init(1M)
Running vipca(silent) for configuring nodeapps

Creating VIP application resource on (0) nodes.
Creating GSD application resource on (2) nodes...
Creating ONS application resource on (2) nodes...
Starting VIP application resource on (2) nodes...
Starting GSD application resource on (2) nodes...
Starting ONS application resource on (2) nodes...
Done.

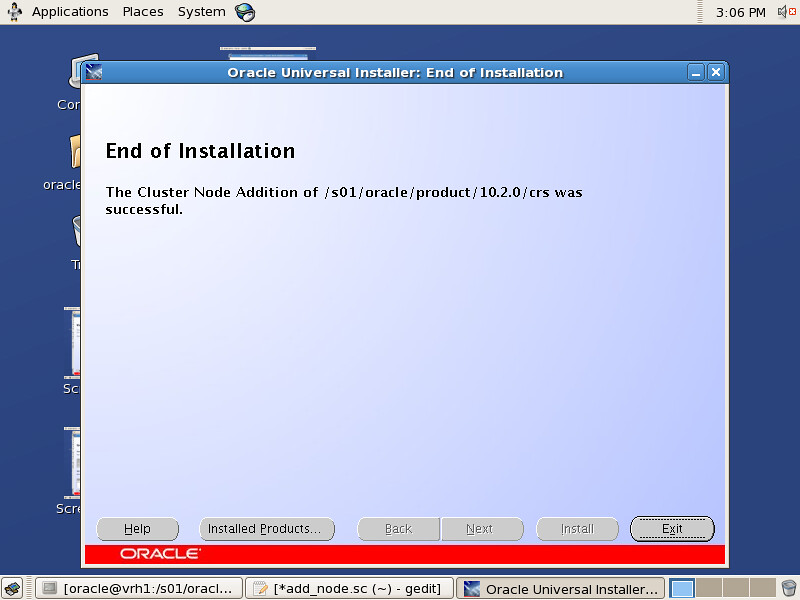
7.运行完成以上脚本后回到OUI界面点选OK,出现安装成功界面:
Screenshot-4

三.在新节点上安装Oracle Database software
1.在原有RAC节点上以Oracle用户身份登录,设置合理的DISPLAY显示环境变量,并运行$ORACLE_HOME/oui/bin目录下的addNode.sh脚本:

[oracle@vrh1 ~]$ export DISPLAY=IP:0.0

[oracle@vrh1 ~]$ cd $ORACLE_HOME/oui/bin
[oracle@vrh1 bin]$ ./addNode.sh 

2.若OUI被正常调用则会出现欢迎界面,并点击NEXT:
Screenshot-5

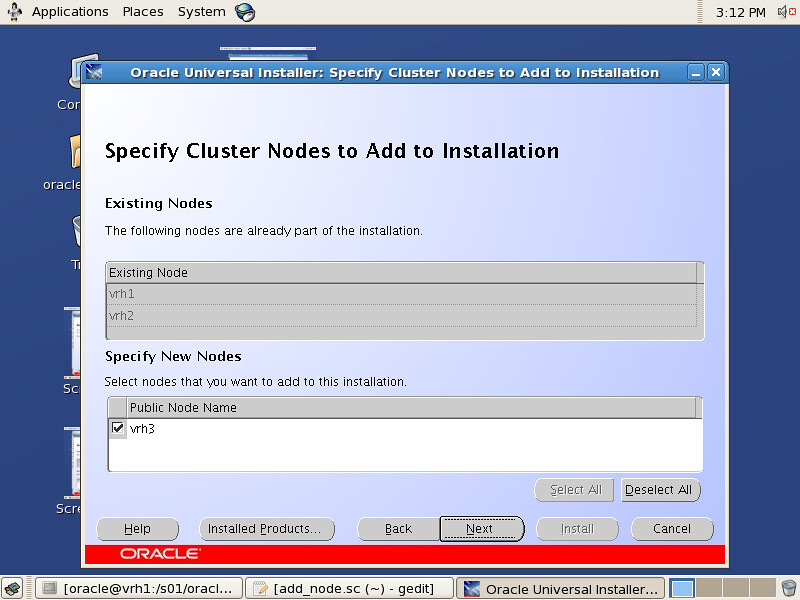
3.在”Specify Cluster Nodes to Add to Installation“界面中勾选需要安装Oracle Database software数据库软件的节点,这里为vrh3:
Screenshot-6

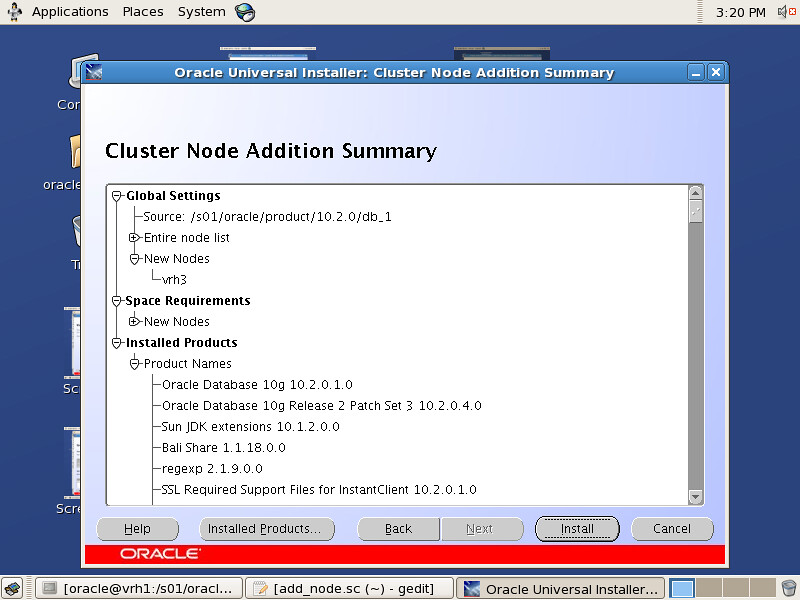
4.出现”Cluster Node Addition Summary”界面,review一遍安装Summary后点击Next:
Screenshot-7

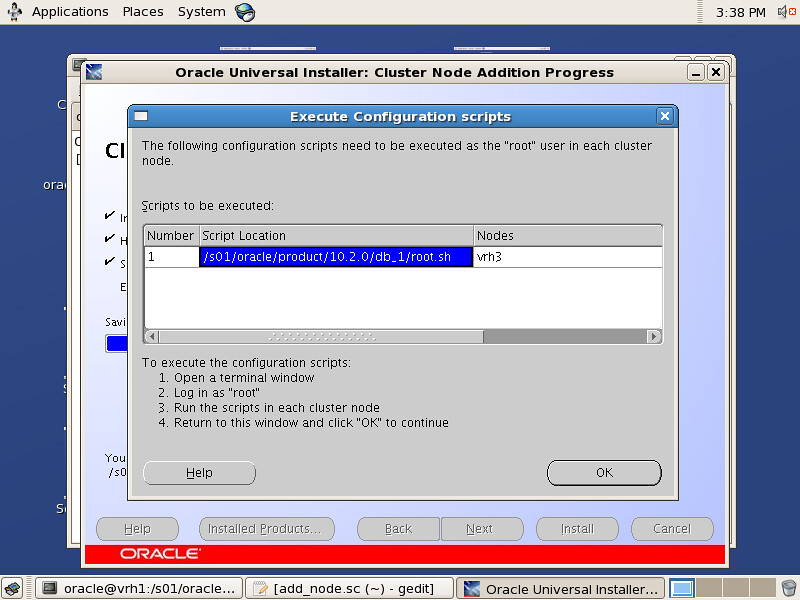
5.出现”Cluster Node Addition Progress”进度条界面,完成对Oracle database Software的远程传输安装后会提示用户运行root.sh脚本:
Screenshot-8

6.在新的节点(这里为vrh3)上运行提示脚本root.sh

四.在新的节点(vrh3)上使用netca工具配置监听器LISTENER,不做展开

五.使用DBCA工具在新节点上添加实例
1.在原有RAC节点上以Oracle用户身份登录,设置合理的DISPLAY显示环境变量,并运行DBCA命令:

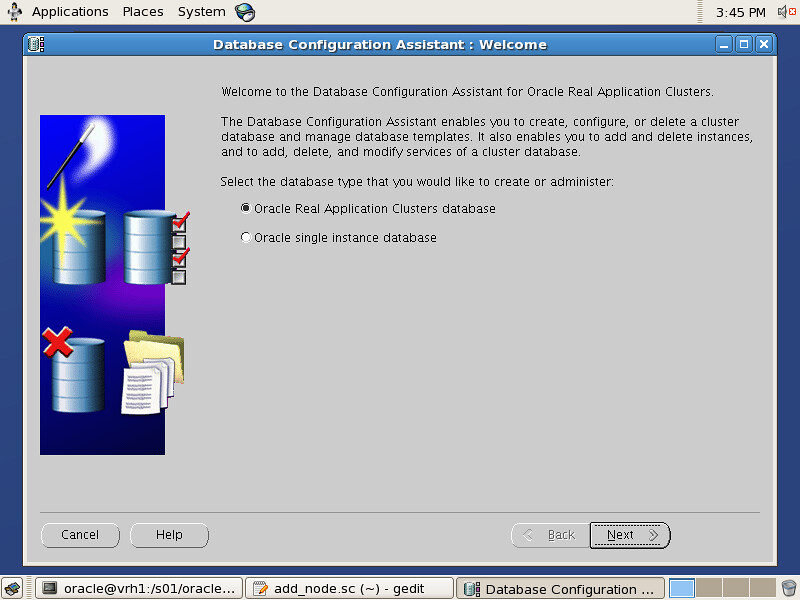
2.出现DBCA欢迎界面,选择”Oracle Real Application Clusters”并点击Next:
Screenshot-9

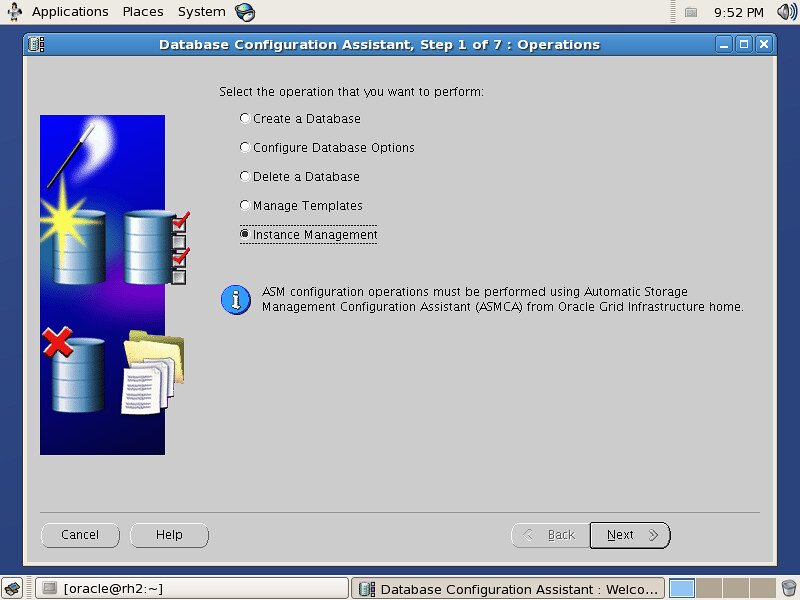
3.勾选节点管理,并点击Next:
Screenshot11

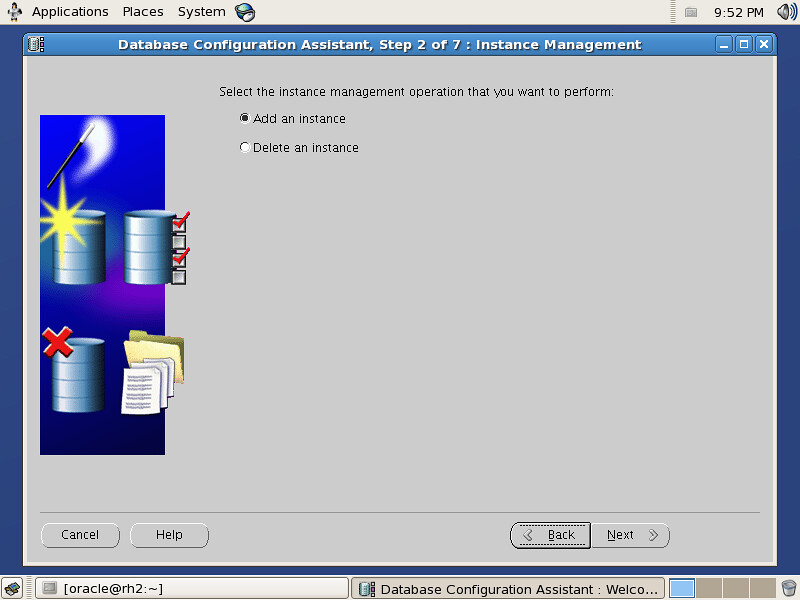
4.勾选”Add an instance”增加节点,并点击Next:
Screenshot12

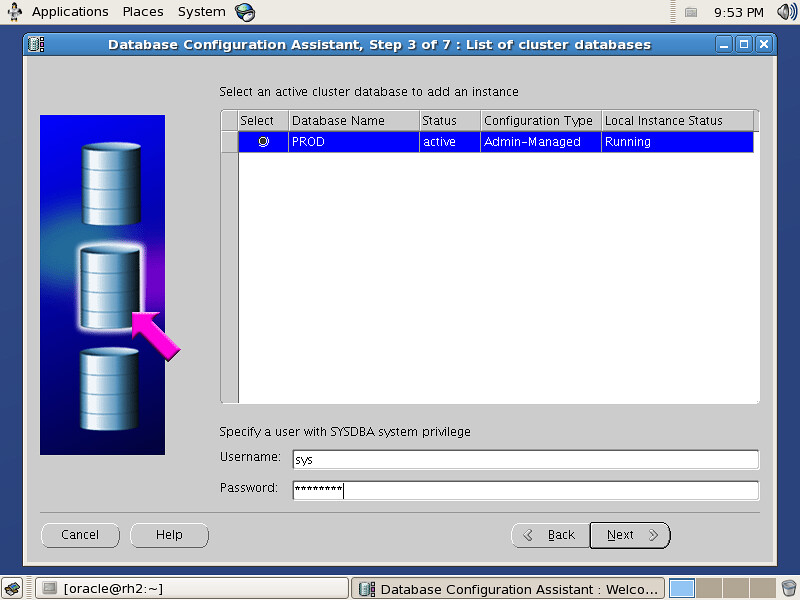
5.勾选想要添加实例的数据库并填写SYSDBA用户信息密码:
Screenshot13

6.勾选正确的实例名和节点,并点击Next

7.Review Storage存储信息,并点击Next

8.Review Summary信息,并点击OK

9.等待进度条完成,当被提示是否执行另一操作”perform another operation”时选择No

10.进一步通过查询gv$instance视图验证节点是否添加成功,若添加成功则当可以看到所有的节点信息。

在AIX 5.3+HACMP 5.4以上环境安装10gR2 10.2.0.1 RAC CRS Clusterware必须先运行Patch 6718715中的rootpre.sh

在AIX 5.3+HACMP 5.4以上环境安装10gR2 10.2.0.1 RAC CRS Clusterware必须先运行Patch 6718715中的rootpre.sh,若不运行该rootpre.sh则会导致后续的诸多问题,例如:


1. 在 “Cluster Node Information” or “Specify Cluster Configuration” 2个界面窗口中无法点击灰色的ADD NODE按钮:


AIX: "Cluster Node Information" or "Specify Cluster Configuration" Window Does not Show Any Node and "Add" Button is Greyed Out

Oracle Server - Enterprise Edition - Version: 10.2.0.1 and later   [Release: 10.2 and later ]
IBM AIX on POWER Systems (64-bit)
Symptoms

Installing Oracle Clusterware (CRS or 11gR2 Grid Infrastructure), "Cluster Node Information" or "Specify Cluster Configuration" window does not show any node and "Add" button is greyed out:

Installation log

[main] [10:21:20:345] [sQueryCluster.isCluster:74]  LKMGR file =/usr/sbin/cluster/utilities/cldomain
[main] [10:21:20:346] [QueryCluster.:49]  Detected Cluster
[main] [10:21:20:346] [QueryCluster.isCluster:65]  Cluster existence check = true

Cause

The cause is IBM HACMP (or PowerHA) executable was not removed cleanly when HACMP was deinstalled. After HACMP was deinstalled, "ls" still shows one HACMP command:

$ ls -l /usr/sbin/cluster/utilities/cldomain
lrwxrwxrwx    1 root     system           29 Sep 21 13:54 /usr/sbin/cluster/utilities/cldomain -> /opt/VRTSvcs/rac/bin/cldomain

Oracle OUI depends on /usr/sbin/cluster/utilities/cldomain to determine if vendor clusterware exists, if so, it will install on top of HACMP and get list of nodes from HACMP.

In this case, since HACMP executable is detected, OUI will not allow user to manually enter node information, however, since HACMP was deinstalled, it does not have any node membership information.

Solution

The solution is to remove /usr/sbin/cluster/utilities/cldomain from all nodes and restart OUI.


2. 运行root.sh时显示ocrconfig.bin无法加载必要的库文件,或者干脆root.sh运行失败 ,显示Failed to start Oracle Clusterware stack;


由于10g CRS对于AIX HACMP有较多的依赖关系所以 随10.2.0.1附带的rootpre.sh无法有效配置oracle用户的HA信息,所以必须先下载Patch 6718715: SUPPORT FOR HACMP 5.4 IN ROOTPRE.SH SCRIPT FOR 版本10.2.0.3,否则10.2.0.1 CRS将无法正常安装。


Product : 	Oracle Database Server 10GR2 (10.2.0.x)

Bug     :       6718715 - Support HACMP 5.4

Platforms: AIX 5L (5.x), AIX 6.x

Steps to apply the patch
------------------------
1--> Login as root user 
2--> Unpack the files shipped in this patch in a temporary directory
3--> Run the rootpre.sh script
     ./rootpre.sh

Note: 
 This patch supercedes any rootpre.sh shipped with the aforementioned 
 Oracle products.

Contents of this distribution
-----------------------------
1--> README.txt
2--> loadext(32bit executable)
3--> pw-syscall32 (32-bit executable for 32-bit kernels in AIX 4.1 & AIX 4.2)
4--> pw-syscall (32-bit executable for 32-bit kernels in AIX 4.3 and AIX 5L)
5--> pw-syscall64 (64-bit executable for 64-bit kernels in AIX 5L)
6--> rootpre.sh(commands text)
7--> ORCLcluster/lib/libskgxnr.a (Oracle 64-bit cluster library)
8--> ORCLcluster/lib/libskgxnr.so (Oracle 64-bit cluster library)
9--> ORCLcluster/lib32/libskgxnr.a (Oracle 32-bit cluster library)
10--> ORCLcluster/lib32/libskgxnr.so (Oracle 32-bit cluster library)

Advice on upgrading to 11.2.0.2 and converting to RAC

Question:Problem Description: Currently we are running 11.2.0.1 Grid on a 2 nodes. We are facing DB crash issue and different bugs with current environment. One of the option Oracle provided is to upgrade Grid to 11.2.0.2 and convert to real RAC.

There are 11.2.0.1 database under the clusterware. These DBs are currently actively running on one node and cold failover HA enabled by Oracle’s perl scripts. We also have 10g standalone DBs running under the same clusterware.

We are planning the upgrade of Grid from 11.2.0.1 to 11.2.0.2, and also converting the cold faliover HA DBs to the real RAC 2 nodes or RAC 1 node.

We will need Oracle’s advice on the technical road map and procedures on this. Also the issues we might face. The upgrade is planned to start in one week from now. We really appreciate that Oracle get back to us as quickly as possible. Thanks.

Answer:
Please follow the below document for manual upgrade or using dbua.
Complete Checklist for Manual Upgrades to 11gR2 (Doc ID 837570.1)
Complete checklist to upgrade the database to 11g R2 using DBUA (Doc ID 870814.1)
Please follow the document to convert the single instance to RAC.
How to Convert 10g Single-Instance database to 10g RAC using Manual Conversion procedure (Doc ID 747457.1)

1. Our current version of Grid/clusterware is 11.2.0.1. Two versions of RDBMS are running currently on the cluster: 11.2.0.1 and 10.2.0.5. They are all on ASMs. +ASM1 is running on node 1 while +ASM2 is running on node 2. Some DBs are Standalone DBs and some DBs are Oracle active-passive HA with failover controlled by the Oracle perl scripts.
We are planning to upgrade Grid to 11.2.0.2 and converting Oracle HA to the real RAC 2 node or RAC 1 node. At the sametime, we are planning to move other system’s DBs onto the same cluster. The current DB versions for that system have 10.2.0.4,10.2.0.1, 9.2.0.7, 9.2.0.5.

Ans:

Oracle 9i Databases were not managed by Oracle Clusterware 11.1 already.The Clusterware has exceeded the limitation. So kindly request to upgrade the 9i database ASAP to manage these databases on 11gR2 clusterware.

2. Does Oracle have any suggestion on the order of upgrade to 11.2.0.2 and the converting to real RAC from Oracle HA under clusterware?

Ans:

There is no documentation. I assume that you have installed clusterware,ASM and RDBMS has been installed on active-passive(Oracle HA) nodes. You need to disable the pearl script and bring up the clusterware ,ASM and RDBMS instance on passive node.

3. In note 1212703.1 Oracle provided, patch 9974223 is mentioned if multicast is enabled only for 224.0.0.251 address. I am confused on the instructions in the readme of patch 9974223. It mentions to apply both on CRS_HOME and RDBMS HOME.

Ans:

If we upgrade RDBMS to 11.2.0.2 as well becides the Grid 11.2.0.2 upgrade, is it required to apply the patch to the RDBMS HOME too, or just optional? If it is required, does the patch only need to be applied in the RDBMS, which has RAC DB running? Does it need to apply on the Standalone DB on the Grid/ASM?

The patch 9974223 is applicable for CRS/RDBMS. You can apply this patch on both home. Yes. Please apply the patch on RDBMS home also. You no need to apply for standalone DB on the Grid/ASM.

1. Per Infrastructure Redundant Interconnect and ora.cluster_interconnect.haip [ID 1210883.1 ], Redundant Interconnect without any 3rd-party IP failover technology (bond, IPMP or similar) is supported natively by Grid Infrastructure starting from 11.2.0.2. The note is for the interconnect.
What about the Oracle VIP? We already binded the 2nd public interface of IPMP to the node-vip (nodeapps) in order to resolve the DB listener down issue when IPMP failover to 2nd interface , do we have to undo it before the 11.2.0.2 upgrade?h

Ans: – no need to undo ipmp what is already configured.

2. In the note Oracle provided: http://download.oracle.com/docs/cd/E11882_01/install.112/e17213/procstop.htm#CEGHBJDB, It says:
=========
– To upgrade existing 11.2.0.1 Oracle Grid Infrastructure installations to Oracle Grid Infrastructure 11.2.0.2, you must first do at least one of the following:

Patch the release 11.2.0.1 Oracle Grid Infrastructure home with the 9413827 and 9706490 patches.

Install Oracle Grid Infrastructure Patch Set 1 (GI PSU1) or Oracle Grid Infrastructure Patch Set 2 (GI PSU2).

– Oracle Clusterware and Oracle ASM upgrades are always out-of-place upgrades. With 11g release 2 (11.2), you cannot perform an in-place upgrade of Oracle Clusterware and Oracle ASM to existing homes.
==========

If the”Oracle Clusterware and Oracle ASM upgrades are always out-of-place upgrades for 11.2″, why still need to patch the existing 11.2.0.1 Grid CRS HOME as mentioned above? If it is out of place, then Grid will have a new CRS HOME.

Ans:- Yes. Still you need to apply the recommended patches before upgrade. The reason is due to known issues, it is recommended to apply the patch before upgrade.
Ofcourse the grid infra needs to be installed on new home. Please go thorough the Grid installation document for more detail.

1. Our Grid is 11.2.0.1.0, we only need to apply one patch 9413827?

Yes. Please apply the 9413827 only.

2. Do we need to apply 9413827 to the RDBMS Home for 2 HA DBs that are under CRS control right before we upgrade the Grid to 11.2.0.2?

Yes. Please apply it.

Please refer the below document to check RAC option is enabled or not.
How to check RAC Option is currently linked into the Oracle Binary (Doc ID 284785.1)

RAC one node is only supported with DB version of 11g under 11.2.0.2 Grid for Solaris 10, correct?

Yes. It is supported. Please find the certification metrics as below

OS Product Certified With Version Status
10 11gR2 64-bit Oracle Clusterware 11g Certified
10 11gR2 64-bit Oracle Solaris Cluster 3.3 Certified
10 11gR2 64-bit Oracle Solaris Cluster 3.2 Certified
10 11gR2 64-bit Veritas Storage Foundation for Oracle RAC 5.1 Certified
10 11gR2 64-bit Veritas Storage Foundation for Oracle RAC 5.0 Certified

We have some DBs with 10g version. Right now they are standalone DBs and can not be upgraded for now. Does Oracle support 10g database with RAC 2 nodes under 11.2.0.2 Grid on Solaris 10?

Yes. It is supported.

了解更多关于11gR2 diskmon


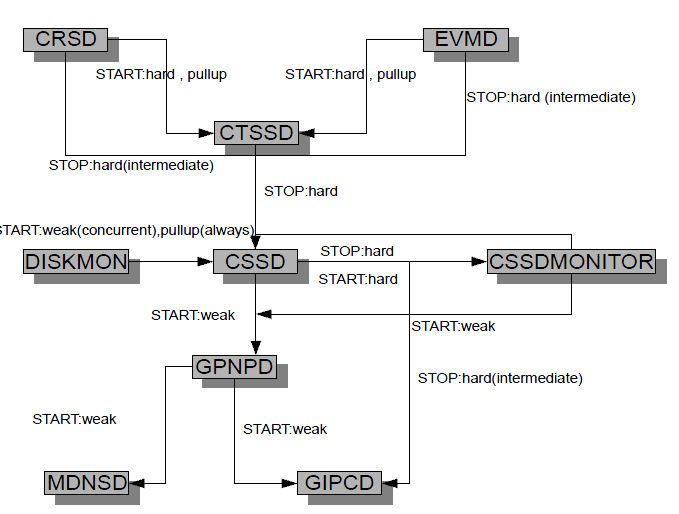
下图显示了有ohasd管理的所有资源(resource)/守护进程(daemons)的依赖关系:


Diskmon


Master diskmon

• Monitors CELLSRVs and Network using Heartbeats
• Propagates Cell/Network state to ASM/RDBMS processes (dskm)
• Maintains a cluster-wide global view of Cells with other DISKMONs in the cluster
• Accepts fencing requests from CRS and delivers them to the Cells
• Accepts intradatabase IORM plans from RDBMS and sends them to the Cells
• Provides communication with the cells


Diskmon daemon用以监控Exadata 中的cell server,即只有在Exadata环境中才有用。但是在版本11.2.0.1-11.2.0.2,即便是非Exadata环境也会默认启动该守护进 程。  在版本11.2.0.3 中 改进了这一细节,非Exadata环境无发启动diskmon了。

11.2.0.3 Grid Infrastructure diskmon Will be Offline by Default in Non-Exadata Environment

What is being announced?

As Grid Infrastructure daemon diskmon.bin is used for Exadata fencing, started from 11.2.0.3, resource ora.diskmon will be offline in non-Exadata environment. This is expected behaviour change.

Prior to 11.2.0.3:

ps -ef| grep diskmon.bin
grid      3361  3166  0 22:57 ?        00:00:00 /ocw/grid/bin/diskmon.bin -d -f

On 11.2.0.3:

ps -ef| grep diskmon.bin

>> no more diskmon.bin


一些diskmon进程的日志:


[ CSSD]2009-07-27 10:27:36.419 [20] >TRACE: kgzf_dskm_conn4: unable to connect to master
diskmon in 60174 msec

[ CSSD]2009-07-27 10:27:36.419 [20] >TRACE: kgzf_send_main1: connection to master diskmon
timed out

[ CSSD]2009-07-27 10:27:36.421 [22] >TRACE: KGZF: Fatal diskmon condition, IO fencing is
not available. For additional error info look at the master diskmon log file (diskmon.log)

[ CSSD]2009-07-27 10:27:36.421 [22] >ERROR: ASSERT clsssc.c 2471
[ CSSD]2009-07-27 10:27:36.421 [22] >ERROR: clssscSAGEInitFenceCompl: Fence completion
failed, rc 56859

It seems that the new process registered with Oracle Clusterware diskmon is not able to communicate properly .

setsid: failed with -1/1
dskm_getenv_oracle_user: calling getpwnam_r for user oracle
dskm_getenv_oracle_user: info for user oracle complete
dskm_set_user: unable to change ownership for the log directory
/optware/oracle/11.1.0.7/crs/log/shplab01/diskmon to user oracle, id 1101, errno 1
07/27/09 10:27:37: Master Diskmon starting

The tusc output of the cssd log gives the following information
...
1248953770.528145 [/optware/ora][20944]{2992772}
unlink("/var/spool/sockets/pwgr/client20944") ERR#2 ENOENT
1248953770.612485 [/optware/ora][20944]{2992772}
unlink("/tmp/.oracle_master_diskmon") ERR#1 EPERM
1248953770.649479 [/optware/ora][20944]{2992772}
unlink("/tmp/.oracle_master_diskmon") ERR#1 EPERM
1248953770.656719 [/optware/ora][20944]{2992772}
unlink("/var/spool/sockets/pwgr/client20944") ERR#1 EPERM
...

 There is a permission error of the file /tmp/.oracle_master_diskmon.
Solution

The resolution is to change the permissions of the file  /tmp/.oracle_master_diskmon, which should be owned by oracle . 

diskmon.log
============
2011-12-01 22:14:49.510: [ DISKMON][14036:1093384512] SKGXP:[386927568.6]{0}:
(14036 -> 12265) SKGXP_CHECK_HEART_BEAT_RESP_EXPIRE: NO PATH to Monitor
entry: 0x17161490
2011-12-01 22:14:49.510: [ DISKMON][14036:1093384512] SKGXP:[386927568.7]{0}:
  Subnet: 0
2011-12-01 22:14:49.510: [ DISKMON][14036:1093384512] SKGXP:[386927568.8]{0}:
   Remote endpoint [192.168.10.3/44538] is DOWN
2011-12-01 22:14:49.510: [ DISKMON][14036:1093384512] SKGXP:[386927568.9]{0}:
   Local endpoint [192.168.10.1/45530] is UP
2011-12-01 22:14:49.510: [ DISKMON][14036:1093384512]
SKGXP:[386927568.10]{0}: SKGXP_DO_HEART_BEAT_RESP: Matching Monitor Entry Not
Found
2011-12-01 22:14:49.510: [ DISKMON][14036:1093384512]
SKGXP:[386927568.11]{0}:   SKGXPGPID Internet address 192.168.10.3 RDS port
number 44538
2011-12-01 22:14:49.510: [ DISKMON][14036:1093384512] dskm_hb_thrd_main11:
got status change
2011-12-01 22:14:49.510: [ DISKMON][14036:1093384512]
dskm_ant_rsc_monitor_start: rscnam: o/192.168.10.3 rsc: 0x171609c0 state:
UNREACHABLE reconn_attempts: 0 last_reconn_ts: 1322773921
2011-12-01 22:14:49.649: [ DISKMON][14036:1093384512]
dskm_node_guids_are_offline: query SM done. retcode = 56891(REACHABLE)
2011-12-01 22:14:49.657: [ DISKMON][14036:1093384512] dskm_oss_get_net_info5:
oss_get_net_info for device o/192.168.10.3 returned skgxpid
040302010001894cb5afca0419ed706ae92f000008000000000000000000000001030000c0a80a
03000000000000000000000000adfa00000000000016000000 and the following 1 ip
adresess. known_reid: Yes
2011-12-01 22:14:49.657: [ DISKMON][14036:1093384512]     192.168.10.1
2011-12-01 22:14:49.657: [ DISKMON][14036:1093384512]
dskm_ant_rsc_monitor_start6.5:Cell does support TCP monitor, and does support
SM Query, cell incarnation is 1, guid num is 2
2011-12-01 22:14:49.657: [ DISKMON][14036:1093384512] GUID-0 =
0x0021280001a0af15
2011-12-01 22:14:49.657: [ DISKMON][14036:1093384512] GUID-1 =
0x0021280001a0af16
2011-12-01 22:14:49.657: [ DISKMON][14036:1093384512]
dskm_ant_rsc_monitor_start2: Connected to Same_Inc OSS device: o/192.168.10.3
numIP: 1
2011-12-01 22:14:49.657: [ DISKMON][14036:1093384512]     192.168.10.1

2011-12-01 22:15:07.501: [ DISKMON][14036:1108523328] dskm_slave_thrd_main3:
peer disconnected
2011-12-01 22:15:07.501: [ DISKMON][14036:1108523328] dskm_slave_thrd_main5:
client +ASM1/ASM/15374 disconnected, reid
cid=14e1b2b4de58ef1eff5487b58dccc906,icin=188142332,nmn=1,lnid=188142332,gid=7
,gin=1,gmn=0,umemid=0,opid=8,opsn=1,lvl=process hdr=0x       0

2011-12-01 22:15:08.440: [ CSSCLNT]clsssRecvMsg: got a disconnect from the
server while waiting for message type 1
2011-12-01 22:15:08.440: [ CSSCLNT]clssgsGroupGetStatus:  communications
failed (0/3/-1)

2011-12-01 22:15:08.440: [ CSSCLNT]clssgsGroupGetStatus: returning 8

2011-12-01 22:15:08.440: [ DISKMON][14036:1102219584] CRITICAL: Diskmon
exiting: dskm_rac_thrd_main10: Diskmon is shutting down due to CSSD ABORT
event
2011-12-01 22:15:08.440: [ DISKMON][14036:1102219584] SHUTDOWN FORCE due to
CSSD ABORT
2011-12-01 22:15:08.440: [ DISKMON][14036:1102219584] dskm_rac_thrd_main:
exiting
2011-12-01 22:15:08.754: [ DISKMON][14036:1104320832] dskm_slave_thrd_main5:
client orarootagent/13701 disconnected, reid
cid=DUMMY,icin=-1,nmn=-1,lnid=-1,gid=-1,gin=-1,gmn=-1,umemid=-1,opid=-1,opsn=-
1,lvl=process hdr=0xfece0100
2011-12-01 22:15:09.988: [ DISKMON][14036:1191118288] dskm_cleanup_thrds:
cleaning up the rac event handling thread tid 1102219584
[ DISKMON][13016]

I/O Fencing and SKGXP HA monitoring daemon -- Version 1.2.0.0
Process 13016 started on 2011-12-01 at 22:15:39.863

2011-12-01 22:15:39.867: [ DISKMON][13016] dskm main: starting up

ocssd.log
==========
2011-12-01 22:15:04.223: [    CSSD][1127139648]clssgmmkLocalKillThread: Time
up. Timeout 60500 Start time 369099698 End time 369160198 Current time
369160198
2011-12-01 22:15:04.223: [    CSSD][1127139648]clssgmmkLocalKillResults:
Replying to kill request from remote node 2 kill id 1 Success map 0x00000000
Fail map 0x00000000
2011-12-01 22:15:04.224: [GIPCHAUP][1094015296] gipchaUpperProcessDisconnect:
processing DISCONNECT for hendp 0x2aa5550 [00000000000092e5] { gipchaEndpoint
: port 'nm2_gts-cluster/af9c-724c-2e3f-3946', peer
'gts1db02:205f-3cac-025e-c962', srcCid 00000000-000092e5,  dstCid
00000000-000009d9, numSend 0, maxSend 100, usrFlags 0x4000, flags 0x204 }
2011-12-01 22:15:04.224: [    CSSD][1122408768]clssnmeventhndlr:
Disconnecting endp 0x932d ninf 0x1c3a2c0
2011-12-01 22:15:04.224: [    CSSD][1122408768]clssnmDiscHelper: gts1db02,
node(2) connection failed, endp (0x932d), probe(0x3000000000), ninf->endp
0x932d
2011-12-01 22:15:04.224: [    CSSD][1122408768]clssnmDiscHelper: node 2 clean
up, endp (0x932d), init state 3, cur state 3
2011-12-01 22:15:04.224: [GIPCXCPT][1122408768] gipcInternalDissociate: obj
0x2e99290 [000000000000932d] { gipcEndpoint : localAddr
'gipcha://gts1db01:nm2_gts-cluster/af9c-724c-2e3f-394', remoteAddr
'gipcha://gts1db02:205f-3cac-025e-c96', numPend 0, numReady 0, numDone 0,
numDead 0, numTransfer 0, objFlags 0x0, pidPeer 0, flags 0x13860e, usrFlags
0x0 } not associated with any container, ret gipcretFail (1)
2011-12-01 22:15:04.224: [GIPCXCPT][1122408768] gipcDissociateF
[clssnmDiscHelper : clssnm.c : 3284]: EXCEPTION[ ret gipcretFail (1) ]  
failed to dissociate obj 0x2e99290 [000000000000932d] { gipcEndpoint :
localAddr 'gipcha://gts1db01:nm2_gts-cluster/af9c-724c-2e3f-394', remoteAddr
'gipcha://gts1db02:205f-3cac-025e-c96', numPend 0, numReady 0, numDone 0,
numDead 0, numTransfer 0, objFlags 0x0, pidPeer 0, flags 0x13860e, usrFlags
0x0 }, flags 0x0
2011-12-01 22:15:04.224: [GIPCXCPT][1122408768] gipcInternalDissociate: obj
0x2e99290 [000000000000932d] { gipcEndpoint : localAddr
'gipcha://gts1db01:nm2_gts-cluster/af9c-724c-2e3f-394', remoteAddr
'gipcha://gts1db02:205f-3cac-025e-c96', numPend 0, numReady 0, numDone 0,
numDead 0, numTransfer 0, objFlags 0x0, pidPeer 0, flags 0x13860e, usrFlags
0x0 } not associated with any container, ret gipcretFail (1)
2011-12-01 22:15:04.224: [GIPCXCPT][1122408768] gipcDissociateF
[clssnmDiscHelper : clssnm.c : 3430]: EXCEPTION[ ret gipcretFail (1) ]  
failed to dissociate obj 0x2e99290 [000000000000932d] { gipcEndpoint :
localAddr 'gipcha://gts1db01:nm2_gts-cluster/af9c-724c-2e3f-394', remoteAddr
'gipcha://gts1db02:205f-3cac-025e-c96', numPend 0, numReady 0, numDone 0,
numDead 0, numTransfer 0, objFlags 0x0, pidPeer 0, flags 0x13860e, usrFlags
0x0 }, flags 0x0
2011-12-01 22:15:04.224: [    CSSD][1122408768]clssnmDiscEndp: gipcDestroy
0x932d
2011-12-01 22:15:04.603: [    
CSSD][1104976192](:CSSNM00005:)clssnmvDiskKillCheck: Aborting, evicted by
node gts1db02, number 2, sync 188142334, stamp 393990918
2011-12-01 22:15:04.603: [    
CSSD][1104976192]###################################
2011-12-01 22:15:04.603: [    CSSD][1104976192]clssscExit: CSSD aborting from
thread clssnmvKillBlockThread
2011-12-01 22:15:04.603: [    
CSSD][1104976192]###################################
2011-12-01 22:15:04.603: [    CSSD][1104976192](:CSSSC00012:)clssscExit: A
fatal error occurred and the CSS daemon is terminating abnormally
gts1db01, number 1, has experienced a failure in thread number 10 and is
shutting down
2011-12-01 22:15:04.603: [    CSSD][1104976192]clssscExit: Starting CRSD
cleanup

2011-12-01 22:15:04.737: [    CSSD][1103399232]clssgmDiscEndpcl: gipcDestroy
0xa2ea2f7
2011-12-01 22:15:04.925: [    
CSSD][1112947008](:CSSNM00058:)clssnmvDiskCheck: No I/O completions for
3472942430 ms for voting file o/192.168.10.5/DBFS_DG_CD_04_gts1cel03)
2011-12-01 22:15:04.925: [    CSSD][1112947008]clssnmvDiskAvailabilityChange:
voting file o/192.168.10.5/DBFS_DG_CD_04_gts1cel03 now offline
2011-12-01 22:15:04.925: [    
CSSD][1112947008](:CSSNM00058:)clssnmvDiskCheck: No I/O completions for
3472942450 ms for voting file o/192.168.10.4/DBFS_DG_CD_02_gts1cel02)
2011-12-01 22:15:04.925: [    CSSD][1112947008]clssnmvDiskAvailabilityChange:
voting file o/192.168.10.4/DBFS_DG_CD_02_gts1cel02 now offline
2011-12-01 22:15:04.925: [    
CSSD][1112947008](:CSSNM00058:)clssnmvDiskCheck: No I/O completions for
3472942480 ms for voting file o/192.168.10.3/DBFS_DG_CD_02_gts1cel01)
2011-12-01 22:15:04.926: [    CSSD][1112947008]clssnmvDiskAvailabilityChange:
voting file o/192.168.10.3/DBFS_DG_CD_02_gts1cel01 now offline
2011-12-01 22:15:04.926: [    
CSSD][1112947008](:CSSNM00018:)clssnmvDiskCheck: Aborting, 0 of 3 configured
voting disks available, need 2
2011-12-01 22:15:04.926: [    CSSD][1112947008]clssscExit: abort already set
1
2011-12-01 22:15:04.926: [   SKGFD][1109793088]Lib :OSS:: closing handle
0x2538e70 for disk :o/192.168.10.5/DBFS_DG_CD_04_gts1cel03:

2011-12-01 22:15:04.926: [   SKGFD][1098676544]Lib :OSS:: closing handle
0x2aaaac0d7cb0 for disk :o/192.168.10.3/DBFS_DG_CD_02_gts1cel01:

Heartbeat timeout logic may to fail to detect dead cells if diskmon
has been running for over 40 days.

Rediscovery Notes:
 If diskmon has been running for over 40 days and DB processes start to hang
 after a cell death, you may have hit this bug.

 All nodes may hang due to one of the heartbeat threads in diskmon
getting stuck trying to notify the instance(s) that it reconnected
to the cell. However if this occurs there is insufficient diagnostic
data collected to help confirm why the hang occurred.
This fix is a diagnostic enhancement for this scenario.

If diskmon/DSKM processes are hung/stuck this fix may help collect
additional useful diagnostics.

PROBLEM:
--------
Diskmon logs fill up quickly causing their disk / volume /u00  to become full

DIAGNOSTIC ANALYSIS:
--------------------
1)  The following are consistently and repeatedly logged:

2010-12-17 03:22:25.848: [ DISKMON][17796:1089268032] dskm_rac_ini13: calling
clssgsqgrp
2010-12-17 03:22:25.849: [ DISKMON][17796:1089268032] dskm_rac_ini80: called
clssgsqgrp:
2010-12-17 03:22:25.849: [ DISKMON][17796:1089268032] dskm_dump_group_priv:
vers: 0 flags: 0x0 confInc: 0 My confInc: 0
2010-12-17 03:22:25.849: [ DISKMON][17796:1089268032] dskm_dump_group_priv:
CSS Msg Hdr: vers: 0 type: UNKNOWN (0) chunks: NO MORE CHUNKS (0) transport:
UNKNOWN (0) mSize: 0
2010-12-17 03:22:25.849: [ DISKMON][17796:1089268032] dskm_dump_group_priv:
Group Private Data is not of type DSKM_MSG_SS_REQ. Not proceeding with msg
dump
2010-12-17 03:22:25.849: [ DISKMON][17796:1089268032] dskm_rac_ini15: Found
my member number 1 to be busy. Waiting (attempts: 598) for OCSSD to clean up
previous incarnation

2) Core files generated, and many  stack dumps of diskmon futher enlarges the
diskmon.log

   The following is frequently seen in the diskmon.log

2010-12-17 03:22:28.855: [ DISKMON][17796:1089268032] dskm_rac_ini16: OCSSD
has notified that another diskmon is currently running in this node.
This might be a duplicate startup. If not consult OCSSD log for additional
information.
2010-12-17 03:22:28.855: [ DISKMON][17796] INCIDENT : EXCEPTION (SIGNAL: 6)
in [gsignal()]
2010-12-17 03:22:28.855: [ DISKMON][17796] Thread 1089268032 got exception 6
2010-12-17 03:22:28.855: [ DISKMON][17796] Stack dump for thread 1089268032
[ DISKMON][17796]
....

诊断RAC全局缓存块丢失gc blocks lost

在Oracle RAC环境中,无论我们从AWR自动负载性能报告、Statspack或者Grid Control中都可以找到Oracle数据库软件所收集的全局缓存工作负载统计信息(global cache work load statistics);其中就包含了全局缓存块丢失(Global cache lost blocks)的统计信息(这些丢失的全局缓存块可能是gc cr block lost或者gc current block lost),若集群中的任意节点出现大量的全局缓存块丢失(下文简写为gc blocks lost),则可能意味着内联(private)网络存在问题或者packet网络包处理低效。通过监控和评估这些全局缓存的相关统计信息,可以有效保证内联全局缓存(interconnect Global Cache)和全局队列服务(Global Enqueue Service)(GCS/GES)以及整个集群的正常工作。全局缓存块丢失一般预示着网络包处理存在问题并需要进一步勘察。另外全局缓存块丢失(gc blocks lost)的问题常会伴随着gc cr multiblock waits等待发生(传输多个连续的数据块全局缓存)。

就目前来看最有嫌疑造成或加速gc blocks lost的”元凶”往往是因为错误地或者不当的配置了内联网络(interconnects)。接下来我们会进一步介绍如何找出造成gc blocks lost的原因。

虽然gc blocks lost对集群造成的影响更多的反应在性能方面,但我们也无法保证其没有造成节点/实例被驱逐(eviction)的可能性。Oracle Clusterware集群及Oracle RAC实例的节点成员管理依赖于内联网络的心跳(heartbeats)。假设在网络心跳持续丢失的情况下,节点/实例的驱逐可以发生。以下我们列出gc blocks lost可能造成的主次要症状:

主要症状:

  • ‘gc cr block lost’或’gc current block lost’成为实例中Top 5的主要等待事件

次要症状:

  • SQL trace报告显示多次出现gc cr requests,gc current request等待事件
  • 出现长时间的gc cr multiblock requests等待
  • 糟糕的应用性能与吞吐量
  • ifconfig或其他网络工具显示存在大量的网络包packet发送接收(send/receive)错误
  • netstat报告显示存在errors/retransmits/reassembly等失败
  • 单个或多个节点失败
  • 由网络处理引发的异常CPU使用率

下面我们尝试列出可能引起gc blocks lost的多种可能性:
1.设置过小的UDP receive (rx) buffer sizes/UDP buffer socket overflows
描述:在真实环境中Oracle RAC全局缓存块处理总是集送式(bursty)地、连续地;当OS在等待可用CPU时需要将接受到的packet存放的相关协议的buffer中。当buffer空间不足时将可能导致静默的packet丢失进而造成全局缓存块丢失(global cache block loss)。在绝大多数UNIX平台上`netstat -s`或`netstat -su`命令帮助我们了解udp溢出(UDPInOverflows),packet接收错误,帧丢弃(frame dropped),或由buffer full造成的packet丢弃。
措施:Packet丢失大多数情况下归因于在接受服务器上不当的UDP buffer缓存大小,进而导致buffer溢出和global cache block loss。当操作系统所设置的UDP接收缓存大小(UDP receive (rx) buffer size)小于128k时Oracle打开一个socket套接字的udp rx buffer size为128K。若OS的设置大于128K时Oracle会遵从该设置值保持不变。Oracle所使用的UDP receive buffer大小会因不同的数据库标准块(>8k)的大小而增大,但不会超过OS系统所决定的限度。当DB_FILE_MULTIBLOCK_READ_COUNT初始化参数设置大于4的环境中出现因不当的udp缓存设置所造成的过度的’global cache cr requests’等待事件超时一般很容易观察到udp buffer溢出、丢包、缓存块丢失等现象。为了缓解这种问题,增大udp buffer的大小是一种行之有效的方法,此外我们还可以降低DB_FILE_MULTIBLOCK_READ_COUNT参数值。
在绝大多数UNIX/Linux平台上以下命令可以帮助我们了解udp socket buffer溢出或丢包的情况:

[maclean@rh2 ~]$ netstat -s
Ip:
    103300 total packets received
    0 forwarded
    0 incoming packets discarded
    103296 incoming packets delivered
    105287 requests sent out
Icmp:
    101 ICMP messages received
    0 input ICMP message failed.
    ICMP input histogram:
        destination unreachable: 75
        echo replies: 26
    175 ICMP messages sent
    0 ICMP messages failed
    ICMP output histogram:
        destination unreachable: 119
        echo request: 56
IcmpMsg:
        InType0: 26
        InType3: 75
        OutType3: 119
        OutType8: 56
Tcp:
    30355 active connections openings
    73 passive connection openings
    29589 failed connection attempts
    35 connection resets received
    3 connections established
    93218 segments received
    102780 segments send out
    68 segments retransmited
    0 bad segments received.
    29644 resets sent
Udp:
    2264 packets received
    46 packets to unknown port received.
    0 packet receive errors
    2270 packets sent
TcpExt:
    17 invalid SYN cookies received
    59 ICMP packets dropped because they were out-of-window
    181 TCP sockets finished time wait in fast timer
    166 delayed acks sent
    1 delayed acks further delayed because of locked socket
    Quick ack mode was activated 3 times
    6247 packets directly queued to recvmsg prequeue.
    6427 packets directly received from backlog
    554572 packets directly received from prequeue
    4171 packets header predicted
    1039 packets header predicted and directly queued to user
    9183 acknowledgments not containing data received
    4216 predicted acknowledgments
    2 times recovered from packet loss due to SACK data
    TCPDSACKUndo: 14
    18 congestion windows recovered after partial ack
    0 TCP data loss events
    2 fast retransmits
    46 other TCP timeouts
    6 DSACKs sent for old packets
    19 DSACKs received
    26 connections reset due to unexpected data
    25 connections reset due to early user close
    9 connections aborted due to timeout
IpExt:
    InMcastPkts: 4168
    InBcastPkts: 3505

[maclean@rh2 ~]$ netstat -su
IcmpMsg:
    InType0: 26
    InType3: 75
    OutType3: 119
    OutType8: 56
Udp:
    2264 packets received
    46 packets to unknown port received.
    0 packet receive errors
    2270 packets sent
IpExt:
    InMcastPkts: 4168
    InBcastPkts: 3505

此外udp丢包常会造成延迟增加,降低带宽,增大cpu使用率(kernel和user部分的),及因包重传(packet retransmission)导致消耗额外的内存。

2.糟糕的内联网络性能及高cpu使用率,`netstat -s`显示出现packet reassembly包重组失败
描述:庞大的UDP数据报(datagrams)可能需要被拆分并以多个帧的形式发送(取决于Medium Transmission Unit MTU的大小),在接收端服务器需要将这些拆分包重组(reassemble);高cpu使用率(持续地或高频率的波峰),不当的reassembly buffers及UDP buffer空间可能造成包重组失败。在接收端服务器`netstat -s`报告可以显示IP统计信息中存在大量的重组失败’reassembles failed’和超时后帧丢弃’fragments dropped after timeout’。碎片包(Fragmented packets)有一个重组的保留时间。未被成功重组的包可能会被丢弃并需要再次申请。在没有重组空间的情况下包会被静默地丢弃。

`netstat –a` 显示IP统计:
     3104582 fragments dropped after timeout
     34550600 reassemblies required
     8961342 packets reassembled ok
     3104582 packet reassembles failed.

措施:增加碎片重组buffer的大小,为重组分配更多的空间。增加重组碎片包的保留时间。增加udp receiver buffer以降低网络延迟,缓解包重组失败及cpu使用率对网络栈处理造成的负面影响。

在Linux上我们可以修改如下阀值以增大重组缓存空间:
/proc/sys/net/ipv4/ipfrag_low_thresh (默认为196608)
/proc/sys/net/ipv4/ipfrag_high_thresh (默认为262144)

为修改碎片包重组时间,可以修改:
/proc/sys/net/ipv4/ipfrag_time (默认为30)

以下上列出可能造成gc blocks lost性能问题的最主要的2种可能性,更多信息可以参考原文:gc lost blocks diagnostics。同时因各UNIX平台的差异可能你无法使用以上指出的命令来观测udp溢出、丢包等现象,那么可以采用OSwatcher工具来收集相关的网络信息。

How to troubleshooting RAC Vip Problem

1.- Please provide the output of the following commands from each node:

 srvctl config nodeapps -n <nodename> -a -g -s -l
 ifconfig -a
 cat /etc/hosts

2.- Please set debug mode for VIP resources and reproduce the problem. Please take note of the time of the test:

 a.- As root user, issue the command :
 crsctl debug log res "<ora.dbtest2.vip>:5"

 (note: replace ora.dbtest2.vip for each of your vip resources)

 b.- Take note of node, date, time

 c.- Reproduce the problem

 d.- You may turn off debugging with command :
 crsctl debug log res "<ora.dbtest2.vip>:0"

3.- Set OS watcher as the following note explain:

 Note 301137.1: OS Watcher User Guide - upload output of OS Watcher

4.- Collect from each node:

 a.- Os log files
 /var/log/messages

 b.- Os watcher stats for the time of the test

 c.- CRS log files:
 From the $ORA_CRS_HOME, run the following commands as root

 * $script /tmp/diag.log
 * $env
 * $id
 * $cd $ORA_CRS_HOME/bin
 o Execute diagcollection.pl by passing the crs_home as the following
 o export ORA_CRS_HOME=/u01/crs
 o $ORA_CRS_HOME/bin/diagcollection.pl -crshome=$ORA_CRS_HOME --collect

This will create the crsData_<hostname>.tar.gz, ocrData_<hostname>.tar.gz,
oraData_<hostname>.tar.gz and basData_<hostname>.tar.gz. Additionally in 11gR2,
there will be os_<hostname>.tar.gz and ipd_

 d.- If Vendor clusterware is not used then upload the oprocd logs.
They are in /var/opt/oracle/`hostname`/ on most platforms.

lower case or UPPER CASE hostname in RAC?

RAC中各节点的hostname是设成大写(UPPER CASE)形式还是小写(lower case)形式好呢?
一开始被这个问题问得有些莫名?之后觉得一切都有必要让事实说话,回顾一下我们使用RAC的惨痛经历便见分晓:

Bug 5168043If node names supplied in VIPCA silent mode are uppercase, VIPCA causes the following error:
Invalid node name "" entered in an input argument.
Workaround   Use VIPCA GUI mode.
Oracle Versions confirmed as being affected - 10203 ( fixed in 10.2.0.4)
PROBLEM:
--------
Env 3 node 10.2.0.1 AIX 5L 

During installation of CRS, root.sh gives "Invalid node name"
error if hostname is written in Capital letters in /etc/hosts.

 # root.sh
  WARNING: directory '/oracle' is not owned by root
  Checking to see if Oracle CRS stack is already configured

  clscfg: version 3 is 10G Release 2.
  Successfully accumulated necessary OCR keys.
  Using ports: CSS=49895 CRS=49896 EVMC=49898 and EVMR=49897.
  node : 

  clscfg: Arguments check out successfully.

  Expecting the CRS daemons to be up within 600 seconds.
  CSS is active on these nodes.
  CSS is active on all nodes.
  Waiting for the Oracle CRSD and EVMD to start
  Oracle CRS stack installed and running under init(1M)
  Running vipca(silent) for configuring nodeapps

DIAGNOSTIC ANALYSIS:
--------------------

We can reproduce the error if we issue vipca like below.

$ORA_CRS_HOME/bin/vipca -silent -nodelist {CAPITAL1},{CAPITAL2}  \
  -nodevips {CAPITAL1}/{CAPITALV1}/255.255.252.0/eth0, \
            {CAPITAL2}/{CAPITALV2}/255.255.252.0/eth0
 Invalid node name "{CAPITAL1}" entered in an input argument.
 Invalid node name "{CAPITAL1}" entered in an input argument.

WORKAROUND:
-----------
- do not write capital letters in /etc/hosts
- use vipca(GUI) and configure VIP resource afterwards.

RELATED BUGS:
-------------
BUG#4632899 solaris port specific bug regarding capital letters.
            May not be related with vipca.

REPRODUCIBILITY:
----------------
100% in 10.2.0.1 AIX
100% in 10.2.0.1 Linux

Bug 4632899 CSS does not start on Solaris if the hostname is in upper case.
 The following errors might be noticed when using CRS scripts:
  Failure at scls_scr_create with code 1
  Category: 1234
  Operation: scls_scr_create
  Location: mkdir
  Other: Unable to make user dir
  Dep: 2

Workaround
  Change the hostname to from uppercase to lower case.
Versions confirmed as being affected - 10203 ( Issue fixed in 11.1.0.6)
PROBLEM STATEMENT:
------------------
The localconfig script fails to startup the CSS in single instance
configuration if the hostname of the server contains capital letters.

Errors encountered :
===
Failure at scls_scr_create with code 1
Internal Error Information:
  Category: 1234
  Operation: scls_scr_create
  Location: mkdir
  Other: Unable to make user dir
  Dep: 2
===

Bug 6674075: RAC: PRKR-1078 FROM SRVCTL MODIFY DATABASE WITH UPPER CASE DB NAME

PROBLEM:
--------
Two Node RAC running 10.2.0.3 CRS,ASM and RDBMS.
Customer has installed another 10.2.0.3 home for RDBMS and trying to change
the oracle home for the existing database.

We ran the "srvctl modify" command from both existing and the new oracle
homes (both are 10.2.0.3) and got the same PRKR-1078 error.

The entry for the CONFIG_VERSION looks okay in the OCR.

DIAGNOSTIC ANALYSIS:
--------------------
The entries for the database JUNK and two instances in the OCR looks okay and
the DATABASE.DATABASES.JUNK.CONFIG_VERSION 10.2:

from the OCRDUMP:
=========================
[DATABASE.DATABASES.junk.CONFIG_VERSION]
ORATEXT : 10.2.0.0.0
========================

from the srvm_trace of srvctl modify :
==========================
[main] [12:55:59:677] [has.ClusterLockNative.Native]  prsr_trace: Native:
acquire: get mutext SRVM.DATABASE.DATABASES.junk

[main] [12:55:59:678] [has.ClusterLockNative.Native]  prsr_trace: Native:
acquire: ret=0

[main] [12:55:59:679] [ClusterLock.acquire:127]  Acquire returned nr=true
status=true
[main] [12:55:59:679] [OCR.keyExists:664]
OCR.keyExists(DATABASE.DATABASES.JUNK.CONFIG_VERSION)
[main] [12:55:59:679] [nativesystem.OCRNative.Native]  keyExists: calling
procr_open_key(DATABASE.DATABASES.JUNK.CONFIG_VERSION)

[main] [12:55:59:694] [nativesystem.OCRNative.Native]  keyExists:
procr_open_key retval = 4 

[main] [12:55:59:694] [OCRTree.setDBOracleHome:1572]  DATABASE.DATABASES.junk
incompatible version
[main] [12:55:59:729] [OCRTree.setDBOracleHome:1587]  Releasing exclusive
lock SRVM.DATABASE.DATABASES.junk
[main] [12:55:59:729] [has.ClusterLockNative.Native]  prsr_trace: Native:
unlock

PRKR-1078 : Database JUNK cannot be administered using current version of
srvctl. Instead run srvctl from /oracle/product/10.2.0/db0
=====================

Bug 7560908: CANN'T START SERVICES ,IF ITS INSTANCES REGISTERD WITH NODE NOME IN UPPER CASE
PROBLEM:
--------
- If we try to start service we got the following errors 

oracle@RZ-DB-44:~> srvctl start service -d db1 -s srv1
PRKP-1030 : Failed to start the service srv1.
CRS-1007: Failed after successful dependency consideration
CRS-0223: Resource 'ora.db.srv1.cs' has placement error.

As per Note 372145.1 - Service start fails with CRS-1030 Crs-1007 Crs-0223 

we delete the services and the database resource and its instances ,then we
add the database again but at this time we add the database instance node
name with lower case ,as it was in upper case ,

- after that we are able to start the database instance
.......................

答案很简单,lower case好于UPPER CASE!不仅仅是hostname,使用大写的rac资源(resource)在某些版本中也可能引发bug!当你在设计RAC系统是有必要把大小写这一问题考虑进去,事实上我相信大多数人和我一样喜欢使用小写字母加数字的形式,譬如我的rh1,rh2,rh3……….

Under the Hoods of Cache Fusion, GES, GRD and GCS

•If I have a 100MB database, I can have a 100 MB buffer cache and I never have to go to the disk, right?
•How does Cache Fusion know where to get the block from?
•I’m confused about Global Cache Service (GCS), Global Resource Directory (GRD) and Global Enqueue Service (GES)
•We will understand how all these actually work

[Read more…]

沪ICP备14014813号-2

沪公网安备 31010802001379号