ORACLE DB数据库常见问题解决及诊断技巧集锦 – ORACLE DBA故障修复必备手册

ORACLE DBA故障修复必备手册 本文地址:https://www.askmac.cn/archives/oracle-troubleshooting.html


关于Oracle数据库问题诊断信息获取

在对Oracle数据库相关情况及问题进行诊断及信息捕获时, 请:


  1. 请确认MAX_DUMP_FILE_SIZE 参数设置, 这将避免用以诊断的追踪文件(trace file)因为空间不足而被截断 !!!


  1. 上传alert.log文件。11g中,文本形式的alert.log是放在ADR home相应”trace”目录下。而XML形式的alert.log则是放在ADR home下的”alert”目录下。如需验证ADR home确切位置,可以执行”select * from v$diag_info” 并从其输出中找到。
    请看下页诊断追踪文件目录地址信息。


  1. 获取RDA收集信息 (版本4.2x以上更佳). 请查看MOS文档 330363.1314422.1以了解更多信息。


  1. 请对所遇问题提供详尽描述以便于分析并更快找到问题原因。

对于 较为严重的问题, 请提供:

  • 相关业务及技术评估
  • 两名24×7联系人,并提供相关人员邮件及电话联系方式(askmac.cn)。
  • 一名相关管理联系人,需提供其邮件及电话联系方式。


问题细节描述:

  • 受影响日期时间
  • 相关报错号及其文本信息。
  • 相关问题影响 – 数据库实例奔溃, 进程失败等.?
  • 错误出现频率?
  • 错误是否可重演。
  • 错误是否总在特定日期时间发生?
  • 错误发生是否与数据库相关活动有关?如备份或高负载处理时.
  • 错误是否总是来自于某个应用或某位用户?
  • 第一次产生此错误是在何时?当时是否正在做何改动?
  • 当时是否有其他错误发生(例如ORA-7445 或 ORA-600错误)?
  • 最近系统是否有任何改变?


  1. 如果你还不确定set events操作会带何种影响,请不要设置。


  1. 随着Oracle 11g诊断追踪文件默认地址的改变。下表展示了以前(10g以及之前版本)和最新11g(ADR)的跟踪文件目录位置。


诊断追踪文件目录地址


诊断数据文件 之前版本文件路径 ADR中文件路径
Foreground process traces USER_DUMP_DEST $ADR_HOME/trace
background process traces BACKGROUND_DUMP_DEST $ADR_HOME/trace
Alert log data BACKGROUND_DUMP_DEST $ADR_HOME/alert&trace
Core dumps CORE_DUMP_DEST $ADR_HOME/cdump
Incident Dumps USER|BACKGROUND_DUMP_DEST $ADR_HOME/incident/incdir_n


Oracle数据库11g并没有对前台和后台追踪文件做区分。两种类型文件都放在$ADR_HOME/trace目录下。


  1. 请注意BDE及其开发需要11g漏洞 IPS打包服务. 在11g中IPS(Incident Packaging Service事件打包服务) 提供了一种对诊断信息打包的简便方法。


所有数据库事件(严重错误)的跟踪文件都被存储在Oracle自动诊断库(Automatic Diagnostic Repository: ADR)中。其提供的ADRCI工具被用于打包所有文件并上传给Oracle支持。从OEM中也能找到IPS相关链接服务。请参考以下文档了解更多相关信息:


Note:422893.1 – 11g Understanding Automatic Diagnostic Repository.

Note:443529.1 – 11g Quick Steps to Package and Send Critical Error

Note:1091653.1 – 11g Quick Steps – How to create an IPS package using Support Workbench


并非11g中所有问题都需生成诊断包. 但对于以下相关11g错误及SR应该考虑获取相关诊断包(askmac.cn)。
Manageability:

ORA-600 & ORA-7445

ORA-4030 & ORA-4031


DB Admin:

ORA-600, ORA-700 & ORA-7445


HA:

ORA-600 & ORA-7445

ORA-8103 – Object no longer exists

ORA-1410 – Invalid ROWID

ORA-1578 – Oracle data block corruption

ORA-376 – File cannot be read at this time

ORA-353 – There is a log corruption near a block, change, and time


以下是一个例子 à


客户看见alert.log中出现以下错误:

Errors in file d:\oracle\diag\rdbms\twn11g\twn11g1\trace\twn11g1_ora_201116.trc:

ORA-00600: internal error code, arguments: [17099], [], [], [], [], [], [], [], [], [], [], []

Errors in file d:\oracle\diag\rdbms\twn11g\twn11g1\trace\twn11g1_ora_201116.trc (incident=19569):

ORA-00600: internal error code, arguments: [17099], [], [], [], [], [], [], [], [], [], [], []

Incident details in: d:\oracle\diag\rdbms\twn11g\twn11g1\incident\incdir_19569\twn11g1_ora_201116_i19569.trc


…因此我们看见事件号为 19569.
在正确设置11g环境变量后,通过ADRCI(命令)进入IPS打包处理服务:


% adrci


因为我们已经知道事件号为19569, 那执行下一步:


adrci> ips pack incident 19569


…这样就在当前目录下建立了zip压缩包.如果你希望压缩包保存在其它目录中, 那么可以在命令后加上路径信息:


adrci> ips pack incident 19569 in D:/tmp/whatever


此命令会提示信息产生了包含事件号19569相关信息的IPS打包文件。这个zip压缩文件之后需要被上传到SR上。


诊断数据库挂起(HANG)事件

请具体表述问题。并询问用户是否能“解冻”数据库?如何做到的?

  • 使用以下命令生成HANGANALYZE追踪文件 ==>


$ sqlplus “/ as sysdba”

SQL> oradebug hanganalyze 3

… Wait 90 seconds (to 2 minutes) to give time to identify process state changes.

SQL> oradebug hanganalyze 3 (level 4 dumps leaf nodes as well and may be useful, but there is more impact on the system)


使用以下语法在执行RAC级HANGANALYZE:


ORADEBUG setmypid

ORADEBUG setinst all

ORADEBUG -g all hanganalyze 3


2) 在运行Hanganalyze之后,登入一个新SQL会话来生成系统状态转储(dump)文件==>


$ sqlplus “/ as sysdba”

SQL> oradebug setmypid

SQL> oradebug unlimit

SQL> oradebug dump systemstate 266

… wait 90 seconds

SQL> oradebug dump systemstate 266

… wait 90 seconds

SQL> oradebug dump systemstate 266


Level 266和267包含了一些堆信息。Level 266是对单实例的信息转储,而Level 267则是对RAC系统systemstate转储。请看Note:300870.1对事件10998了解更多信息。


**Note: 我们同样可以通过使用Hang File Generator (HANGFG) 工具来完成以上1)和2)中使用hanganalyze和systemstate收集信息的操作。HANGFG工具提供了一系列UNIX shell脚本命令来自动化收集和生成hanganalyze和sysemstate追踪文件。在使用HANGFG生成并收集追踪文件时需要考虑到需要在已处于性能退化的系统中进行诊断的影响。由于影响级别作为此工具参数被传给HANGFG, 所以用户需要做出决定, 在启用此工具时,何种级别的影响是可接受的。当用户选择轻度影响或中等影响(选项1 或2)作为参数时, HANGFG工具同样有能力做出调整以适应用户做出的决定。HANGFG是RAC自识别的,并且能在RAC和非RAC环境中运行。请看Note:362094.1 (the HANGFG User Guide)以了解其相关信息。


3) 当hang事件发生后,获取到的Statspack或AWR/ASH(10g/11g)报告是否具有时效性取决于做Statspack快照频繁程度。举个例子,如果你每隔1小时做一次快照,在下一次快照前发生了5分钟的数据库挂起事件。那么快照由于显得时间跨度太长而很难用于分析当时5分钟发生的情况。


AWR/ASH报告上的其他相关信息可以在“数据库性能”章节中找到。


有时在尝试连接数据库时,你的调试会话也会挂起在那里。这时留给你3种可选方法==>


1) 找一个之前已连上的可用会话。

2) 如果你正在使用10g/11g,那么你可以使用-prelim选项来登录数据库:

SQL*Plus. Eg:

sqlplus -prelim / as sysdba

oradebug setmypid

oradebug unlimit;

oradebug dump systemstate 266;

3) 使用操作系统调试器来查看运行进程

  • 获取服务器oracle先关影子进程ID (请注意并非oracle后台进程,调试后台进程可能导致数据库奔溃)…”ps –ef | grep ora”
  • 使用当前系统级调试器(如dbx, adb, gdb等)来获取systemstate:

$ gdb $ORACLE_HOME/bin/oracle <process ID>

(gdb) print ksudss(267)


括号中的数字(267)是你希望转储systemstate的级别.


**对于RAC挂起事件请看“RAC性能”部分中对于racdiag脚本的使用**


通过以下systemstate命令可在同一时点转储所有RAC节点状态:

SQL> oradebug -g all dump systemstate 267


总结,你可以上传以下文件:


– Hanganalyze输出

– Systemstate 转储(dumps)

– hangfiles.out (如果使用 HANGFG工具命令)

– alert.log

– 在一个很短时间内的Statspack/AWR/ASH 报告

– 可用的系统调试监控输出


更多信息,请查阅以下文档:


Process Spins (进程消耗CPU资源达100%)

当进程出现spinning现象,可使用以下命令:
(** Busy spin术语解释: 由于程序导致进程不断地检查是否条件为true)


sqlplus / as sysdba

SQL> oradebug setospid <OSPID of spinning process>

SQL> oradebug unlimit

SQL> oradebug dump errorstack 3

— wait for 1 minute

SQL> oradebug dump errorstack 3


从 pstack命令输出中获取进程call信息:


$ pstack <process id of spinning process>


可以使用Strace命令来记录系统进程的系统调动及相关进程输入信号等信息:


$ strace –p <process id of spinning process>


对于RAC系统,可以使用systemstate命令转储相关状态,此命令的使用在“诊断数据库挂起事件”部分有提到。


 ORA-4031错误分析

当试图在共享池中分配大块连续内存而失败时,Oracle会首先从池中清理当前不用的对象从而使得空闲内存碎片(chunk:内存块)得以合并。如果这样仍然没有足够大的单个chunk来满足分配需要,则会产生ORA-04031报错。有许多ORA-04031错误直接原因都是由于共享池的大小或调整不当造成的。


Note:ORA-4031错误的进程并不总是内存消耗的元凶。错误的发生仅是因为此进程无法得到所需内存而造成的(askmac.cn)。


如果已经按所有步骤正确设置了共享池大小(SHARD_POOL_SIZE) , 但此问题仍然产生时,除了从应用(例如:使用绑定变量查询替代静态SQL等)入手进行分析解决问题外,也可从其他trace文件中获得共享池的一些快照信息==>


修改init.ora参数文件,增加以下事件以从追踪文件中获取相关问题信息:

event = “4031 trace name errorstack level 3”

event = “4031 trace name HEAPDUMP level 3”


注意:除非重启实例,否则这个参数文件设置不会起效。从Oracle 9.2.0.5版本起,除了在请求heapdump时使用level 1,2,3 或32 你同样可以使用相同等级并加值536870912.这样将会在此等级上再进一步显示5个最大的subheaps同时每个subheap下显示相关5个最大的heap areas.

如果问题可以重现,则可在执行有问题的SQL语句前,在会话级别对事件进行设置:

SQL> alter session set events ‘4031 trace name errorstack level 3’;

SQL> alter session set events ‘4031 trace name HEAPDUMP level 536870914’;


Level 536870912 转储5个最大subheaps并且对应每个subheap将显示其5个最大heap areas。由于ORA-04031错误可能在不同池中发生(共享池,大池,java池,流池等),其level值的设置可参照如下:


Component Level
PGA 1
SGA 2
Large Pool 32
Streams Pool   64
Java Pool      128


Note:  如果4031错误出现频繁,在实例级设置此事件(heapdump 536870914)将会产生许多大的trace文件.  这不仅会影响数据库性能而且可能使数据库挂起 (某些情况下可能会使得数据库崩溃).  因此有必要及时使用以下语句关闭此事件追踪:


alter system set events ‘4031 trace name HEAPDUMP off’;


我们也通过Library cache转储来帮助确认产生ora-4031问题的游标:


sqlplus / as sysdba

SQL> oradebug setmypid

SQL> oradebug unlimit

SQL> oradebug dump library_cache 10


请注意:在Oracle 9.2.0.5+, 10g和11g版本中,4031 trace文件默认会在ORA-4031发生时产生并存放于user_dump_dest目录。如果你的数据库版本是其中的一个,那么你就不需要进行相关设置来生成4031 trace 文件。


ORA-4031 诊断 à

  • 检查Alert日志并查看错误是否记录。注意不是所有ORA-4031错误都会记录在alert日志中。
  • 如果错误被记录,请检查SGA的哪部分收到此错误。是共享池,大池,java池或streams池?
  • 查询v$sgastat以检查是否有组件表现出非正常增长.
  • 查询v$librarycache并检查:

– 有无无效对象 (多为DDL语句)

– 有无重载 (Library cache可能不够大)

– 内存命中率 (低命中率可能是非共享游标造成的)

  • 检查是否存在高Version Counts的游标。 可通过v$sql_shared_cursor查询. 如果存在某父游标下有许多子游标的情况,检查不可共享的原因. 大量子游标会加快共享池的碎片化. 请确认应用正在使用绑定变量方式查询.


更多信息,请看:


ORA-4030 报错

这个错误原因是Oracle服务器进程不能从操作系统上分配出更多内存。含有PGA(程序全局区)的进程其内存的分配取决于服务器的设置。对于dedicated服务器进程,其包含了stack堆栈和UGA(用户全局区), 保存有用户会话信息、游标信息和数据分类排序区。在多线程模式配置(shared服务器)中,UGA是在SGA中进行分配,所以不对ORA-4030报错负责。


因此ORA-4030是对需要更多内存(用于stack UGA或PGA)来完成工作的进程而言的。


请记住产生ORA-4030错误的进程并非总是内存损耗的元凶,错误的发生仅仅是因为此进程无法取得所需的内存造成的。


当你碰到这个错误时,意味着你已不能从系统中分配内存。这可能是由于你的进程本身导致的(如果你的进程正需求很多内存),也可能是其他原因导致操作系统内存被耗尽(如过大的SGA或者太多进程占用了系统的物理内存和虚拟内存)。如何处理此问题?


  1. 确定是否还有足够可用内存?使用系统专用工具来检查内存使用情况 (如vmstat, top等).
  2. 是否存在操作系统设定限制? 检查ulimit命令检查当前资源限制.
  3. 是否存在Oracle限制设置? 检查pga_aggregate_target和相关会话的pga内存值.
  4. 找出当前哪个进程正在要求大量内存, 可通过v$statname 和v$sesstat以了解当前最忙的进程.


当进程正在稳定增长其所需内存时,我们可以观察它们的运行:

– 通过v$sql_area可以看到哪些命令正被执行:

SQL> select sql_text  from v$sqlarea a, v$session s where a.address = s.sql_address and s.sid = <SID>;

– 你也可以通过heapdump转储来查看它们:

SQL> oradebug setorapid 10 (10是Oracle进程Id, 使用setospid 以设置当前调试进程)

SQL> oradebug unlimit

SQL> oradebug dump heapdump 5

– 如果报错问题间歇性发生或者由于进程失败太快以至于难以捕获(但又很可能是内存大量消耗的根本原因),则我们可以设置事件来获取heapdump转储信息:

SQL> alter sssion set events ‘4030 trace name heapdump level 5’;

…或者直接在 init.ora文件中设置event.


更多其他相关信息请看:

  • Note:1 – Diagnosing and Resolving ORA-4030 errors
  • Note:1 – FAQ: ORA-4030


ORA-600错误

理解ORA-600错误含义对于评估客户数据库中可能存在的问题非常重要。ORA-600报错的第一个参数指出了问题所在的相关位置 (如 ORA-600 [XXXX]).对于此错误:


  • 至少需要提供相关的 trace文件和log文件.
  • 操作系统错误/消息日志 (如果可用的话, 像坏块问题等)


对此问题也有一些新工具可用于加快原因查找。工具使用及其他相关信息支持文档请看:

  • Note:390293.1 – Introduction to 600/7445 Internal Error Analysis
  • Note:153788.1 – Troubleshoot an ORA-600 Error Using the ORA-600 Argument Lookup Tool


此外,如果可能,请设法提供测试用例,数据库历史改变细节和出错频繁程度等情况。并查找Oracle在当时自动转储的任何system状态信息文件。


ORA-1801错误

ORA-1801报错是指日期格式字符串太长以至无法做转换处理. 这仅发生在当几个长字符串按字面值被转换为一个日期部分时。如果当前没有相关错误的trace文件, 我们可以设置以下事件来获取errorstack和 heapdump ==>


对应实例级需在init.ora中设置:

event=”1801 trace name errorstack level 3; name heapdump level 13325″

或在系统级设置:

alter system set events ‘1801 trace name errorstack level 3; name heapdump level 13325’;

或在会话级设置:

alter session set events ‘1801 trace name errorstack level 3; name heapdump level 13325’;


ORA-7445 错误

当Oracle服务器进程做了某些错误的处理(以至于触发了某种形式的信号违背signal violation)时,会抛出ORA-7445这样一个通用错误, (就像UNIX下的SIGSEGV). 对我们来说,当碰到ORA-7445报错的时候,最重要的事情就是从trace文件中找到call stack trace信息,因为它告诉我们相关违背行为是在哪里发生的。


  • 提供相关trace 文件
  • 如果可以的话,请一并提供相关操作系统错误消息日志
  • 如果存在相关core文件, 请从其中抓取出stack trace信息。


更多相关其它信息请看:


另外,如果可能的话,请提供如测试用例,数据库历史改变信息以及错误放生频繁程度信息等相关信息。请查找当时Oracle自动生成的systemstate转储文件。


其它ORA-NNNN报错

这里我们讨论下如何诊断一些未预料的Oracle错误(ORA-NNNN)。
在诊断问题前,做一些例行询问(按经验总结,尝试形成一种模式). 例如:

  1. 是否总是同一个用户/应用造成的?
  2. 是否是在数据导入时发生?
  3. 问题是在做了哪些操作或修改了哪些之后产生的?


之后,我们需要收集更多信息以了解错误是如何产生的,甚至到哪些语句触发了此问题(如果问题是由一个递归SQL语句造成的话)。为了达到此目的我们需要在会话级或实例级建立Errorstack事件. 如果你能很容易地重现问题,那么用会话级,否则则需要在实例级建立事件。


因此,假设我们收到一个ORA-904  “invalid column”报错,我们可以使用:


alter session set events ‘904 trace name errorstack level 3’;

alter system set events ‘904 trace name errorstack level 3’;

event = “904 trace name errorstack level 3”  (in the init.ora)


一旦我们获取了trace文件,我们就能从以下对象中找出实际产生错误的SQL语句:

  1. “当前执行的SQL”
  2. “当前执行的游标”

然后你就能直接通过这些找到的SQL来重现问题。而这已经足以用来确认出原因。


更多相关其他信息请看:


Database Performance数据库性能问题

为诊断数据库性能问题所要收集的信息:

  • 提供对以下问题的回答 à
  • 性能退化影响到了哪些方面?
  • 是否DBA能登陆并检查v$视图?
  • 你是否能将性能回复到正常? 如何做到的?
  • 提供STATSPACK/AWR/ADDM 报告以能对性能问题做一些短期快照. 请不要跑得报告时间段过长超出问题发生时间. 对实例来说,如果问题持续了半小时,那么抓取那个时间段中20分钟的状态为佳。如果你能精确把握整个时间过程,那么在性能问题发生前获取第一个快照,然后在产生性能问题的过程段中获取另一个快照。请不要在两个快照间重启实例,因为这将使得获取的结果变得无意义。
  • 你也可以在系统运行得“不错”的时候做一个快照(相同时间长度),这个快照可以作为和有性能问题的快照对比时基准。
  • 如果我们需要一个更短时间片上信息(不如当前当前的分析需要5到10分钟的详细活动信息), 那么可以查看ASH (Active Session History活动的会话历史) 报告输出. ASH报告工具在判断活动会话数量,查询会话从事的任务和在一段时间最活跃的SQL语句时很有用。它特别擅长用于分析短暂的性能问题。  运行此报告的ashrpt.sql脚本可以在 $ORACLE_HOME/rdbms/admin目录中找到。
  • 收集操作系统参数来衡量其活动(在运行正常和性能不佳时):
  • CPU
  • 磁盘I/O
  • Memory/Swap
  • 进程活动
  • 操作系统监控程序OS Watcher输出
  • 提供 2个 Hanganalyze报告和 3 个Systemstate转储信息报告 (具体请看“数据库挂起”部分章节)。
  • 提供系统RDA收集报告。
  • 提供Oracle LTOM工具收集的信息。


更多其他相关信息请看:


监听器挂起及性能问题

当监听器(Listener)发生性能问题时设置一个级别16的客户端连接追踪。


在客户端sqlnet.ora文件中设置参数:

TRACE_LEVEL_CLIENT=16

TRACE_FILE_CLIENT=CLIENT

TRACE_DIRECTORY_CLIENT=full path to directory where you want the trace file created.

TRACE_TIMESTAMP_CLIENT=on

TRACE_UNIQUE_CLIENT=on


获取这几分钟监听器进程(tnslsnr)的truss命令输出以及(发生问题的时间段)不同时间点上pstack信息输出。


====================================================


Truss ==> truss -o /tmp/mytruss -faed -p <pid of listener process>

…这个工具会一直保持追踪直到你终止它。可以使用ctrl-c来终止truss。如果你是在后台运行此工具命令,那么可以通过kill来杀掉truss进程以终止它的运行。


Process stack ==> pstack <pid of listener process>

…执行3次此命令,之间间隔30秒左右


如果可以的话,做一个短暂的监听器追踪:

=============================================


在服务器端sqlnet.ora文件中设置参数::


TRACE_LEVEL_SERVER=16

TRACE_DIRECTORY_SERVER=<some_known_directory>

TRACE_FILE_SERVER=server

TRACE_TIMESTAMP_SERVER=ON

TRACE_FILELEN_SERVER=<file_size_in_Kbytes>

TRACE_FILENO_SERVER=<number_of_files>


…后2个参数是为了避免服务器上的监听器trace文件过多而设的. 举例如果你在客户端设置了以下参数:

TRACE_FILELEN_SERVER=100

TRACE_FILENO_SERVER=2


…那么客户端上的2个100K的trace文件会被先后填满。之后客户端会切换回第一个trace文件继续写入trace信息,覆盖原有的trace内容,当写满后,再到第二个trace文件中写,如此往复。因此在trace信息被覆盖前,你需要将这些文件拷贝到其他目录。


我们也可以通过使用LSNRCTL 来对监听器进行追踪,并且此工具会一直运行会话结束(除非你主动关闭它).在 LSNRCTL 命令中不存在“=”符号.


LSNRCTL set current_listener listenername

LSNRCTL SET TRC_LEVEL 16

…好了,这样LSNRCTL就开始追踪了. 让它跑一会,这样我们就能看到追踪到的行为信息以及相关的延迟了。


在跑了至少5分钟后, 关闭LSNRCTL:

LSNRCTL set current_listener listenername

LSNRCTL SET TRC_LEVEL OFF


在使用 LSNRCTL进行追踪时, 在listener.ora文件中设置 ADMIN_RESTRICTIONS_listener_name=ON 以禁止运行时其参数的修改. 这样,监听器就会拒绝SET命令对其参数的修改了。更多信息请看 Note:272633.1.


如果需要改变listener.ora中包括ADMIN_RESTRICTIONS_listener_name本身以及其他参数的设置。我们将不得不手工修改listener.ora文件并用RELOAD命令使得参数起效。


请注意:  服务器端的追踪并不会在你改了Oracle Net(服务器端) tracing参数为OFF后关闭。它会随着客户端tracing的关闭而自动关闭。如果tracing由于疏忽一直保持启用, 则它可能将导致非常巨大trace文件的产生并损耗服务资源。为了正确关闭Oracle Net server tracing, 在设置tracing参数值为OFF后主动 stop并restart Oracle Net server 进程. 这可能会导致一些进程的关闭并引发数据库重启,严重程度取决于当前涉及到的会话数量。


因此,你需要上传以下文件:


– 客户端sqlnet trace文件

– 对于客户端低效连接的Pstack trace

– 监听器进程的Truss输出

– 3个对监听器进程的Pstack traces (3 of them).

– alert.log

– listener.log

– listener traces


更多其他相关信息请看:


SQL性能问题

对于SQL语句性能问题诊断, 我们需要了解:

  • 对于存在性能问题的SQL语句. 你能否通过使得性能回归正常? 如何修改?
  • 提供SQL在良好和较差性能下的执行计划输出.
  • 设置级别12的事件10046追踪以生成trace文件(在良好和较差性能情况下) à

alter session set events ‘10046 trace name context forever, level 12’;

  • 在良好和较差性能情况下的SQL运行 Tkprof输出
  • 在良好和较差性能情况下的SQL运行时间
  • 在执行计划输出中对涉及对象的定义 (如 DDL).
  • 在执行计划输出中对涉及基表的行数统计
  • 在良好和较差性能情况下的事件10053的trace输出à


ALTER SESSION SET EVENTS ‘10053 trace name context forever, level 1’;


…为了获取有效 10053 trace信息, 就不可避免需要对SQL语句进行硬解析。我们可以通过改变SQL语句的大小写或空格多少来达到此目的或通过清空共享池(在生产环境中并不推荐)来实现。


Oracle 10g及以上版本:

  • 你能使用AWR/Statspack报告和awrsqrpt.sql脚本来获取2个AWR快照之间的SQL语句执行计划。从AWR/StatsPack报告中, 定位产生性能问题的语句的SQL_ID并生成以下:

— 对应SQL_ID的AWR SQL报告

— 以SYSDBA登陆SQL*Plus

— SQL> @?/rdbms/admin/awrsqrpt.sql

— 请确保所使用AWR快照都是来自于获取的SQL_ID地方。


  • 对AWR报告中相应SQL_ID的查询提供数据字典信息:

— 以SYSDBA 登陆SQL*Plus.

— SQL> SELECT PLAN_TABLE_OUTPUT FROM

TABLE(DBMS_XPLAN.DISPLAY_CURSOR(‘<sqlid>’));


其它信息收集 (特别对于bug) à

对于执行计划的查询性能问题,请收集所有相关查询对象输出转储和其统计参数,通过使用这些信息,我们可以及时重现这些良好和较差的执行计划。


更多其它相关信息请看à

  • Note:21154.1 – EVENT: 10046 “enable SQL statement tracing (including binds/waits)”
  • Note:225598.1 – How to Obtain Tracing of Optimizer Computations (EVENT 10053)
  • Note:41634.1 – TKProf Simplistic Overview
  • Note:372431.1 – TROUBLESHOOTING: Tuning a New Query
  • Note:398838.1 – FAQ: Query Tuning Frequently Asked Questions
  • Note:163563.1 – TROUBLESHOOTING: Advanced Query Tuning
  • Note:208340.1 – Troubleshooting SQL Tuning
  • Note:215187.1 – SQLT (SQLTXPLAIN) – Enhanced Explain Plan and related diagnostic info for one DML SQL statement


如果由于数据库升级导致的查询性能退化,请看 à

  • Note:160089.1 – Server Upgrade Results in Slow Query Performance
  • Note 258167.1 – Upgrading from 8.1.X to 9.X – Potential Query Tuning Related Issues
  • Note 295819.1 – Upgrading from 9i to 10g – Potential Query Tuning Related Issues
  • Note:752662.1 – TROUBLESHOOTING Query Tuning
  • Note:748200.1 – Slow Performance of Queries After Upgrading To 10g


安装/升级/重连问题

对于数据库在安装或重连时发生问题的信息收集:

  • /tmp/OraInstall/oraInstall.err
  • /tmp/OraInstall/oraInstall.out
  • ../oraInventory/logs/installActions.log
  • $ORACLE_HOME/install/make.log
  • 对于补丁安装的OPATCH工具日志


更多其他相关信息请看 à


RAC 性能问题

请具体描述问题. 当提到问题发生时间时,请尽量精确,如某个特定时间等。


请提供RAC配置细节:

  • 在集群中节点号
  • 确定是否第三方集群件正和集群就绪服务(CRS)一起被使用
  • 注册盘和表决盘的存储类型
  • 确认ASM是否正被使用
  • 每个节点上数据库实例的数量


RAC 诊断(racdiag.sql)脚本被用于提供用户友好向导并对RAC挂起会话及低性能情景进行问题排查。脚本包括了用于判断RAC挂起原因而进行收集大量重要调试信息的相关操作信息。此脚本在转储hanganalyze信息的同时,并会在本地目录中建立一个racdiag<timestamp>.out文件。


除了从查询输出中判定锁和等待会话之外,racdiag脚本还会动态生成 systemstate 转储和 hanganalyze信息输出。此外, racdiag还提供了内部连接性能的主要度量标准。


从文档 135714.1中对于 racdiag的描述 à 这个脚本应该能在RAC环境中出现会话或系统级挂起时运行。脚本应该以SYS用户运行。在运行racdiag脚本前, catparr.sql应该已经以SYS运行过,以在受影响的数据库中建立相关GV$视图。有一些系统挂起类型事件能够阻止racdiag脚本的运行。 如果此脚本跑不起来,那么建议以SYS用户在每个节点获取systemstate转储信息以帮助调试问题。


请上传以下文件:

  1. sql脚本输出文件
  2. 每个节点的AWR/ASH报告或 Statspack输出
  3. 操作系统监控器输出(如果此监控器正运行在当前系统上)


相关racdiag脚本及其他信息请看à

  • Note:135714.1 – Script to Collect RAC Diagnostic Information (racdiag.sql)
  • Note:412894.1 – Diagnosing Hangs and Troubleshooting Performance Issues in a RAC Environment
  • Note:556679.1 – Data Gathering for Troubleshooting RAC Issues
  • Note:810394.1 – RAC Assurance Support Team: RAC Starter Kit and Best Practices


RAC实例驱逐问题

请具体描述问题. 当提到问题发生时间时,请尽量精确,如某个特定时间等。

请提供RAC配置细节:

  • 集群中的节点数量
  • 是否有第三方集群件正和集群就绪服务(CRS)一起被使用
  • 注册盘和表决盘的存储类型
  • 确认ASM是否正被使用
  • 每个节点上数据库实例的数量


对于实例驱逐被踢(Eviction)问题的诊断– 如ORA-29740错误, 请参考以下文档来做数据收集工作:

  • Note 219361.1 – Troubleshooting ORA-29740 in a RAC Environment
  • Note:412884.1 – Data Gathering for Instance Evictions in a RAC environment


至少你需要上传:

  1. 对于此类问题,除了上传数据库实例后台进程相关trace文件以外, 也要上传(每个实例)RAC特定后台进程 (如LMON, LMS, LCK, LMD, DIAG 等) 相关trace文件.

注意: 如果问题导致实例重起, 请确保以上上传文件来自重起之前的实例。

  1. 每个实例的告警日志文件
  2. 获取被踢的每个实例AWR/ASH报告或 Statspack输出
  3. 使用pl工具来收集Oracle集群件日志. 更多详情请看文档 330358.1. 运行diagcollection.pl时,使用 ‘–nocore’参数选项可降低输出的文件大小.
  4. 系统消息日志,具体文件位置取决于所使用的操作系统:

– Linux: /var/log/messages

-Windows: 使用事件查看器查看保存的应用日志和系统日志TXT文件。 – Sun: /var/adm/messages

– IBM: /bin/errpt -a (被重定向到messages.out文件)

– HP-UX: /var/adm/syslog/syslog.log

– Tru64: /var/adm/messages

  1. 如果有操作系统监控器运行,则也请获取所有节点的监控器输出


注意:Oracle实例被启动后,每个相关后台进程(PMON,SMON,LMS,DIAG等)会产生一个trace文件。之后仅当需要转储trace文件时,才会继续对这个trace 文件进行写入。请不要删除这些文件。如果你删除了属于某个后台进程的Trace文件, Oracle trace信息仍会保持向这个节点位置中写入。这造成了有用的诊断信息被丢失。如果你发现属于某个Oracle数据库后台进程trace文件被删除,请按My Oracle Support文档中提供的步骤来重建它:

Note:394891.1 – How to recreate background trace file(s) that may have been accidentally deleted


Oracle集群就绪服务(CRS)问题

对于CRS问题:


  • 如果正在使用第三方提供的clusterware (SFRAC, SUN Cluster等.), 首先判断是否第三方cluster正在运行 (参考文档 803661.1).


  • 检查当前CRS是否正在运行:

◦ crsctl check crs

◦ crs_stat –t


  • 检查是否所有私有内连接都起了并可ping通

◦ ifconfig –a

◦ traceroute <private interconnect IP>


  • 检查表决盘(voting disks)和注册盘(OCR)都可以从所有节点访问到

◦ ocrcheck

◦ ls –l <full path of voting disk>


  • 请提供以下信息:
  • sql输出
  • CLUVFY (Cluster 验证工具) 输出.
  • 系统消息日志. 其存放位置取决于当前操作系统:

– Linux: /var/log/messages

– Windows: 使用事件查看器查看保存的应用日志和系统日志TXT文件。

– Sun: /var/adm/messages

– IBM: /bin/errpt -a (重定向到 messages.out文件)

– HP-UX: /var/adm/syslog/syslog.log

– Tru64: /var/adm/messages 如果监控工具正在运行,其操作系统监控输出将存放在此目录中

  • 从每个cluster节点上的三个目录树中收集所有CRS日志文件, trace文件和core转储文件 :

– $CRS_HOME (css/log css/init crs/log crs/init evm/log evm/init srvm/log racg/dump log)

– $ORACLE_HOME (racg/dump admin/*/hdump)

– $ORACLE_BASE (admin/*/hdump)

…也可以用另一种方法获取打包的trace文件:

$CRS_HOME/bin/diagcollect.pl


其他相关信息请看:

  • Note 339939.1 – Running Cluster Verification Utility to Diagnose Install Problems
  • Note 272332.1 – CRS 10g Diagnostic Collection Guide
  • Note 330358.1 – CRS 10gR2/ 11gR1/ 11gR2 Diagnostic Collection Guide
  • Note:289690.1 – Data Gathering for Troubleshooting CRS Issues
  • Note:783456.1 – CRS Diagnostic Data Gathering: A Summary of Common tools and their Usage
  • Note:556679.1 – Data Gathering for Troubleshooting RAC Issues
  • Note:357808.1 – Diagnosability for CRS / EVM / RACG as directed by Oracle support


Data Guard 日志传输和物理应用

– 确认归档日志是否成功被传送到备库。

– 判断Data Guard设置是非级联设置的还是级联设置,物理备库设置还是逻辑备库设置。- 确认主库是归档日志模式并已开启自动归档。

– 确认归档有足够空间。

– 判断是否产生错误的条件都满足。

– 确认备库处于mounted状态。

– 确认managed recovery 正在运行.


其他相关信息请看:

  • Note:237213.1 – Troubleshooting Data Guard
  • Note:312434.1 – Oracle10g Data Guard SQL Apply Troubleshooting
  • Note:814417.1 – Dataguard Information gathering to upload with the Service Requests
  • Note:241374.1 – Script to Collect Data Guard Primary Site Diagnostic Information
  • Note:241438.1 – Script to Collect Data Guard Physical Standby Diagnostic Information


Data Guard网络故障

– 检查系统瓶颈: CPU (sar -u), I/O (iostat), Memory (vmstat)

– 数据库等待事件 (ARCH 传输, SYNC传输等.)

– 查看Statspack Stats报告 (重做率”redo rate”, 事务率”transaction rate”, 平均重做写大小”average redo write size”,…)

– 检查网络 (备库是否可连?, 是否有网络错误?, 网络带宽是否足够?)

– 检查alert.log (主库和备库)文件中的所有错误.

– 检查系统消息日志中的错误. 日志文件位置取决于你所用的系统:

– Linux: /var/log/messages

– Windows: 应用日志和系统日志被保存为 .TXT文件并使用事件查看器查看

– Sun: /var/adm/messages

– IBM: /bin/errpt -a (重定向到文件 messages.out)

– HP-UX: /var/adm/syslog/syslog.log

– Tru64: /var/adm/messages


更多其他信息请看:


Streams 错误及问题

对于问题解决及原因分析,请à


  • 具体描述问题。
  • 描述Streams设置信息 – local capture or downstream capture, number of Streams database, unidirectional or bi-directional replication, etc.
  • 来自源和目标系统的Alert 文件.
  • 当报告Streams问题时,请提供源和目标数据库健康检查报告 (请看 Note 273674.1)
  • 运行Streams 故障发现查询脚本. 参考 Note 729860.1.
  • 对于STREAMS 性能问题:

◦ 请参考Streams Performance recommendations (Note 335516.1).

◦ 请参看Note 290605.1在源和目标数据库运行STRMMON.

◦ 生成源及目标数据库当时时段AWR/ASH/ADDM报告.


更多其他信息请看à

  • Note:746247.1 – Troubleshooting Streams Capture when status is Paused For Flow Control
  • Note:335502.1 – How To Reinstantiate a Single Table in a Streams Environment
  • Note:749036.1 – How to re-synchronize the streams replicated objects online
  • Note:405541.1 – Print the LCR’s listed in the Error Queue
  • Note:291686.1 – LogMiner Utility Release 8.1.x – 10g


Streams 应用(Apply)

当对Streams Apply进程进行问题诊断时,我们需要注意以下3种情况:


1) 没有事务到达目的地

  • 检查apply进程状态并确认其是启用的
  • 确认apply进程是否还没使事务出队列。
  • 检查队列的传播是否有发送事务到应用端
  • 检查相关规则是否有在global, schema和table每个级别上正确建立以控制(获取capture, 传播propagation, 应用apply)
  • 检查 init.ora文件
  • 检查BACKGROUND_DUMP_DEST下的trace文件


2) 事务到达了目的地端, 但没有出队列.

  • 确认是否 apply进程没有让任何事务出队列
  • 检查出错队列
  • 检查是否有定义冲突的方案
  • 检查对象实例化SCN
  • 检查当前数据库 SCN值
  • 检查BACKGROUND_DUMP_DEST下的trace文件


3) 事务到达目的地端并出队列, 但没有被应用.

  • 检查apply进程延迟
  • 检查出错队列
  • 检查是否有定义冲突的方案
  • 检查对象实例化SCN
  • 检查当前数据库 SCN值
  • 检查BACKGROUND_DUMP_DEST下的trace文件


注意: 任何情况下, 请通过Streams健康检查脚本以提供报告输出。


请看以下文档以便了解与上文相关的更详细信息 à

  • Note:230898.1 – How To Troubleshoot the Streams Apply Process
  • Note:273674.1 – Streams Configuration Report and Health Check Script
  • Note:730036.1 – Overview for Troubleshooting Streams Performance Issues
  • Note:418755.1 – 10gR2 Streams Recommended Configuration
  • Note:789913.1 – Streams Troubleshooting guide step by step
  • Note:779801.1 – Streams Conflict Resolution
  • Note:265201.1 – Troubleshooting Streams Apply Error ORA-1403, ORA-26787 or ORA-26786


高级队列传播(AQ propagation)问题

如果你碰到高级队列传播问题 (很慢或卡住), 请收集以下信息:


sqlplus / as sysdba


oradebug setospid  <spid of the j00 background process executing the schedule>

oradebug unlimit

oradebug Event 10046 trace name context forever, level 12

–等待10分钟

oradebug Event 10046 trace name context off

exit


sqlplus / as sysdba

oradebug setospid  <spid of the j00  background process executing the schedule>

oradebug unlimit

oradebug Event 24040 trace name context forever, level 10

–等待10分钟

oradebug Event 24040 trace name context off

exit


oracledebug tracefile_name命令能显示trace文件在哪里生成


当传播问题发生,我们需要从所有实例中获取相关systemstate转储信息à


sqlplus / as sysdba

oradebug setmypid

oradebug unlimit

oradebug -g all dump systemstate 266

— 等大约2分钟

oradebug -g all dump systemstate 266


相关其他信息请看 à

  • Note:233099.1 – Troubleshooting Advanced Queuing Propagation
  • Note:102926.1 – Performance Tuning Advanced Queuing Databases and Applications


复制问题(Replication)

相关信息请看:

  • Note:1035874.6 – Troubleshooting Guide: Replication Propagation
  • Note:122039.1 – Troubleshooting Basics for Advanced Replication
  • Note:231499.1 – Multi-Master Replication: Diagnostic Information Required & What To Check


 ASM 问题诊断 (包括在空闲空间存在并可用时的 ASM磁盘空间耗尽报错)

====================================================================


▪请执行My Oracle Support Note:351117.1 中的ASM调试脚本 (收集诊断ASM空间问题所需信息)


▪ 提供ASM alert.log文件, traces 及操作系统消息文件 (可能同时需要数据库和 ASM alerts 和traces文件)


更多其他信息请看à

  • Note:340417.1 – Data Gathering for Troubleshooting ASM Issues
  • Note:309815.1 – Configuring Oracle ASMLib on Multipath Disks
  • Note:284646.1 – Creating and using the kfed utility to view ASM disk header


消息网关(Message Gateway)问题

当消息网关不处理任何信息,请获取以下诊断信息进行分析:


对Hang问题及 系统State进行信息收集及转储à


sqlplus / as sysdba

oradebug setmypid

oradebug unlimit

oradebug –g all hanganalyze 3;


等待30秒后再次运行hanganalyze…
oradebug setmypid

oradebug unlimit

oradebug –g all hanganalyze 3;


Sqlplus / as sysdba;

oradebug setmypid;

oradebug unlimit;

oradebug –g all dump systemstate 266;


等待30秒后再次运行hanganalyze…


oradebug setmypid;

oradebug unlimit;

oradebug –g all dump systemstate 266;


当消息网关不处理消息时,扩大gateway日志级别以收集更多gateway进程相关信息。


sqlplus / as sysdba;

SELECT * FROM MGW_GATEWAY;

exec DBMS_MGWADM.SET_LOG_LEVEL (3);


上传MGW trace文件.


获取MGW Java进程相关thread转储文件:


ps -ef | grep mgwextproc


使用以下脚本命令得到JVM下的thread转储信息


for pids in `ps -ef | grep mgwextproc | awk ‘{print $2}’`

do

echo $pids

kill -3 $pids

done

Trace文件会在当前工作目录中产生。请上传这些trace文件。


ORA-3113错误

ORA-3113错误通常产生自Oracle客户端工具。此错误意味着客户端未能和Oracle影子进程进行通讯。此错误常常需要我们收集更多的信息来帮助分析原因,且原因也多种多样。因此这种“oracle影子进程通讯失败”错误是一种“普遍涉及”类型。ORA-3113常发生在当由于某些原因致Oracle服务器进程死亡时。


我们需要更多信息用来判断错误成因:


  1. 错误是发生在尝试建立数据库连接时或在一个已经建立的连接上?
  2. 在USER_DUMP_DEST(或11g上的$ADR_HOME/trace)目录下存在相关失败会话的trace文件。
  3. 此错误是因为特定命令造成的或是随机产生的? 如果是由于特定命令造成的,在会话级别开启 SQL_TRACE以找到问题命令.


其他相关信息,请看 à


数据库/实例崩溃

为方便解决及原因分析, 请提供以下内容 à


  • BACKGROUND_DUMP_DEST或$ADR_HOME/trace下的Alert.log文件
  • Alert log文件中最新涉及的错误(如ORA-600或ORA-7445)相关的trace文件.
  • 当时Oracle自动收集的系统状态转储文件
  • RDA (Remote Diagnostic Agent远程诊断代理)输出,可参考Note 314422.1


数据库块讹误(Corruption)

有很多原因可能造成坏块,其包括:

– IO硬件损坏

– 操作系统问题

– Oracle造成的问题

– 对数据库中已使用”UNRECOVERABLE”或”NOLOGGING”关键字命令操作的数据恢复(这种情况会提示ORA-1578错误)


Oracle发现并报错的时间可能晚于数据最初产生讹误的时间。

由于并非总能了解当时坏块产生的原因,而多数情况下,关键业务需求数据库立即响应并再次开始运行,因此以下步骤用于处理当前问题:


  • 判断数据讹误问题的影响程度及范围,是临时的还是永久不可恢复的错误。如果坏块大范围出现或者错误在各处不断产生,那么就需要先集中精力先确定问题原因(如检查硬件设备等)。这一点很重要,如果你的硬件本身出了问题,那怎么操作都无法恢复系统。


  • 替换或移走(可能)存在问题的硬件设备。


  • 判断哪些数据库对象收到了影响。


  • 选择最恰当的数据库恢复/数据解救方案。


为方便解决及原因分析, 请提供以下内容à


  • BACKGROUND_DUMP_DEST 或 $ADR_HOME/trace下的Alert.log文件
  • Alert log文件中最新涉及的错误(如ORA-600或ORA-7445)相关的trace文件
  • Block转储及其他相关诊断信息,可参考 Note 28814.1
  • RDA (Remote Diagnostic Agent远程诊断代理)输出,可参考Note 314422.1


更多相关信息请看à

  • Note:1088018.1 – Master Note for Handling Oracle Database Corruption Issues
  • Note:28814.1 – Handling Oracle Block Corruptions in Oracle7/8/8i/9i/10g/11g
  • Note:412566.1 – Basics of Debugging/Getting Dumps on Windows and Unix Platforms for Internals/Corruption Analysts
  • Note:76375.1 – Prevention, Detection and Repair of Database Corruption


RMAN 报错

问题解决及原因分析à


Oracle企业管理器 / 网格控制(OEM/Grid Control)


为方便问题解决及原因分析,请à


  • 具体描述问题
  • 对于EM Agent问题:

– 打包压缩并上传$AGENT_HOME/sysman/log中的文件

– $AGENT_HOME/sysman/config/emd.properties文件

Note 229624.1 – How to Log and Trace the EM 10g Management Agents

  • 对于OMS错误及问题:

– 打包压缩并上传$OMS_HOME/sysman/log中的文件

– $AGENT_HOME/sysman/config/emoms.properties文件

Note 229627.1 How to Log and Trace the EM 10g Management Service

Note 421053.1– EMDiagkit Download and Master Index


更多相关信息请看 à


SQL*Net 报错

问题解决及原因分析à


  • Note:16564.1 – SQL*Net V2 on Unix – A Quick Guide to Setting Up Client Side Tracing
  • Note:219968.1 – SQL*Net, Oracle Net Services – Tracing and Logging at a Glance
  • Note:67983.1 – Oracle Net Performance Tuning


补丁应用问题

问题解决及原因分析à


为了调试检查补丁问题,需要设置:

◦ export OPATCH_DEBUG=TRUE

◦ export PERL_DL_DEBUG=1


请看相关信息 à


JDBC事件

问题解决及原因分析 à


Memory Leaks内存泄漏

内存泄漏是指当进程始终不能归还其做临时使用而分配的内存时,可用内存在这种分配下逐渐损失的情况。内存泄漏最终可导致可用内存不断变少最终耗尽。如果不做检查,那些正受到内存泄漏的进程将不断增长对内存的需求直到其达到当前系统对用户模式下进程设置所允许的最大值。因此,对内存基线需求和内存泄漏之间的判断就很必要了。当然内存使用的增长并不一定归因于内存泄漏。


问题解决及原因分析à


  • Note:477521.1 – How To Troubleshoot Memory Leaks on Microsoft Windows
  • Note:477522.1 – How To Troubleshoot Memory Leaks on UNIX
  • Note:1003841.1 – Diagnosing swap full problems/possible memory leak issues
  • Note:166490.1 – Diagnosing Oracle memory on HP using GLANCE
  • Note:163763.1 – Diagnosing Oracle memory on Sun Solaris using PMAP
  • Note:166491.1 – Diagnosing Oracle Memory on AIX using SVMON
  • Note:403584.1 – Understanding and Diagnosing ORA-600 [729] Space Leak Errors


PRM-DUL成功助力安徽某乙方恢复了用户数据库

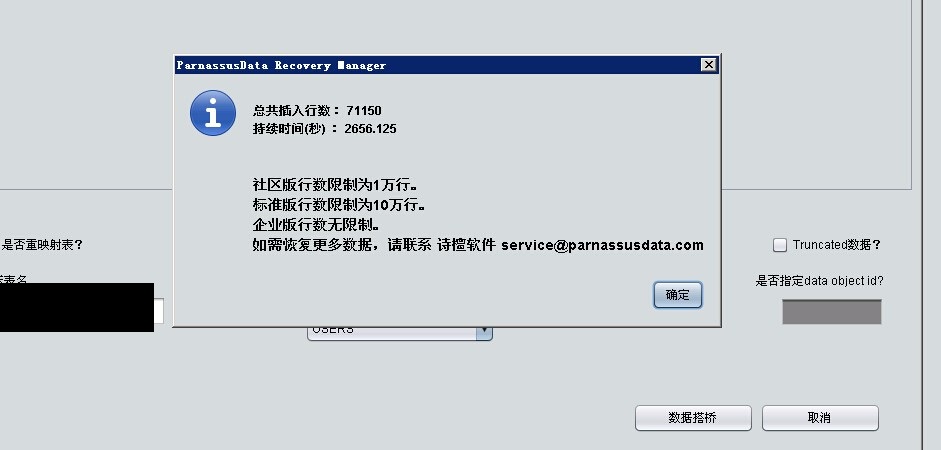
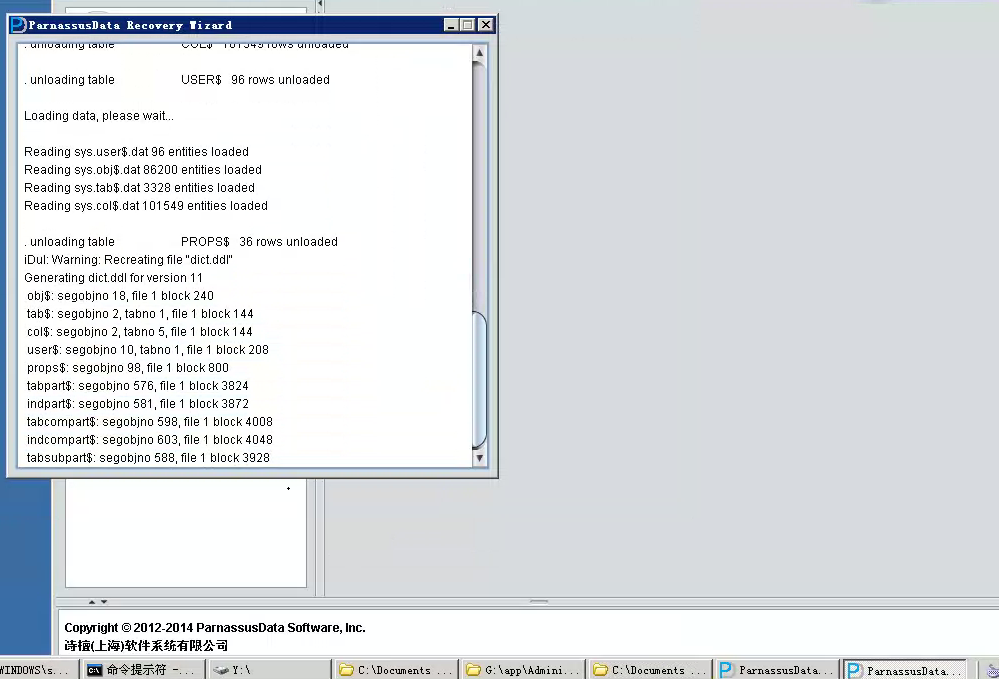
PRM-DUL成功助理安徽某乙方恢复了用户涉及到大量图片BLOB的数据库,该数据库由于存储异常且无任何备份导致无法打开和恢复:


最新版PRM-DUL下载地址: http://parnassusdata.com/sites/default/files/ParnassusData_PRMForOracle_3206.zip

免费的PRM-DUL License :http://www.parnassusdata.com/zh-hans/node/122 


prm-dul win 2 prm-dul win3 prm-dul win1

【Oracle数据库恢复】ORA-00600 [4194]: 内部错误代码, 参数: [4194]又一例

某用户11.1.0.6的系统在系统断电重启后遭遇了ORA-600 [4194]错误:


Starting background process QMNC
Wed Dec 10 21:26:24 2014
QMNC started with pid=21, OS id=2932
Errors in file d:\app\administrator\diag\rdbms\erp\erp\trace\erp_smon_3612.trc (incident=33600227):
ORA-00600: 内部错误代码, 参数: [4194], [60], [59], [], [], [], [], []
Incident details in: d:\app\administrator\diag\rdbms\erp\erp\incident\incdir_33600227\erp_smon_3612_i33600227.trc
Doing block recovery for file 3 block 4378
Block recovery from logseq 1, block 127 to scn 1309041534
Recovery of Online Redo Log: Thread 1 Group 1 Seq 1 Reading mem 0
Mem# 0: D:\APP\ADMINISTRATOR\ORADATA\ERP\REDO01.LOG
Block recovery stopped at EOT rba 1.129.16
Block recovery completed at rba 1.129.16, scn 0.1309041534
Doing block recovery for file 3 block 121
Block recovery from logseq 1, block 127 to scn 1309041531
Recovery of Online Redo Log: Thread 1 Group 1 Seq 1 Reading mem 0
Mem# 0: D:\APP\ADMINISTRATOR\ORADATA\ERP\REDO01.LOG
Block recovery completed at rba 1.128.16, scn 0.1309041533
Errors in file d:\app\administrator\diag\rdbms\erp\erp\trace\erp_smon_3612.trc:
ORA-01595: 释放区 (2) 回退段 (8) 时出错
ORA-00607: 当更改数据块时出现内部错误
ORA-00600: 内部错误代码, 参数: [4194], [60], [59], [], [], [], [], []
LOGSTDBY: Validating controlfile with logical metadata
LOGSTDBY: Validation complete
Wed Dec 10 21:26:26 2014
Trace dumping is performing id=[cdmp_20141210212626]
Wed Dec 10 21:26:31 2014
Sweep Incident[33600227]: completed
Wed Dec 10 21:26:31 2014
Errors in file d:\app\administrator\diag\rdbms\erp\erp\trace\erp_m004_4524.trc (incident=33600347):
ORA-00600: 内部错误代码, 参数: [4194], [60], [59], [], [], [], [], []
Incident details in: d:\app\administrator\diag\rdbms\erp\erp\incident\incdir_33600347\erp_m004_4524_i33600347.trc
Trace dumping is performing id=[cdmp_20141210212632]
Doing block recovery for file 3 block 4378
Block recovery from logseq 1, block 127 to scn 1309041534

ump of buffer cache at level 4 for tsn=2, rdba=12587290
BH (0x000000016BFB7308) file#: 3 rdba: 0x00c0111a (3/4378) class: 32 ba: 0x000000016B7EA000
set: 11 bsz: 8192 bsi: 0 sflg: 2 pwc: 51 lid: 0x00000000,0x00000000
dbwrid: 0 obj: -1 objn: 0 tsn: 2 afn: 3
hash: [0x00000001E2F7DCC0,0x00000001E2F7DCC0] lru: [0x000000016BFB74C8,0x000000016BFB7268]
obj-flags: object_ckpt_list
ckptq: [0x000000016BF8F7F8,0x000000016BFB7478] fileq: [0x00000001E3BDB698,0x000000016BFB7488] objq: [0x000000016BFEAFC8,0x000000016BF821D8]
use: [0x00000001D8653448,0x00000001D8653448] wait: [NULL]
st: XCURRENT md: EXCL tch: 0
flags: buffer_dirty mod_started gotten_in_current_mode
change state: ACTIVE
change count: 1
LRBA: [0x14.7d.0] LSCN: [0x0.4e0c7c32] HSCN: [0x0.4e0c7c32] HSUB: [65535]
cr pin refcnt: 0 sh pin refcnt: 0
buffer tsn: 2 rdba: 0x00c0111a (3/4378)
scn: 0x0000.4e0662ff seq: 0x02 flg: 0x04 tail: 0x62ff0202
frmt: 0x02 chkval: 0xa54a type: 0x02=KTU UNDO BLOCK
*** ktuc_diag_dmp: dump of redo for rdba 0x00c0111a
Cleaning up copy latch 0
Copy latch cleanup completed
DUMP REDO
Opcodes *.*
DBAs (file#, block#):
(3, 4378) .
SCNs: scn: 0x0000.00000000 thru scn: 0xffff.ffffffff
**NOTE: Only Dumping Redo less then 12 hours**
Times: 12/10/2014 21:23:27 thru eternity

*** 2014-12-11 09:23:27.382
SCN Start Scan Point: scn: 0x0000.4e0bd8c2 (1309399234)
INCARNATION:
START: scn: 0x0000.4e0662ee (1309041390) Timestamp: 12/10/2014 21:26:17
END: scn: 0xffff.ffffffff
descrip:"Thread 0001, Seq# 0000000018, SCN 0x00004e0bd8c2-0x00004e0c295e"

REDO RECORD - Thread:1 RBA: 0x000012.00000002.0010 LEN: 0x0070 VLD: 0x05
SCN: 0x0000.4e0bd8c4 SUBSCN: 1 12/11/2014 09:19:10
CHANGE #1 MEDIA RECOVERY MARKER SCN:0x0000.00000000 SEQ: 0 OP:17.3
descrip:"Thread 0001, Seq# 0000000019, SCN 0x00004e0c295e-0x00004e0c79f5"

REDO RECORD - Thread:1 RBA: 0x000013.00000002.0010 LEN: 0x0070 VLD: 0x05
SCN: 0x0000.4e0c2960 SUBSCN: 1 12/11/2014 09:20:14
CHANGE #1 MEDIA RECOVERY MARKER SCN:0x0000.00000000 SEQ: 0 OP:17.3
descrip:"Thread 0001, Seq# 0000000020, SCN 0x00004e0c79f5-0xffffffffffff"

REDO RECORD - Thread:1 RBA: 0x000014.00000002.0010 LEN: 0x0070 VLD: 0x05
SCN: 0x0000.4e0c79f7 SUBSCN: 1 12/11/2014 09:23:13
CHANGE #1 MEDIA RECOVERY MARKER SCN:0x0000.00000000 SEQ: 0 OP:17.3
END OF DUMP REDO
Incident 35120409 created, dump file: d:\app\administrator\diag\rdbms\erp\erp\incident\incdir_35120409\erp_ora_548_i35120409.trc
ORA-00600: 内部错误代码, 参数: [4194], [60], [59], [], [], [], [], []

Error 607 in redo application callback
Dump of change vector:
TYP:0 CLS:32 AFN:3 DBA:0x00c0111a OBJ:4294967295 SCN:0x0000.4e0662ff SEQ: 2 OP:5.1
ktudb redo: siz: 208 spc: 1094 flg: 0x0012 seq: 0x91a4 rec: 0x3b
xid: 0x0008.01d.001511ce
ktubl redo: slt: 29 rci: 0 opc: 11.1 objn: 74 objd: 74 tsn: 0
Undo type: Regular undo Begin trans Last buffer split: No
Temp Object: No
Tablespace Undo: No
0x00000000 prev ctl uba: 0x00c0111a.91a4.39
prev ctl max cmt scn: 0x0000.4e065bc8 prev tx cmt scn: 0x0000.4e065be6
txn start scn: 0xffff.ffffffff logon user: 0 prev brb: 12587289 prev bcl: 0 BuExt idx: 0 flg2: 0
KDO undo record:
KTB Redo
op: 0x04 ver: 0x01
compat bit: 4 (post-11) padding: 0
op: L itl: xid: 0x000d.012.000346f7 uba: 0x00c01d8e.1899.2a
flg: C--- lkc: 0 scn: 0x0000.4e0c7c3e
KDO Op code: URP row dependencies Disabled
xtype: XAxtype KDO_KDOM2 flags: 0x00000080 bdba: 0x00400222 hdba: 0x00400221
itli: 1 ispac: 0 maxfr: 4863
tabn: 0 slot: 8(0x8) flag: 0x2c lock: 0 ckix: 0
ncol: 10 nnew: 9 size: 0
Vector content:
col 1: [ 2] c1 02
col 2: [ 2] c1 02
col 3: [ 2] c5 15
col 4: [ 2] c1 02
col 5: [ 1] 80
col 6: [ 2] c3 02
col 7: [ 5] c4 06 4a 13 0b
col 8: [32]
2d 2d 2d 2d 2d 2d 2d 2d 2d 2d 2d 2d 2d 2d 2d 2d 2d 2d 2d 2d 2d 2d 2d 2d 2d
2d 2d 2d 2d 2d 2d 2d
col 9: [ 1] 80
Block after image is corrupt:
buffer rdba: 0x00c0111a
scn: 0x0000.4e0662ff seq: 0x02 flg: 0x04 tail: 0x62ff0202
frmt: 0x02 chkval: 0xa54a type: 0x02=KTU UNDO BLOCK
Hex dump of block: st=0, typ_found=1
Dump of memory from 0x000000016B7EA000 to 0x000000016B7EC000
16B7EA000 0000A202 00C0111A 4E0662FF 04020000 [.........b.N....]


该ORA-00600: 内部错误代码, 参数: [4194]错误我们之前有多次提过,

【Oracle数据恢复】通过BBED修复ORA-600[4193]和ORA-600[4194]的例子

【Oracle数据恢复】ORA-600[4194]错误一例


ORA-600[4194]内部错误一般由重做记录与回滚记录不匹配引发。Oracle在验证Undo record number时,会对比redo change 和回滚段中的undo record number,若发现2者存在差异则报该4194错误。其错误argument[a][b],a代表回滚块中的最大undo record number,b代表重做日志中记录的undo record number。这个错误可能由回滚段或者redo log日志文件讹误引起。

ORA-00600[4194]错误的根本原因是 redo记录与回滚段(rollback/undo)记录之间的不一致。当ORACLE在验证undo记录时相对应的变化需要应用到undo数据块的最大undo记录上,此时若检验出错则会报ORA-00600[4194]


ORA-600[4194]的2个的含义:

Arg [a] Maximum Undo record number in Undo block
Arg [b] Undo record number from Redo block


以上可以通过trace定位到可能存在触发该UNDO问题的数据块是rdba: 0x00c0111a (3/4378), 该问题一般可以通过设置EVENT、隐藏参数或BBED来修复。


如果自己搞不定可以找诗檀软件专业ORACLE数据库修复团队成员帮您恢复!


诗檀软件专业数据库修复团队


服务热线 : 13764045638   QQ号:47079569    邮箱:service@parnassusdata.com

Oracle 12.1.0.2新特性 Approximate Count Distinct

[oracle@PD009 ~]$ grep -i approx_count oracle.str
settings for approx_count_distinct optimizations
qkaGBPushdown:  estimated memory without GPD = groupSize (%.2f) * aclsum (%u) = %.2f; estimated memory with GPD = optHllEntry (%u) * # of approx_count_distinct (%d) * parallelDegree (%.0f) = %.2f
APPROX_COUNT_DISTINCT
 
 
_approx_cnt_distinct_gby_pushdown = choose
_approx_cnt_distinct_optimization = 0


 alter system flush shared_pool;
  alter session set events '10053 trace name context forever ,level 1';
 select count( distinct prod_id) from sales_history where  amount_sold>1;
 

 select approx_count_distinct(prod_id) from sales_history where  amount_sold>1;

  oradebug setmypid;
  oradebug tracefile_name;
  /s01/diag/rdbms/pdprod/PDPROD/trace/PDPROD_ora_4086.trc


  sql= select count( distinct prod_id) from sales_history where  amount_sold>1
----- Explain Plan Dump -----
----- Plan Table -----

============
Plan Table
============
---------------------------------------------+-----------------------------------+
| Id  | Operation             | Name         | Rows  | Bytes | Cost  | Time      |
---------------------------------------------+-----------------------------------+
| 0   | SELECT STATEMENT      |              |       |       |  4912 |           |
| 1   |  SORT AGGREGATE       |              |     1 |    13 |       |           |
| 2   |   VIEW                | VW_DAG_0     |    72 |   936 |  4912 |  00:00:59 |
| 3   |    HASH GROUP BY      |              |    72 |   648 |  4912 |  00:00:59 |
| 4   |     TABLE ACCESS FULL | SALES_HISTORY| 3589K |   32M |  4820 |  00:00:58 |
---------------------------------------------+-----------------------------------+


sql= select approx_count_distinct(prod_id) from sales_history where  amount_sold>1
----- Explain Plan Dump -----
----- Plan Table -----
 
============
Plan Table
============
----------------------------------------------+-----------------------------------+
| Id  | Operation              | Name         | Rows  | Bytes | Cost  | Time      |
----------------------------------------------+-----------------------------------+
| 0   | SELECT STATEMENT       |              |       |       |  4820 |           |
| 1   |  SORT AGGREGATE APPROX |              |     1 |     9 |       |           |
| 2   |   TABLE ACCESS FULL    | SALES_HISTORY| 3589K |   32M |  4820 |  00:00:58 |
----------------------------------------------+-----------------------------------+
Predicate Information: 


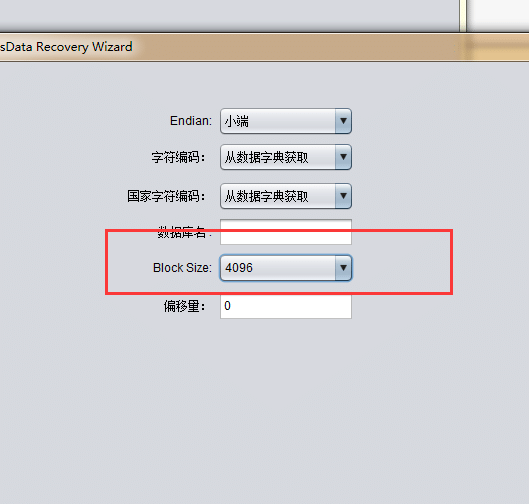
PRM: Warning:scaned 10MB data, couldn’t find file header

PRM: Warning:scaned 10MB data, couldn’t find file header ,如果在使用PRM-DUL过程中遇到了该问题,则可能是:


prm-dul-warning

1、选择了错误的 BLOCK_SIZE

PRM-DUL-BLOCK-SIZE


2、选择了错误的endian ,AIX、HPUX 、Solaris Sparc上的datafile均为Big Endian。 其他的操作系统Windows、Linux、Solaris X86基本都为Little Endian,如上图


3、启动PRM的用户没有足够的权限读取数据文件,这个情况下WIndows下可能出现


4、加入的数据文件的文件头真的丢失 或者损坏了,这个情况请联系我们  service@parnassusdata.com


more about osysmond.bin

We have some questions on this guess:
1.What kind of operation osysmond.bin will do when a new disk device is scaned by os?

Currently osysmond detects disks only when it starts. If osysmond is running and a new disk is added to system, Osymond will not detect it right away. It will detect it only when it restarts;

What do you exactly mean by a new disk? If you are referring to hot plugging a new OS disk, then currently it won’t be detected by osysmond unless and until the process/stack is restarted. If by a new disk, you mean adding a new asm disk on top of existing os disks then it should ideally get marked as an ASM disk.

– osysmond collects the list of disks during its startup and creates a static list. This list do not change dynamically.
So when a new disk is scanned by O/S as of now that may not be detected by osysmond.bin. There is an enhancement request filed for detecting new disks added dynamically at run time.

2.Which disks osysmond.bin will read/write on during crfmond_refresh, disk matching asm_diskstring? or all disks which lsdev can found?

crfmond_refresh runs every 1 hour and checks for configuration change. For example if a normal disk(which was detected by osysmond at start) has been added to ASM disk
group in last hour, osymond will tag with “ASM” type.

Currently the disks are marked based on what kfod API returns(it uses disk string internally) using stat64() function. sysmond as such doesn’t read/write from/to any OS disk. The ASM disk marking mechanism is changing in 12.1 and in the new mechanism it doesn’t make a call to stat64() during the marking process.

– it will only read specific disks Voting, ASM, OCR etc. For getting this list osysmond internally calls APIs from those layers CSS/ASM/OCR etc.

3.Why osysmond.bin need to tag voting/ocr disks when gathering performance data?

This is done for customer to see disk configuration on their system in a glance. Oclumon tool display disk type along with various other metrics(like I/O, queue length etc).

sysmond tags the OS disks as voting/ocr/asm etc only once in every hour. This data is used for diagnostics and by upstream tools for detecting problems in the system.

– it will only read specific disks Voting, ASM, OCR etc. For getting this list osysmond internally calls APIs from those layers CSS/ASM/OCR etc.

4.What’s the meanings of get ID failed, is this a common info in all 11g RAC deployment? if not , how to fixed it?

For tagging purpose osysmond internally maintains unique ID for each disk. We need to look a bit more to figure out why it is failing.

The disk tagging mechanism is changing in 12.1 and this issue should be resolved there. But this message as such should be benign. What is the exact problem that you guys see? As i mentioned earlier osysmond doesn’t try to read/write the disks. It tags the disks by making a stat64() call to find the device id of the disk to be tagged and this happens once in every hour. Is it the stat64() call which is taking long and locking the disk. Do you have the output of strace etc to confirm the same?

– This means osysmond is not able to find device Id for certain disks for tagging ASM/VOTING etc disks. This is known issue and there are bugs filed for it.
We are working on it.

about db_lost_write_protect


SQL> create table lost_write(t1 int) tablespace users; 

Table created.

SQL> 
SQL> insert into lost_write values(1);

1 row created.

SQL> commit;

Commit complete.

SQL> alter system checkpoint;

System altered.


select dbms_rowid.rowid_block_number(rowid),dbms_rowid.rowid_relative_fno(rowid) from lost_write;

DBMS_ROWID.ROWID_BLOCK_NUMBER(ROWID) DBMS_ROWID.ROWID_RELATIVE_FNO(ROWID)
------------------------------------ ------------------------------------
                                 222                                    6


	alter system set db_lost_write_protect=typical;


SQL> select name from v$datafile where file#=6;

NAME
--------------------------------------------------------------------------------
/s01/oradata/PDPROD/datafile/o1_mf_users_b2wgb20l_.dbf


update lost_write set t1=9999;

alter system flush buffer_cache;


dd if=/s01/oradata/PDPROD/datafile/o1_mf_users_b2wgb20l_.dbf skip=222 bs=8192 count=1  of=222_block

dd if=222_block of=/s01/oradata/PDPROD/datafile/o1_mf_users_b2wgb20l_.dbf  seek=222 bs=8192 count=1 conv=notrunc

11g以后的space preallocation特性和SMCO/W00N

11g以后oracle引入了智能空间预分配space preallocation的新特性,该新特性涉及3个领域:

  • 表空间的预分配和扩展
  • 数据段segment的预分配和扩展
  • LOB chunk的预分配和扩展


以下是一个tablespace 预分配和扩展的例子,可以看到某个表空间对应的FILE#=3的数据文件,由于在一段时间内的空间使用情况预估,所以在几个小时内扩展了不少的空间:


Sat Oct 04 06:07:46 2014
Resize operation completed for file# 3, old size 706560K, new size 716800K
Sat Oct 04 08:00:03 2014
www.askmac.cn
Thread 1 advanced to log sequence 60 (LGWR switch)
  Current log# 2 seq# 60 mem# 0: /s01/oradata/PDPROD/onlinelog/o1_mf_2_b2wgc3rf_.log
  Current log# 2 seq# 60 mem# 1: /s01/fast_recovery_area/PDPROD/onlinelog/o1_mf_2_b2wgc4mf_.log
Sat Oct 04 08:00:05 2014
TT00: Standby redo logfile selected for thread 1 sequence 60 for destination LOG_ARCHIVE_DEST_2
Sat Oct 04 08:00:06 2014
Archived Log entry 79 added for thread 1 sequence 59 ID 0xe5f08f5 dest 1:
Sat Oct 04 08:08:00 2014
www.askmac.cn
Resize operation completed for file# 3, old size 716800K, new size 727040K
Sat Oct 04 10:08:37 2014
Thread 1 advanced to log sequence 61 (LGWR switch)
  Current log# 3 seq# 61 mem# 0: /s01/oradata/PDPROD/onlinelog/o1_mf_3_b2wgc6ol_.log
  Current log# 3 seq# 61 mem# 1: /s01/fast_recovery_area/PDPROD/onlinelog/o1_mf_3_b2wgc70g_.log
Sat Oct 04 10:08:37 2014
TT00: Standby redo logfile selected for thread 1 sequence 61 for destination LOG_ARCHIVE_DEST_2
Sat Oct 04 10:08:40 2014
Archived Log entry 81 added for thread 1 sequence 60 ID 0xe5f08f5 dest 1:
Sat Oct 04 13:08:34 2014
Resize operation completed for file# 3, old size 727040K, new size 737280K
Sat Oct 04 14:04:39 2014


Resize operation completed for file# 3, old size 747520K, new size 757760K


以上这种扩展受到Oracle内部预定义的参数TBS_EXTENSION_MAX_STEP_SIZE(64MB)的限制,即最大一次扩展是64MB,可以从上述日志看到大多数扩展在这里是一次10MB。


对于表空间预分配, space preallocation特性会基于过去6个小时内的表空间使用情况,每隔10分钟分析一次,基于以下的数据分析:

  • Database id – Database identifier
  • Tablespace id – Tablespace identifier number
  • Creation SCN (wrap, base) [NEW] – SCN when the tablespace is created. This is for tablespace sanity check in case that the tablespace is dropped or recreated after the statistics is collected.
  • Allocated space – Space allocated to the tablespace
  • Used space – Space currently used in the tablespace. For permanent tablespace, it is represented by the used extents. For temporary tablespace, this should be the space used by active sorts, hash joins and other transient objects.
  • Max size – Maximum size of the tablespace
  • Flag – Tablespace flag (e.g. perm/temp/undo)
  • Stat-collection Timestamp [NEW] – The time when the statistics is collected


对于数据段segment预分配,数据段的统计信息会每半个小时flush到AWR中(WRH$_SEG_STAT),Segment growth trend数据段的增长趋势也会每半个小时完成一次, 基于以下的数据分析:

  • Tablespace id
  • Tablespace creation SCN (wrap, base) [NEW]
  • Segment obj#
  • Segment dataobj#
  • Number of allocated blocks
  • Number of used blocks
  • Stat-collect Timestamp [NEW] – The time when the statistics is collected
  • Last-analysis timestamp [NEW] – The time when the segment is analyzed the last time
  • Number of forecasted used blocks [NEW]


LOB chunk的使用情况 会每10分钟记录在内存中,也会定期flush到AWR中,基于以下的数据分析:


  • Instance id
  • Tablespace id
  • Tablespace creation SCN (wrap, base)
  • Segment obj#
  • Segment dataobj#
  • Number of estimated optimal allocation for each chunk size (Ne) – One occurrence of an allocation for a chunk size refers to a planned
  • allocation of the optimal chunk size that is calculated by the space layer when receiving a chunk allocation request from the data layer.
  • Number of allocations for each chunk size (Na)
  • Number of deallocation for each chunk size (Nd)
  • Number of under-allocation for each chunk size (Nu)
  • Number of split for each chunk size (Ns)
  • Number of projected allocations for each chunk size (Np)
  • Timestamp – The time when the statistics is collected


这些预分配和扩展任务主要由SMCO(Space Management Coordinator Process)和其小工进程W00n(slave )一起完成。 SMCO和W00n是基于任务task驱动的后台任务Framework。这个后台任务体系是基于实例的,而非基于数据库的。每一个实例instance有其自己的后台任务服务体系,运行和处理在本实例发起的任务。RAC的不同实例之间不会交互来负责此种任务的负载。


Task coordinator ( SMCO ) ,SMCO充当调度进程以便管理任务队列和slave进程池。其主要任务是在几个task queue之间移动任务,清理过期任务,基于任务需要来动态分配新的slave(W00n)进程,并监控slave进程。 一个实例只有一个SMCO进程,且SMCO进程不是fatal进程,kill了一般也没事。


部分12c新特性 Policy Driven Data Movement and ILM(Information Lifecycle Management) Project 数据生命周期管理也依赖于SMCO后台进程。


SMON,SMON是老牌后台进程 已经负责了一系列任务。其现在也负载动态启动SMCO进程。SMON现在会定期检查SMCO是否启动着,SMON也会当有任务提交时启动SMCO。

W00n等一组Slave Process,Slave进程总是实际干活的人。Salve process由SMCO这个调度器动态分配。一旦启动后,slave 进程将自主工作,其自动从ready-task队列中找寻任务并执行。如果空闲了过长时间,那么W00n也会自行终止。


其大致的工作流程如下:


  • The foreground system/user session submits a task through ktsjCreateTask.
  • The task is created. If the task is planned to start right away, it is inserted into one of the ready-task queue directly, otherwise, it isinserted into the not-ready-task queue.
  • If SMCO does not exist, post SMON to start SMCO .
  • If SMCO is available, post SMCO that a new task is available.
  • SMCO knows that there is a task that needs to be run in the near future. It starts a slave process.
  • SMCO moves the task from the not-ready queue to the ready queue and posts any waiting slave.
  • The slave process picks up the task from the ready queue and invokes the task’s callback function.
  • The task is done. The slave process executes the completion call back of the task.
  • The slave process post SMCO that a task is finished. askmac.cn
  • SMCO updates task execution statistics and may choose to free the task if there is no enough memory for task cache.
  • The slave process periodically checks if there is any task in the ready-task queue.


与该11g以后的space preallocation特性相关的参数如下:

_enable_space_background_task/_enable_spacebg – This parameter specifies whether the background task support is enabled.

_max_ smco _slaves – This parameter specifies the maximum number of active slave process that can be spawned at a time. Ideally, the number
of slave processes should be decided by the system workload and the availability of system resources.
_max_ smco _tasks – This parameter specifies the maximum number of tasks that can be stored in memory. Ideally, the number of tasks should be
decided by the availability of SGA memory and the efficiency of task maintenance. Too many cached tasks will simply increase the burden of
task maintenance.


_enable_space_background_task
Parameter Name: _enable_space_background_task
Parameter Type: boolean
Allowable Values: TRUE to enable the feature, and FALSE to disable the feature
Default Value: TRUE. The space management background task support will be enabled by default.
Description: This parameter allows the user to choose whether to enable the space management background task support feature.
Dynamic: The parameter is dynamic and the scope is ALTER SYSTEM.
Example: alter system set “_enable_space_background_task ” = TRUE


_enable_space_preallocation
Parameter Name: _enable_space_preallocation
Parameter Type: integer
Allowable Values:
0x00: disable all levels of space preallocation
0x01: enable tablespace extension ahead of time
0x02: enable segment growth ahead of time
0x04: enable chunk allocation ahead of time
Combination of any of the above 3 levels of space preallocation Default Value: 0x07. The space preallocation at all levels will be enabled by default. However, whether the space preallocation will be done and how much space will be allocated relies on the system monitor analysis result.

Description: This parameter allows the user to enable different levels of space preallocation.
Dynamic: The parameter is dynamic and the scope is ALTER SYSTEM.
Example: alter system set “_enable_space_prealloaction ” = 1
_max_spacebg_slaves
the parameter that allows user to set maximum number of space BG slaves

_minmax_spacebg_slaves
the parameter that allows user to set min-max number of space BG slaves

_min_spacebg_slaves

the parameter that allows user to set minimum number of space BG slaves

_max_spacebg_tasks

the parameter that specifies the maximum number of space BG tasks
_max_spacebg_msgs_percentage

the parameter that specifies percentage of _messages (ksaxxm) before KTSJ
throttling occurs. Default level is 50%. When throttle level is reached,
interrupt messages are not sent (thus avoiding _messages queue).

_enable_space_preallocation 3 enable space pre-allocation
_enable_spacebg TRUE enable space management background task
_max_spacebg_slaves 1024 maximum space management background slaves
_minmax_spacebg_slaves 8 min-max space management background slaves
_min_spacebg_slaves 2 minimum space management background slaves
_max_spacebg_tasks 8192 maximum space management background tasks
_max_spacebg_msgs_percentage 50 maximum space management interrupt message throttling

对于由于SMCO 或W00n在完成space preallocation过程中遇到的问题时,可以考虑禁用该特性,具体方法为:


SQL> alter system set "_enable_spacebg"=false;

System altered.

SQL> alter system set "_enable_space_preallocation"=0;

System altered.


SMCO/Wnnn


Short Description: The space management coordinator (SMCO) process coordinates the execution of
various space management related tasks, such as proactive space allocation and space reclamation. It
dynamically spawns slave processes (Wnnn) to implement the task.
Detailed Description: The space management coordinator (SMCO) and slave (Wnnn) processes work
cooperatively on various background space management tasks in a database instance. The coordinator
is responsible for maintaining the tasks and dispatching tasks. It dynamically spawns new slaves based
on task needs. The slave process performs the actual space management task, including space preallocation
and space reclamation. Once started, the slave process acts as an autonomous agent. After
it finishes execution of the task, it automatically pick up another one from the task queue. It terminates
itself after being idle for a long time. SMCO and Wnnn are optional non-fatal background processes.
There is at most one SMCO process per instance. There can be several Wnnn processes at a time. The
failure of these processes does not cause instance to fail.
Properties: Optional, non-fatal, database instance only


12c RMAN新特性restore/recover from service远程恢复

12c中提供了基于网络的RMAN Restore和recover功能:


About Restoring Files Over the Network

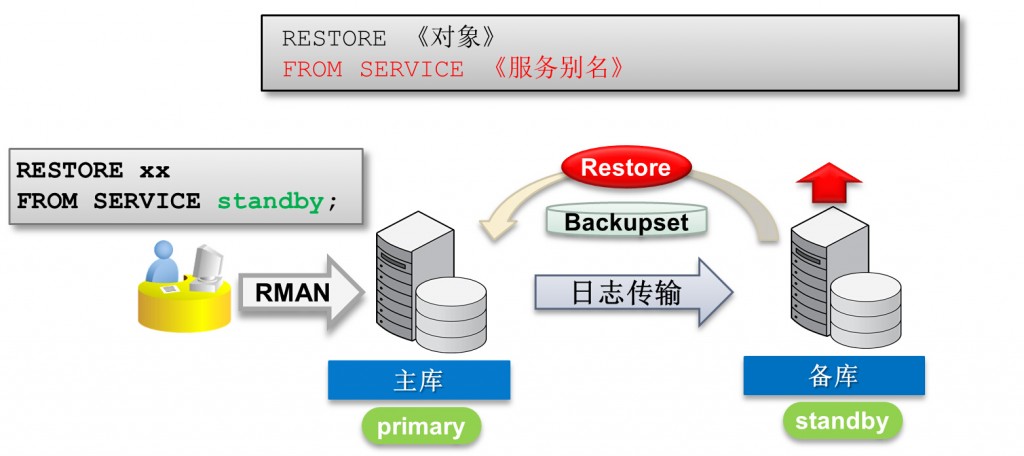
RMAN restores database files, over the network, from a physical standby database by using the FROM SERVICE clause of the RESTORE command. The FROM SERVICE clause provides the service name of the physical standby database from which the files must be restored. During the restore operation, RMAN creates backup sets, on the physical standby database, of the files that need to be restored and then transfers these backup sets to the target database over the network.

Use the SECTION SIZE clause of the RESTORE command to perform a multisection restore operation. To encrypt the backup sets created on the physical standby database, use the SET ENCRYPTION command before the RESTORE command to specify the encryption algorithm used.

To transfer files from the physical standby database as compressed backup sets, use the USING COMPRESSED BACKUPSET clause in the RESTORE command. By default, RMAN compresses backup sets using the algorithm that is set in the RMAN configuration. You can override the default and set a different algorithm by using the SET COMPRESSION ALGORITHM command before the RESTORE statement.

About Recovering Files Over the Network

RMAN can perform recovery by fetching an incremental backup, over the network, from a primary database and then applying this incremental backup to the physical standby database. RMAN is connected as TARGET to the physical standby database. The recovery process is optimized by restoring only the used data blocks in a data file. Use the FROM SERVICE clause to specify the service name of the primary database from which the incremental backup must be fetched.

To use multisection backup sets during the recovery process, specify the SECTION SIZE clause in the RECOVER command. To transfer the required files from the primary database as encrypted backup sets, use the SET ENCRYPTION command before the RESTORE command to specify the encryption algorithm used to create the backup sets.

To compress backup sets that are used to recover files over the network, use the USING COMPRESSED BACKUPSET. RMAN compresses backup sets when it creates them on the primary database and then transfers these backup sets to the target


restore from service


可以通过restore .. from service指定的对象类型:

  • database
  • datafile
  • tablespace
  • 控制文件
  • SPFILE


restore datafile from service

当在主库Primary丢失/或损坏FILE#=6的user01.dbf数据文件时,可以直接使用restore datafile from service来从standby(其实并不要求一定是DataGuard,只需要是合适的备用库即可)上获得数据文件,例如:


select * from v$version;

BANNER                                                                                         CON_ID
------------------------------------------------------------------------------------------ ----------
Oracle Database 12c Enterprise Edition Release 12.1.0.2.0 - 64bit Production                        0
PL/SQL Release 12.1.0.2.0 - Production                                                              0
CORE    12.1.0.2.0      Production                                                                          0
TNS for Linux: Version 12.1.0.2.0 - Production                                                      0
NLSRTL Version 12.1.0.2.0 - Production                                                           askmac.cn


RMAN> select name from v$datafile where file#=6;


NAME                                                                            
--------------------------------------------------------------------------------

/s01/oradata/PDPROD/datafile/o1_mf_users_b2wgb20l_.dbf
 

RMAN> alter database datafile 6 offline;

Statement processed


RMAN> restore datafile 6 from service pdstby;

Starting restore at 04-OCT-14
allocated channel: ORA_DISK_1
channel ORA_DISK_1: SID=51 device type=DISK

channel ORA_DISK_1: starting datafile backup set restore
channel ORA_DISK_1: using network backup set from service pdstby
channel ORA_DISK_1: specifying datafile(s) to restore from backup set
channel ORA_DISK_1: restoring datafile 00006 to /s01/oradata/PDPROD/datafile/o1_mf_users_b2wgb20l_.dbf
channel ORA_DISK_1: restore complete, elapsed time: 00:00:01
Finished restore at 04-OCT-14


RMAN> recover datafile 6 from service pdstby;

Starting recover at 04-OCT-14
using channel ORA_DISK_1
channel ORA_DISK_1: starting incremental datafile backup set restore
channel ORA_DISK_1: using network backup set from service pdstby
destination for restore of datafile 00006: /s01/oradata/PDPROD/datafile/o1_mf_users_b2wgb20l_.dbf
RMAN-00571: ===========================================================
RMAN-00569: =============== ERROR MESSAGE STACK FOLLOWS ===============
RMAN-00571: ===========================================================
RMAN-03002: failure of recover command at 10/04/2014 02:57:09

ORA-19845: error in backupDatafile while communicating with remote database server
ORA-17628: Oracle error 19648 returned by remote Oracle server
ORA-19648: datafile : incremental-start SCN equals checkpoint SCN
ORA-19660: some files in the backup set could not be verified
ORA-19661: datafile 6 could not be verified
ORA-19845: error in backupDatafile while communicating with remote database server
ORA-17628: Oracle error 19648 returned by remote Oracle server
ORA-19648: datafile : incremental-start SCN equals checkpoint SCN


之后recover 并online datafile 6即可


具体的几种用法:


  • 数据库级别: restore database from service <服务别名>
  • 表空间: restore tablespace from service <服务别名>
  • 控制文件: restore controlfile to ‘指定的位置’ from service <服务别名>
  • SPFILE: restore spfile from service <服务别名>


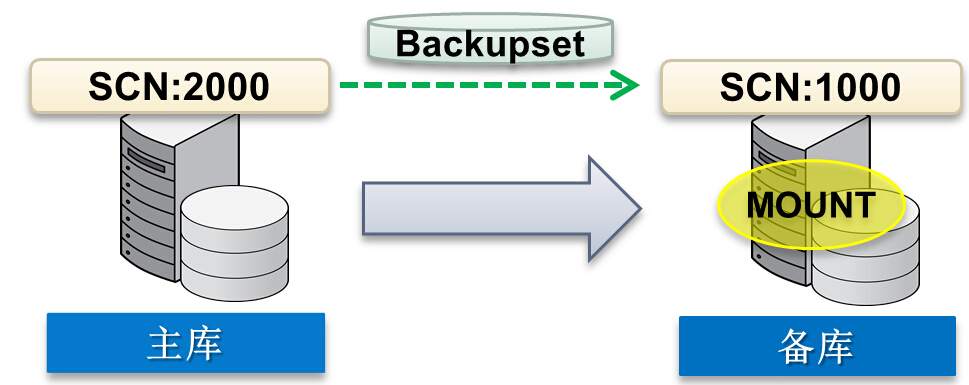
通过recover .. from service命令可以通过网络将service指定的数据库的增量备份拉过来在本地做recover从而让本地数据库跟上远程数据库的SCN。

CONNECT TARGET “sys/<password>@standby as sysdba” RECOVER DATABASE FROM SERVICE primary;

recover database from service


此外上述增量备份还可以是基于压缩备份的:


SET COMPRESSION ALGORITHM ‘BASIC’;

SET COMPRESSION ALGORITHM ‘LOW’;

SET COMPRESSION ALGORITHM ‘MEDIUM’;

SET COMPRESSION ALGORITHM ‘HIGH’;


CONNECT TARGET “sys/<password>@standby as sysdba”

SET COMPRESSION ALGORITHM ‘BASIC’;

RECOVER DATABASE FROM SERVICE primary

USING COMPRESSED BACKUPSET;

为12.1 DataGuard配置DGMGRL遇到ORA-16698

为12.1.0.2 DataGuard配置DGMGRL时遇到了ORA-16698错误:


BANNER                                                                                         CON_ID
------------------------------------------------------------------------------------------ ----------
Oracle Database 12c Enterprise Edition Release 12.1.0.2.0 - 64bit Production                        0
PL/SQL Release 12.1.0.2.0 - Production                                                              0
CORE    12.1.0.2.0      Production                                                                          0
TNS for Linux: Version 12.1.0.2.0 - Production                                                      0
NLSRTL Version 12.1.0.2.0 - Production                                                              0


DGMGRL> DGMGRL> [oracle@PD009 ~]$ oerr ora 16698
16698, 0000, "LOG_ARCHIVE_DEST_n parameter set for object to be added"
// *Cause:  One or more LOG_ARCHIVE_DEST_n initialization parameters that
//          contain a SERVICE attribute but not the NOREGISTER attribute were
//          set when attempting to create a configuration or add a standby or
//          far sync instance to the configuration.  askmac.cn
// *Action: If creating a configuration, clear all LOG_ARCHIVE_DEST_n
//          initialization parameters that contain a SERVICE attribute but not
//          the NOREGISTER attribute. If adding a standby database or far sync
//          instance, clear the LOG_ARCHIVE_DEST_n initialization parameter
//          that specifies the database or far sync instance to be added.


这个错误可以通过在Primary 和 Standby上取消log_archive_dest_n参数来解决,实际这一块的参数应当是交给DG broker 来管理了,不再需要人为介入设置。


primary:


SQL>  alter system reset log_archive_dest_2 scope=spfile sid='*';

System altered.


SQL> alter system reset log_archive_dest_1 scope=spfile sid='*';

System altered.


SQL> startup force;
ORACLE instance started.

standby:


SQL>  alter system reset log_archive_dest_2 scope=spfile sid='*';

System altered.


SQL> alter system reset log_archive_dest_1 scope=spfile sid='*';

System altered.


重启primary和standby实例

[oracle@PD009 ~]$  dgmgrl sys/oracle@PDPROD
DGMGRL for Linux: Version 12.1.0.2.0 - 64bit Production

Copyright (c) 2000, 2013, Oracle. All rights reserved.

Welcome to DGMGRL, type "help" for information.
Connected as SYSDBA.
DGMGRL> create CONFIGURATION PDPROD as primary database is PDPROD CONNECT IDENTIFIER IS  PDPROD;
Configuration "pdprod" created with primary database "pdprod"

add database PDSTBY as CONNECT IDENTIFIER IS PDSTBY MAINTAINED AS PHYSICAL;

Database "pdstby" added

Connected as SYSDBA.
DGMGRL> enable configuration;

Enabled.
DGMGRL> DGMGRL> show configuration;

Configuration - pdprod

  Protection Mode: MaxPerformance
  Members:
  pdprod - Primary database
    pdstby - Physical standby database 

Fast-Start Failover: DISABLED

Configuration Status:
SUCCESS   (status updated 5 seconds ago)


沪ICP备14014813号-2

沪公网安备 31010802001379号